Operation Manual
Page 3
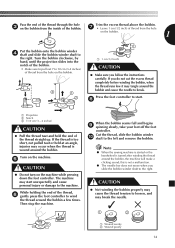
... an unsteady or slanted table, otherwise the machine may fall, resulting in injuries. 6 Special care is required when sewing: • Always pay close attention is necessary when the machine is used . • Always consult the operation manual when replacing or installing any assemblies, the presser feet, needle, or other hot objects. • Use only neutral soaps or detergents to clean the case. Never allow children to...
... an unsteady or slanted table, otherwise the machine may fall, resulting in injuries. 6 Special care is required when sewing: • Always pay close attention is necessary when the machine is used . • Always consult the operation manual when replacing or installing any assemblies, the presser feet, needle, or other hot objects. • Use only neutral soaps or detergents to clean the case. Never allow children to...

Operation Manual
Page 5
...needle 8 Changing the presser foot 10 THE CONTROLS 11 Pattern selection dial 11 Patterns and stitch names 11 Reverse sewing lever 12 THREADING THE MACHINE 13 Winding the bobbin 13 Lower threading 15 Lower threading (for models equipped with a quick-set bobbin 16 Upper threading 17 Using the needle threader (for models equipped with a twin needle (Option 25 Thread tension 27 3. BUILT-IN STITCHES 29 Straight stitching 29 Zigzag stitching 29 Blind hem stitching 30 Overedge stitching 31 Elastic stitching 31 Double action stitching 32 4. SEWING BUTTONHOLES ........ 33 Making...
...needle 8 Changing the presser foot 10 THE CONTROLS 11 Pattern selection dial 11 Patterns and stitch names 11 Reverse sewing lever 12 THREADING THE MACHINE 13 Winding the bobbin 13 Lower threading 15 Lower threading (for models equipped with a quick-set bobbin 16 Upper threading 17 Using the needle threader (for models equipped with a twin needle (Option 25 Thread tension 27 3. BUILT-IN STITCHES 29 Straight stitching 29 Zigzag stitching 29 Blind hem stitching 30 Overedge stitching 31 Elastic stitching 31 Double action stitching 32 4. SEWING BUTTONHOLES ........ 33 Making...
Operation Manual
Page 6
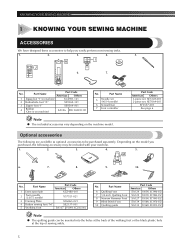
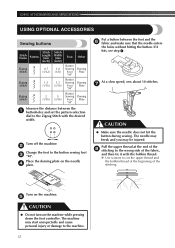
.... KNOWING YOUR SEWING MACHINE 1 KNOWING YOUR SEWING MACHINE ACCESSORIES We have designed these accessories to help you purchased, the following are available as optional accessories to be inserted into the holes at the back of the walking foot or the black plastic hole at the top of sewing ankle. 5 Part Name Part Code Americas Others 1 Extra spool pin XG3488-001 2 Twin needle (2.0/75 needle) X57521-021 3 Darning Plate XC6063-021 4 Button sewing foot "M" XE2137-001 5 Walking Foot SA107 F034N: XC2165...
.... KNOWING YOUR SEWING MACHINE 1 KNOWING YOUR SEWING MACHINE ACCESSORIES We have designed these accessories to help you purchased, the following are available as optional accessories to be inserted into the holes at the back of the walking foot or the black plastic hole at the top of sewing ankle. 5 Part Name Part Code Americas Others 1 Extra spool pin XG3488-001 2 Twin needle (2.0/75 needle) X57521-021 3 Darning Plate XC6063-021 4 Button sewing foot "M" XE2137-001 5 Walking Foot SA107 F034N: XC2165...
Operation Manual
Page 7
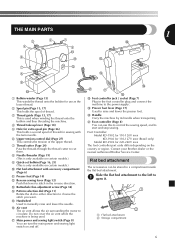
... the bobbin and then threading the machine. 4 Thread take-up lever (Page 18) 5 Hole for extra spool pin (Page 26) This holds a second spool of thread for sewing with the twin needle. 6 Upper tension-control dial (Page 27) This controls the tension of thread. 3 Thread guide (Page 13, 17) This is only available on certain models.) 0 Flat bed attachment with accessory compartment (Page 6) A Presser foot (Page 10) B Reverse sewing lever (Page 12) Push this to control the sewing speed, and to start and stop sewing. I Presser foot lever...
... the bobbin and then threading the machine. 4 Thread take-up lever (Page 18) 5 Hole for extra spool pin (Page 26) This holds a second spool of thread for sewing with the twin needle. 6 Upper tension-control dial (Page 27) This controls the tension of thread. 3 Thread guide (Page 13, 17) This is only available on certain models.) 0 Flat bed attachment with accessory compartment (Page 6) A Presser foot (Page 10) B Reverse sewing lever (Page 12) Push this to control the sewing speed, and to start and stop sewing. I Presser foot lever...

Operation Manual
Page 12
To choose a stitch, simply turn the pattern selection dial, the needle, presser foot or fabric may be damaged. KNOWING YOUR SEWING MACHINE THE CONTROLS Pattern selection dial CAUTION ● When you use the pattern selection dial to choose a pattern, raise the needle by turning the handwheel toward you turn the pattern selection dial in the down position when you (counterclockwise) so that the mark on certain models. Pattern Stitch Name 1 Preset Length (mm (inch)) Preset...
To choose a stitch, simply turn the pattern selection dial, the needle, presser foot or fabric may be damaged. KNOWING YOUR SEWING MACHINE THE CONTROLS Pattern selection dial CAUTION ● When you use the pattern selection dial to choose a pattern, raise the needle by turning the handwheel toward you turn the pattern selection dial in the down position when you (counterclockwise) so that the mark on certain models. Pattern Stitch Name 1 Preset Length (mm (inch)) Preset...
Operation Manual
Page 15
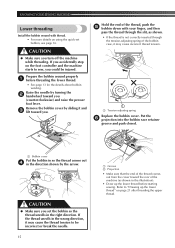
... bobbin. 7 • Leave 1 cm (1/2 inch) of thread from the hole on the bobbin. 3 1 2 1 1 1 cm (1/2 inch) CAUTION ● Make sure you follow the instructions carefully. If you slide the bobbin winder shaft to the right. Press the foot controller to break. this is not a malfunction. ● The needle bar does not move when you do not cut the excess thread completely before winding the bobbin, when the thread...
... bobbin. 7 • Leave 1 cm (1/2 inch) of thread from the hole on the bobbin. 3 1 2 1 1 1 cm (1/2 inch) CAUTION ● Make sure you follow the instructions carefully. If you slide the bobbin winder shaft to the right. Press the foot controller to break. this is not a malfunction. ● The needle bar does not move when you do not cut the excess thread completely before winding the bobbin, when the thread...
Operation Manual
Page 16
... about bobbin winding. If the thread unrolls in the wrong direction, it may cause incorrect thread tension. 1 1 Tension-adjusting spring Replace the bobbin cover. If you accidentally step on using the quick-set the bobbin so the thread unrolls in the illustration). • Draw up the lower thread" on page 21 after threading the upper thread. Remove the bobbin cover by the arrow. Refer to sew, you could be incorrect or break the needle. 15 1 2 1 Groove 2 Projection • Make...
... about bobbin winding. If the thread unrolls in the wrong direction, it may cause incorrect thread tension. 1 1 Tension-adjusting spring Replace the bobbin cover. If you accidentally step on using the quick-set the bobbin so the thread unrolls in the illustration). • Draw up the lower thread" on page 21 after threading the upper thread. Remove the bobbin cover by the arrow. Refer to sew, you could be incorrect or break the needle. 15 1 2 1 Groove 2 Projection • Make...
Operation Manual
Page 18
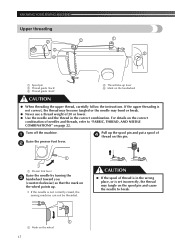
... break. ● Never use a thread weight of 20 or lower. ● Use the needle and the thread in the correct combination. For details on the correct combination of 4 thread on this pin. 1 1 Presser foot lever Raise the needle by turning the 3 handwheel toward you (counterclockwise) so that the mark on the handwheel CAUTION ● When threading the upper thread, carefully follow the instructions. KNOWING YOUR SEWING MACHINE Upper threading 2 2 3 4 1 5 1 Spool pin 2 Thread guide (back) 3 Thread guide (front) 4 Thread...
... break. ● Never use a thread weight of 20 or lower. ● Use the needle and the thread in the correct combination. For details on the correct combination of 4 thread on this pin. 1 1 Presser foot lever Raise the needle by turning the 3 handwheel toward you (counterclockwise) so that the mark on the handwheel CAUTION ● When threading the upper thread, carefully follow the instructions. KNOWING YOUR SEWING MACHINE Upper threading 2 2 3 4 1 5 1 Spool pin 2 Thread guide (back) 3 Thread guide (front) 4 Thread...

Operation Manual
Page 22
... the lower thread, put them toward you (counterclockwise) by hand to lower and then raise the needle. ■ For models equipped with a quick-set bobbin You can draw up the lower thread by hand so that some thread will be removed. Remove the bobbin cover, and then 1 reinstall the bobbin. Replace the bobbin cover. 4 2 1 Upper thread 2 Lower thread Pull out about 10 cm (4 inches) of both 3 threads and put the bobbin back in. When sewing gathers or...
... the lower thread, put them toward you (counterclockwise) by hand to lower and then raise the needle. ■ For models equipped with a quick-set bobbin You can draw up the lower thread by hand so that some thread will be removed. Remove the bobbin cover, and then 1 reinstall the bobbin. Replace the bobbin cover. 4 2 1 Upper thread 2 Lower thread Pull out about 10 cm (4 inches) of both 3 threads and put the bobbin back in. When sewing gathers or...
Operation Manual
Page 23
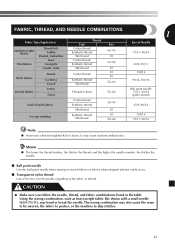
..., Satin Thick fabrics Denim Corduroy Tweed Thread Type Cotton thread Synthetic thread Silk thread Cotton thread Synthetic thread Silk thread Cotton thread Synthetic thread Silk thread Size 60-90 50 60-90 50 30 50 50-60 Size of the fabric or thread. and the higher the needle number, the thicker the needle. ■ Ball point needle Use the ball point needle when sewing on stretch fabrics or fabrics where skipped stitches easily occur. ■ Transparent nylon thread Use a 90...
..., Satin Thick fabrics Denim Corduroy Tweed Thread Type Cotton thread Synthetic thread Silk thread Cotton thread Synthetic thread Silk thread Cotton thread Synthetic thread Silk thread Size 60-90 50 60-90 50 30 50 50-60 Size of the fabric or thread. and the higher the needle number, the thicker the needle. ■ Ball point needle Use the ball point needle when sewing on stretch fabrics or fabrics where skipped stitches easily occur. ■ Transparent nylon thread Use a 90...
Operation Manual
Page 26
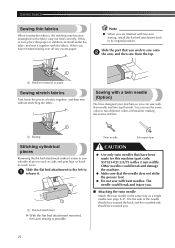
... free-arm sewing, install the flat bed attachment back in the same way as cuffs and pant legs, or hardto-reach areas. The needle could break and damage the machine. ● Make sure that have designed your machine so you are finished with a 2 mm width). If this needle and two top threads. Sewing with a twin needle (Option) We have been made for making decorative stitches. 1 1 Basting Twin needle Extra spool pin Stitching cylindrical pieces Removing...
... free-arm sewing, install the flat bed attachment back in the same way as cuffs and pant legs, or hardto-reach areas. The needle could break and damage the machine. ● Make sure that have designed your machine so you are finished with a 2 mm width). If this needle and two top threads. Sewing with a twin needle (Option) We have been made for making decorative stitches. 1 1 Basting Twin needle Extra spool pin Stitching cylindrical pieces Removing...
Operation Manual
Page 28
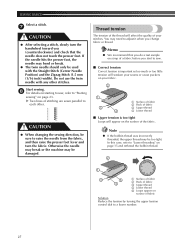
... fabric. Otherwise the needle may break or the machine may be damaged. Note ● If the bobbin thread was incorrectly threaded, the upper thread may be too tight. CAUTION ● When changing the sewing direction, be used with any other . Memo ● We recommend that the needle does not touch the presser foot. If the needle hits the presser foot, the needle may need to adjust it when you start to a lower number. 27 Thread tension The tension...
... fabric. Otherwise the needle may break or the machine may be damaged. Note ● If the bobbin thread was incorrectly threaded, the upper thread may be too tight. CAUTION ● When changing the sewing direction, be used with any other . Memo ● We recommend that the needle does not touch the presser foot. If the needle hits the presser foot, the needle may need to adjust it when you start to a lower number. 27 Thread tension The tension...
Operation Manual
Page 30
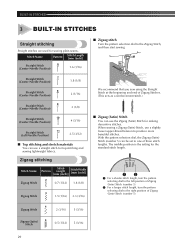
...; Top stitching and stretch materials You can use a slightly looser upper-thread tension to one of three stitch lengths. When sewing a Zigzag (Satin) Stitch, use the Zigzag (Satin) Stitch for top stitching and sewing lightweight fabrics. BUILT-IN STITCHES 3 BUILT-IN STITCHES Straight stitching Straight stitches are used for sewing plain seams. Stitch Name Pattern Stitch Length [mm (inch)] Straight Stitch 6 (Center Needle Position) 1.6 (1/16) ■ Zigzag stitch Turn the pattern selection dial to the right position of Zigzag (Satin) Stitch (number 5). 4 Zigzag Stitch...
...; Top stitching and stretch materials You can use a slightly looser upper-thread tension to one of three stitch lengths. When sewing a Zigzag (Satin) Stitch, use the Zigzag (Satin) Stitch for top stitching and sewing lightweight fabrics. BUILT-IN STITCHES 3 BUILT-IN STITCHES Straight stitching Straight stitches are used for sewing plain seams. Stitch Name Pattern Stitch Length [mm (inch)] Straight Stitch 6 (Center Needle Position) 1.6 (1/16) ■ Zigzag stitch Turn the pattern selection dial to the right position of Zigzag (Satin) Stitch (number 5). 4 Zigzag Stitch...
Operation Manual
Page 34
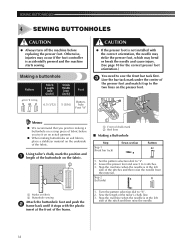
... bar tack) Sewn section Pattern 1. Using tailor's chalk, mark the position and 1 length of the buttonhole on the fabric. 2 1 1 1 Front of the tailor's chalk line. 3. Step 2 (Left side) 1 Marks on fabric 2 Buttonhole sewing Attach the buttonhole foot and push the 2 frame back until it up to 6 stitches. 3. Making a buttonhole Pattern 1 Stitch Stitch Length [mm Width [mm Foot (inch)] (inch)] 0.5 (1/32) Button5 (3/16) hole Foot "A" CAUTION ● If the presser foot is accidentally pressed and the machine starts sewing...
... bar tack) Sewn section Pattern 1. Using tailor's chalk, mark the position and 1 length of the buttonhole on the fabric. 2 1 1 1 Front of the tailor's chalk line. 3. Step 2 (Left side) 1 Marks on fabric 2 Buttonhole sewing Attach the buttonhole foot and push the 2 frame back until it up to 6 stitches. 3. Making a buttonhole Pattern 1 Stitch Stitch Length [mm Width [mm Foot (inch)] (inch)] 0.5 (1/32) Button5 (3/16) hole Foot "A" CAUTION ● If the presser foot is accidentally pressed and the machine starts sewing...
Operation Manual
Page 38
... 3 Stitch Zigzag 4 Stitch Stitch Length [mm (inch)] 0.7 (1/32) 1.5 (1/16) 2 (1/16) Stitch Width [mm (inch)] 1.8 (1/8) 3.3 (3/16) 5 (3/16) Foot Other Button Sewing Darning Foot Plate "M" Button Sewing Darning Foot Plate "M" Button Sewing Darning Foot Plate "M" Measure the distance between the foot and the 6 fabric and make sure that the needle enters the holes without hitting the button. If it with the bobbin thread. Use scissors to the Zigzag Stitch with the desired width. Put a button between the 1 buttonholes and set the pattern selection dial to cut the upper thread...
... 3 Stitch Zigzag 4 Stitch Stitch Length [mm (inch)] 0.7 (1/32) 1.5 (1/16) 2 (1/16) Stitch Width [mm (inch)] 1.8 (1/8) 3.3 (3/16) 5 (3/16) Foot Other Button Sewing Darning Foot Plate "M" Button Sewing Darning Foot Plate "M" Button Sewing Darning Foot Plate "M" Measure the distance between the foot and the 6 fabric and make sure that the needle enters the holes without hitting the button. If it with the bobbin thread. Use scissors to the Zigzag Stitch with the desired width. Put a button between the 1 buttonholes and set the pattern selection dial to cut the upper thread...
Operation Manual
Page 40
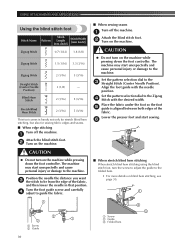
...foot controller. Align the foot guide with the desired width. Set the pattern selection dial to guide the fabric. ■ When stretch blind hem stitching When stretch blind hem stitching using the blind stitch foot, turn on blind hem stitching, see page 30. 1 1 2 2 1 1 Screw 2 Guide 1 Screw 2 Guide 3 Folded hem 2 3 39 Turn the foot guide screw and carefully 4 adjust to the Zigzag 4 Stitch with the needle position. Lower the presser foot and start unexpectedly and cause personal injury or damage to the 3 Straight Stitch (Center Needle Position). The machine may start...
...foot controller. Align the foot guide with the desired width. Set the pattern selection dial to guide the fabric. ■ When stretch blind hem stitching When stretch blind hem stitching using the blind stitch foot, turn on blind hem stitching, see page 30. 1 1 2 2 1 1 Screw 2 Guide 1 Screw 2 Guide 3 Folded hem 2 3 39 Turn the foot guide screw and carefully 4 adjust to the Zigzag 4 Stitch with the needle position. Lower the presser foot and start unexpectedly and cause personal injury or damage to the 3 Straight Stitch (Center Needle Position). The machine may start...

Operation Manual
Page 43
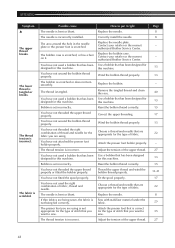
... upper thread tension is incorrectly installed. Fit the spool properly. - 17 6 The area around the hole in the thread. Replace the needle plate. The bobbin case is scratched. You have not used a bobbin that has been Use a bobbin that you want to the machine does right. appropriate for the type of fabric. 22 The presser foot you are using . Contact your retailer or the nearest - Contact your retailer or the nearest authorized Brother Service...
... upper thread tension is incorrectly installed. Fit the spool properly. - 17 6 The area around the hole in the thread. Replace the needle plate. The bobbin case is scratched. You have not used a bobbin that has been Use a bobbin that you want to the machine does right. appropriate for the type of fabric. 22 The presser foot you are using . Contact your retailer or the nearest - Contact your retailer or the nearest authorized Brother Service...
Operation Manual
Page 44
... plate. Use a bobbin that has been designed for this machine. Use a bobbin that has been designed for this machine. Wind the bobbin thread properly. Adjust the tension of thread and needle for this machine. Use a bobbin that has been designed for the fabric you want to put it . Reset the bobbin thread correctly. Fit the spool properly. Replace the needle. The thread tension is incorrect. The area around the hole in the needle plate or the presser foot is incorrect. Reset the bobbin thread correctly. Attach the presser foot holder properly. Sew...
... plate. Use a bobbin that has been designed for this machine. Use a bobbin that has been designed for this machine. Wind the bobbin thread properly. Adjust the tension of thread and needle for this machine. Use a bobbin that has been designed for the fabric you want to put it . Reset the bobbin thread correctly. Fit the spool properly. Replace the needle. The thread tension is incorrect. The area around the hole in the needle plate or the presser foot is incorrect. Reset the bobbin thread correctly. Attach the presser foot holder properly. Sew...
Operation Manual
Page 45
... not threaded the upper thread properly. Replace the needle. Correctly install the needle. Attach the presser foot that is correct for the type of stitch that you want to sew. Possible cause You have not used the right combination of fabric, thread and needle. You have not inserted the needle properly. The needle is fitted on the wheel points up. Dust has accumulated under the needle plate or in the bobbin case, clean the bobbin case. The needle threader...
... not threaded the upper thread properly. Replace the needle. Correctly install the needle. Attach the presser foot that is correct for the type of stitch that you want to sew. Possible cause You have not used the right combination of fabric, thread and needle. You have not inserted the needle properly. The needle is fitted on the wheel points up. Dust has accumulated under the needle plate or in the bobbin case, clean the bobbin case. The needle threader...
Operation Manual
Page 46
...Accessories 5 optional 5 37 Appliqués 36 B Blind hem stitching 30 Blind stitch foot 39 Bobbin winding 13 Button sewing 37 Buttonhole adjusting 34 making 33 Buttonhole fine-adjustment screw 34 C Cleaning 40 Connecting plugs 7 D , Darning 38 Darning plate 37 38 Double action stitching 32 Drawing up the lower thread 21 E Elastic stitching 31 F Fabric, thread, and needle combinations ...... 22 Flat bed attachment 6 Foot controller 8 Free-arm style 25 G Gathering 36 H Handwheel 17 L Light switch 8 Lower threading 15 M Main parts 6 Main power 8 Maintenance 40 N Needle...
...Accessories 5 optional 5 37 Appliqués 36 B Blind hem stitching 30 Blind stitch foot 39 Bobbin winding 13 Button sewing 37 Buttonhole adjusting 34 making 33 Buttonhole fine-adjustment screw 34 C Cleaning 40 Connecting plugs 7 D , Darning 38 Darning plate 37 38 Double action stitching 32 Drawing up the lower thread 21 E Elastic stitching 31 F Fabric, thread, and needle combinations ...... 22 Flat bed attachment 6 Foot controller 8 Free-arm style 25 G Gathering 36 H Handwheel 17 L Light switch 8 Lower threading 15 M Main parts 6 Main power 8 Maintenance 40 N Needle...


