Users Manual - English and Spanish
Page 2
... removing covers, lubricating, or when making any object into water. Special care is not working properly, if it is required around the sewing machine needle. 11. Do not allow this machine to the off , then remove plug from all instructions before using and before changing the light bulb. Use only accessories recommended by pulling...
... removing covers, lubricating, or when making any object into water. Special care is not working properly, if it is required around the sewing machine needle. 11. Do not allow this machine to the off , then remove plug from all instructions before using and before changing the light bulb. Use only accessories recommended by pulling...
Users Manual - English and Spanish
Page 3
...needle while sewing. For a longer service life 1. Benzene, thinner, and scouring powders can damage the case and machine, and should contact your authorized dealer to inspect and adjust the machine yourself. Never use plugs with a disability. 2 When storing this product are subject to keep your local authorized Brother... use • Maintaining the machine • Leaving the machine unattended 3. FOR USERS IN AUSTRALIA AND NEW ZEALAND This sewing machine is completed • Replacing or removing the needle or any assemblies, the presser feet, needle, or other parts •...
...needle while sewing. For a longer service life 1. Benzene, thinner, and scouring powders can damage the case and machine, and should contact your authorized dealer to inspect and adjust the machine yourself. Never use plugs with a disability. 2 When storing this product are subject to keep your local authorized Brother... use • Maintaining the machine • Leaving the machine unattended 3. FOR USERS IN AUSTRALIA AND NEW ZEALAND This sewing machine is completed • Replacing or removing the needle or any assemblies, the presser feet, needle, or other parts •...
Users Manual - English and Spanish
Page 4
... ...28 Blind hem stitching ...28 Darning ...30 3 KNOWING YOUR SEWING MACHINE 5 NAMES OF MACHINE PARTS AND THEIR FUNCTIONS 5 The main parts ...5 Needle and presser foot section ...6 Flat bed attachment ...6 ACCESSORIES ...7 OPTIONAL ACCESSORIES 7 USING YOUR SEWING MACHINE 8 Power supply precautions ...8 Power supply ...8 Foot controller ...9 Steadying the machine ...9 THREADING THE MACHINE 10 Winding the bobbin ...10 Lower threading ...11 Upper...
... ...28 Blind hem stitching ...28 Darning ...30 3 KNOWING YOUR SEWING MACHINE 5 NAMES OF MACHINE PARTS AND THEIR FUNCTIONS 5 The main parts ...5 Needle and presser foot section ...6 Flat bed attachment ...6 ACCESSORIES ...7 OPTIONAL ACCESSORIES 7 USING YOUR SEWING MACHINE 8 Power supply precautions ...8 Power supply ...8 Foot controller ...9 Steadying the machine ...9 THREADING THE MACHINE 10 Winding the bobbin ...10 Lower threading ...11 Upper...
Users Manual - English and Spanish
Page 6
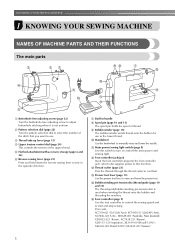
...), XD0115-121(Argentina), XE3414-001(Brazil(120V)), XE4302-001(Brazil(220V)),XE3447-001(Taiwan) 5 KNOWING YOUR SEWING MACHINE 1 KNOWING YOUR SEWING MACHINE NAMES OF MACHINE PARTS AND THEIR FUNCTIONS The main parts a Buttonhole fine-adjusting screw (page 32) Turn the buttonhole fine-...sewing lever to start and stop sewing. k Main power/sewing light switch (page 8) Use this machine. j Handwheel Use the handwheel to raise and lower the presser foot. g Built-in the opposite direction. n Presser foot lever (page 13) Use the presser foot lever to manually raise and lower the needle...
...), XD0115-121(Argentina), XE3414-001(Brazil(120V)), XE4302-001(Brazil(220V)),XE3447-001(Taiwan) 5 KNOWING YOUR SEWING MACHINE 1 KNOWING YOUR SEWING MACHINE NAMES OF MACHINE PARTS AND THEIR FUNCTIONS The main parts a Buttonhole fine-adjusting screw (page 32) Turn the buttonhole fine-...sewing lever to start and stop sewing. k Main power/sewing light switch (page 8) Use this machine. j Handwheel Use the handwheel to raise and lower the presser foot. g Built-in the opposite direction. n Presser foot lever (page 13) Use the presser foot lever to manually raise and lower the needle...
Users Manual - English and Spanish
Page 8
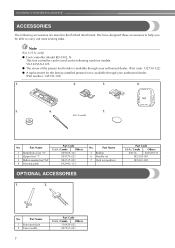
... following accessories are stored in the flat bed attachment. Note (For U.S.A. Part Name 1 Extra spool pin 2 Twin needle 7 Part Code U.S.A. / Canada Others 130920-021 X57521-021 KNOWING YOUR SEWING MACHINE ACCESSORIES The following machine models: VX-1435/LX-3125. ● The screw of the presser foot holder is available through your authorized dealer. (Part code: 132730...
... following accessories are stored in the flat bed attachment. Note (For U.S.A. Part Name 1 Extra spool pin 2 Twin needle 7 Part Code U.S.A. / Canada Others 130920-021 X57521-021 KNOWING YOUR SEWING MACHINE ACCESSORIES The following machine models: VX-1435/LX-3125. ● The screw of the presser foot holder is available through your authorized dealer. (Part code: 132730...

Users Manual - English and Spanish
Page 12
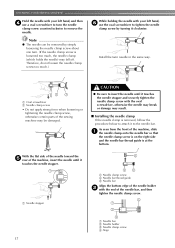
..., and the bobbin is turned after winding the thread around the bobbin and cause the needle to start. h When the bobbin seems full and begins spinning i slowly, take your foot off while threading the machine. KNOWING YOUR SEWING MACHINE Trim the excess thread above the bobbin. g Lower threading Install the bobbin wound with thread...
..., and the bobbin is turned after winding the thread around the bobbin and cause the needle to start. h When the bobbin seems full and begins spinning i slowly, take your foot off while threading the machine. KNOWING YOUR SEWING MACHINE Trim the excess thread above the bobbin. g Lower threading Install the bobbin wound with thread...
Users Manual - English and Spanish
Page 14
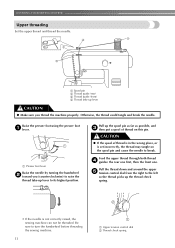
... first, then the front one. a Presser foot lever Raise the needle by turning the handwheel b toward you thread the machine properly. Be sure to its highest position. KNOWING YOUR SEWING MACHINE Upper threading Set the upper thread and thread the needle. a Spool pin b Thread guide (rear) c Thread guide (... of thread is in the wrong place, or is not correctly raised, the sewing machine can not be threaded. Otherwise, the thread could tangle and break the needle. Pull up the thread check spring. • If the needle is set incorrectly, the thread may tangle on this pin.
... first, then the front one. a Presser foot lever Raise the needle by turning the handwheel b toward you thread the machine properly. Be sure to its highest position. KNOWING YOUR SEWING MACHINE Upper threading Set the upper thread and thread the needle. a Spool pin b Thread guide (rear) c Thread guide (... of thread is in the wrong place, or is not correctly raised, the sewing machine can not be threaded. Otherwise, the thread could tangle and break the needle. Pull up the thread check spring. • If the needle is set incorrectly, the thread may tangle on this pin.
Users Manual - English and Spanish
Page 16
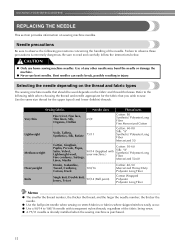
... observe these precautions is purchased. 15 Use the same size thread for the fabric that should be used depends on sewing machine needles. Refer to sew. Selecting the needle depending on the thread and fabric types The sewing machine needle that you wish to the following precautions concerning the handling of the fabric being sewn. ● A 75/11...
... observe these precautions is purchased. 15 Use the same size thread for the fabric that should be used depends on sewing machine needles. Refer to sew. Selecting the needle depending on the thread and fabric types The sewing machine needle that you wish to the following precautions concerning the handling of the fabric being sewn. ● A 75/11...
Users Manual - English and Spanish
Page 17
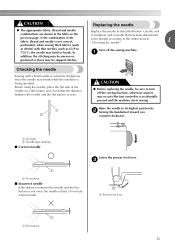
...that has been determined to be sure to turn off the sewing machine. Do not use a bent needle. If the combination of the needle on the previous page. Raise the needle to 75/11), the needle may be skipped stitches. Lower the presser foot lever. Use...a Flat surface 16 CAUTION ● The appropriate fabric, thread and needle combinations are shown in "Checking the needle" . 1 Turn off the sewing machine, otherwise injuries may occur if the foot controller is even. 1 2 Replacing the needle Replace the needle as 65/9 to its highest position by b turning the handwheel toward...
...that has been determined to be sure to turn off the sewing machine. Do not use a bent needle. If the combination of the needle on the previous page. Raise the needle to 75/11), the needle may be skipped stitches. Lower the presser foot lever. Use...a Flat surface 16 CAUTION ● The appropriate fabric, thread and needle combinations are shown in "Checking the needle" . 1 Turn off the sewing machine, otherwise injuries may occur if the foot controller is even. 1 2 Replacing the needle Replace the needle as 65/9 to its highest position by b turning the handwheel toward...
Users Manual - English and Spanish
Page 18
... the needle clamp screw. a Needle stopper a Needle clamp screw b Needle bar thread guide c Needle bar Align the bottom edge of the needle holder b with the end of the machine, insert the needle until it clockwise. As seen from the front of the sewing machine may result. ■ Installing the needle clamp If the needle clamp is at the bottom. a Needle bar b Needle holder c Needle clamp...
... the needle clamp screw. a Needle stopper a Needle clamp screw b Needle bar thread guide c Needle bar Align the bottom edge of the needle holder b with the end of the machine, insert the needle until it clockwise. As seen from the front of the sewing machine may result. ■ Installing the needle clamp If the needle clamp is at the bottom. a Needle bar b Needle holder c Needle clamp...
Users Manual - English and Spanish
Page 20
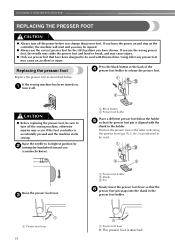
...the holder e so that the presser foot pin is attached. Raise the needle to release the presser foot. Position the presser foot so the letter indicating the presser foot type (A, I, etc.) is accidentally pressed and the machine starts sewing. c a Presser foot holder b Shank c Pin Slowly lower the ... position by b turning the handwheel toward you change the presser foot. CAUTION ● Before replacing the presser foot, be read. KNOWING YOUR SEWING MACHINE REPLACING THE PRESSER FOOT CAUTION ● Always turn off . If you leave the power on and step on , a turn it off the...
...the holder e so that the presser foot pin is attached. Raise the needle to release the presser foot. Position the presser foot so the letter indicating the presser foot type (A, I, etc.) is accidentally pressed and the machine starts sewing. c a Presser foot holder b Shank c Pin Slowly lower the ... position by b turning the handwheel toward you change the presser foot. CAUTION ● Before replacing the presser foot, be read. KNOWING YOUR SEWING MACHINE REPLACING THE PRESSER FOOT CAUTION ● Always turn off . If you leave the power on and step on , a turn it off the...
Users Manual - English and Spanish
Page 22
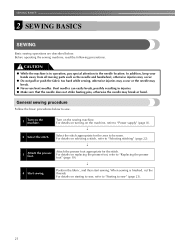
... sew, refer to "Starting to be sewn. Attach the presser foot appropriate for the area to sew" (page 23). 21 Before operating the sewing machine, read the following precautions. When sewing is in injuries. ● Make sure that the needle does not strike basting pins, otherwise the needle may break. ● Never use bent needles. Turn on the sewing machine...
... sew, refer to "Starting to be sewn. Attach the presser foot appropriate for the area to sew" (page 23). 21 Before operating the sewing machine, read the following precautions. When sewing is in injuries. ● Make sure that the needle does not strike basting pins, otherwise the needle may break. ● Never use bent needles. Turn on the sewing machine...
Users Manual - English and Spanish
Page 24
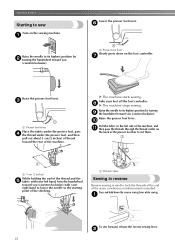
... down on the foot controller. a Raise the needle to the left hand, turn the handwheel toward you (counterclockwise). a To sew forward, release the reverse sewing lever. SEWING BASICS Starting to the starting point of the machine. X The machine starts sewing. a 5 cm (2 inches) While holding the... the presser foot lever. a Thread cutter Sewing in reverse Reverse sewing is needed. Raise the needle to cut them. b 23 Take your left side of the machine, and k then pass the threads through the thread cutter on the sewing machine. c a Presser foot lever Place the...
... down on the foot controller. a Raise the needle to the left hand, turn the handwheel toward you (counterclockwise). a To sew forward, release the reverse sewing lever. SEWING BASICS Starting to the starting point of the machine. X The machine starts sewing. a 5 cm (2 inches) While holding the... the presser foot lever. a Thread cutter Sewing in reverse Reverse sewing is needed. Raise the needle to cut them. b 23 Take your left side of the machine, and k then pass the threads through the thread cutter on the sewing machine. c a Presser foot lever Place the...

Users Manual - English and Spanish
Page 26
... stitch length in the fabric). When sewing along a curve while using the needle as those used with too much force, the needle may bend or break. Sewing curves Stop sewing, and then slightly change the sewing direction to sew around the curve. Changing the sewing direction When the stitching reaches a corner, stop the a sewing machine. Lower the presser foot lever...
... stitch length in the fabric). When sewing along a curve while using the needle as those used with too much force, the needle may bend or break. Sewing curves Stop sewing, and then slightly change the sewing direction to sew around the curve. Changing the sewing direction When the stitching reaches a corner, stop the a sewing machine. Lower the presser foot lever...

Users Manual - English and Spanish
Page 34
... attached. Pull the upper thread at the end of the h stitching to be sewn on the needle plate as c shown below. Use scissors to cut the upper and lower threads, leaving a length of the sewing machine, and then sew them in the a button to the wrong side of the button. Distance between holes 1.6 mm...
... attached. Pull the upper thread at the end of the h stitching to be sewn on the needle plate as c shown below. Use scissors to cut the upper and lower threads, leaving a length of the sewing machine, and then sew them in the a button to the wrong side of the button. Distance between holes 1.6 mm...

Users Manual - English and Spanish
Page 38
... dial Stitch name Application Attaching zippers, 6 7 8 9 10 Straight stitch basic stitching, (Center needle and sewing position) gathers or darning, etc. They are called "shell tucks". Sew while making sure that look like shells are used to create gathers. Fold the fabric along the...stitching The gathers that the needle drops c slightly off the edge of the upper thread (to b about 2). • For details, refer to "Thread tension" (page 24). UTILITY STITCHES DECORATIVE STITCHING Various decorative stitches can be sewn with this sewing machine. d Smooth the gathers by...
... dial Stitch name Application Attaching zippers, 6 7 8 9 10 Straight stitch basic stitching, (Center needle and sewing position) gathers or darning, etc. They are called "shell tucks". Sew while making sure that look like shells are used to create gathers. Fold the fabric along the...stitching The gathers that the needle drops c slightly off the edge of the upper thread (to b about 2). • For details, refer to "Thread tension" (page 24). UTILITY STITCHES DECORATIVE STITCHING Various decorative stitches can be sewn with this sewing machine. d Smooth the gathers by...
Users Manual - English and Spanish
Page 44
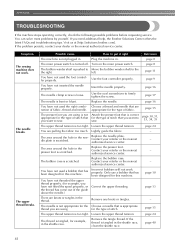
... You have not threaded the upper thread properly. (for example, in . The needle is appropriate thread you are pulling the fabric too much. page 15 page 24 page 40 43 Symptom The sewing machine does not work properly. Use the foot controller properly. Loosen the upper thread tension....presser foot that is tangled, for example, you need additional help, the Brother Solutions Center offers the latest FAQs and troubleshooting tips. You can solve most problems by yourself. Possible cause How to sew. The main power switch is too tight. If you have not inserted ...
... You have not threaded the upper thread properly. (for example, in . The needle is appropriate thread you are pulling the fabric too much. page 15 page 24 page 40 43 Symptom The sewing machine does not work properly. Use the foot controller properly. Loosen the upper thread tension....presser foot that is tangled, for example, you need additional help, the Brother Solutions Center offers the latest FAQs and troubleshooting tips. You can solve most problems by yourself. Possible cause How to sew. The main power switch is too tight. If you have not inserted ...

Users Manual - English and Spanish
Page 47
... presser presser fffsoooeoooletttchlt.eio.ov.l.en.d.r.ed.r.i..a.....l...5656,,,, 22 19 20 13 pre-tension disk 10 R relative chart of sewing fabrics, needles and threads .....15 reverse sewing lever 23 S satin stitching 27 seam ripper 32 sewing machine needles 15 shell tuck stitching 37 shuttle hook removal 41 sshpouottllepriance..c..l.e..a..n..i.n..g 1..0..,.. 41 13 straight stitch 28 stretch blind stitch...
... presser presser fffsoooeoooletttchlt.eio.ov.l.en.d.r.ed.r.i..a.....l...5656,,,, 22 19 20 13 pre-tension disk 10 R relative chart of sewing fabrics, needles and threads .....15 reverse sewing lever 23 S satin stitching 27 seam ripper 32 sewing machine needles 15 shell tuck stitching 37 shuttle hook removal 41 sshpouottllepriance..c..l.e..a..n..i.n..g 1..0..,.. 41 13 straight stitch 28 stretch blind stitch...
Quick Setup Guide - English and Spanish
Page 1
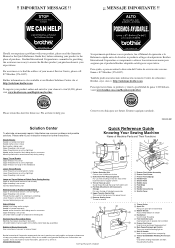
...assistance necessary to ensure the Brother product you . Brother International Corporation se compromete a ofrecer la asistencia necesaria para asegurar que el producto Brother adquirido satisfaga sus expectativas. Conserve esta hoja para uso futuro. Many of your machine/sewing light on N Built-... (Zigzag) 0 Needle Plate A Shuttle Hook B Bobbin Case C Feed Dogs D Needle E Needle Clamp Screw F Shuttle Cover Skips Stitches Needle is not sharp and/or straight Needle is unevenly wound on bobbin Incorrect bobbin being used Quick Reference Guide Knowing Your Sewing Machine Name of the ...
...assistance necessary to ensure the Brother product you . Brother International Corporation se compromete a ofrecer la asistencia necesaria para asegurar que el producto Brother adquirido satisfaga sus expectativas. Conserve esta hoja para uso futuro. Many of your machine/sewing light on N Built-... (Zigzag) 0 Needle Plate A Shuttle Hook B Bobbin Case C Feed Dogs D Needle E Needle Clamp Screw F Shuttle Cover Skips Stitches Needle is not sharp and/or straight Needle is unevenly wound on bobbin Incorrect bobbin being used Quick Reference Guide Knowing Your Sewing Machine Name of the ...

Quick Setup Guide - English and Spanish
Page 2
... Cotton: 40-50 Mercerized Heavy Duty Polyester Long Fiber Cotton Wrapped Polyester Polyester Long Fiber Uses common replacement accessories: Bobbin: Class 15 Needle: Standard sewing machine needles Light Bulb: Small screw base sewing machine bulb Remove the hook by turning the handwheel. Place the thread spool on the pin on bobbin shaft and slide to the...
... Cotton: 40-50 Mercerized Heavy Duty Polyester Long Fiber Cotton Wrapped Polyester Polyester Long Fiber Uses common replacement accessories: Bobbin: Class 15 Needle: Standard sewing machine needles Light Bulb: Small screw base sewing machine bulb Remove the hook by turning the handwheel. Place the thread spool on the pin on bobbin shaft and slide to the...


