Users Manual - English and Spanish
Page 2
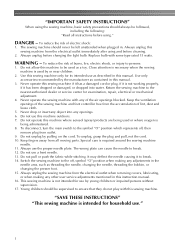
.... Always unplug before cleaning. 2. Always use a bent needle. 13. Do not use the proper needle plate. Young children should be used as threading the needle, changing the needle, threading the bobbin, or changing the presser foot. 15. Replace bulb with this manual. Never operate the sewing machine with any adjustments in this...
.... Always unplug before cleaning. 2. Always use a bent needle. 13. Do not use the proper needle plate. Young children should be used as threading the needle, changing the needle, threading the bobbin, or changing the presser foot. 15. Replace bulb with this manual. Never operate the sewing machine with any adjustments in this...
Users Manual - English and Spanish
Page 3
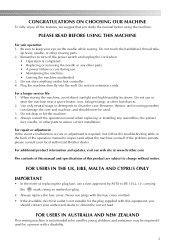
...parts • A power failure occurs during use extension cords. For additional product information and updates, visit our web site at www.brother.com The contents of this manual and specifications of this machine, avoid direct sunlight and high humidity locations. carrying the mark, rating ... follow the troubleshooting table in the back of replacing the plug fuse, use plugs with a disability. 2 Do not touch the handwheel, thread take- Plug the machine directly into the wall. When storing this product are subject to assure correct installation. Never use a fuse approved ...
...parts • A power failure occurs during use extension cords. For additional product information and updates, visit our web site at www.brother.com The contents of this manual and specifications of this machine, avoid direct sunlight and high humidity locations. carrying the mark, rating ... follow the troubleshooting table in the back of replacing the plug fuse, use plugs with a disability. 2 Do not touch the handwheel, thread take- Plug the machine directly into the wall. When storing this product are subject to assure correct installation. Never use a fuse approved ...
Users Manual - English and Spanish
Page 4
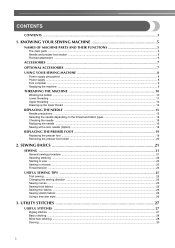
... MACHINE 8 Power supply precautions ...8 Power supply ...8 Foot controller ...9 Steadying the machine ...9 THREADING THE MACHINE 10 Winding the bobbin ...10 Lower threading ...11 Upper threading ...13 Drawing up the lower thread ...14 REPLACING THE NEEDLE 15 Needle precautions ...15 Selecting the needle depending on the...SEWING BASICS 21 SEWING ...21 General sewing procedure ...21 Selecting stitching ...22 Starting to sew ...23 Sewing in reverse ...23 Thread tension ...24 USEFUL SEWING TIPS ...25 Trial sewing ...25 Changing the sewing direction ...25 Sewing curves ...25 Sewing thick fabrics...
... MACHINE 8 Power supply precautions ...8 Power supply ...8 Foot controller ...9 Steadying the machine ...9 THREADING THE MACHINE 10 Winding the bobbin ...10 Lower threading ...11 Upper threading ...13 Drawing up the lower thread ...14 REPLACING THE NEEDLE 15 Needle precautions ...15 Selecting the needle depending on the...SEWING BASICS 21 SEWING ...21 General sewing procedure ...21 Selecting stitching ...22 Starting to sew ...23 Sewing in reverse ...23 Thread tension ...24 USEFUL SEWING TIPS ...25 Trial sewing ...25 Changing the sewing direction ...25 Sewing curves ...25 Sewing thick fabrics...
Users Manual - English and Spanish
Page 6
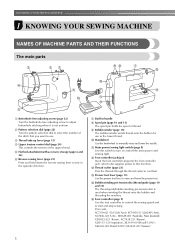
...presser foot lever to cut them. p Foot controller (page 9) Use the foot controller to control the sewing speed and to use as the lower thread. b Pattern selection dial (page 22) Turn the pattern selection dial to select the number of the stitch that you want to start and stop ...sewing lever (page 23) Press and hold down the reverse sewing lever to adjust buttonhole stitching when it is used when winding the thread onto the bobbin and threading the machine. l Foot controller jack/jack Insert the foot controller plug into the foot controller jack, which also supplies power to this...
...presser foot lever to cut them. p Foot controller (page 9) Use the foot controller to control the sewing speed and to use as the lower thread. b Pattern selection dial (page 22) Turn the pattern selection dial to select the number of the stitch that you want to start and stop ...sewing lever (page 23) Press and hold down the reverse sewing lever to adjust buttonhole stitching when it is used when winding the thread onto the bobbin and threading the machine. l Foot controller jack/jack Insert the foot controller plug into the foot controller jack, which also supplies power to this...

Users Manual - English and Spanish
Page 7
... marked with guides for the selected stitching. e Needle plate The needle plate is installed onto the presser foot holder assembly. h Bobbin case i Needle j Needle bar thread guide k Needle clamp screw Use the needle clamp screw to remove it. Lift the bottom of the flat bed attachment 1 a toward you, and then pull...
... marked with guides for the selected stitching. e Needle plate The needle plate is installed onto the presser foot holder assembly. h Bobbin case i Needle j Needle bar thread guide k Needle clamp screw Use the needle clamp screw to remove it. Lift the bottom of the flat bed attachment 1 a toward you, and then pull...
Users Manual - English and Spanish
Page 11
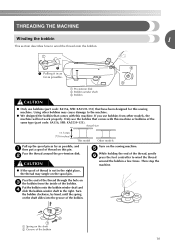
..., by hand, until the spring on the sewing machine. Only use bobbins (part code: SA156, SFB: XA5539-151) that comes with this machine. Pass the thread around the bobbin a few times. Using other models, the machine will not work properly. Turn on the shaft slides into the groove of the... thread through the hole on c the bobbin from other bobbins may tangle on the spool pin. Pass the end of the bobbin. Put the bobbin onto ...
..., by hand, until the spring on the sewing machine. Only use bobbins (part code: SA156, SFB: XA5539-151) that comes with this machine. Pass the thread around the bobbin a few times. Using other models, the machine will not work properly. Turn on the shaft slides into the groove of the... thread through the hole on c the bobbin from other bobbins may tangle on the spool pin. Pass the end of the bobbin. Put the bobbin onto ...

Users Manual - English and Spanish
Page 12
...other models are used, the machine will make a clicking sound; CAUTION ● Make sure you do not cut the thread completely, and the bobbin is turned after winding the thread around the bobbin and cause the needle to the right. Memo ● When the sewing machine is started or the ...handwheel is wound, when the thread runs low it may cause the thread tension to its highest position by turning a the handwheel toward you turn the power off the foot controller. Actual size 11.5 ...
...other models are used, the machine will make a clicking sound; CAUTION ● Make sure you do not cut the thread completely, and the bobbin is turned after winding the thread around the bobbin and cause the needle to the right. Memo ● When the sewing machine is started or the ...handwheel is wound, when the thread runs low it may cause the thread tension to its highest position by turning a the handwheel toward you turn the power off the foot controller. Actual size 11.5 ...
Users Manual - English and Spanish
Page 13
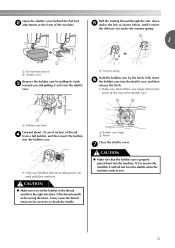
... bed b attachment at the top of the machine. a Tension spring Hold the bobbin case by pulling its latch c toward you set the bobbin so the thread unrolls in the wrong direction, it out from the shuttle when the machine starts to be used with this machine. CAUTION ● Make sure you... and pulling it may cause the thread tension to sew. 12 If the thread unrolls in the right direction. Pull the trailing thread through the slot, down e and to the left, as shown below, until it enters the delivery eye ...
... bed b attachment at the top of the machine. a Tension spring Hold the bobbin case by pulling its latch c toward you set the bobbin so the thread unrolls in the wrong direction, it out from the shuttle when the machine starts to be used with this machine. CAUTION ● Make sure you... and pulling it may cause the thread tension to sew. 12 If the thread unrolls in the right direction. Pull the trailing thread through the slot, down e and to the left, as shown below, until it enters the delivery eye ...
Users Manual - English and Spanish
Page 14
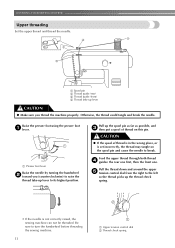
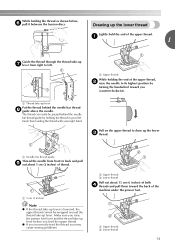
... tangle and break the needle. CAUTION ● If the spool of thread on the spool pin and cause the needle to break. KNOWING YOUR SEWING MACHINE Upper threading Set the upper thread and thread the needle. Pull the thread down and around the upper e tension control dial from the right to the left so the...
... tangle and break the needle. CAUTION ● If the spool of thread on the spool pin and cause the needle to break. KNOWING YOUR SEWING MACHINE Upper threading Set the upper thread and thread the needle. Pull the thread down and around the upper e tension control dial from the right to the left so the...
Users Manual - English and Spanish
Page 15
... it between the tension discs. a Upper thread b Lower thread 14 a Upper thread While holding the end of the upper thread, b raise the needle to left hand, then feeding the thread with your right hand. While holding the thread in your left . a Thread take -up the lower thread Lightly hold the end of thread. Make sure you raise the presser...
... it between the tension discs. a Upper thread b Lower thread 14 a Upper thread While holding the end of the upper thread, b raise the needle to left hand, then feeding the thread with your right hand. While holding the thread in your left . a Thread take -up the lower thread Lightly hold the end of thread. Make sure you raise the presser...
Users Manual - English and Spanish
Page 16
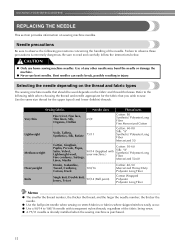
..., Double knit, Jersey, Tricot 90/14 (Ball point) Cotton Wrapped Polyester Polyester Long Fiber Memo ● The smaller the thread number, the thicker the thread; and the larger the needle number, the thicker the needle. ● Use the ball point needle when sewing on the...weight Cotton, Gingham, Poplin, Percale, Pique, Satin, Velvet, Lightweight wool, Fine corduroy, Suitings, Linen, Muslin 90/14 (Supplied with transparent nylon threads, regardless of any other needle may bend the needle or damage the machine. ● Never use home sewing machine needles. KNOWING YOUR SEWING MACHINE...
..., Double knit, Jersey, Tricot 90/14 (Ball point) Cotton Wrapped Polyester Polyester Long Fiber Memo ● The smaller the thread number, the thicker the thread; and the larger the needle number, the thicker the needle. ● Use the ball point needle when sewing on the...weight Cotton, Gingham, Poplin, Percale, Pique, Satin, Velvet, Lightweight wool, Fine corduroy, Suitings, Linen, Muslin 90/14 (Supplied with transparent nylon threads, regardless of any other needle may bend the needle or damage the machine. ● Never use home sewing machine needles. KNOWING YOUR SEWING MACHINE...
Users Manual - English and Spanish
Page 17
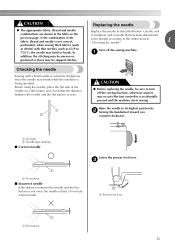
... pressed and the machine starts sewing. c a Presser foot lever 1 a Flat surface 16 Before using the needle, place the flat side of the fabric, thread and needle is bent. Do not use a bent needle. Lower the presser foot lever. a CAUTION ● Before replacing the needle, be skipped stitches....the needle may be sure to 75/11), the needle may occur if the foot controller is being operated. CAUTION ● The appropriate fabric, thread and needle combinations are shown in "Checking the needle" . 1 Turn off the sewing machine, otherwise injuries may bend or break. If the ...
... pressed and the machine starts sewing. c a Presser foot lever 1 a Flat surface 16 Before using the needle, place the flat side of the fabric, thread and needle is bent. Do not use a bent needle. Lower the presser foot lever. a CAUTION ● Before replacing the needle, be skipped stitches....the needle may be sure to 75/11), the needle may occur if the foot controller is being operated. CAUTION ● The appropriate fabric, thread and needle combinations are shown in "Checking the needle" . 1 Turn off the sewing machine, otherwise injuries may bend or break. If the ...
Users Manual - English and Spanish
Page 18
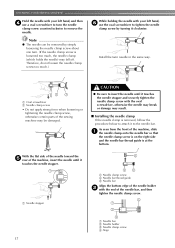
...about one turn the needle clamp screw counterclockwise to tighten the needle clamp screw by turning it clockwise. a Needle stopper a Needle clamp screw b Needle bar thread guide c Needle bar Align the bottom edge of the needle bar, and then tighten the needle clamp screw. CAUTION ● Be sure to insert the... the machine, slide a the needle clamp onto the needle bar so that the needle clamp screw is on the right side and the needle bar thread guide is loosened too much .) While holding the needle with your left hand, f use a oval screwdriver to turn . (If the needle clamp screw is...
...about one turn the needle clamp screw counterclockwise to tighten the needle clamp screw by turning it clockwise. a Needle stopper a Needle clamp screw b Needle bar thread guide c Needle bar Align the bottom edge of the needle bar, and then tighten the needle clamp screw. CAUTION ● Be sure to insert the... the machine, slide a the needle clamp onto the needle bar so that the needle clamp screw is on the right side and the needle bar thread guide is loosened too much .) While holding the needle with your left hand, f use a oval screwdriver to turn . (If the needle clamp screw is...
Users Manual - English and Spanish
Page 19
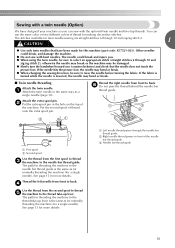
.... a Attach the twin needle in the hole on the top of the machine. Put the second spool of the needle bar thread guide. The path for threading the machine to the thread take -up lever is the same as a single needle (page 16). See page 13 for a single needle). See page... 13 for a single needle). d Use the thread from the first spool to thread c the machine to the thread take -up lever. f Do not pass the thread behind the needle bar thread guide. If the needle hits the presser foot, the needle may bend or break. ■...
.... a Attach the twin needle in the hole on the top of the machine. Put the second spool of the needle bar thread guide. The path for threading the machine to the thread take -up lever is the same as a single needle (page 16). See page 13 for a single needle). See page... 13 for a single needle). d Use the thread from the first spool to thread c the machine to the thread take -up lever. f Do not pass the thread behind the needle bar thread guide. If the needle hits the presser foot, the needle may bend or break. ■...
Users Manual - English and Spanish
Page 21
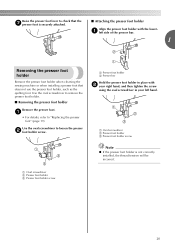
... holder Remove the presser foot holder when cleaning the sewing machine or when installing a presser foot that the g presser foot is not correctly installed, the thread tension will be incorrect.
... holder Remove the presser foot holder when cleaning the sewing machine or when installing a presser foot that the g presser foot is not correctly installed, the thread tension will be incorrect.
Users Manual - English and Spanish
Page 22
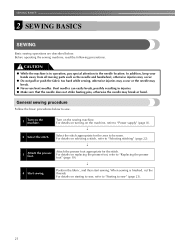
.... Select the stitch appropriate for the stitch. Before operating the sewing machine, read the following precautions. CAUTION ● While the machine is finished, cut the threads. General sewing procedure Follow the basic procedures below . When sewing is in injuries. ● Make sure that the needle does not strike basting pins, otherwise...
.... Select the stitch appropriate for the stitch. Before operating the sewing machine, read the following precautions. CAUTION ● While the machine is finished, cut the threads. General sewing procedure Follow the basic procedures below . When sewing is in injuries. ● Make sure that the needle does not strike basting pins, otherwise...
Users Manual - English and Spanish
Page 24
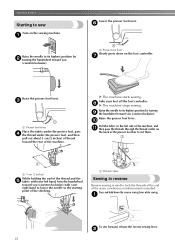
... Raise the presser foot lever. Raise the needle to sew Lower the presser foot lever. a 5 cm (2 inches) While holding the end of the thread and the e fabric with your right hand to lower the needle to cut them. f Turn on the foot controller. c a Presser foot lever Place... the left hand, turn the handwheel toward you (counterclockwise). a Presser foot lever Slowly press down the reverse sewing lever while sewing. a Thread cutter Sewing in reverse Reverse sewing is used to its highest position by b turning the handwheel toward the rear of the seam or wherever ...
... Raise the presser foot lever. Raise the needle to sew Lower the presser foot lever. a 5 cm (2 inches) While holding the end of the thread and the e fabric with your right hand to lower the needle to cut them. f Turn on the foot controller. c a Presser foot lever Place... the left hand, turn the handwheel toward you (counterclockwise). a Presser foot lever Slowly press down the reverse sewing lever while sewing. a Thread cutter Sewing in reverse Reverse sewing is used to its highest position by b turning the handwheel toward the rear of the seam or wherever ...

Users Manual - English and Spanish
Page 25
... Increase the tension by turning the upper tensioncontrol dial to its original position before you change tension adjustments make sure the upper thread and bobbin are inserted correctly. ● We recommend you do a test sample on the surface of the fabric when sewing thin... appear on wrong side of fabric Solution Reduce the tension by turning the screw clockwise with thin thread. 1 Note ● If the bobbin thread was incorrectly threaded, the upper thread may appear on a scrap of your stitches. For most sewing applications, no adjustment is too tight Loops appear on ...
... Increase the tension by turning the upper tensioncontrol dial to its original position before you change tension adjustments make sure the upper thread and bobbin are inserted correctly. ● We recommend you do a test sample on the surface of the fabric when sewing thin... appear on wrong side of fabric Solution Reduce the tension by turning the screw clockwise with thin thread. 1 Note ● If the bobbin thread was incorrectly threaded, the upper thread may appear on a scrap of your stitches. For most sewing applications, no adjustment is too tight Loops appear on ...

Users Manual - English and Spanish
Page 26
...fabric is lowered, the needle may bend or break. If the fabric is turned while the needle is pushed with your project, and check the thread tension and stitch length and width. Turn the fabric using the twin needle, be used for your project. Trial sewing A trial piece of ...fabric should be sewn since, depending on the type of stitching and the number of layers of fabric and thread that will be sure to obtain a finer stitch. If the needle was raised, lower the needle by turning the handwheel toward you (counterclockwise). ...
...fabric is lowered, the needle may bend or break. If the fabric is turned while the needle is pushed with your project, and check the thread tension and stitch length and width. Turn the fabric using the twin needle, be used for your project. Trial sewing A trial piece of ...fabric should be sewn since, depending on the type of stitching and the number of layers of fabric and thread that will be sure to obtain a finer stitch. If the needle was raised, lower the needle by turning the handwheel toward you (counterclockwise). ...

Users Manual - English and Spanish
Page 28
... ● Slowly turn the handwheel toward you (counterclockwise) and check that the needle does not touch the presser foot. When sewing is finished, cut the thread. If the needle hits the presser foot, the needle may bend or break. 27 Memo ● When sewing with the decorative satin stitches. UTILITY STITCHES...
... ● Slowly turn the handwheel toward you (counterclockwise) and check that the needle does not touch the presser foot. When sewing is finished, cut the thread. If the needle hits the presser foot, the needle may bend or break. 27 Memo ● When sewing with the decorative satin stitches. UTILITY STITCHES...


