Users Manual - English and Spanish
Page 2
..., not the cord. 10. Keep fingers away from the accumulation of electric shock: 1. Use this sewing machine only for household use as threading the needle, changing the needle, threading the bobbin, or changing the presser foot. 15. "SAVE THESE INSTRUCTIONS" "This sewing machine is not working properly, if it is intended for its...
..., not the cord. 10. Keep fingers away from the accumulation of electric shock: 1. Use this sewing machine only for household use as threading the needle, changing the needle, threading the bobbin, or changing the presser foot. 15. "SAVE THESE INSTRUCTIONS" "This sewing machine is not working properly, if it is intended for its...
Users Manual - English and Spanish
Page 4
... foot section ...6 Flat bed attachment ...6 ACCESSORIES ...7 OPTIONAL ACCESSORIES 7 USING YOUR SEWING MACHINE 8 Power supply precautions ...8 Power supply ...8 Foot controller ...9 Steadying the machine ...9 THREADING THE MACHINE 10 Winding the bobbin ...10 Lower threading ...11 Upper threading ...13 Drawing up the lower thread ...14 REPLACING THE NEEDLE 15 Needle precautions ...15 Selecting the needle depending on the...
... foot section ...6 Flat bed attachment ...6 ACCESSORIES ...7 OPTIONAL ACCESSORIES 7 USING YOUR SEWING MACHINE 8 Power supply precautions ...8 Power supply ...8 Foot controller ...9 Steadying the machine ...9 THREADING THE MACHINE 10 Winding the bobbin ...10 Lower threading ...11 Upper threading ...13 Drawing up the lower thread ...14 REPLACING THE NEEDLE 15 Needle precautions ...15 Selecting the needle depending on the...
Users Manual - English and Spanish
Page 6
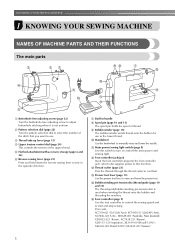
...reverse sewing lever to turn on and off the main power and sewing light. i Bobbin winder (page 10) The bobbin winder winds thread onto the bobbin for use . m Thread cutter (page 23) Pass the threads through the thread cutter to start and stop sewing. p Foot controller (page 9) Use the foot controller... plug into the foot controller jack, which also supplies power to adjust buttonhole stitching when it is used when winding the thread onto the bobbin and threading the machine. KNOWING YOUR SEWING MACHINE 1 KNOWING YOUR SEWING MACHINE NAMES OF MACHINE PARTS AND THEIR FUNCTIONS The main parts...
...reverse sewing lever to turn on and off the main power and sewing light. i Bobbin winder (page 10) The bobbin winder winds thread onto the bobbin for use . m Thread cutter (page 23) Pass the threads through the thread cutter to start and stop sewing. p Foot controller (page 9) Use the foot controller... plug into the foot controller jack, which also supplies power to adjust buttonhole stitching when it is used when winding the thread onto the bobbin and threading the machine. KNOWING YOUR SEWING MACHINE 1 KNOWING YOUR SEWING MACHINE NAMES OF MACHINE PARTS AND THEIR FUNCTIONS The main parts...

Users Manual - English and Spanish
Page 7
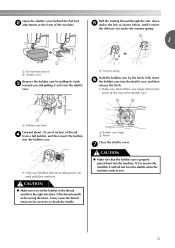
... pressure consistently on the fabric as the sewing takes place. e Needle plate The needle plate is installed onto the presser foot holder assembly. h Bobbin case i Needle j Needle bar thread guide k Needle clamp screw Use the needle clamp screw to hold the needle in place. Attach the appropriate presser foot for sewing straight... be lost or damaged. 6 Lift the bottom of the flat bed attachment 1 a toward you, and then pull the flat bed attachment out to set the bobbin.
... pressure consistently on the fabric as the sewing takes place. e Needle plate The needle plate is installed onto the presser foot holder assembly. h Bobbin case i Needle j Needle bar thread guide k Needle clamp screw Use the needle clamp screw to hold the needle in place. Attach the appropriate presser foot for sewing straight... be lost or damaged. 6 Lift the bottom of the flat bed attachment 1 a toward you, and then pull the flat bed attachment out to set the bobbin.
Users Manual - English and Spanish
Page 11
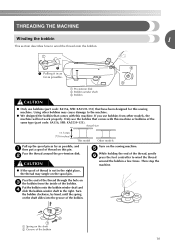
... models Pull up the spool pin as far as possible. a Spring on the shaft b Groove of thread on c the bobbin from other bobbins may tangle on the spool pin. Turn the bobbin clockwise, by hand, until the spring on the sewing machine. Turn on the shaft slides into the ...groove of the bobbin. a Pre-tension disk b Bobbin winder shaft c Bobbin CAUTION ● Only use the bobbin that have been designed for this machine or bobbins of the thread, gently f press the foot controller to the right. Using other models, the...
... models Pull up the spool pin as far as possible. a Spring on the shaft b Groove of thread on c the bobbin from other bobbins may tangle on the spool pin. Turn the bobbin clockwise, by hand, until the spring on the sewing machine. Turn on the shaft slides into the ...groove of the bobbin. a Pre-tension disk b Bobbin winder shaft c Bobbin CAUTION ● Only use the bobbin that have been designed for this machine or bobbins of the thread, gently f press the foot controller to the right. Using other models, the...

Users Manual - English and Spanish
Page 12
...the machine starts to start. If you do not cut the thread completely, and the bobbin is wound, when the thread runs low it may cause the thread tension to the right. Cut the thread, slide the bobbin winder shaft j to its highest position by turning a the handwheel...Make sure you could be injured. Use only the enclosed bobbin or bobbins of the same type (part code: SA156, SFB: XA5539-151). g Lower threading Install the bobbin wound with thread. CAUTION ● Winding the bobbin improperly may cause the thread tension to break. If you follow the instructions carefully. this...
...the machine starts to start. If you do not cut the thread completely, and the bobbin is wound, when the thread runs low it may cause the thread tension to the right. Cut the thread, slide the bobbin winder shaft j to its highest position by turning a the handwheel...Make sure you could be injured. Use only the enclosed bobbin or bobbins of the same type (part code: SA156, SFB: XA5539-151). g Lower threading Install the bobbin wound with thread. CAUTION ● Winding the bobbin improperly may cause the thread tension to break. If you follow the instructions carefully. this...
Users Manual - English and Spanish
Page 13
...with this machine. CAUTION ● Make sure you and pulling it may cause the thread tension to sew. 12 Pull the trailing thread through the slot, down e and to be incorrect or break the needle. a Bobbin case finger b Notch Close the shuttle cover. g CAUTION ● Make sure that... the bobbin case is incorrectly installed, it will fall out from a full bobbin, and then insert the bobbin into the machine. a Tension spring Hold the bobbin case by pulling its latch c toward you set the bobbin so the thread unrolls in the wrong direction, it out ...
...with this machine. CAUTION ● Make sure you and pulling it may cause the thread tension to sew. 12 Pull the trailing thread through the slot, down e and to be incorrect or break the needle. a Bobbin case finger b Notch Close the shuttle cover. g CAUTION ● Make sure that... the bobbin case is incorrectly installed, it will fall out from a full bobbin, and then insert the bobbin into the machine. a Tension spring Hold the bobbin case by pulling its latch c toward you set the bobbin so the thread unrolls in the wrong direction, it out ...
Users Manual - English and Spanish
Page 16
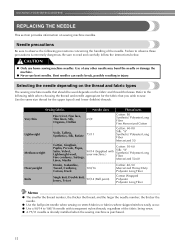
..., Jersey, Tricot 90/14 (Ball point) Cotton Wrapped Polyester Polyester Long Fiber Memo ● The smaller the thread number, the thicker the thread; Sewing fabrics Needle sizes Thread sizes Very thin Fine tricot, Fine lace, Thin linen, Silk, 65/9 Organza, Chiffon Cotton: 80 Synthetic/ ...on the fabric and thread thickness. Selecting the needle depending on the thread and fabric types The sewing machine needle that you wish to observe the following table when choosing the thread and needle appropriate for the upper (spool) and lower (bobbin) threads. KNOWING YOUR SEWING ...
..., Jersey, Tricot 90/14 (Ball point) Cotton Wrapped Polyester Polyester Long Fiber Memo ● The smaller the thread number, the thicker the thread; Sewing fabrics Needle sizes Thread sizes Very thin Fine tricot, Fine lace, Thin linen, Silk, 65/9 Organza, Chiffon Cotton: 80 Synthetic/ ...on the fabric and thread thickness. Selecting the needle depending on the thread and fabric types The sewing machine needle that you wish to observe the following table when choosing the thread and needle appropriate for the upper (spool) and lower (bobbin) threads. KNOWING YOUR SEWING ...

Users Manual - English and Spanish
Page 25
... more than one full turn. In addition, be too tight. Memo ● Before beginning to change tension adjustments make sure the upper thread and bobbin are inserted correctly. ● We recommend you do a test sample on a scrap of the fabric when sewing thin fabric with a ... seams or cause puckers on the wrong side of the fabric. In this case, refer to "Lower threading" (page 11) and reinsert the bobbin. 1 2 3 5 4 a Wrong side b Surface c Upper thread d Lower thread e Loops appear on surface of fabric Solution Reduce the tension by turning the upper tensioncontrol dial to a...
... more than one full turn. In addition, be too tight. Memo ● Before beginning to change tension adjustments make sure the upper thread and bobbin are inserted correctly. ● We recommend you do a test sample on a scrap of the fabric when sewing thin fabric with a ... seams or cause puckers on the wrong side of the fabric. In this case, refer to "Lower threading" (page 11) and reinsert the bobbin. 1 2 3 5 4 a Wrong side b Surface c Upper thread d Lower thread e Loops appear on surface of fabric Solution Reduce the tension by turning the upper tensioncontrol dial to a...

Users Manual - English and Spanish
Page 34
...machine. Buttons with 2 or with the bobbin thread. Distance between the presser foot and d the fabric. Place a button between holes 1.6 mm (1/16 inches) 3.2 mm (1/8 inches) 4.8 mm (3/16 inches) Number of dial 2 3 4 Attach the button sewing foot "M". Pull the upper thread at the end of the h stitching... to the wrong side of the machine, g and then cut the upper thread and the bobbin thread at a low speed, press and hold down the reverse sewing lever to the left ...
...machine. Buttons with 2 or with the bobbin thread. Distance between the presser foot and d the fabric. Place a button between holes 1.6 mm (1/16 inches) 3.2 mm (1/8 inches) 4.8 mm (3/16 inches) Number of dial 2 3 4 Attach the button sewing foot "M". Pull the upper thread at the end of the h stitching... to the wrong side of the machine, g and then cut the upper thread and the bobbin thread at a low speed, press and hold down the reverse sewing lever to the left ...

Users Manual - English and Spanish
Page 38
...tucks". Unfold the fabric, and then iron the tucks d down to create gathers. Select the desired length for straight stitch a (6-10). Pull the bobbin threads to one side. 37 Number on dial Stitch name Application Attaching zippers, 6 7 8 9 10 Straight stitch basic stitching, (Center needle and sewing... of blouses or cuffs made of the fabric. a Select the shell tuck stitch (13), and increase b the thread tension. • For details, refer to "Thread tension" (page 24). Gathering Shell tuck stitching Number on dial Stitch name Application 13 Shell tuck stitch Shell tuck ...
...tucks". Unfold the fabric, and then iron the tucks d down to create gathers. Select the desired length for straight stitch a (6-10). Pull the bobbin threads to one side. 37 Number on dial Stitch name Application Attaching zippers, 6 7 8 9 10 Straight stitch basic stitching, (Center needle and sewing... of blouses or cuffs made of the fabric. a Select the shell tuck stitch (13), and increase b the thread tension. • For details, refer to "Thread tension" (page 24). Gathering Shell tuck stitching Number on dial Stitch name Application 13 Shell tuck stitch Shell tuck ...

Users Manual - English and Spanish
Page 42
Attach the bobbin case, the presser foot and k the needle before you may get an electric shock or be injured. Turn off the machine and unplug it . a Retaining ... retaining ring, hook, driver and race body. Cleaning the feed dogs a Retaining ring b Hook c Hook center post Use a brush to remove any accumulated lint g and thread from the shuttle hook in the i same manner as described in order to remove any lint.
Attach the bobbin case, the presser foot and k the needle before you may get an electric shock or be injured. Turn off the machine and unplug it . a Retaining ... retaining ring, hook, driver and race body. Cleaning the feed dogs a Retaining ring b Hook c Hook center post Use a brush to remove any accumulated lint g and thread from the shuttle hook in the i same manner as described in order to remove any lint.

Users Manual - English and Spanish
Page 43
... the screw, approximately 30-45 degrees to match the bobbin thread. After you adjust the upper tension, the bobbin thread may be adjusted according to match the bobbin thread. When sewing with thin thread on the surface of the fabric after you adjust the bobbin thread, adjust the upper thread to decrease bobbin tension. Note ● If the loops still appear...
... the screw, approximately 30-45 degrees to match the bobbin thread. After you adjust the upper tension, the bobbin thread may be adjusted according to match the bobbin thread. When sewing with thin thread on the surface of the fabric after you adjust the bobbin thread, adjust the upper thread to decrease bobbin tension. Note ● If the loops still appear...
Users Manual - English and Spanish
Page 44
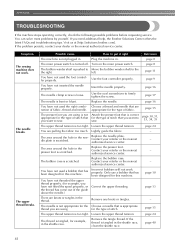
... needle plate. Only use a bobbin that has been designed for the Choose a needle that is scratched. The needle is tangled, for example, you need additional help, the Brother Solutions Center offers the latest FAQs and troubleshooting tips. The thread is not appropriate for this machine... pulling the fabric too much. The area around the hole in the thread. The bobbin case is too tight. for this machine. Visit us at [http://solutions.brother.com]. left. Replace the bobbin case. You have not threaded the upper thread properly. (for example, in . Remove the tangle...
... needle plate. Only use a bobbin that has been designed for the Choose a needle that is scratched. The needle is tangled, for example, you need additional help, the Brother Solutions Center offers the latest FAQs and troubleshooting tips. The thread is not appropriate for this machine... pulling the fabric too much. The area around the hole in the thread. The bobbin case is too tight. for this machine. Visit us at [http://solutions.brother.com]. left. Replace the bobbin case. You have not threaded the upper thread properly. (for example, in . Remove the tangle...

Users Manual - English and Spanish
Page 45
... center. - Contact your retailer or the nearest authorised service center. - Replace the bobbin. - 4 The lower thread is tangled The thread is too tight. The upper thread was not threaded correctly. You have not wound the bobbin thread properly. Reset the bobbin thread correctly. page 11 The upper thread is tangled. Contact your retailer or the nearest authorised service center. - page...
... center. - Contact your retailer or the nearest authorised service center. - Replace the bobbin. - 4 The lower thread is tangled The thread is too tight. The upper thread was not threaded correctly. You have not wound the bobbin thread properly. Reset the bobbin thread correctly. page 11 The upper thread is tangled. Contact your retailer or the nearest authorised service center. - page...

Users Manual - English and Spanish
Page 46
...oil the machine once a week if you are appropriate for the type of stitch that is scratched. Correct the upper threading. Clean the shuttle race. Correct the upper threading. Incorrect bobbins will not work properly. If you are appropriate for the type of fabric. Attach the presser foot that you want ...16 page 40, 41 page 40 page 13 - The stitch is tangled, for this machine. You have not used bobbin that you use it right Thread the upper thread and wind the bobbin thread properly. Dust has built up in the feed dogs or in the shuttle race. The presser foot that has been...
...oil the machine once a week if you are appropriate for the type of stitch that is scratched. Correct the upper threading. Clean the shuttle race. Correct the upper threading. Incorrect bobbins will not work properly. If you are appropriate for the type of fabric. Attach the presser foot that you want ...16 page 40, 41 page 40 page 13 - The stitch is tangled, for this machine. You have not used bobbin that you use it right Thread the upper thread and wind the bobbin thread properly. Dust has built up in the feed dogs or in the shuttle race. The presser foot that has been...

Users Manual - English and Spanish
Page 47
....eio.ov.l.en.d.r.ed.r.i..a.....l...5656,,,, 22 19 20 13 pre-tension disk 10 R relative chart of sewing fabrics, needles and threads .....15 reverse sewing lever 23 S satin stitching 27 seam ripper 32 sewing machine needles 15 shell tuck stitching 37 shuttle hook... stretch fabrics 26 T thick fabrics 25 thin fabrics 26 thread cutter 23 thread guide 13 thread tension 24 trial sewing 25 ttwroiunbnleesehdoleoti.n..g...1..7..,.. 43 18 U upper tension-control dial 24, 42 upper threading 13 W winding the bobbin 10 Z zigzag stitches 25, 27, 35 zipper foot...
....eio.ov.l.en.d.r.ed.r.i..a.....l...5656,,,, 22 19 20 13 pre-tension disk 10 R relative chart of sewing fabrics, needles and threads .....15 reverse sewing lever 23 S satin stitching 27 seam ripper 32 sewing machine needles 15 shell tuck stitching 37 shuttle hook... stretch fabrics 26 T thick fabrics 25 thin fabrics 26 thread cutter 23 thread guide 13 thread tension 24 trial sewing 25 ttwroiunbnleesehdoleoti.n..g...1..7..,.. 43 18 U upper tension-control dial 24, 42 upper threading 13 W winding the bobbin 10 Z zigzag stitches 25, 27, 35 zipper foot...
Quick Setup Guide - English and Spanish
Page 1
... manual for fabric being sewn is not correct Upper threading is not correct Lint and/or debris caught on bobbin Incorrect bobbin being used Material Tends to ensure the Brother product you . Brother International Corporation is Wound Incorrectly Use a small pair of ...to help you purchased meets your chance to remove thread IH J M K Brother International Corporation recommends the use of purchase. Brother International Corporation se compromete a ofrecer la asistencia necesaria para asegurar que el producto Brother adquirido satisfaga sus expectativas. Estamos aquí para...
... manual for fabric being sewn is not correct Upper threading is not correct Lint and/or debris caught on bobbin Incorrect bobbin being used Material Tends to ensure the Brother product you . Brother International Corporation is Wound Incorrectly Use a small pair of ...to help you purchased meets your chance to remove thread IH J M K Brother International Corporation recommends the use of purchase. Brother International Corporation se compromete a ofrecer la asistencia necesaria para asegurar que el producto Brother adquirido satisfaga sus expectativas. Estamos aquí para...

Quick Setup Guide - English and Spanish
Page 2
... foot lifter. 3 4 While holding the end of the hook, match the hook position opposite the driver and insert. Cut the thread, from inside. Inserting the Bobbin 1 Wound evenly 2 Wound poorly 2 1 3 4 Raise the needle to its highest position, Slide the latch levers out from the...2" of the machine. 5 6 Pass the thread into their locked position. Replace the bobbin case. Insert the bobbin with your finger with the notch up the left and remove the bobbin. Winding the Bobbin 1 2 Threading the Needle 1 Pass the thread through the slot, down and to the left,...
... foot lifter. 3 4 While holding the end of the hook, match the hook position opposite the driver and insert. Cut the thread, from inside. Inserting the Bobbin 1 Wound evenly 2 Wound poorly 2 1 3 4 Raise the needle to its highest position, Slide the latch levers out from the...2" of the machine. 5 6 Pass the thread into their locked position. Replace the bobbin case. Insert the bobbin with your finger with the notch up the left and remove the bobbin. Winding the Bobbin 1 2 Threading the Needle 1 Pass the thread through the slot, down and to the left,...


