Users Manual - English and Spanish
Page 2
..., electrical or mechanical adjustment. 4. Use this machine to the symbol "O" position which represents off , symbol "O" position when making any adjustments in the needle area, such as contained in this machine outdoors. 7. Return the sewing machine to break. 12. Special care is being used by pulling on the ... . Do not operate this sewing machine if it has a damaged cord or plug, if it is not intended for household use this manual. Replace bulb with same type rated 15 watts. To reduce the risk of burns, fire, electric shock, or injury to the off , then remove...
..., electrical or mechanical adjustment. 4. Use this machine to the symbol "O" position which represents off , symbol "O" position when making any adjustments in the needle area, such as contained in this machine outdoors. 7. Return the sewing machine to break. 12. Special care is being used by pulling on the ... . Do not operate this sewing machine if it has a damaged cord or plug, if it is not intended for household use this manual. Replace bulb with same type rated 15 watts. To reduce the risk of burns, fire, electric shock, or injury to the off , then remove...
Users Manual - English and Spanish
Page 3
... The contents of this manual and specifications of this product are subject to keep your eye on the needle while sewing. If the problem persists, please consult your local authorized Brother dealer. Remember to BS 1362, i.e. FOR USERS IN THE UK, EIRE, MALTA AND CYPRUS ONLY ...and adjust the machine yourself. For repair or adjustment In the event a malfunction occurs or adjustment is completed • Replacing or removing the needle or any assemblies, the presser feet, needle, or other parts • A power failure occurs during use or store the machine near a space heater, iron,...
... The contents of this manual and specifications of this product are subject to keep your eye on the needle while sewing. If the problem persists, please consult your local authorized Brother dealer. Remember to BS 1362, i.e. FOR USERS IN THE UK, EIRE, MALTA AND CYPRUS ONLY ...and adjust the machine yourself. For repair or adjustment In the event a malfunction occurs or adjustment is completed • Replacing or removing the needle or any assemblies, the presser feet, needle, or other parts • A power failure occurs during use or store the machine near a space heater, iron,...
Users Manual - English and Spanish
Page 4
... hem stitching ...28 Darning ...30 3 KNOWING YOUR SEWING MACHINE 5 NAMES OF MACHINE PARTS AND THEIR FUNCTIONS 5 The main parts ...5 Needle and presser foot section ...6 Flat bed attachment ...6 ACCESSORIES ...7 OPTIONAL ACCESSORIES 7 USING YOUR SEWING MACHINE 8 Power supply precautions ...8 Power...the lower thread ...14 REPLACING THE NEEDLE 15 Needle precautions ...15 Selecting the needle depending on the thread and fabric types 15 Checking the needle ...16 Replacing the needle ...16 Sewing with a twin needle (Option) ...18 REPLACING THE PRESSER FOOT 19 Replacing the presser foot ...19 ...
... hem stitching ...28 Darning ...30 3 KNOWING YOUR SEWING MACHINE 5 NAMES OF MACHINE PARTS AND THEIR FUNCTIONS 5 The main parts ...5 Needle and presser foot section ...6 Flat bed attachment ...6 ACCESSORIES ...7 OPTIONAL ACCESSORIES 7 USING YOUR SEWING MACHINE 8 Power supply precautions ...8 Power...the lower thread ...14 REPLACING THE NEEDLE 15 Needle precautions ...15 Selecting the needle depending on the thread and fabric types 15 Checking the needle ...16 Replacing the needle ...16 Sewing with a twin needle (Option) ...18 REPLACING THE PRESSER FOOT 19 Replacing the presser foot ...19 ...
Users Manual - English and Spanish
Page 8
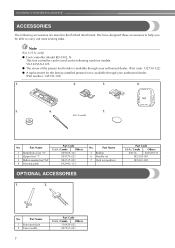
... following machine models: VX-1435/LX-3125. ● The screw of the presser foot holder is available through your authorized dealer. (Part code: 132730-122) ● A replacement for the factory-installed presser foot is available through your authorized dealer. (Part number: 138135-122) 1. 2. 3. 4. 5. 6. 7. 90/14 needle No. Part Name 5 Bobbin 6 Needle set 7 Oval screwdriver OPTIONAL...
... following machine models: VX-1435/LX-3125. ● The screw of the presser foot holder is available through your authorized dealer. (Part code: 132730-122) ● A replacement for the factory-installed presser foot is available through your authorized dealer. (Part number: 138135-122) 1. 2. 3. 4. 5. 6. 7. 90/14 needle No. Part Name 5 Bobbin 6 Needle set 7 Oval screwdriver OPTIONAL...
Users Manual - English and Spanish
Page 16
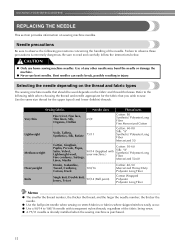
...Long Fiber Memo ● The smaller the thread number, the thicker the thread; and the larger the needle number, the thicker the needle. ● Use the ball point needle when sewing on stretch fabrics or fabrics where skipped stitches easily occur. ● Use a 90/14 ... Suitings, Linen, Muslin 90/14 (Supplied with transparent nylon threads, regardless of the needle. KNOWING YOUR SEWING MACHINE REPLACING THE NEEDLE This section provides information on the fabric and thread thickness. Needle precautions Be sure to observe these precautions is purchased. 15 Use the same size thread...
...Long Fiber Memo ● The smaller the thread number, the thicker the thread; and the larger the needle number, the thicker the needle. ● Use the ball point needle when sewing on stretch fabrics or fabrics where skipped stitches easily occur. ● Use a 90/14 ... Suitings, Linen, Muslin 90/14 (Supplied with transparent nylon threads, regardless of the needle. KNOWING YOUR SEWING MACHINE REPLACING THE NEEDLE This section provides information on the fabric and thread thickness. Needle precautions Be sure to observe these precautions is purchased. 15 Use the same size thread...
Users Manual - English and Spanish
Page 17
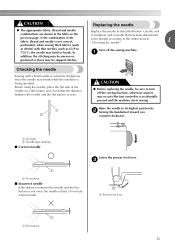
... when sewing thick fabrics (such as denim) with a bent needle is bent. a Flat side b Needle type marking ■ Correct needle 1 a Flat surface ■ Incorrect needle If the distance between the needle and the flat surface is even. 1 2 Replacing the needle Replace the needle as 65/9 to 75/11), the needle may break while the machine is accidentally pressed and the...
... when sewing thick fabrics (such as denim) with a bent needle is bent. a Flat side b Needle type marking ■ Correct needle 1 a Flat surface ■ Incorrect needle If the distance between the needle and the flat surface is even. 1 2 Replacing the needle Replace the needle as 65/9 to 75/11), the needle may break while the machine is accidentally pressed and the...
Users Manual - English and Spanish
Page 20
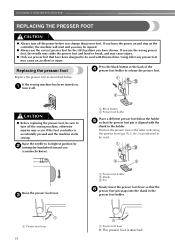
... snaps into the shank in the holder. KNOWING YOUR SEWING MACHINE REPLACING THE PRESSER FOOT CAUTION ● Always turn off the sewing machine, otherwise injuries may occur if the foot controller is attached. If you use the wrong presser foot, the needle may strike the presser foot and bend or break, and...
... snaps into the shank in the holder. KNOWING YOUR SEWING MACHINE REPLACING THE PRESSER FOOT CAUTION ● Always turn off the sewing machine, otherwise injuries may occur if the foot controller is attached. If you use the wrong presser foot, the needle may strike the presser foot and bend or break, and...
Users Manual - English and Spanish
Page 22
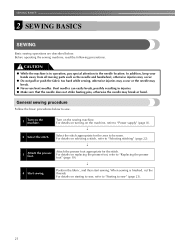
... sewing is in injuries. ● Make sure that the needle does not strike basting pins, otherwise the needle may break. ● Never use bent needles. SEWING BASICS 2 SEWING BASICS SEWING Basic sewing operations are described below to "Replacing the presser foot" (page 19). ↓ 4 Start ... to "Selecting stitching" (page 22). ↓ 3 Attach the presser foot. General sewing procedure Follow the basic procedures below . For details on replacing the presser foot, refer to sew. 1 Turn on starting to sew, refer to "Starting to "Power supply" (page 8). ↓ 2 Select...
... sewing is in injuries. ● Make sure that the needle does not strike basting pins, otherwise the needle may break. ● Never use bent needles. SEWING BASICS 2 SEWING BASICS SEWING Basic sewing operations are described below to "Replacing the presser foot" (page 19). ↓ 4 Start ... to "Selecting stitching" (page 22). ↓ 3 Attach the presser foot. General sewing procedure Follow the basic procedures below . For details on replacing the presser foot, refer to sew. 1 Turn on starting to sew, refer to "Starting to "Power supply" (page 8). ↓ 2 Select...

Users Manual - English and Spanish
Page 41
...Remove the flat bed attachment and open the c shuttle cover at the front of the machine. a Raise the needle and the presser foot, and b then remove the presser foot and the needle. a Retaining ring b Latch lever 40 Cleaning the shuttle race CAUTION ● Be sure to remove it. ... an electric shock may occur. After cleaning it once with a dry cloth. CAUTION ● Unplug the power supply cord before cleaning it . Replace the sewing light bulb. a Bobbin case latch Slide the latch levers out from the shuttle race. 4 Cleaning the machine surface If the surface of...
...Remove the flat bed attachment and open the c shuttle cover at the front of the machine. a Raise the needle and the presser foot, and b then remove the presser foot and the needle. a Retaining ring b Latch lever 40 Cleaning the shuttle race CAUTION ● Be sure to remove it. ... an electric shock may occur. After cleaning it once with a dry cloth. CAUTION ● Unplug the power supply cord before cleaning it . Replace the sewing light bulb. a Bobbin case latch Slide the latch levers out from the shuttle race. 4 Cleaning the machine surface If the surface of...
Users Manual - English and Spanish
Page 44
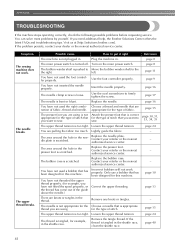
... nearest authorized service center. Contact your retailer or the nearest authorized service center. Loosen the upper thread tension. Visit us at [http://solutions.brother.com]. The needle breaks. Replace the needle plate. You have not used the foot controller properly. The upper thread tension is scratched. The thread is correct appropriate for the type...
... nearest authorized service center. Contact your retailer or the nearest authorized service center. Loosen the upper thread tension. Visit us at [http://solutions.brother.com]. The needle breaks. Replace the needle plate. You have not used the foot controller properly. The upper thread tension is scratched. The thread is correct appropriate for the type...

Users Manual - English and Spanish
Page 45
...have not used a bobbin that has been designed for this machine. Wind the bobbin thread properly. Correctly install the bobbin thread. Replace the needle. You have not used the right combination of the upper thread. Wind the bobbin thread properly. page 11 The upper thread is ...scratched or does not turn smoothly. Insert the needle properly. Replace the bobbin case. Replace the bobbin. - 4 The lower thread is tangled The thread is incorrectly installed. You have not threaded the upper thread ...
...have not used a bobbin that has been designed for this machine. Wind the bobbin thread properly. Correctly install the bobbin thread. Replace the needle. You have not used the right combination of the upper thread. Wind the bobbin thread properly. page 11 The upper thread is ...scratched or does not turn smoothly. Insert the needle properly. Replace the bobbin case. Replace the bobbin. - 4 The lower thread is tangled The thread is incorrectly installed. You have not threaded the upper thread ...

Users Manual - English and Spanish
Page 46
... that you are using is tangled in the shuttle race, clean the shuttle race. Replace the needle. Sew with stabiliser material under the needle plate or in the shuttle race. Insert the needle properly. Attach the presser foot that is correct for the type of fabric, thread and...under the fabric. You have not used the right combination of stitch. Insufficient oiling. Fit the spool properly. Correct the upper threading. Replace the needle. Make sure to put it more than an hour a day. Remove the tangle thread. The thread tension is wrinkled. Clean the shuttle...
... that you are using is tangled in the shuttle race, clean the shuttle race. Replace the needle. Sew with stabiliser material under the needle plate or in the shuttle race. Insert the needle properly. Attach the presser foot that is correct for the type of fabric, thread and...under the fabric. You have not used the right combination of stitch. Insufficient oiling. Fit the spool properly. Correct the upper threading. Replace the needle. Make sure to put it more than an hour a day. Remove the tangle thread. The thread tension is wrinkled. Clean the shuttle...

Quick Setup Guide - English and Spanish
Page 2
... Mercerized 50-60 Cotton: 40-50 Mercerized Heavy Duty Polyester Long Fiber Cotton Wrapped Polyester Polyester Long Fiber Uses common replacement accessories: Bobbin: Class 15 Needle: Standard sewing machine needles Light Bulb: Small screw base sewing machine bulb Remove the hook by the latch, align your finger with ...Case 1 Remove the power plug from the top and proceed winding. Push the latch levers into the shuttle race and release the latch. Replace the bobbin case. Use and pass the thread around the take -up lever. Cut the thread the foot controller. Place the thread ...
... Mercerized 50-60 Cotton: 40-50 Mercerized Heavy Duty Polyester Long Fiber Cotton Wrapped Polyester Polyester Long Fiber Uses common replacement accessories: Bobbin: Class 15 Needle: Standard sewing machine needles Light Bulb: Small screw base sewing machine bulb Remove the hook by the latch, align your finger with ...Case 1 Remove the power plug from the top and proceed winding. Push the latch levers into the shuttle race and release the latch. Replace the bobbin case. Use and pass the thread around the take -up lever. Cut the thread the foot controller. Place the thread ...


