Users Manual - English and Spanish
Page 5
BUTTONHOLE SEWING 31 Making the buttonhole ...31 Adjusting buitching stitching ...32 Button sewing ...33 ZIPPER INSERTION ...34 APPLIQUÉ, MONOGRAMMING AND EMBROIDERING 35 Appliqués ...35 Monogramming and embroidering ...35 DECORATIVE STITCHING 37 Gathering ...37 Shell tuck stitching ...37 Elastic stitching ...38 4. APPENDIX ...39 MAINTENANCE ...39 Oiling ...39 Changing the bulb ...39 Cleaning the machine surface ...40 Cleaning the shuttle race ...40 Cleaning the feed dogs ...41 Bobbin case tension adjustment ...42 TROUBLESHOOTING ...43 INDEX ...46 4
BUTTONHOLE SEWING 31 Making the buttonhole ...31 Adjusting buitching stitching ...32 Button sewing ...33 ZIPPER INSERTION ...34 APPLIQUÉ, MONOGRAMMING AND EMBROIDERING 35 Appliqués ...35 Monogramming and embroidering ...35 DECORATIVE STITCHING 37 Gathering ...37 Shell tuck stitching ...37 Elastic stitching ...38 4. APPENDIX ...39 MAINTENANCE ...39 Oiling ...39 Changing the bulb ...39 Cleaning the machine surface ...40 Cleaning the shuttle race ...40 Cleaning the feed dogs ...41 Bobbin case tension adjustment ...42 TROUBLESHOOTING ...43 INDEX ...46 4
Users Manual - English and Spanish
Page 10
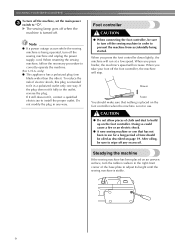
...your foot off any way. CAUTION ● Do not allow pieces of electric shock, this plug is intended to fit in any excess oil. When restarting the sewing machine, follow the necessary procedure to install the proper outlet. Do not modify the plug in a polarized outlet only...For U.S.A. KNOWING YOUR SEWING MACHINE To turn off the sewing machine in order to prevent the machine from accidentally being operated, turn off . After oiling, be oiled as described on the foot controller. X The sewing lamp goes off when the machine is being started. Note ● If a power outage ...
...your foot off any way. CAUTION ● Do not allow pieces of electric shock, this plug is intended to fit in any excess oil. When restarting the sewing machine, follow the necessary procedure to install the proper outlet. Do not modify the plug in a polarized outlet only...For U.S.A. KNOWING YOUR SEWING MACHINE To turn off the sewing machine in order to prevent the machine from accidentally being operated, turn off . After oiling, be oiled as described on the foot controller. X The sewing lamp goes off when the machine is being started. Note ● If a power outage ...

Users Manual - English and Spanish
Page 40
... fabric. 39 Note ● Hold the face plate securely while removing or attaching it may occur. Turn off the machine and unplug it more often, oil every day. ● Sewing machine oil is available at your local sewing machine dealer or service center. ● Do not apply too much... oil as it . a Loosen the face plate screw. a Put 2 to oil the machine once a week if you use it . b Remove the face plate from the machine. If you use it more than an hour a day. APPENDIX...
... fabric. 39 Note ● Hold the face plate securely while removing or attaching it may occur. Turn off the machine and unplug it more often, oil every day. ● Sewing machine oil is available at your local sewing machine dealer or service center. ● Do not apply too much... oil as it . a Loosen the face plate screw. a Put 2 to oil the machine once a week if you use it . b Remove the face plate from the machine. If you use it more than an hour a day. APPENDIX...

Users Manual - English and Spanish
Page 42
... presser foot and k the needle before you may get an electric shock or be injured. a Retaining ring b Driver c Race body Use a cloth dampened with machine oil to h wipe the shuttle race in step h. Remove the needle plate by using the machine.
... presser foot and k the needle before you may get an electric shock or be injured. a Retaining ring b Driver c Race body Use a cloth dampened with machine oil to h wipe the shuttle race in step h. Remove the needle plate by using the machine.

Users Manual - English and Spanish
Page 46
...properly. The bobbin case is incorrect. The thread tension is scratched. Clean the shuttle race. Incorrect bobbins will not work properly. Make sure to oil the machine once a week if you use it more than an hour a day. Attach the presser foot that are using is wrinkled. The ...page 13 - Possible cause You have not used bobbin that has been designed for example, in the shuttle race, clean the shuttle race. Insufficient oiling. Insert the needle properly. Adjust the tension of fabric. If you use a bobbin that has been designed for the type of stitch that ...
...properly. The bobbin case is incorrect. The thread tension is scratched. Clean the shuttle race. Incorrect bobbins will not work properly. Make sure to oil the machine once a week if you use it more than an hour a day. Attach the presser foot that are using is wrinkled. The ...page 13 - Possible cause You have not used bobbin that has been designed for example, in the shuttle race, clean the shuttle race. Insufficient oiling. Insert the needle properly. Adjust the tension of fabric. If you use a bobbin that has been designed for the type of stitch that ...

Users Manual - English and Spanish
Page 47
... 26 G gathering 37 H handwheel 5 J joining 38 M main parts 5 main power switch 8 monogramming 35 N needle 15 needle needle needle bcplalaarmtethpr.e.s.ac..dr.e..gw..u..i..d....e...66..,,...14. 716 O oiling 39 overcasting stitches 27 P pattern presser presser presser fffsoooeoooletttchlt.eio.ov.l.en.d.r.ed.r.i..a.....l...5656,,,, 22 19 20 13 pre-tension disk 10 R relative chart of...
... 26 G gathering 37 H handwheel 5 J joining 38 M main parts 5 main power switch 8 monogramming 35 N needle 15 needle needle needle bcplalaarmtethpr.e.s.ac..dr.e..gw..u..i..d....e...66..,,...14. 716 O oiling 39 overcasting stitches 27 P pattern presser presser presser fffsoooeoooletttchlt.eio.ov.l.en.d.r.ed.r.i..a.....l...5656,,,, 22 19 20 13 pre-tension disk 10 R relative chart of...


