
Users Manual - English
Page 1
Computerized Embroidery and Sewing Machine Operation Manual Product Code 885-V31/V33 GETTING READY SEWING BASICS UTILITY STITCHES EMBROIDERY APPENDIX
Computerized Embroidery and Sewing Machine Operation Manual Product Code 885-V31/V33 GETTING READY SEWING BASICS UTILITY STITCHES EMBROIDERY APPENDIX

Users Manual - English
Page 3
... openings of burns, fire, electric shock, or injury to make any user servicing adjustments mentioned in this embroidery and sewing machine. Lifting the sewing machine by its handle. Important Safety Instructions Please read the "Important Safety Instructions", and then study this machine if ... using, when cleaning, when making any adjustments mentioned in the machine falling, which could cause injuries. • When lifting the sewing machine, be careful not to persons. 2 Always unplug the machine from the electrical outlet when removing covers, lubricating, or when making...
... openings of burns, fire, electric shock, or injury to make any user servicing adjustments mentioned in this embroidery and sewing machine. Lifting the sewing machine by its handle. Important Safety Instructions Please read the "Important Safety Instructions", and then study this machine if ... using, when cleaning, when making any adjustments mentioned in the machine falling, which could cause injuries. • When lifting the sewing machine, be careful not to persons. 2 Always unplug the machine from the electrical outlet when removing covers, lubricating, or when making...
Users Manual - English
Page 4
...additional product information and updates, visit our web site at www.brother.com 2 Never allow children to play with the bag due to... sunlight and high humidity locations. Special care is required around the machine needle. • Switch the sewing machine to the symbol "O" position to turn it off when making any assemblies, the presser feet, ...described in injuries. 5 Special care is required, first follow careful instruction when freehand stitching so that this sewing machine on an unstable surface, such as a stove or iron; Use accessories recommended by authorized dealer....
...additional product information and updates, visit our web site at www.brother.com 2 Never allow children to play with the bag due to... sunlight and high humidity locations. Special care is required around the machine needle. • Switch the sewing machine to the symbol "O" position to turn it off when making any assemblies, the presser feet, ...described in injuries. 5 Special care is required, first follow careful instruction when freehand stitching so that this sewing machine on an unstable surface, such as a stove or iron; Use accessories recommended by authorized dealer....
Users Manual - English
Page 5
FOR USERS IN AUSTRALIA AND NEW ZEALAND This sewing machine is not suitable for the plug supplied with this equipment, you should contact your authorized dealer to BS 1362, i.e. carrying the mark, rating as ...
FOR USERS IN AUSTRALIA AND NEW ZEALAND This sewing machine is not suitable for the plug supplied with this equipment, you should contact your authorized dealer to BS 1362, i.e. carrying the mark, rating as ...
Users Manual - English
Page 6
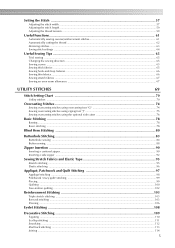
... Presser Foot 43 Presser foot precautions ...43 Replacing the presser foot ...43 Removing and attaching the presser foot holder 45 Sewing Cylindrical Pieces 46 Free-arm sewing ...46 SEWING BASICS 47 Sewing...48 General sewing procedure ...48 Selecting stitching ...49 Positioning the fabric ...50 Starting to sew...51 Securing the stitching ...53 Cutting the thread ...55 4
... Presser Foot 43 Presser foot precautions ...43 Replacing the presser foot ...43 Removing and attaching the presser foot holder 45 Sewing Cylindrical Pieces 46 Free-arm sewing ...46 SEWING BASICS 47 Sewing...48 General sewing procedure ...48 Selecting stitching ...49 Positioning the fabric ...50 Starting to sew...51 Securing the stitching ...53 Cutting the thread ...55 4
Users Manual - English
Page 7
......63 Saving stitch settings ...64 Useful Sewing Tips ...65 Trial sewing ...65 Changing the sewing direction ...65 Sewing curves ...65 Sewing thick fabrics ...65 Sewing hook-and-loop fastener ...66 Sewing thin fabrics...66 Sewing stretch fabrics ...67 Sewing an even seam allowance ...67 UTILITY ...Basic stitching ...78 Blind Hem Stitching ...80 Buttonhole Stitching ...83 Buttonhole sewing ...84 Button sewing ...88 Zipper Insertion ...90 Inserting a centered zipper ...90 Inserting a side zipper ...92 Sewing Stretch Fabrics and Elastic Tape 95 Stretch stitching ...95 Elastic attaching ...96...
......63 Saving stitch settings ...64 Useful Sewing Tips ...65 Trial sewing ...65 Changing the sewing direction ...65 Sewing curves ...65 Sewing thick fabrics ...65 Sewing hook-and-loop fastener ...66 Sewing thin fabrics...66 Sewing stretch fabrics ...67 Sewing an even seam allowance ...67 UTILITY ...Basic stitching ...78 Blind Hem Stitching ...80 Buttonhole Stitching ...83 Buttonhole sewing ...84 Button sewing ...88 Zipper Insertion ...90 Inserting a centered zipper ...90 Inserting a side zipper ...92 Sewing Stretch Fabrics and Elastic Tape 95 Stretch stitching ...95 Elastic attaching ...96...
Users Manual - English
Page 9
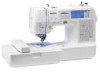
... 32). g Lighting Start/Stop button When the green light is on dark fabrics. i Embroidery You can be cut automatically after sewing (page 55, 62). h Easy-to-use needle threader You can start sewing without pulling up (page 12). c Built-in utility stitches available (page 70). b Fast bobbin winding system With the fast...
... 32). g Lighting Start/Stop button When the green light is on dark fabrics. i Embroidery You can be cut automatically after sewing (page 55, 62). h Easy-to-use needle threader You can start sewing without pulling up (page 12). c Built-in utility stitches available (page 70). b Fast bobbin winding system With the fast...

Users Manual - English
Page 12
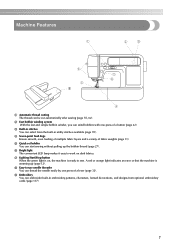
...machine. f Operation panel (page 13) Use the keys on the spool pin. j Flat bed attachment (page 46) Remove the flat bed attachment when sewing cylindrical pieces such as sleeve cuffs. l Needle threader lever (page 35) Use the needle threader lever to raise and lower the presser foot . h Presser...page 22) Use the bobbin winder when winding the bobbin. k Thread cutter (page 56) Pass the threads through the thread cutter to use the sewing machine, etc. i Operation buttons (page 12) Use these descriptions to learn the names of thread on this panel to select stitches or embroidery ...
...machine. f Operation panel (page 13) Use the keys on the spool pin. j Flat bed attachment (page 46) Remove the flat bed attachment when sewing cylindrical pieces such as sleeve cuffs. l Needle threader lever (page 35) Use the needle threader lever to raise and lower the presser foot . h Presser...page 22) Use the bobbin winder when winding the bobbin. k Thread cutter (page 56) Pass the threads through the thread cutter to use the sewing machine, etc. i Operation buttons (page 12) Use these descriptions to learn the names of thread on this panel to select stitches or embroidery ...

Users Manual - English
Page 13
...vent allows the air surrounding the motor to use your machine. 11 g Power supply jack (page 17) Insert the plug on the fabric as the sewing takes place. i Presser foot holder (page 45) The presser foot is being used. f Bobbin cover/bobbin case (page 28) Remove the bobbin ... the plug on and off. d Needle plate (page 67) The needle plate is marked with guides for the selected stitching. a Handle Carry the sewing machine by its handle when transporting the machine. c Needle bar thread guide (page 34) Pass the upper thread through 13 while you (counterclockwise) to...
...vent allows the air surrounding the motor to use your machine. 11 g Power supply jack (page 17) Insert the plug on the fabric as the sewing takes place. i Presser foot holder (page 45) The presser foot is being used. f Bobbin cover/bobbin case (page 28) Remove the bobbin ... the plug on and off. d Needle plate (page 67) The needle plate is marked with guides for the selected stitching. a Handle Carry the sewing machine by its handle when transporting the machine. c Needle bar thread guide (page 34) Pass the upper thread through 13 while you (counterclockwise) to...
Users Manual - English
Page 14
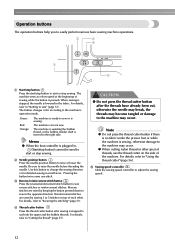
... needle is lowered in the opposite direction. For details, refer to "Starting to raise the needle before threading the needle. Be sure to sew" (page 51). Reverse stitches are sewn by keeping the button pressed down to 5 stitches on the side of each other. Reinforcement stitches are...The button changes color according to "Securing the stitching" (page 53). The machine is winding the bobbin thread, or the bobbin winder shaft is sewing. z When cutting nylon thread or other special threads, use the thread cutter on top of the machine. Green: Red: Orange: The machine is...
... needle is lowered in the opposite direction. For details, refer to "Starting to raise the needle before threading the needle. Be sure to sew" (page 51). Reverse stitches are sewn by keeping the button pressed down to 5 stitches on the side of each other. Reinforcement stitches are...The button changes color according to "Securing the stitching" (page 53). The machine is winding the bobbin thread, or the bobbin winder shaft is sewing. z When cutting nylon thread or other special threads, use the thread cutter on top of the machine. Green: Red: Orange: The machine is...

Users Manual - English
Page 15
... details, refer to enter alphabet character embroidery or embroidery patterns you have edited or adjusted, etc. f Utility stitch key Press this key to sew embroidery. g Embroidery key Press this key to perform operations. Operation panel The front operation panel has an LCD (liquid crystal display) and operation... panel) Setting for the selected stitch or pattern and error messages appear in the LCD. Touch the keys displayed on using the sewing machine. i Sewing machine help key Press to get help on the LCD with your finger or the touch pen to select a utility stitch. Displays...
... details, refer to enter alphabet character embroidery or embroidery patterns you have edited or adjusted, etc. f Utility stitch key Press this key to sew embroidery. g Embroidery key Press this key to perform operations. Operation panel The front operation panel has an LCD (liquid crystal display) and operation... panel) Setting for the selected stitch or pattern and error messages appear in the LCD. Touch the keys displayed on using the sewing machine. i Sewing machine help key Press to get help on the LCD with your finger or the touch pen to select a utility stitch. Displays...

Users Manual - English
Page 17
Turning the Machine On/Off 16 LCD (Liquid Crystal Display) Operation 18 Winding/Installing the Bobbin 22 Upper Threading ...31 Replacing the Needle 39 Replacing the Presser Foot 43 Sewing Cylindrical Pieces 46 1 GETTING READY The various preparations required before starting to sew are described in this chapter.
Turning the Machine On/Off 16 LCD (Liquid Crystal Display) Operation 18 Winding/Installing the Bobbin 22 Upper Threading ...31 Replacing the Needle 39 Replacing the Presser Foot 43 Sewing Cylindrical Pieces 46 1 GETTING READY The various preparations required before starting to sew are described in this chapter.
Users Manual - English
Page 18
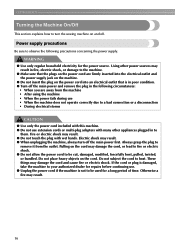
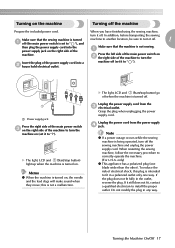
... to them. Pulling on and off. Power supply precautions Be sure to heat. Electric shock may result. ● When unplugging the machine, always turn the sewing machine on the cord may damage the cord, or lead to fire or electric shock. ● Do not allow the power cord to be used...
... to them. Pulling on and off. Power supply precautions Be sure to heat. Electric shock may result. ● When unplugging the machine, always turn the sewing machine on the cord may damage the cord, or lead to fire or electric shock. ● Do not allow the power cord to be used...
Users Manual - English
Page 19
... the power supply cord into a b house hold electrical outlet. Grasp the plug when unplugging the power supply cord. Note z If a power outage occurs while the sewing machine is turned on, the needle and the feed dogs will make sound when they move; If the plug does not fit fully in any... way. machine off (the main power switch is set to "|"). this plug is turned off . If it off . In addition, before transporting the sewing Make sure that the sewing machine is turned machine to another location, be sure to fit in a polarized outlet only one blade wider than the other). X The light...
... the power supply cord into a b house hold electrical outlet. Grasp the plug when unplugging the power supply cord. Note z If a power outage occurs while the sewing machine is turned on, the needle and the feed dogs will make sound when they move; If the plug does not fit fully in any... way. machine off (the main power switch is set to "|"). this plug is turned off . If it off . In addition, before transporting the sewing Make sure that the sewing machine is turned machine to another location, be sure to fit in a polarized outlet only one blade wider than the other). X The light...

Users Manual - English
Page 20
... screen is displayed. 1 l k 2 0 9 3 8 4 7 5 6 a Selected stitch b Presser foot to be used c Stitches d Stitch settings and twin needle sewing e Stitch width f Stitch length g Number of the selected stitch h Number of stitches contained i Horizontal mirror image j Automatic thread cutting k Automatic reverse/reinforcement l Single/twin needle... displayed when the embroidery unit is attached. Change the screen on the LCD using the keys on the right side of the sewing machine. For details, refer to "Error messages" (page 159) for messages displayed on the front of the LCD, and ...
... screen is displayed. 1 l k 2 0 9 3 8 4 7 5 6 a Selected stitch b Presser foot to be used c Stitches d Stitch settings and twin needle sewing e Stitch width f Stitch length g Number of the selected stitch h Number of stitches contained i Horizontal mirror image j Automatic thread cutting k Automatic reverse/reinforcement l Single/twin needle... displayed when the embroidery unit is attached. Change the screen on the LCD using the keys on the right side of the sewing machine. For details, refer to "Error messages" (page 159) for messages displayed on the front of the LCD, and ...
Users Manual - English
Page 21
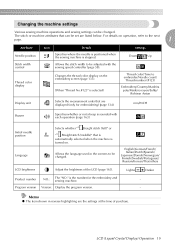
... "Thread No.#123" is turned on. Program version Version: Display the program version. - Changing the machine settings Various sewing machine operations and sewing settings can be changed . The stitch or machine attributes that is automatically selected when the machine is selected) Embroidery/Country.../Madeira poly/Madeira rayon/Sulky/ Robison Anton Display unit Selects the measurement units that are displayed (only for the embroidery and sewing machine. - For details on the embroidery screen (page 133). mm/INCH Buzzer Specifies whether or not a beep is stopped...
... "Thread No.#123" is turned on. Program version Version: Display the program version. - Changing the machine settings Various sewing machine operations and sewing settings can be changed . The stitch or machine attributes that is automatically selected when the machine is selected) Embroidery/Country.../Madeira poly/Madeira rayon/Sulky/ Robison Anton Display unit Selects the measurement units that are displayed (only for the embroidery and sewing machine. - For details on the embroidery screen (page 133). mm/INCH Buzzer Specifies whether or not a beep is stopped...

Users Manual - English
Page 22
...is the initial setting. Press b panel. (Settings key) on . When settings are saved even if the power is the individual number for the sewing machine. z Settings that are changed are complete, press d (Back key). X The initial stitch screen appears again. X The LCD comes on ... Changing the needle stop position X The setting screen appears. a The highlighted display is installed in the sewing machine. Memo z "NO" is turned off. 20 GETTING READY Turn on the sewing machine. c Switch the screen using (Previous page key) and (Next page key). • The following...
...is the initial setting. Press b panel. (Settings key) on . When settings are saved even if the power is the individual number for the sewing machine. z Settings that are changed are complete, press d (Back key). X The initial stitch screen appears again. X The LCD comes on ... Changing the needle stop position X The setting screen appears. a The highlighted display is installed in the sewing machine. Memo z "NO" is turned off. 20 GETTING READY Turn on the sewing machine. c Switch the screen using (Previous page key) and (Next page key). • The following...

Users Manual - English
Page 23
.... bobbin winding / setting bobbin thread / needle replacement / embroidery unit attachment / Example: Upper threading embroidery frame attachment / embroidery foot attachment / presser foot replacement on the sewing machine. X The sewing machine help key) on b the display panel. Turn on the LCD. Memo z For details on each topic, refer to the previous page. LCD (Liquid...
.... bobbin winding / setting bobbin thread / needle replacement / embroidery unit attachment / Example: Upper threading embroidery frame attachment / embroidery foot attachment / presser foot replacement on the sewing machine. X The sewing machine help key) on b the display panel. Turn on the LCD. Memo z For details on each topic, refer to the previous page. LCD (Liquid...
Users Manual - English
Page 24
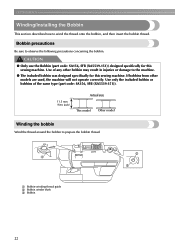
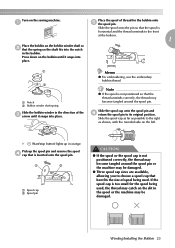
...or damage to prepare the bobbin thread. CAUTION ● Only use the Bobbin (part code: SA156, SFB (XA5539-151)) designed specifically for this sewing machine. Use of the same type (part code: SA156, SFB (XA5539-151)). 11.5 mm (7/16 inch) Actual size This model Other model ...Winding the bobbin Wind the thread around the bobbin to the machine. ● The included bobbin was designed specifically for this sewing machine. b a c a Bobbin-winding thread guide b Bobbin winder shaft c Bobbin 22 Bobbin precautions Be sure to wind the thread onto the bobbin...
...or damage to prepare the bobbin thread. CAUTION ● Only use the Bobbin (part code: SA156, SFB (XA5539-151)) designed specifically for this sewing machine. Use of the same type (part code: SA156, SFB (XA5539-151)). 11.5 mm (7/16 inch) Actual size This model Other model ...Winding the bobbin Wind the thread around the bobbin to the machine. ● The included bobbin was designed specifically for this sewing machine. b a c a Bobbin-winding thread guide b Bobbin winder shaft c Bobbin 22 Bobbin precautions Be sure to wind the thread onto the bobbin...
Users Manual - English
Page 25
... place. Slide the spool cap as far as possible to its original position. Memo z For embroidering, use the embroidery bobbin thread. Press down on the sewing machine. Turn on the bobbin until it snaps into place. Slide the spool onto the pin so that the spool is horizontal and the thread...
... place. Slide the spool cap as far as possible to its original position. Memo z For embroidering, use the embroidery bobbin thread. Press down on the sewing machine. Turn on the bobbin until it snaps into place. Slide the spool onto the pin so that the spool is horizontal and the thread...


