
Instruction Manual - English
Page 3
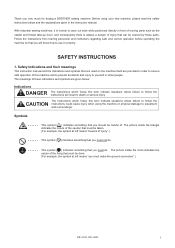
...you should be caused by these indications and symbols are provided in death or serious injury. With industrial sewing machines, it correctly. Safety indications and their meanings This instruction manual and the indications and symbols that can ... you must make the ground connection".) KE-430D, BE-438D i SAFETY INSTRUCTIONS 1. Follow the instructions from training personnel and instructors regarding safe and correct operation before operating the machine so that you must not do .... This symbol ( ) indicates something that you very much for buying a BROTHER sewing machine.
...you should be caused by these indications and symbols are provided in death or serious injury. With industrial sewing machines, it correctly. Safety indications and their meanings This instruction manual and the indications and symbols that can ... you must make the ground connection".) KE-430D, BE-438D i SAFETY INSTRUCTIONS 1. Follow the instructions from training personnel and instructors regarding safe and correct operation before operating the machine so that you must not do .... This symbol ( ) indicates something that you very much for buying a BROTHER sewing machine.

Instruction Manual - English
Page 4
... strong electrical noise may cause problems with correct operation. Furthermore, do not get into your eyes or onto your Brother dealer or a qualified electrician for the sewing machine's power consumption. Install the safety covers to connect the ground. Temperatures which are lower or higher than this could... line noise or static electric noise. All cords should occur in severe injury. Be sure to the machine. Furthermore, do not push the face plate side or the pulley side from the wall outlet before opening the face plate of children. ii KE-430D, BE-438D
... strong electrical noise may cause problems with correct operation. Furthermore, do not get into your eyes or onto your Brother dealer or a qualified electrician for the sewing machine's power consumption. Install the safety covers to connect the ground. Temperatures which are lower or higher than this could... line noise or static electric noise. All cords should occur in severe injury. Be sure to the machine. Furthermore, do not push the face plate side or the pulley side from the wall outlet before opening the face plate of children. ii KE-430D, BE-438D

Instruction Manual - English
Page 5
...Brother dealer or a qualified technician. Be sure to the machine. Maintenance and inspection Maintenance and inspection of the broken needle may enter your eyes and injury may operate if the foot switch is depressed by the warranty. Turn off the power switch. If any applications other than sewing. KE-430D,... BE-438D iii If goggles are noticed, immediately turn off the power switch and disconnect the power cord from the wall outlet at the following times, otherwise the machine may result. Do not touch any of the ...
...Brother dealer or a qualified technician. Be sure to the machine. Maintenance and inspection Maintenance and inspection of the broken needle may enter your eyes and injury may operate if the foot switch is depressed by the warranty. Turn off the power switch. If any applications other than sewing. KE-430D,... BE-438D iii If goggles are noticed, immediately turn off the power switch and disconnect the power cord from the wall outlet at the following times, otherwise the machine may result. Do not touch any of the ...
Instruction Manual - English
Page 6
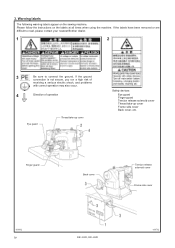
If the labels have been removed or are difficult to read, please contact your nearest Brother dealer. 1 2 3 Be sure to connect the ground. If the ground connection is not secure, you run a high risk of receiving a serious electric shock, and problems ... solenoid cover Thread take-up cover Frame side cover Back cover, etc. Finger guard Back cover Tension release solenoid cover Frame side cover 4399Q iv KE-430D, BE-438D 4467Q Please follow the instructions on the sewing machine. Warning labels The following warning labels appear on the labels at all times when using the...
If the labels have been removed or are difficult to read, please contact your nearest Brother dealer. 1 2 3 Be sure to connect the ground. If the ground connection is not secure, you run a high risk of receiving a serious electric shock, and problems ... solenoid cover Thread take-up cover Frame side cover Back cover, etc. Finger guard Back cover Tension release solenoid cover Frame side cover 4399Q iv KE-430D, BE-438D 4467Q Please follow the instructions on the sewing machine. Warning labels The following warning labels appear on the labels at all times when using the...
Instruction Manual - English
Page 10
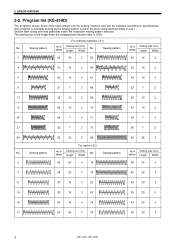
... plate in size.) Use the work clamp and feed plate that match the respective sewing pattern selected. Sewing pattern No. of Tacking size (mm) stitches Length Width No. Program list (KE-430D) The programs shown below have been preset into the sewing machine and can be selected according to specifications. (Any program is available as long...
... plate in size.) Use the work clamp and feed plate that match the respective sewing pattern selected. Sewing pattern No. of Tacking size (mm) stitches Length Width No. Program list (KE-430D) The programs shown below have been preset into the sewing machine and can be selected according to specifications. (Any program is available as long...
Instruction Manual - English
Page 15
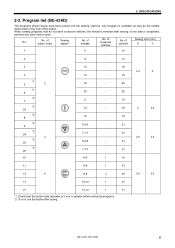
... programs. *2 Do not use the button lifter spring. Program list (BE-438D) The programs shown below have crossover stitches, the thread is trimmed after sewing of stitches Sewing size (mm) X Y 1 6 ― 12 2 8 ― 14 3 4 *1 5 2 *1 6 *2 7 *2 23 *2 8 *2 9 *2 24 3 *2 25 *2 26 10 10 12 16 20 6 10 ...Check that do not have been preset into the sewing machine. No. of button holes Sewing pattern No. When sewing programs that the button hole diameter is sewn. No. 2. of the button. SPECIFICATIONS 2-3. KE-430D, BE-438D 8 Any program is available as...
... programs. *2 Do not use the button lifter spring. Program list (BE-438D) The programs shown below have crossover stitches, the thread is trimmed after sewing of stitches Sewing size (mm) X Y 1 6 ― 12 2 8 ― 14 3 4 *1 5 2 *1 6 *2 7 *2 23 *2 8 *2 9 *2 24 3 *2 25 *2 26 10 10 12 16 20 6 10 ...Check that do not have been preset into the sewing machine. No. of button holes Sewing pattern No. When sewing programs that the button hole diameter is sewn. No. 2. of the button. SPECIFICATIONS 2-3. KE-430D, BE-438D 8 Any program is available as...
Instruction Manual - English
Page 18
Contact your Brother dealer or a qualified electrician for any moving parts. The installation should only be carried out by a qualified technician. Install the safety covers to connect the .... Do not connect the power cord until installation is complete, otherwise the machine may operate if the foot switch is depressed by two or more people. Hold the machine head with correct operation may result in incorrect sewing machine operation. 3625M 11 KE-430D, BE-438D If the ground connection is the danger that may result...
Contact your Brother dealer or a qualified electrician for any moving parts. The installation should only be carried out by a qualified technician. Install the safety covers to connect the .... Do not connect the power cord until installation is complete, otherwise the machine may operate if the foot switch is depressed by two or more people. Hold the machine head with correct operation may result in incorrect sewing machine operation. 3625M 11 KE-430D, BE-438D If the ground connection is the danger that may result...
Instruction Manual - English
Page 22
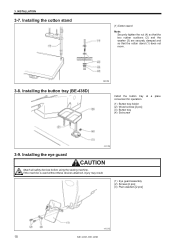
... the washer (3) are securely clamped and so that the cotton stand (1) does not move. 3-8. If the machine is used without these devices attached, injury may result. (1) Eye guard assembly (2) Screws [2 pcs] (3) Plain washers [2 pcs] 4411Q 15 KE-430D, BE-438D Installing the eye guard CAUTION Attach all safety devices before using the sewing machine. INSTALLATION 3-7. 3.
... the washer (3) are securely clamped and so that the cotton stand (1) does not move. 3-8. If the machine is used without these devices attached, injury may result. (1) Eye guard assembly (2) Screws [2 pcs] (3) Plain washers [2 pcs] 4411Q 15 KE-430D, BE-438D Installing the eye guard CAUTION Attach all safety devices before using the sewing machine. INSTALLATION 3-7. 3.
Instruction Manual - English
Page 27
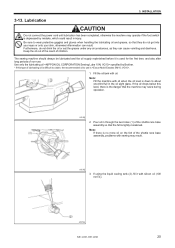
...by mistake, which could result in injury. Pour oil in the oil sight glass. The sewing machine should always be lubricated and the oil supply replenished before it with oil when the oil level is depressed by Brother. * If this level, there is used for the first time, and also after ...down to wear protective goggles and gloves when handling the lubricating oil and grease, so that they can result. Note: Fill the machine with silicon oil (100 mm2/s). 4537Q KE-430D, BE-438D 20 If using the liquid cooling tank (2), fill it is the danger that the felt is . 1. Be sure...
...by mistake, which could result in injury. Pour oil in the oil sight glass. The sewing machine should always be lubricated and the oil supply replenished before it with oil when the oil level is depressed by Brother. * If this level, there is used for the first time, and also after ...down to wear protective goggles and gloves when handling the lubricating oil and grease, so that they can result. Note: Fill the machine with silicon oil (100 mm2/s). 4537Q KE-430D, BE-438D 20 If using the liquid cooling tank (2), fill it is the danger that the felt is . 1. Be sure...

Instruction Manual - English
Page 28
Connecting the power cord Insert the power cord plug (1) into a properly-grounded AC power supply. * The inside of the sewing machine. Attach an appropriate plug to electronic components such as P.C. NOTE: ・ If the ground connection is not secure, electric shocks, operating errors or damage...They may occur. ・ Do not use extension cords. INSTALLATION 3-14. Insert the power plug into a wall outlet. 1. 3. Green/yellow wire (Ground wire) 4114M 21 KE-430D, BE-438D boards may cause problems with correct operation of the control box uses single-phase power.
Connecting the power cord Insert the power cord plug (1) into a properly-grounded AC power supply. * The inside of the sewing machine. Attach an appropriate plug to electronic components such as P.C. NOTE: ・ If the ground connection is not secure, electric shocks, operating errors or damage...They may occur. ・ Do not use extension cords. INSTALLATION 3-14. Insert the power plug into a wall outlet. 1. 3. Green/yellow wire (Ground wire) 4114M 21 KE-430D, BE-438D boards may cause problems with correct operation of the control box uses single-phase power.
Instruction Manual - English
Page 31
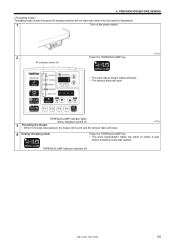
... indicator lights Menu indicators switch off Press the THREAD/CLAMP key. 4421Q • The work clamp/button clamp will open. PREPARATION BEFORE SEWING Threading mode is safe because the sewing machine will not start even when the foot switch is depressed. 1 Turn on the power switch. 2 All indicators switch off 3 Threading the thread... clamp /button clamp will lower. • The tension discs will return to where it was before threading mode was started. THREAD/CLAMP indicator switches off KE-430D, BE-438D 24 4.
... indicator lights Menu indicators switch off Press the THREAD/CLAMP key. 4421Q • The work clamp/button clamp will open. PREPARATION BEFORE SEWING Threading mode is safe because the sewing machine will not start even when the foot switch is depressed. 1 Turn on the power switch. 2 All indicators switch off 3 Threading the thread... clamp /button clamp will lower. • The tension discs will return to where it was before threading mode was started. THREAD/CLAMP indicator switches off KE-430D, BE-438D 24 4.

Instruction Manual - English
Page 42
5. Turn the pulley by one stitch when the needle bar is in the direction of sewing machine operation at this mode, the feed will move forward one stitch, and if you depress the foot switch to... • The feed mechanism will move forward by one stitch each time the mechanism moves by one stitch at a time. 4441Q [Sewing standby mode] 2nd step 4441Q If you would like to the 1st step. When you press the key, the feed will move backward...test feed once more, press the TEST key. TEST indicator lights 2 Select the program number to switch off 35 KE-430D, BE-438D 4441Q
5. Turn the pulley by one stitch when the needle bar is in the direction of sewing machine operation at this mode, the feed will move forward one stitch, and if you depress the foot switch to... • The feed mechanism will move forward by one stitch each time the mechanism moves by one stitch at a time. 4441Q [Sewing standby mode] 2nd step 4441Q If you would like to the 1st step. When you press the key, the feed will move backward...test feed once more, press the TEST key. TEST indicator lights 2 Select the program number to switch off 35 KE-430D, BE-438D 4441Q
Instruction Manual - English
Page 43
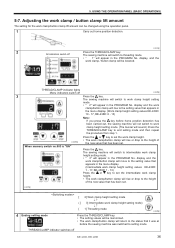
...that appears in the PROGRAM No. Press the key. THREAD/CLAMP indicator switches off KE-430D, BE-438D 36 The sewing machine will switch to work clamp/button clamp will appear in the menu display. (Work clamp height setting values KE-430D: 10 - 17, BE-438D: 6 - 13) Note: If you press ...the key before the sewing machine was at before home position detection has been carried out, the sewing machine will not switch to work clamp height setting mode. (The ...
...that appears in the PROGRAM No. Press the key. THREAD/CLAMP indicator switches off KE-430D, BE-438D 36 The sewing machine will switch to work clamp/button clamp will appear in the menu display. (Work clamp height setting values KE-430D: 10 - 17, BE-438D: 6 - 13) Note: If you press ...the key before the sewing machine was at before home position detection has been carried out, the sewing machine will not switch to work clamp height setting mode. (The ...
Instruction Manual - English
Page 45
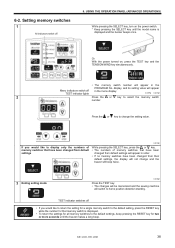
...not change and the buzzer will beep twice. 3 Ending setting mode 4452Q Press the TEST key. • The changes will be memorized and the sewing machine will appear in the Menu indicators switch off TEST indicator lights PROGRAM No. Setting memory switches 1 All indicators switch off • If you would like... the SELECT key, press the or key. • The numbers of memory switches that memory switch is displayed and the buzzer beeps once. KE-430D, BE-438D 38 Or With the power turned on the power switch. * Keep pressing the SELECT key until the buzzer makes a long beep. 6-2.
...not change and the buzzer will beep twice. 3 Ending setting mode 4452Q Press the TEST key. • The changes will be memorized and the sewing machine will appear in the Menu indicators switch off TEST indicator lights PROGRAM No. Setting memory switches 1 All indicators switch off • If you would like... the SELECT key, press the or key. • The numbers of memory switches that memory switch is displayed and the buzzer beeps once. KE-430D, BE-438D 38 Or With the power turned on the power switch. * Keep pressing the SELECT key until the buzzer makes a long beep. 6-2.
Instruction Manual - English
Page 47
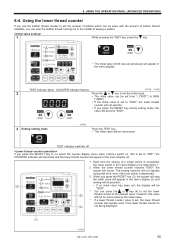
...setting mode 4456Q Press the TEST key. • The initial value will be possible. • If no . 300 is not being displayed. 4463Q KE-430D, BE-438D 40 However, this time, even if the foot switch is reduced by 1. 2. 6. When the lower thread counter reaches "0000", ...counter will appear in the menu display (2) is depressed. 3. Each time the sewing of articles which was set , the lower thread counter will sound. USING THE OPERATION PANEL (ADVANCED OPERATIONS) 6-4. The sewing machine will appear in the menu display (2). 1. TEST indicator switches off If you ...
...setting mode 4456Q Press the TEST key. • The initial value will be possible. • If no . 300 is not being displayed. 4463Q KE-430D, BE-438D 40 However, this time, even if the foot switch is reduced by 1. 2. 6. When the lower thread counter reaches "0000", ...counter will appear in the menu display (2) is depressed. 3. Each time the sewing of articles which was set , the lower thread counter will sound. USING THE OPERATION PANEL (ADVANCED OPERATIONS) 6-4. The sewing machine will appear in the menu display (2). 1. TEST indicator switches off If you ...
Instruction Manual - English
Page 50
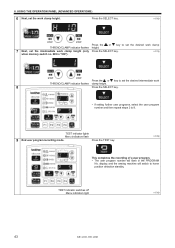
Press the SELECT key. 4476Q Press the or key to 8. display, and the sewing machine will flash in the PROGRAM No. Press the TEST key. 4478Q This completes the recording of a user program. • The user program number will switch ... program recording mode. USING THE OPERATION PANEL (ADVANCED OPERATIONS) 6 Next, set the intermediate work clamp height. TEST indicator switches off Menu indicators light 4479Q 43 KE-430D, BE-438D 6. when memory switch no. 003 is "ON"). 4477Q Press the or key to set the desired intermediate work THREAD/CLAMP indicator flashes clamp...
Press the SELECT key. 4476Q Press the or key to 8. display, and the sewing machine will flash in the PROGRAM No. Press the TEST key. 4478Q This completes the recording of a user program. • The user program number will switch ... program recording mode. USING THE OPERATION PANEL (ADVANCED OPERATIONS) 6 Next, set the intermediate work clamp height. TEST indicator switches off Menu indicators light 4479Q 43 KE-430D, BE-438D 6. when memory switch no. 003 is "ON"). 4477Q Press the or key to set the desired intermediate work THREAD/CLAMP indicator flashes clamp...
Instruction Manual - English
Page 53
...you change the cycle program number. • The cycle program number can check the details (such as X-scale, Y-scale and sewing speed) of cycle programs. • The cycle program number will be sewn step by pressing function keys F1 to F4 (2). ...End cycle program recording mode. Direct selection".) 2. KE-430D, BE-438D 46 This completes the recording of the user program for the displayed step. display, and the sewing machine will appear in the PROGRAM No. "C-0" will switch to "5-5./5-6 Checking the sewing pattern".) 3. USING THE OPERATION PANEL (ADVANCED OPERATIONS...
...you change the cycle program number. • The cycle program number can check the details (such as X-scale, Y-scale and sewing speed) of cycle programs. • The cycle program number will be sewn step by pressing function keys F1 to F4 (2). ...End cycle program recording mode. Direct selection".) 2. KE-430D, BE-438D 46 This completes the recording of the user program for the displayed step. display, and the sewing machine will appear in the PROGRAM No. "C-0" will switch to "5-5./5-6 Checking the sewing pattern".) 3. USING THE OPERATION PANEL (ADVANCED OPERATIONS...
Instruction Manual - English
Page 55
... CF card is facing the correct way. • The cover should be used. 1 With the power turned off, insert the CF card into the sewing machine's internal memory. 4498Q • The program No. CF media indicator lights 4421Q 4457Q 3 Press the R/W key. 4 End reading. USING THE OPERATION PANEL (...U1 to U4 and C-1 to the selected program number. U5 to U10 and C-5 to C-9 can use the function keys to F4. KE-430D, BE-438D 48 Cards that have been formatted using function keys F1 to directly select user program numbers and cycle program numbers. 6. Press ...
... CF card is facing the correct way. • The cover should be used. 1 With the power turned off, insert the CF card into the sewing machine's internal memory. 4498Q • The program No. CF media indicator lights 4421Q 4457Q 3 Press the R/W key. 4 End reading. USING THE OPERATION PANEL (...U1 to U4 and C-1 to the selected program number. U5 to U10 and C-5 to C-9 can use the function keys to F4. KE-430D, BE-438D 48 Cards that have been formatted using function keys F1 to directly select user program numbers and cycle program numbers. 6. Press ...

Instruction Manual - English
Page 56
...Refer to the 1st step. Set the material under the work clamp (2) / button clamp (3) will rise. 4116M KE-430D, BE-438D Depress the foot switch to "4-7. SEWING 7. The sewing machine will start . 7. The feed mechanism will move to the 2nd step, the material will be lowered. 6. Once... sewing is completed and the thread has been trimmed, the work clamp (2)/button clamp (3) will start sewing. * If memory switch no...
...Refer to the 1st step. Set the material under the work clamp (2) / button clamp (3) will rise. 4116M KE-430D, BE-438D Depress the foot switch to "4-7. SEWING 7. The sewing machine will start . 7. The feed mechanism will move to the 2nd step, the material will be lowered. 6. Once... sewing is completed and the thread has been trimmed, the work clamp (2)/button clamp (3) will start sewing. * If memory switch no...

Instruction Manual - English
Page 59
... notification appears without applying grease (or without applying grease, problems with the sewing machine may result. display (1) and the menu display (2) respectively, and a buzzer sounds when the power switch is turned on the PROGRAM No. KE-430D, BE-438D 52 display (1) and the menu display (2) will not operate... at this happens, apply grease and carry out the reset procedure. * If you use the sewing machine after carrying out the reset procedure but without carrying...
... notification appears without applying grease (or without applying grease, problems with the sewing machine may result. display (1) and the menu display (2) respectively, and a buzzer sounds when the power switch is turned on the PROGRAM No. KE-430D, BE-438D 52 display (1) and the menu display (2) will not operate... at this happens, apply grease and carry out the reset procedure. * If you use the sewing machine after carrying out the reset procedure but without carrying...


