
Users Manual - English
Page 18
...and FAX-5750e Only) ........ 12-1 Installing the Optional Memory Board 12-1 Paper Cassette #2 (Option for FAX-4100 and FAX-4750e).... 12-4 Network (LAN) Board (Option for FAX-4750e 12-4 13 Troubleshooting and Routine Maintenance...Paper Cassette 13-5 Paper is Jammed near the Drum Unit 13-5 Paper is Jammed in the Fuser Unit 13-5 If You Are Having Difficulty with Your Machine 13-6 Packing and Shipping the ...Canada Compliance Statement (For Canada Only 14-4 Warranty 14-4 International ENERGY STAR® Compliance Statement.... 14-4 Important Safety Instructions 14-4 Trademarks 14-6 xvi
...and FAX-5750e Only) ........ 12-1 Installing the Optional Memory Board 12-1 Paper Cassette #2 (Option for FAX-4100 and FAX-4750e).... 12-4 Network (LAN) Board (Option for FAX-4750e 12-4 13 Troubleshooting and Routine Maintenance...Paper Cassette 13-5 Paper is Jammed near the Drum Unit 13-5 Paper is Jammed in the Fuser Unit 13-5 If You Are Having Difficulty with Your Machine 13-6 Packing and Shipping the ...Canada Compliance Statement (For Canada Only 14-4 Warranty 14-4 International ENERGY STAR® Compliance Statement.... 14-4 Important Safety Instructions 14-4 Trademarks 14-6 xvi
Users Manual - English
Page 111
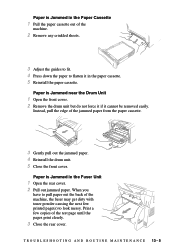
Paper is Jammed near the Drum Unit 1 Open the front cover. 2 Remove the drum unit but do not force it if it in the Fuser Unit 1 Open the rear cover. 2 Pull out jammed paper. Paper is Jammed in the paper cassette. 5 Reinstall the paper cassette. When you have to pull ...paper out the back of the machine, the fuser may get dirty with toner powder causing the next few copies of the test page until the pages print clearly. 3 Close the rear cover. Print...
Paper is Jammed near the Drum Unit 1 Open the front cover. 2 Remove the drum unit but do not force it if it in the Fuser Unit 1 Open the rear cover. 2 Pull out jammed paper. Paper is Jammed in the paper cassette. 5 Reinstall the paper cassette. When you have to pull ...paper out the back of the machine, the fuser may get dirty with toner powder causing the next few copies of the test page until the pages print clearly. 3 Close the rear cover. Print...


