
Users Manual - English
Page 13
...Recommended paper 1-8 Choosing acceptable paper 1-8 Paper capacity of the paper trays 1-9 How to load paper 1-10 To load paper or other media in the paper tray 1-10 To load paper or other media in the manual feed ... Pulse dialing mode (For Canada only 2-1 Setting the Station ID 2-2 General Setup ...2-3 Setting the Mode Timer (FAX-2820, FAX-2910 and FAX-2920 only 2-3 Setting the Mode Timer (MFC-7220 and MFC-7225N only 2-3 Setting the...Amplify 2-6 Setting Volume Amplify 2-7 Turning on Automatic Daylight Savings Time 2-7 Toner Save ...2-7 Sleep Time ...2-8 Setting the LCD Contrast 2-8 xi
...Recommended paper 1-8 Choosing acceptable paper 1-8 Paper capacity of the paper trays 1-9 How to load paper 1-10 To load paper or other media in the paper tray 1-10 To load paper or other media in the manual feed ... Pulse dialing mode (For Canada only 2-1 Setting the Station ID 2-2 General Setup ...2-3 Setting the Mode Timer (FAX-2820, FAX-2910 and FAX-2920 only 2-3 Setting the Mode Timer (MFC-7220 and MFC-7225N only 2-3 Setting the...Amplify 2-6 Setting Volume Amplify 2-7 Turning on Automatic Daylight Savings Time 2-7 Toner Save ...2-7 Sleep Time ...2-8 Setting the LCD Contrast 2-8 xi
Users Manual - English
Page 91
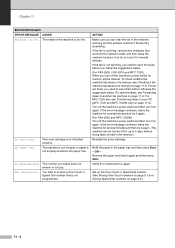
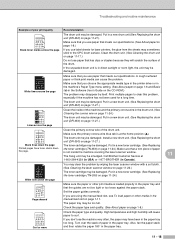
... there are faxes you need to save the faxes before you follow the suggestions below (To save them before following the suggestions below . (For FAX-2820, FAX-2910 and MFC-7220) When you can be cleared. If the error message continues leave the machine for up the One-Touch or Speed... for several minutes and try again. ACTION Make sure you turn it for several minutes. No cartridge No Paper Fed The toner cartridge is busy. Refill the paper in the paper tray and then press Start. -OR- If the fan is not spinning, you dialed does not answer or is not installed...
... there are faxes you need to save the faxes before you follow the suggestions below (To save them before following the suggestions below . (For FAX-2820, FAX-2910 and MFC-7220) When you can be cleared. If the error message continues leave the machine for up the One-Touch or Speed... for several minutes and try again. ACTION Make sure you turn it for several minutes. No cartridge No Paper Fed The toner cartridge is busy. Refill the paper in the paper tray and then press Start. -OR- If the fan is not spinning, you dialed does not answer or is not installed...
Users Manual - English
Page 92
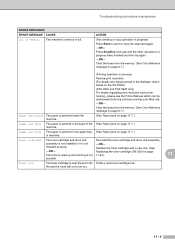
... Paper jams on page 11-7.) Paper Jam Rear The paper is jammed in the back of the (See Paper jams on the CD-ROM.) (FAX-2820 and FAX-2920 only) For details regarding print resolution and printer memory, please see the Printer Manual which can be downloaded from the memory. (See... is not 11-24.) 11 possible. Clear the faxes from the solutions.brother.com Web site. -OR- installed properly. Replacing the toner cartridge (TN-350) on page 11-7.) of its Order a new toner cartridge now. Paper Jam Tray The paper is jammed in the Software User's Guide on page 11-7.) machine. Press Stop/Exit...
... Paper jams on page 11-7.) Paper Jam Rear The paper is jammed in the back of the (See Paper jams on the CD-ROM.) (FAX-2820 and FAX-2920 only) For details regarding print resolution and printer memory, please see the Printer Manual which can be downloaded from the memory. (See... is not 11-24.) 11 possible. Clear the faxes from the solutions.brother.com Web site. -OR- installed properly. Replacing the toner cartridge (TN-350) on page 11-7.) of its Order a new toner cartridge now. Paper Jam Tray The paper is jammed in the Software User's Guide on page 11-7.) machine. Press Stop/Exit...
Users Manual - English
Page 96
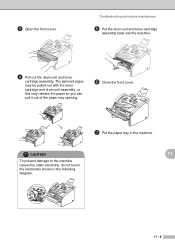
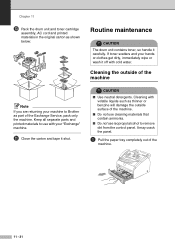
Troubleshooting and routine maintenance 5 Put the drum unit and toner cartridge assembly back into the machine. 4 Pull out the drum unit and toner cartridge assembly. CAUTION 11 To prevent damage to the machine caused by static electricity, do not touch the electrodes shown in the machine. 3 Open the front cover. The jammed paper may be pulled out with the toner cartridge and drum unit assembly, or this may release the paper so you can pull it out of the paper tray opening. 6 Close the front cover. 7 Put the paper tray in the following diagram. 11 - 8
Troubleshooting and routine maintenance 5 Put the drum unit and toner cartridge assembly back into the machine. 4 Pull out the drum unit and toner cartridge assembly. CAUTION 11 To prevent damage to the machine caused by static electricity, do not touch the electrodes shown in the machine. 3 Open the front cover. The jammed paper may be pulled out with the toner cartridge and drum unit assembly, or this may release the paper so you can pull it out of the paper tray opening. 6 Close the front cover. 7 Put the paper tray in the following diagram. 11 - 8
Users Manual - English
Page 106
...laser scanner window on page 1-8.) Check the paper type and quality. Make sure that meets our specifications. The drum unit may be damaged. Call Brother Customer Service at the home position (▲). High temperatures and high humidity will scratch the surface of the drum. A rough surfaced paper or ...Also, fan the paper stack and then rotate the paper 180° in the paper tray. Put in direct sunlight or room light, the unit may be damaged. Put in a new toner cartridge. (See Replacing the toner cartridge (TN-350) on page 11-24.) Make sure the paper or other media ...
...laser scanner window on page 1-8.) Check the paper type and quality. Make sure that meets our specifications. The drum unit may be damaged. Call Brother Customer Service at the home position (▲). High temperatures and high humidity will scratch the surface of the drum. A rough surfaced paper or ...Also, fan the paper stack and then rotate the paper 180° in the paper tray. Put in direct sunlight or room light, the unit may be damaged. Put in a new toner cartridge. (See Replacing the toner cartridge (TN-350) on page 11-24.) Make sure the paper or other media ...
Users Manual - English
Page 109
... your "Exchange" machine. Keep all separate parts and printed materials to use isopropyl alcohol to Brother as part of the machine. 11 - 21 It may crack the panel. 1 Pull the paper tray completely out of the Exchange Service, pack only the machine. Cleaning the outside surface of the... cold water. Chapter 11 0 Pack the drum unit and toner cartridge assembly, AC cord and printed materials in the original carton as shown below: Routine maintenance CAUTION The drum unit contains toner, so handle it shut. If toner scatters and your hands or clothes get dirty, immediately wipe...
... your "Exchange" machine. Keep all separate parts and printed materials to use isopropyl alcohol to Brother as part of the machine. 11 - 21 It may crack the panel. 1 Pull the paper tray completely out of the Exchange Service, pack only the machine. Cleaning the outside surface of the... cold water. Chapter 11 0 Pack the drum unit and toner cartridge assembly, AC cord and printed materials in the original carton as shown below: Routine maintenance CAUTION The drum unit contains toner, so handle it shut. If toner scatters and your hands or clothes get dirty, immediately wipe...
Quick Setup Guide - English
Page 2
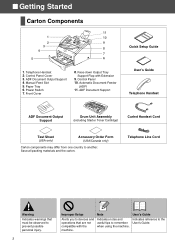
...11. Manual Feed Slot 5. ■ Getting Started Carton Components 11 1 10 2 9 3 4 8 7 5 6 1. Face-down Output Tray Support Flap with the machine. Telephone Handset 2. Telephone Line Cord Warning Indicates warnings that are not compatible with Extension 9. ADF Document Support Quick Setup ...Guide User's Guide Telephone Handset ADF Document Output Support Drum Unit Assembly (including Starter Toner Cartridge) Curled Handset Cord Test Sheet (USA only) Accessory Order Form (USA/Canada only) Carton components may differ...
...11. Manual Feed Slot 5. ■ Getting Started Carton Components 11 1 10 2 9 3 4 8 7 5 6 1. Face-down Output Tray Support Flap with the machine. Telephone Handset 2. Telephone Line Cord Warning Indicates warnings that are not compatible with Extension 9. ADF Document Support Quick Setup ...Guide User's Guide Telephone Handset ADF Document Output Support Drum Unit Assembly (including Starter Toner Cartridge) Curled Handset Cord Test Sheet (USA only) Accessory Order Form (USA/Canada only) Carton components may differ...


