
Users Manual - English
Page 6
... referred to in this warranty as Paper Feeding Kit, Fuser and Laser Units. What to do if you purchased a product from the original purchase date or the rated life of consumable, whichever comes first. You are also responsible for Printers, or to a Brother Authorized Service Center within the United States (and does...
... referred to in this warranty as Paper Feeding Kit, Fuser and Laser Units. What to do if you purchased a product from the original purchase date or the rated life of consumable, whichever comes first. You are also responsible for Printers, or to a Brother Authorized Service Center within the United States (and does...
Users Manual - English
Page 10
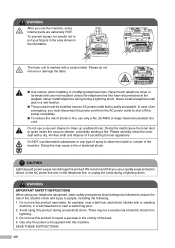
... shown in a wet basement or near an AC power outlet that you use the machine, some internal parts are not insulated unless the telephone line has been disconnected at the walljack. SAVE THESE INSTRUCTIONS viii The fuser unit is easily accessible. There may cause a fire or electrical shock. To prevent injures, be...
... shown in a wet basement or near an AC power outlet that you use the machine, some internal parts are not insulated unless the telephone line has been disconnected at the walljack. SAVE THESE INSTRUCTIONS viii The fuser unit is easily accessible. There may cause a fire or electrical shock. To prevent injures, be...
Users Manual - English
Page 39
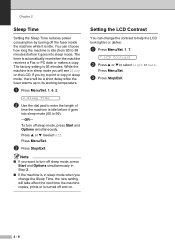
... ▼ toselect Off. Setting the LCD Contrast You can choose how long the machine is in sleep mode, there will be a short delay while the fuser warms up to its working temperature. 1 Press Menu/Set, 1, 6, 2. 2.Sleep Time 2 Use the dial pad to select Light or Dark. You can change the Sleep... machine copies, prints or is idle. The timer is 05 minutes. Chapter 2 Sleep Time Setting the Sleep Time reduces power consumption by turning off the fuser inside the machine while it goes into sleep mode (00 to turn off and on the LCD. While the machine is in sleep mode you...
... ▼ toselect Off. Setting the LCD Contrast You can choose how long the machine is in sleep mode, there will be a short delay while the fuser warms up to its working temperature. 1 Press Menu/Set, 1, 6, 2. 2.Sleep Time 2 Use the dial pad to select Light or Dark. You can change the Sleep... machine copies, prints or is idle. The timer is 05 minutes. Chapter 2 Sleep Time Setting the Sleep Time reduces power consumption by turning off the fuser inside the machine while it goes into sleep mode (00 to turn off and on the LCD. While the machine is in sleep mode you...
Users Manual - English
Page 90
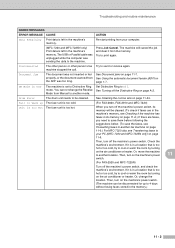
... MESSAGES ERROR MESSAGE CAUSE ACTION Data Remaining Print data is too hot. (For FAX-2820, FAX-2910 and MFC-7220) When you need to save them before following the ...and MFC-7225N) Turn off the machine's power switch. machine stopped the call. Unit is too Hot The fuser unit is left in the machine's memory. Then, turn on page 11-6.) For MFC-7220 also see Transferring... power switch, and check the machine's environment. Re-start printing from Manual to be disconnected for up The fuser unit is too hot or too cold, try to Off. See Using the automatic document feeder (ADF) on...
... MESSAGES ERROR MESSAGE CAUSE ACTION Data Remaining Print data is too hot. (For FAX-2820, FAX-2910 and MFC-7220) When you need to save them before following the ...and MFC-7225N) Turn off the machine's power switch. machine stopped the call. Unit is too Hot The fuser unit is left in the machine's memory. Then, turn on page 11-6.) For MFC-7220 also see Transferring... power switch, and check the machine's environment. Re-start printing from Manual to be disconnected for up The fuser unit is too hot or too cold, try to Off. See Using the automatic document feeder (ADF) on...
Users Manual - English
Page 97
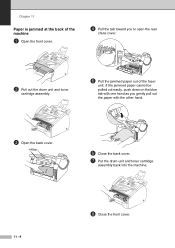
If the jammed paper cannot be pulled out easily, push down on the blue tab with one hand as you to open the rear chute cover. 2 Pull out the drum unit and toner cartridge assembly. 5 Pull the jammed paper out of the fuser unit. Chapter 11 Paper is jammed at the back of the machine 1 Open the front cover. 4 Pull the tab toward you gently pull out the paper with the other hand. 3 Open the back cover. 6 Close the back cover. 7 Put the drum unit and toner cartridge assembly back into the machine. 11 - 9 8 Close the front cover.
If the jammed paper cannot be pulled out easily, push down on the blue tab with one hand as you to open the rear chute cover. 2 Pull out the drum unit and toner cartridge assembly. 5 Pull the jammed paper out of the fuser unit. Chapter 11 Paper is jammed at the back of the machine 1 Open the front cover. 4 Pull the tab toward you gently pull out the paper with the other hand. 3 Open the back cover. 6 Close the back cover. 7 Put the drum unit and toner cartridge assembly back into the machine. 11 - 9 8 Close the front cover.


