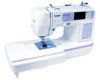
Operation Manual
Page 3
... the foot controller. • Do not use an extension cord. • Always unplug your work area clear: • Never operate the machine with any other part may injure your back or knees. 4 Always keep your machine if the power is cut. 3 Never operate this machine if it has a damaged cord or...
... the foot controller. • Do not use an extension cord. • Always unplug your work area clear: • Never operate the machine with any other part may injure your back or knees. 4 Always keep your machine if the power is cut. 3 Never operate this machine if it has a damaged cord or...
Operation Manual
Page 4
... not a toy: • Your close attention to the needle. Do not use bent or damaged needles. • Keep fingers away from all moving parts. Benzene, thinner, and scouring powders can damage the case and machine, and should never be used by or near a heat source, such as a...opening. • Do not operate where aerosol (spray) products are subject to clean the case. If the problem persists, please consult your local authorized Brother dealer. otherwise, the machine, power cord or garment being administered. • Do not use the machine near children. • The plastic bag ...
... not a toy: • Your close attention to the needle. Do not use bent or damaged needles. • Keep fingers away from all moving parts. Benzene, thinner, and scouring powders can damage the case and machine, and should never be used by or near a heat source, such as a...opening. • Do not operate where aerosol (spray) products are subject to clean the case. If the problem persists, please consult your local authorized Brother dealer. otherwise, the machine, power cord or garment being administered. • Do not use the machine near children. • The plastic bag ...
Operation Manual
Page 6
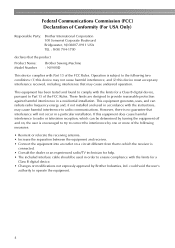
...in a residential installation. could void the user's authority to Part 15 of the FCC Rules. Federal Communications Commission (FCC) Declaration of Conformity (For USA Only) Responsible Party: Brother International Corporation 100 Somerset Corporate Boulevard Bridgewater, NJ 08807-0911 USA... TEL : (908) 704-1700 declares that the product Product Name: Model Number Brother Sewing Machine : NV900D This device complies with the...
...in a residential installation. could void the user's authority to Part 15 of the FCC Rules. Federal Communications Commission (FCC) Declaration of Conformity (For USA Only) Responsible Party: Brother International Corporation 100 Somerset Corporate Boulevard Bridgewater, NJ 08807-0911 USA... TEL : (908) 704-1700 declares that the product Product Name: Model Number Brother Sewing Machine : NV900D This device complies with the...

Operation Manual
Page 7
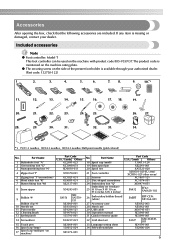
Contents Introduction ...1 Important Safety Instructions 1 Machine Features ...8 Accessories...9 Included accessories ...9 Optional accessories ...10 Names of Machine Parts and Their Functions 11 Front view...11 Needle and presser foot section ...12 Right-side/rear view ...12 Operation buttons ...13 Operation panel...14 GETTING ...
Contents Introduction ...1 Important Safety Instructions 1 Machine Features ...8 Accessories...9 Included accessories ...9 Optional accessories ...10 Names of Machine Parts and Their Functions 11 Front view...11 Needle and presser foot section ...12 Right-side/rear view ...12 Operation buttons ...13 Operation panel...14 GETTING ...
Operation Manual
Page 11
...Disc-shaped screwdriver 24 Embroidery foot "Q" Embroidery set (medium) 25 H 10 cm X W 10 cm (H 4 inches X W 4 inches) Part Code U.S.A. / Canada Others 130013-124 XE2241-001 XA5523-020 XD0501-021(EU area) XC8816-021(other areas) XC1807-121 XC1074-051 XD0474-051 ... needle 12 Cleaning brush 13 Eyelet punch 14 Screwdriver 15 Touch pen 16 Spool cap (large) 17 Spool cap (medium) (on the machine rating plate. Part Name 1 Buttonhole foot "A" 2 Overcasting foot "G" 3 Monogramming foot "N" 4 Zipper foot "I" 5 Zigzag foot "J" (on machine) 6 Blind stitch foot "R" 7 Button fitting foot ...
...Disc-shaped screwdriver 24 Embroidery foot "Q" Embroidery set (medium) 25 H 10 cm X W 10 cm (H 4 inches X W 4 inches) Part Code U.S.A. / Canada Others 130013-124 XE2241-001 XA5523-020 XD0501-021(EU area) XC8816-021(other areas) XC1807-121 XC1074-051 XD0474-051 ... needle 12 Cleaning brush 13 Eyelet punch 14 Screwdriver 15 Touch pen 16 Spool cap (large) 17 Spool cap (medium) (on the machine rating plate. Part Name 1 Buttonhole foot "A" 2 Overcasting foot "G" 3 Monogramming foot "N" 4 Zipper foot "I" 5 Zigzag foot "J" (on machine) 6 Blind stitch foot "R" 7 Button fitting foot ...
Operation Manual
Page 12
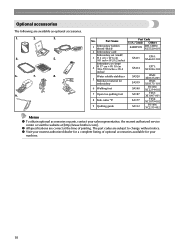
..., the nearest authorized service center or visit the website at the time of printing. z All specifications are correct at [http://www.brother.com/]. z Visit your nearest authorized dealer for a complete listing of optional accessories available for embroidery 6 Walking foot 7 Open toe ...quilting foot 8 Side cutter "S" 9 Quilting guide Part Code U.S.A. / Canada Others SAEBT999 EBT-CEBN: XC5520-001 SA431 EF61: XA6630-102 SA434 SA520 SA519 SA140 SA187 SA177 SA132 EF71: XC2026...
..., the nearest authorized service center or visit the website at the time of printing. z All specifications are correct at [http://www.brother.com/]. z Visit your nearest authorized dealer for a complete listing of optional accessories available for embroidery 6 Walking foot 7 Open toe ...quilting foot 8 Side cutter "S" 9 Quilting guide Part Code U.S.A. / Canada Others SAEBT999 EBT-CEBN: XC5520-001 SA431 EF61: XA6630-102 SA434 SA520 SA519 SA140 SA187 SA177 SA132 EF71: XC2026...

Operation Manual
Page 13
...to raise and lower the presser foot . k Thread cutter (page 60) Pass the threads through the thread cutter to learn the names of the machine parts. n Thread take-up lever (page 34) o Bobbin-winding thread guide and pretension disc (page 24) Pass the thread under this thread guide when ...c Spool pin (page 23, 32) Place a spool of the sewing machine and their functions are described below. Names of Machine Parts and Their Functions The names of the various parts of thread on this panel to select stitches or embroidery patterns, or check how to use the sewing machine, etc. e LCD...
...to raise and lower the presser foot . k Thread cutter (page 60) Pass the threads through the thread cutter to learn the names of the machine parts. n Thread take-up lever (page 34) o Bobbin-winding thread guide and pretension disc (page 24) Pass the thread under this thread guide when ...c Spool pin (page 23, 32) Place a spool of the sewing machine and their functions are described below. Names of Machine Parts and Their Functions The names of the various parts of thread on this panel to select stitches or embroidery patterns, or check how to use the sewing machine, etc. e LCD...

Operation Manual
Page 24
...Use only the included bobbin or bobbins of any other models are used, the machine will not operate correctly. Use of the same type (part code: SA156, SFB (XA5539-151)). 11.5 mm (7/16 inch) Actual size This model Other model Winding the bobbin Wind the thread around ...GETTING READY Winding/Installing the Bobbin This section describes how to observe the following precautions concerning the bobbin. CAUTION ● Only use the Bobbin (part code: SA156, SFB (XA5539-151)) designed specifically for this sewing machine. If bobbins from other bobbin may result in injuries or damage to ...
...Use only the included bobbin or bobbins of any other models are used, the machine will not operate correctly. Use of the same type (part code: SA156, SFB (XA5539-151)). 11.5 mm (7/16 inch) Actual size This model Other model Winding the bobbin Wind the thread around ...GETTING READY Winding/Installing the Bobbin This section describes how to observe the following precautions concerning the bobbin. CAUTION ● Only use the Bobbin (part code: SA156, SFB (XA5539-151)) designed specifically for this sewing machine. If bobbins from other bobbin may result in injuries or damage to ...

Operation Manual
Page 29
... thread. a CAUTION 1 ● Use a bobbin that surround the bobbin case. e Note z Make sure that the thread passes under the pretension disk of the same type (part code: SA156, SFB (XA5539-151)). Wind the bobbin again. Winding/Installing the Bobbin 27 If bobbins from the shaft. Use only the included bobbin or...
... thread. a CAUTION 1 ● Use a bobbin that surround the bobbin case. e Note z Make sure that the thread passes under the pretension disk of the same type (part code: SA156, SFB (XA5539-151)). Wind the bobbin again. Winding/Installing the Bobbin 27 If bobbins from the shaft. Use only the included bobbin or...
Operation Manual
Page 38
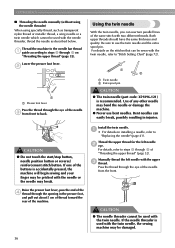
... With the twin needle, you can be sewn with the twin needle, refer to back. a b a Twin needle b Extra spool pin CAUTION ● The twin needle (part code: X59296-121) is accidentally pressed, the machine will begin sewing and your finger may be pricked with the needle or the needle may bend...
... With the twin needle, you can be sewn with the twin needle, refer to back. a b a Twin needle b Extra spool pin CAUTION ● The twin needle (part code: X59296-121) is accidentally pressed, the machine will begin sewing and your finger may be pricked with the needle or the needle may bend...

Operation Manual
Page 43
... a screwdriver to remove the needle. a Screwdriver b Needle clamp screw • Do not apply a strong force when loosening or tightening the needle clamp screw, otherwise certain parts of the operation buttons is accidentally pressed and the machine starts sewing. Place fabric or paper under the presser foot to raise the needle.
... a screwdriver to remove the needle. a Screwdriver b Needle clamp screw • Do not apply a strong force when loosening or tightening the needle clamp screw, otherwise certain parts of the operation buttons is accidentally pressed and the machine starts sewing. Place fabric or paper under the presser foot to raise the needle.

Operation Manual
Page 48
... any other way than how it easier to sew onto the b arm, and then sew from the top. Remove the flat bed attachment. Slide the part that you have finished free-arm sewing, c reconnect the flat bed attachment. Remove the flat bed attachment. a a a Flat bed attachment X With the flat bed attachment...
... any other way than how it easier to sew onto the b arm, and then sew from the top. Remove the flat bed attachment. Slide the part that you have finished free-arm sewing, c reconnect the flat bed attachment. Remove the flat bed attachment. a a a Flat bed attachment X With the flat bed attachment...

Operation Manual
Page 52
... break or bend. For details on the machine" (page 17). ↓ 3 Select the stitch. Start sewing. In addition, keep your hands away from all moving parts such as the needle and handwheel, otherwise injuries may break. For details on cutting the thread, refer to be sewn under the presser foot. CAUTION...
... break or bend. For details on the machine" (page 17). ↓ 3 Select the stitch. Start sewing. In addition, keep your hands away from all moving parts such as the needle and handwheel, otherwise injuries may break. For details on cutting the thread, refer to be sewn under the presser foot. CAUTION...

Operation Manual
Page 90
Otherwise, injuries may occur if (Start/stop button) is about 28 mm (1-1/8 inches) (diameter + thickness of the button). The names of parts of buttonhole foot "A", which is used for sewing buttonholes, are sewn from the front of the buttonhole. 1 2 5 6 3 4 A a Button guide plate b Presser foot scale c Pin d Reference ...
Otherwise, injuries may occur if (Start/stop button) is about 28 mm (1-1/8 inches) (diameter + thickness of the button). The names of parts of buttonhole foot "A", which is used for sewing buttonholes, are sewn from the front of the buttonhole. 1 2 5 6 3 4 A a Button guide plate b Presser foot scale c Pin d Reference ...

Operation Manual
Page 93
... width by sewing a trial buttonhole on replacing the presser foot, refer to remove any other way than how it . Hook the gimp thread onto the part of the stitching. ■ Changing the stitch width Adjust the stitch width. It fits into the grooves, and then loosely tie it is finished, gently...
... width by sewing a trial buttonhole on replacing the presser foot, refer to remove any other way than how it . Hook the gimp thread onto the part of the stitching. ■ Changing the stitch width Adjust the stitch width. It fits into the grooves, and then loosely tie it is finished, gently...

Operation Manual
Page 127
... 125 Press (Utility stitch key) on a piece of scrap fabric that is selected. X The sewing machine stops after sewing the pattern has finished. e If the part of fabric being sewn or the sewing speed. a If the pattern is not sewn correctly, follow the steps below to how the pattern is sewn...
... 125 Press (Utility stitch key) on a piece of scrap fabric that is selected. X The sewing machine stops after sewing the pattern has finished. e If the part of fabric being sewn or the sewing speed. a If the pattern is not sewn correctly, follow the steps below to how the pattern is sewn...

Operation Manual
Page 146
... fabric, it is larger than a the embroidery frame being used. Attach a stabilizer material for thin fabrics or stretch fabrics. To obtain optional accessories or parts, visit [http://www.brother.com/], or [http:// www.brothermall.com] (in the embroidery frame without using stabilizers with adhesive, place b the adhesive surface of the stabilizer material...
... fabric, it is larger than a the embroidery frame being used. Attach a stabilizer material for thin fabrics or stretch fabrics. To obtain optional accessories or parts, visit [http://www.brother.com/], or [http:// www.brothermall.com] (in the embroidery frame without using stabilizers with adhesive, place b the adhesive surface of the stabilizer material...

Operation Manual
Page 151
... b twice to remove. e CAUTION ● Do not touch the start/stop button, needle position button or reverse/ reinforcement stitch button. a Needle position button Press the part of the buttons is completely stopped and follow the instructions below. Make sure that the sewing machine is accidentally pressed, the machine will separate from...
... b twice to remove. e CAUTION ● Do not touch the start/stop button, needle position button or reverse/ reinforcement stitch button. a Needle position button Press the part of the buttons is completely stopped and follow the instructions below. Make sure that the sewing machine is accidentally pressed, the machine will separate from...

Operation Manual
Page 159
... color step/Number of colors in the setting screen. Give the thread a little slack. Press (Setting key), and then change of color d Current color part e Next color part • Refer to "Threading the upper thread" (page 32). The pattern may break or bend. ● Do not let hands or objects hit the...
... color step/Number of colors in the setting screen. Give the thread a little slack. Press (Setting key), and then change of color d Current color part e Next color part • Refer to "Threading the upper thread" (page 32). The pattern may break or bend. ● Do not let hands or objects hit the...

Operation Manual
Page 177
... z Do not apply oil to g remove any lint and dust from the race and bobbin thread sensor and their surrounding area. For a new bobbin case (part code: XC3152-221 (green marking)), contact your nearest authorized service center. ● Be sure that the projection h on the left to make sure that the...
... z Do not apply oil to g remove any lint and dust from the race and bobbin thread sensor and their surrounding area. For a new bobbin case (part code: XC3152-221 (green marking)), contact your nearest authorized service center. ● Be sure that the projection h on the left to make sure that the...


