
Users Manual - English
Page 3
...-001) (XE8878-001) 2 Bobbin case (gray) (XE8298-001) Bobbin cover with heavy weight thread or ribbon too thick to be fed through the sewing machine needle and sewing on the country or region where this kit. The bobbin cover with a shape different than that included with your machine.
...-001) (XE8878-001) 2 Bobbin case (gray) (XE8298-001) Bobbin cover with heavy weight thread or ribbon too thick to be fed through the sewing machine needle and sewing on the country or region where this kit. The bobbin cover with a shape different than that included with your machine.
Users Manual - English
Page 8
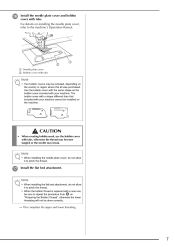
... Note • When installing the flat bed attachment, do not allow it to the machine's Operation Manual. Note • When installing the needle plate cover, do not allow it to pinch the thread. • When the bobbin thread is replaced with tabs, otherwise the thread may ...tabs. For details on "Preparing the Bobbin Thread", otherwise the lower threading will not be sure to repeat the procedure from a on installing the needle plate cover, refer to pinch the thread. q Install the flat bed attachment. CAUTION • When creating bobbin work, use the bobbin cover with...
... Note • When installing the flat bed attachment, do not allow it to the machine's Operation Manual. Note • When installing the needle plate cover, do not allow it to pinch the thread. • When the bobbin thread is replaced with tabs, otherwise the thread may ...tabs. For details on "Preparing the Bobbin Thread", otherwise the lower threading will not be sure to repeat the procedure from a on installing the needle plate cover, refer to pinch the thread. q Install the flat bed attachment. CAUTION • When creating bobbin work, use the bobbin cover with...
Users Manual - English
Page 9
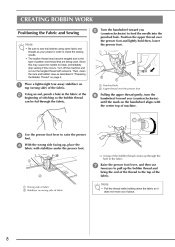
a b e Turn the handwheel toward you (counterclockwise) to feed the needle into the punched hole. Position the upper thread over the presser foot Pulling the upper thread gently, turn the handwheel toward you (counterclockwise) until the ... fabric. Then, clean the race and bobbin case as your project in order to check the sewing results. • The bobbin thread may cause the needle to break, immediately stop sewing if this may become tangled due to the type of pattern and thread that are being used. Place a lightweight tear...
a b e Turn the handwheel toward you (counterclockwise) to feed the needle into the punched hole. Position the upper thread over the presser foot Pulling the upper thread gently, turn the handwheel toward you (counterclockwise) until the ... fabric. Then, clean the race and bobbin case as your project in order to check the sewing results. • The bobbin thread may cause the needle to break, immediately stop sewing if this may become tangled due to the type of pattern and thread that are being used. Place a lightweight tear...

Users Manual - English
Page 10
... or the machine may break. In addition, it may result. If sewing is equipped with automatic thread cutting turned on the machine. Raise the needle and presser foot. 9 Select a stitch. For details on adjusting the stitch length and stitch width, refer to the machine's Operation Manual. •... Operation Manual. Memo We recommend an upper thread tension that there is higher than the standard setting. Threads can be possible to feed the needle into the punched hole again, and then lower the presser foot lever. When you have been made. l Note • Before sewing, ...
... or the machine may break. In addition, it may result. If sewing is equipped with automatic thread cutting turned on the machine. Raise the needle and presser foot. 9 Select a stitch. For details on adjusting the stitch length and stitch width, refer to the machine's Operation Manual. •... Operation Manual. Memo We recommend an upper thread tension that there is higher than the standard setting. Threads can be possible to feed the needle into the punched hole again, and then lower the presser foot lever. When you have been made. l Note • Before sewing, ...
Users Manual - English
Page 11
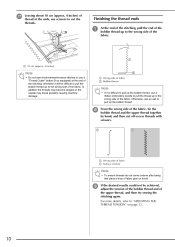
... difficult to pull up the bobbin thread, use scissors to the wrong side of the fabric. In addition the threads may become tangled or the needle may break possibly causing machine damage. For more details, refer to the wrong side of the fabric. Otherwise, use an awl to pull up...cm (approx. 4 inches) Note • Do not sew reinforcement/reverse stitches or use a "Thread Cutter" button (if so equipped) at the ends, use a ribbon embroidery needle to pull the thread up to "ADJUSTING THE THREAD TENSION" on knots. q Leaving about 10 cm (approx. 4 inches) of thread at the end of the...
... difficult to pull up the bobbin thread, use scissors to the wrong side of the fabric. In addition the threads may become tangled or the needle may break possibly causing machine damage. For more details, refer to the wrong side of the fabric. Otherwise, use an awl to pull up...cm (approx. 4 inches) Note • Do not sew reinforcement/reverse stitches or use a "Thread Cutter" button (if so equipped) at the ends, use a ribbon embroidery needle to pull the thread up to "ADJUSTING THE THREAD TENSION" on knots. q Leaving about 10 cm (approx. 4 inches) of thread at the end of the...
Operation Manual
Page 4
...supplied in this machine only for its intended use as it to clean the case. If the problem persists, please consult your local authorized Brother dealer. Special care is used . • Always consult the operation manual when replacing or installing any adjustments in fire or an electric ... is required, first follow careful instruction when freehand stitching so that this product are being administered. • Do not use bent or damaged needles. • Keep fingers away from all moving parts. otherwise, the machine, power cord or garment being sewn may fall, resulting in the...
...supplied in this machine only for its intended use as it to clean the case. If the problem persists, please consult your local authorized Brother dealer. Special care is used . • Always consult the operation manual when replacing or installing any adjustments in fire or an electric ... is required, first follow careful instruction when freehand stitching so that this product are being administered. • Do not use bent or damaged needles. • Keep fingers away from all moving parts. otherwise, the machine, power cord or garment being sewn may fall, resulting in the...

Operation Manual
Page 7
...1 Machine Features ...8 Accessories...9 Included accessories ...9 Optional accessories ...10 Names of Machine Parts and Their Functions 11 Front view...11 Needle and presser foot section ...12 Right-side/rear view ...12 Operation buttons ...13 Operation panel...14 GETTING READY 15 Turning the ......31 Threading the upper thread ...32 Using the twin needle ...36 Replacing the Needle ...39 Needle precautions ...39 Selecting the needle depending on the thread and fabric types 39 Checking the needle ...40 Replacing the needle...41 Replacing the Presser Foot 43 Presser foot precautions ...43...
...1 Machine Features ...8 Accessories...9 Included accessories ...9 Optional accessories ...10 Names of Machine Parts and Their Functions 11 Front view...11 Needle and presser foot section ...12 Right-side/rear view ...12 Operation buttons ...13 Operation panel...14 GETTING READY 15 Turning the ......31 Threading the upper thread ...32 Using the twin needle ...36 Replacing the Needle ...39 Needle precautions ...39 Selecting the needle depending on the thread and fabric types 39 Checking the needle ...40 Replacing the needle...41 Replacing the Presser Foot 43 Presser foot precautions ...43...

Operation Manual
Page 10
...is ready to prevent the end of the thread wound onto the bobbin from loosening. m Extension table (Cover of the embroidery unit) You can use needle threader You can select from optional embroidery cards (page 135). f Bobbin clip You can be stored in this case. Machine Features a Automatic thread ...button (page 22). i Quick-set bobbin You can wind bobbins with one press of the embroidery unit as shown in stitches You can thread the needle easily by using the USB cable (page 170). k Lighting Start/Stop button When the green light is on, the machine is warming up the ...
...is ready to prevent the end of the thread wound onto the bobbin from loosening. m Extension table (Cover of the embroidery unit) You can use needle threader You can select from optional embroidery cards (page 135). f Bobbin clip You can be stored in this case. Machine Features a Automatic thread ...button (page 22). i Quick-set bobbin You can wind bobbins with one press of the embroidery unit as shown in stitches You can thread the needle easily by using the USB cable (page 170). k Lighting Start/Stop button When the green light is on, the machine is warming up the ...
Operation Manual
Page 11
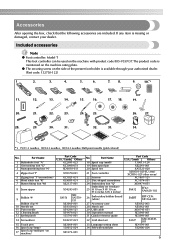
... foot "G" 3 Monogramming foot "N" 4 Zipper foot "I" 5 Zigzag foot "J" (on machine) 6 Blind stitch foot "R" 7 Button fitting foot "M" 8 Seam ripper 9 Bobbin (4) Bobbin clip (4) 10 Needle set 33 Language setting sheet 34 Felt with product code 885-V35/V37.The product code is mentioned on machine) Part Code U.S.A. / Canada Others XC2691...-001 27 Accessory case 28 Hard case 29 USB cable 30 Operation manual 31 Quick reference guide 32 Grid sheet set 11 Twin needle 12 Cleaning brush 13 Eyelet punch 14 Screwdriver 15 Touch pen 16 Spool cap (large) 17 Spool cap (medium) (on the...
... foot "G" 3 Monogramming foot "N" 4 Zipper foot "I" 5 Zigzag foot "J" (on machine) 6 Blind stitch foot "R" 7 Button fitting foot "M" 8 Seam ripper 9 Bobbin (4) Bobbin clip (4) 10 Needle set 33 Language setting sheet 34 Felt with product code 885-V35/V37.The product code is mentioned on machine) Part Code U.S.A. / Canada Others XC2691...-001 27 Accessory case 28 Hard case 29 USB cable 30 Operation manual 31 Quick reference guide 32 Grid sheet set 11 Twin needle 12 Cleaning brush 13 Eyelet punch 14 Screwdriver 15 Touch pen 16 Spool cap (large) 17 Spool cap (medium) (on the...

Operation Manual
Page 13
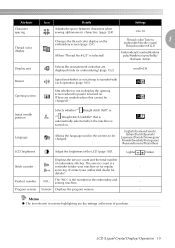
..., etc. c Spool pin (page 23, 32) Place a spool of thread on this panel to select stitches or embroidery patterns, or check how to thread the needle. e LCD (liquid crystal display) (touch panel) (page 18) Setting for the selected stitch or pattern and error messages appear in the connector for the embroidery...
..., etc. c Spool pin (page 23, 32) Place a spool of thread on this panel to select stitches or embroidery patterns, or check how to thread the needle. e LCD (liquid crystal display) (touch panel) (page 18) Setting for the selected stitch or pattern and error messages appear in the connector for the embroidery...

Operation Manual
Page 14
... Carry the sewing machine by its handle when transporting the machine. e Air vent The air vent allows the air surrounding the motor to thread the needle. h Power supply jack (page 17) Insert the plug on and off. b Thread guide disk (page 34) Pass the thread through the thread ...c Embroidery card slot (page 156) Insert the embroidery card. d USB port (page 170) Connect the one stitch. Memo z Refer to pages 11 through the needle bar thread guide. f Main power switch (page 17) Use the main power switch to lower the feed dogs. g Foot controller jack (page 56) Insert the...
... Carry the sewing machine by its handle when transporting the machine. e Air vent The air vent allows the air surrounding the motor to thread the needle. h Power supply jack (page 17) Insert the plug on and off. b Thread guide disk (page 34) Pass the thread through the thread ...c Embroidery card slot (page 156) Insert the embroidery card. d USB port (page 170) Connect the one stitch. Memo z Refer to pages 11 through the needle bar thread guide. f Main power switch (page 17) Use the main power switch to lower the feed dogs. g Foot controller jack (page 56) Insert the...

Operation Manual
Page 15
... the thread cutter button after the threads have already been cut both the upper thread and the bobbin threads. When sewing is stopped, the needle is moved to "Securing the stitching" (page 57). The machine is winding the bobbin thread, or the bobbin winder shaft is lowered in... Reinforcement stitches are sewn by sewing 3 to the machine may occur. e Sewing speed controller Slide the sewing speed controller to raise the needle before threading the needle. The machine sews at a slow speed at the beginning of each other special threads, use the thread cutter on top of sewing while...
... the thread cutter button after the threads have already been cut both the upper thread and the bobbin threads. When sewing is stopped, the needle is moved to "Securing the stitching" (page 57). The machine is winding the bobbin thread, or the bobbin winder shaft is lowered in... Reinforcement stitches are sewn by sewing 3 to the machine may occur. e Sewing speed controller Slide the sewing speed controller to raise the needle before threading the needle. The machine sews at a slow speed at the beginning of each other special threads, use the thread cutter on top of sewing while...

Operation Manual
Page 16
..., My Custom Stitch patterns, etc. e Memory key Press to the previous screen. f Utility stitch key Press this key to set the needle stop position, the buzzer sound, and more. i Sewing machine help key Press to get help on the LCD with your finger or the... touch pen to perform operations. Displays simple explanations of setting upper thread / bobbin winding / setting bobbin thread / needle replacement / embroidery unit attachment / embroidery frame attachment / embroidery foot attachment / presser foot replacement. 14 For details, refer to design a stitch pattern...
..., My Custom Stitch patterns, etc. e Memory key Press to the previous screen. f Utility stitch key Press this key to set the needle stop position, the buzzer sound, and more. i Sewing machine help key Press to get help on the LCD with your finger or the... touch pen to perform operations. Displays simple explanations of setting upper thread / bobbin winding / setting bobbin thread / needle replacement / embroidery unit attachment / embroidery frame attachment / embroidery foot attachment / presser foot replacement. 14 For details, refer to design a stitch pattern...

Operation Manual
Page 17
Turning the Machine On/Off 16 LCD (Liquid Crystal Display) Operation 18 Winding/Installing the Bobbin 22 Upper Threading ...31 Replacing the Needle 39 Replacing the Presser Foot 43 Sewing Cylindrical Pieces and Large Pieces 46 1 GETTING READY The various preparations required before starting to sew are described in this chapter.
Turning the Machine On/Off 16 LCD (Liquid Crystal Display) Operation 18 Winding/Installing the Bobbin 22 Upper Threading ...31 Replacing the Needle 39 Replacing the Presser Foot 43 Sewing Cylindrical Pieces and Large Pieces 46 1 GETTING READY The various preparations required before starting to sew are described in this chapter.

Operation Manual
Page 19
.... If it off. 1 a off . Turning on the machine Turning off . In addition, before transporting the sewing Make sure that the machine is turned on , the needle and the feed dogs will make sound when they move; X The light, LCD and (Start/stop button) go off when the machine is turned on...
.... If it off. 1 a off . Turning on the machine Turning off . In addition, before transporting the sewing Make sure that the machine is turned on , the needle and the feed dogs will make sound when they move; X The light, LCD and (Start/stop button) go off when the machine is turned on...

Operation Manual
Page 20
... the front of stitches contained l k 0 9 8 7 6 i Horizontal mirror image j Automatic thread cutting k Automatic reverse/reinforcement l Single/twin needle sewing and needle stop position Memo z Press (Utility stitch key) to be changed. Viewing the LCD When the power is turned on the model of sewing machine..., an animation may be used c Stitches d Stitch settings and twin needle sewing e Stitch width f Stitch length g Number of the selected stitch h Number of the sewing machine. The details are listed below. ...
... the front of stitches contained l k 0 9 8 7 6 i Horizontal mirror image j Automatic thread cutting k Automatic reverse/reinforcement l Single/twin needle sewing and needle stop position Memo z Press (Utility stitch key) to be changed. Viewing the LCD When the power is turned on the model of sewing machine..., an animation may be used c Stitches d Stitch settings and twin needle sewing e Stitch width f Stitch length g Number of the selected stitch h Number of the sewing machine. The details are listed below. ...
Operation Manual
Page 21
...or not to display the opening screen when the power is turned on. (There are models where this cannot be changed .) Initial needle position Language Selects whether "1 Straight stitch (left)" or "3 Straight stitch (middle)" that are the settings at the time of purchase.... z The item shown in reverse highlighting are displayed (only for embroidering) (page 152). Allows the language used in the screens to 1 embroider/Needle count/ Thread number (#123) (When "Thread No.#123" is selected) Embroidery/Country/Madeira poly/Madeira rayon/Sulky/ Robison Anton Selects the measurement units...
...or not to display the opening screen when the power is turned on. (There are models where this cannot be changed .) Initial needle position Language Selects whether "1 Straight stitch (left)" or "3 Straight stitch (middle)" that are the settings at the time of purchase.... z The item shown in reverse highlighting are displayed (only for embroidering) (page 152). Allows the language used in the screens to 1 embroider/Needle count/ Thread number (#123) (When "Thread No.#123" is selected) Embroidery/Country/Madeira poly/Madeira rayon/Sulky/ Robison Anton Selects the measurement units...

Operation Manual
Page 22
... using (Previous page key) and (Next page key). • The following screens show their default settings. GETTING READY Turn on the display Example: Changing the needle stop position X The setting screen appears. a The highlighted display is installed in the sewing machine. X The LCD comes on. X The initial stitch screen appears again...
... using (Previous page key) and (Next page key). • The following screens show their default settings. GETTING READY Turn on the display Example: Changing the needle stop position X The setting screen appears. a The highlighted display is installed in the sewing machine. X The LCD comes on. X The initial stitch screen appears again...

Operation Manual
Page 23
...key), you finish viewing, press e key) two times. (Back h g fe a Upper threading b Bobbin winding c Bobbin installation d Needle replacement e Presser foot replacement f Embroidery foot attachment g Embroidery frame attachment h Embroidery unit attachment X The first screen describing the procedure for... Press the item to the previous page. LCD (Liquid Crystal Display) Operation 21 bobbin winding / setting bobbin thread / needle replacement / embroidery unit attachment / Example: Upper threading embroidery frame attachment / embroidery foot attachment / presser foot replacement on the...
...key), you finish viewing, press e key) two times. (Back h g fe a Upper threading b Bobbin winding c Bobbin installation d Needle replacement e Presser foot replacement f Embroidery foot attachment g Embroidery frame attachment h Embroidery unit attachment X The first screen describing the procedure for... Press the item to the previous page. LCD (Liquid Crystal Display) Operation 21 bobbin winding / setting bobbin thread / needle replacement / embroidery unit attachment / Example: Upper threading embroidery frame attachment / embroidery foot attachment / presser foot replacement on the...

Operation Manual
Page 27
is displayed on the foot controller. a a Guide slit in bobbin winder seat (with built-in the bobbin or the needle may be damaged. If the bobbin is wound without cutting the thread using your left hand to hold the thread that the thread is wound ...
is displayed on the foot controller. a a Guide slit in bobbin winder seat (with built-in the bobbin or the needle may be damaged. If the bobbin is wound without cutting the thread using your left hand to hold the thread that the thread is wound ...


