Operation Manual
Page 1
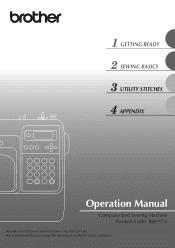
We recommend that you keep this document before using the machine. GETTING READY SEWING BASICS UTILITY STITCHES APPENDIX Operation Manual Computerized Sewing Machine Product Code: 888-V14 Be sure to read this document nearby for future reference.
We recommend that you keep this document before using the machine. GETTING READY SEWING BASICS UTILITY STITCHES APPENDIX Operation Manual Computerized Sewing Machine Product Code: 888-V14 Be sure to read this document nearby for future reference.
Operation Manual
Page 3
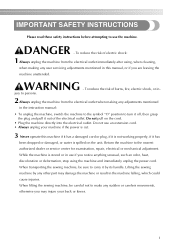
...mentioned in use if you are leaving the machine unattended. While the machine is spilled on the cord. • Plug the machine directly into the electrical outlet. When transporting the sewing machine, be careful not to persons. 2 Always unplug the machine from the electrical outlet immediately after using, ...electrical or mechanical adjustment. DANGER - To reduce the risk of the electrical outlet. Lifting the sewing machine by its handle. Do not pull on the unit. When lifting the sewing machine, be sure to turn it off, then grasp the plug and pull it by any user...
...mentioned in use if you are leaving the machine unattended. While the machine is spilled on the cord. • Plug the machine directly into the electrical outlet. When transporting the sewing machine, be careful not to persons. 2 Always unplug the machine from the electrical outlet immediately after using, ...electrical or mechanical adjustment. DANGER - To reduce the risk of the electrical outlet. Lifting the sewing machine by its handle. Do not pull on the unit. When lifting the sewing machine, be sure to turn it off, then grasp the plug and pull it by any user...
Operation Manual
Page 4
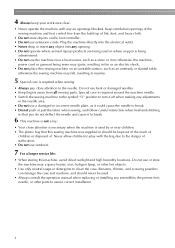
...sewn may ignite, resulting in fire or an electric shock. • Do not place this sewing machine on the foot controller. • Do not use extension cords. Keep ventilation openings of the sewing machine and foot control free from all moving parts. Never allow children to play with any opening..., dust, and loose cloth. • Do not store objects on an unstable surface, such as an unsteady or slanted table, otherwise the sewing machine may fall, resulting in should be used. • Always consult the operation manual when replacing or installing any adjustments in the needle area....
...sewn may ignite, resulting in fire or an electric shock. • Do not place this sewing machine on the foot controller. • Do not use extension cords. Keep ventilation openings of the sewing machine and foot control free from all moving parts. Never allow children to play with any opening..., dust, and loose cloth. • Do not store objects on an unstable surface, such as an unsteady or slanted table, otherwise the sewing machine may fall, resulting in should be used. • Always consult the operation manual when replacing or installing any adjustments in the needle area....
Operation Manual
Page 7
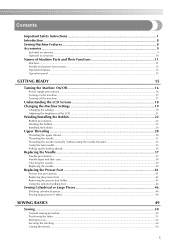
...Sewing Machine Features ...8 Accessories ...9 Included accessories ...9 Optional accessories ...10 Names of Machine Parts and Their Functions 11 Machine...11 Needle and presser foot section ...12 Operation buttons ...12 Operation panel ...13 GETTING READY 15 Turning the Machine On/Off 16 Power supply precautions ...16 Turning on the machine... ...17 Turning off the machine ...17 Understanding the LCD Screens 18 Changing the Machine Settings 19 Changing the settings ...19 Adjusting...
...Sewing Machine Features ...8 Accessories ...9 Included accessories ...9 Optional accessories ...10 Names of Machine Parts and Their Functions 11 Machine...11 Needle and presser foot section ...12 Operation buttons ...12 Operation panel ...13 GETTING READY 15 Turning the Machine On/Off 16 Power supply precautions ...16 Turning on the machine... ...17 Turning off the machine ...17 Understanding the LCD Screens 18 Changing the Machine Settings 19 Changing the settings ...19 Adjusting...
Operation Manual
Page 10
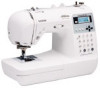
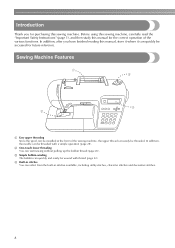
... you have finished reading this manual, store it where it can quickly be accessed for the correct operation of the sewing machine, the upper thread can be installed at the front of the various functions. In addition, the needle can be threaded. Before using... this sewing machine, carefully read the "Important Safety Instructions" (page 1), and then study this sewing machine. Sewing Machine Features a Easy upper threading Since the spool can easily be threaded with thread (page 22). b ...
... you have finished reading this manual, store it where it can quickly be accessed for the correct operation of the sewing machine, the upper thread can be installed at the front of the various functions. In addition, the needle can be threaded. Before using... this sewing machine, carefully read the "Important Safety Instructions" (page 1), and then study this sewing machine. Sewing Machine Features a Easy upper threading Since the spool can easily be threaded with thread (page 22). b ...
Operation Manual
Page 12
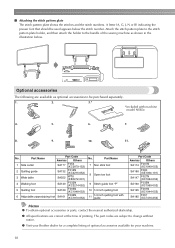
.... z All specifications are correct at the time of the sewing machine as optional accessories to change without notice. z Visit your Brother dealer for a complete listing of optional accessories available for your machine. 10 ■ Attaching the stitch pattern plate The stitch pattern...dealership. Part Name 7 Non stick foot 8 Open toe foot 9 Stitch guide foot "P" 10 1/4 inch quilting foot 11 1/4 inch quilting foot with machine model NS85e. 4. 5. 6. 7. 8. 9. 10. 11. Optional accessories The following are subject to be used appears below . Part Name Americas ...
.... z All specifications are correct at the time of the sewing machine as optional accessories to change without notice. z Visit your Brother dealer for a complete listing of optional accessories available for your machine. 10 ■ Attaching the stitch pattern plate The stitch pattern...dealership. Part Name 7 Non stick foot 8 Open toe foot 9 Stitch guide foot "P" 10 1/4 inch quilting foot 11 1/4 inch quilting foot with machine model NS85e. 4. 5. 6. 7. 8. 9. 10. 11. Optional accessories The following are subject to be used appears below . Part Name Americas ...
Operation Manual
Page 13
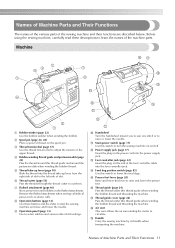
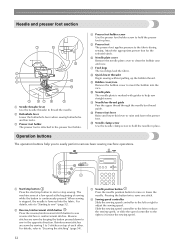
... supply jack. m Foot controller jack (page 52) Insert the plug on the spool pin. Names of the sewing machine and their functions are described below. Before using the sewing machine, carefully read these buttons and the slider to learn the names of the upper thread. b Spool pin (page...up lever (page 30) Slide the thread into the foot controller jack. h Operation buttons (page 12) Use these descriptions to start the sewing machine and raise and lower the needle. d Bobbin-winding thread guide and pretension disk (page 22) Pass the thread around the pretension disk ...
... supply jack. m Foot controller jack (page 52) Insert the plug on the spool pin. Names of the sewing machine and their functions are described below. Before using the sewing machine, carefully read these buttons and the slider to learn the names of the upper thread. b Spool pin (page...up lever (page 30) Slide the thread into the foot controller jack. h Operation buttons (page 12) Use these descriptions to start the sewing machine and raise and lower the needle. d Bobbin-winding thread guide and pretension disk (page 22) Pass the thread around the pretension disk ...
Operation Manual
Page 14
...Reverse/reinforcement stitch button Press the reverse/reinforcement stitch button to the presser foot holder. Reinforcement stitches are sewn by sewing 3 to easily perform various basic sewing machine operations. e Presser foot The presser foot applies pressure to clean the bobbin case and race. f Needle plate ... screw Use the presser foot holder screw to insert the bobbin into the fabric. a Start/stop button Press the start/stop sewing. The machine sews at a low speed at the beginning of each other. For details, refer to raise or lower the needle. c Needle position...
...Reverse/reinforcement stitch button Press the reverse/reinforcement stitch button to the presser foot holder. Reinforcement stitches are sewn by sewing 3 to easily perform various basic sewing machine operations. e Presser foot The presser foot applies pressure to clean the bobbin case and race. f Needle plate ... screw Use the presser foot holder screw to insert the bobbin into the fabric. a Start/stop button Press the start/stop sewing. The machine sews at a low speed at the beginning of each other. For details, refer to raise or lower the needle. c Needle position...
Operation Manual
Page 15
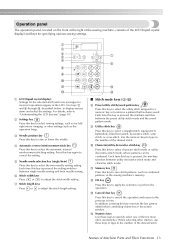
... such as combined patterns, in the LCD. d Automatic reverse/reinforcement stitch key Press this key to select sewing settings, such as for incorrect operations appear in the sewing machine's memory. Use keys b and f through n, described below, to adjust the stitch width setting. b Settings... number of the desired stitch. Operation panel The operation panel, located on the front at the right of the sewing machine, consists of the LCD (liquid crystal display) and keys for specifying various sewing settings. 1 2 3 5 4 8 9 @ A C a LCD (liquid crystal display) Settings for the selected ...
... such as combined patterns, in the LCD. d Automatic reverse/reinforcement stitch key Press this key to select sewing settings, such as for incorrect operations appear in the sewing machine's memory. Use keys b and f through n, described below, to adjust the stitch width setting. b Settings... number of the desired stitch. Operation panel The operation panel, located on the front at the right of the sewing machine, consists of the LCD (liquid crystal display) and keys for specifying various sewing settings. 1 2 3 5 4 8 9 @ A C a LCD (liquid crystal display) Settings for the selected ...
Operation Manual
Page 18
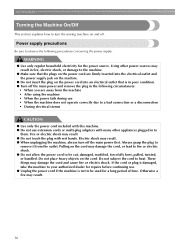
...Otherwise a fire may result. ● Do not touch the plug with many other power sources may result. ● When unplugging the machine, always turn the sewing machine on and off the main power and remove the plug in the following precautions concerning the power supply. Do not place heavy objects on... the power cord into the electrical outlet and the power supply jack on the machine. ● Do not insert the plug on ...
...Otherwise a fire may result. ● Do not touch the plug with many other power sources may result. ● When unplugging the machine, always turn the sewing machine on and off the main power and remove the plug in the following precautions concerning the power supply. Do not place heavy objects on... the power cord into the electrical outlet and the power supply jack on the machine. ● Do not insert the plug on ...
Operation Manual
Page 19
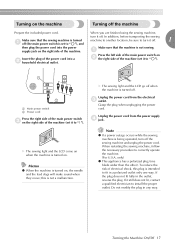
.... Grasp the plug when unplugging the power cord. Note z If a power outage occurs while the sewing machine is turned off the sewing machine and unplug the power cord. In addition, before transporting the sewing machine to another location, be sure to turn it still does not fit, contact a qualified electrician to... cord. Turning on , the needle and the feed dogs will make sound when they move; When you are finished using the sewing machine, Make sure that the machine is not a malfunction. Do not modify the plug in the outlet, reverse the plug. a Main power switch b Power cord...
.... Grasp the plug when unplugging the power cord. Note z If a power outage occurs while the sewing machine is turned off the sewing machine and unplug the power cord. In addition, before transporting the sewing machine to another location, be sure to turn it still does not fit, contact a qualified electrician to... cord. Turning on , the needle and the feed dogs will make sound when they move; When you are finished using the sewing machine, Make sure that the machine is not a malfunction. Do not modify the plug in the outlet, reverse the plug. a Main power switch b Power cord...
Operation Manual
Page 20
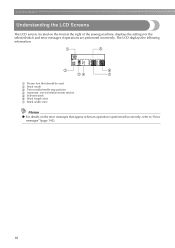
... stop position d Automatic reverse/reinforcement stitches e Selected stitch f Stitch length (mm) g Stitch width (mm) Memo z For details on the front at the right of the sewing machine, displays the settings for the selected stitch and error messages if operations are performed incorrectly.
... stop position d Automatic reverse/reinforcement stitches e Selected stitch f Stitch length (mm) g Stitch width (mm) Memo z For details on the front at the right of the sewing machine, displays the settings for the selected stitch and error messages if operations are performed incorrectly.
Operation Manual
Page 21
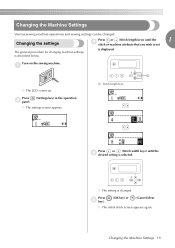
... below. a Stitch length keys Press or (Stitch width keys) until the 1 c stitch or machine attribute that you wish to set The general procedure for changing machine settings is changed . Changing the Machine Settings 19 Changing the Machine Settings Various sewing machine operations and sewing settings can be changed . Changing the settings Press or (Stitch length keys) until...
... below. a Stitch length keys Press or (Stitch width keys) until the 1 c stitch or machine attribute that you wish to set The general procedure for changing machine settings is changed . Changing the Machine Settings 19 Changing the Machine Settings Various sewing machine operations and sewing settings can be changed . Changing the settings Press or (Stitch length keys) until...
Operation Manual
Page 24
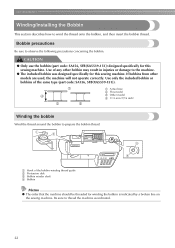
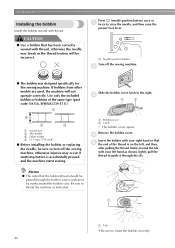
...Bobbin winder shaft d Bobbin Memo z The order that the machine should be threaded for this sewing machine. GETTING READY Winding/Installing the Bobbin This section describes how to thread the machine as indicated. 22 Use of any other models are used, the machine will not operate correctly. a a Hook of the same ... precautions concerning the bobbin. CAUTION ● Only use the bobbin (part code: SA156, SFB(XA5539-151)) designed specifically for this sewing machine. Be sure to wind the thread onto the bobbin, and then insert the bobbin thread. Bobbin precautions Be sure to the...
...Bobbin winder shaft d Bobbin Memo z The order that the machine should be threaded for this sewing machine. GETTING READY Winding/Installing the Bobbin This section describes how to thread the machine as indicated. 22 Use of any other models are used, the machine will not operate correctly. a a Hook of the same ... precautions concerning the bobbin. CAUTION ● Only use the bobbin (part code: SA156, SFB(XA5539-151)) designed specifically for this sewing machine. Be sure to wind the thread onto the bobbin, and then insert the bobbin thread. Bobbin precautions Be sure to the...
Operation Manual
Page 25
..., with the rounded side on the slit in the bobbin. Turn on the bobbin until c it snaps into the notch in the spool or the machine may break. ● Three spool cap sizes are available (large, medium and small), allowing you to the front at the bottom. 1 Place the bobbin ... used , the thread may become tangled around the spool pin and the needle may be damaged. Winding/Installing the Bobbin 23 Press down on the sewing machine. CAUTION ● If the spool or the spool cap is not positioned so that the thread unwinds correctly, the thread may become tangled around the...
..., with the rounded side on the slit in the bobbin. Turn on the bobbin until c it snaps into the notch in the spool or the machine may break. ● Three spool cap sizes are available (large, medium and small), allowing you to the front at the bottom. 1 Place the bobbin ... used , the thread may become tangled around the spool pin and the needle may be damaged. Winding/Installing the Bobbin 23 Press down on the sewing machine. CAUTION ● If the spool or the spool cap is not positioned so that the thread unwinds correctly, the thread may become tangled around the...
Operation Manual
Page 27
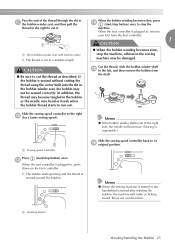
... the right side, the needle will make a clicking sound; Slide the sewing speed controller back to the right l (for a faster sewing speed). this is impossible.) a Sewing speed controller Press m (start/stop the machine, otherwise the sewing machine may be wound correctly. If the bobbin is plugged in the bobbin winder... cutting the thread using the cutter built into the slit in , press down on the foot controller. Memo z When the sewing machine is started or the handwheel is wound around the bobbin. X The bobbin starts spinning and the thread is turned after winding the bobbin...
... the right side, the needle will make a clicking sound; Slide the sewing speed controller back to the right l (for a faster sewing speed). this is impossible.) a Sewing speed controller Press m (start/stop the machine, otherwise the sewing machine may be wound correctly. If the bobbin is plugged in the bobbin winder... cutting the thread using the cutter built into the slit in , press down on the foot controller. Memo z When the sewing machine is started or the handwheel is wound around the bobbin. X The bobbin starts spinning and the thread is turned after winding the bobbin...
Operation Manual
Page 28
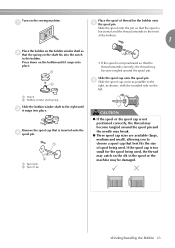
...a b a Bobbin cover b Latch X The bobbin cover opens. If bobbins from other models are used, the machine will be incorrect. a Needle position button Turn off the sewing machine, otherwise injuries may break or the thread tension will not operate correctly. Use only the included bobbin or bobbins of... by marks around the tab with thread. Remove the bobbin cover. Be sure to guide it through the bobbin case is accidentally pressed and the machine starts sewing. CAUTION ● Use a bobbin that e the end of the same type (part code: SA156, SFB(XA5539-151)). 1 4 2 3 a Actual ...
...a b a Bobbin cover b Latch X The bobbin cover opens. If bobbins from other models are used, the machine will be incorrect. a Needle position button Turn off the sewing machine, otherwise injuries may break or the thread tension will not operate correctly. Use only the included bobbin or bobbins of... by marks around the tab with thread. Remove the bobbin cover. Be sure to guide it through the bobbin case is accidentally pressed and the machine starts sewing. CAUTION ● Use a bobbin that e the end of the same type (part code: SA156, SFB(XA5539-151)). 1 4 2 3 a Actual ...
Operation Manual
Page 30
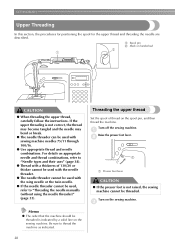
...Thread with a thickness of thread on the spool pin, and then thread the machine. For details on the sewing machine. c b a a Presser foot lever CAUTION ● If the presser foot is not raised, the sewing machine cannot be used with the needle threader. ● The needle threader cannot ... handwheel CAUTION ● When threading the upper thread, carefully follow the instructions. a Spool pin b Mark on the sewing machine. Turn off the sewing machine. GETTING READY Upper Threading In this section, the procedures for positioning the spool for the upper thread and threading the needle...
...Thread with a thickness of thread on the spool pin, and then thread the machine. For details on the sewing machine. c b a a Presser foot lever CAUTION ● If the presser foot is not raised, the sewing machine cannot be used with the needle threader. ● The needle threader cannot ... handwheel CAUTION ● When threading the upper thread, carefully follow the instructions. a Spool pin b Mark on the sewing machine. Turn off the sewing machine. GETTING READY Upper Threading In this section, the procedures for positioning the spool for the upper thread and threading the needle...
Operation Manual
Page 31
... at this position, press (needle position button) until it is not at the top, as shown, with the rounded side on handwheel Turn off the sewing machine. CAUTION ● If the spool or the spool cap is not positioned correctly, the thread may become tangled around the spool pin and the needle...
... at this position, press (needle position button) until it is not at the top, as shown, with the rounded side on handwheel Turn off the sewing machine. CAUTION ● If the spool or the spool cap is not positioned correctly, the thread may become tangled around the spool pin and the needle...
Operation Manual
Page 33
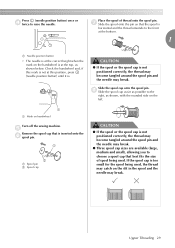
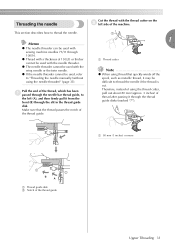
... "7"). 1 a 80 mm (3 inches) or more a b B A a Thread guide disk b Notch of the machine. Pull the end of the thread, which has been a passed through the needle bar thread guide, to thread the needle. z The needle threader cannot be used with sewing machine needles 75/11 through 100/16. Memo z The needle threader can be...
... "7"). 1 a 80 mm (3 inches) or more a b B A a Thread guide disk b Notch of the machine. Pull the end of the thread, which has been a passed through the needle bar thread guide, to thread the needle. z The needle threader cannot be used with sewing machine needles 75/11 through 100/16. Memo z The needle threader can be...


