
Users Manual - English
Page 3
The bobbin cover with a shape different than that included with your machine. Bobbin work is sewn using the special bobbin case (gray) and bobbin cover with tabs included with built-in decorative stitches) Free-motion sewing INCLUDED ACCESSORIES 1. 2. 3. 4. Utility stitches Decorative stitches (For models ...dimensional appearance to the surface of the fabric. Bobbin case (gray) (XE8298-001) Bobbin cover with your machine cannot be fed through the sewing machine needle and sewing on the wrong side of the fabric, by winding the bobbin with heavy weight thread or ribbon too thick ...
The bobbin cover with a shape different than that included with your machine. Bobbin work is sewn using the special bobbin case (gray) and bobbin cover with tabs included with built-in decorative stitches) Free-motion sewing INCLUDED ACCESSORIES 1. 2. 3. 4. Utility stitches Decorative stitches (For models ...dimensional appearance to the surface of the fabric. Bobbin case (gray) (XE8298-001) Bobbin cover with your machine cannot be fed through the sewing machine needle and sewing on the wrong side of the fabric, by winding the bobbin with heavy weight thread or ribbon too thick ...

Users Manual - English
Page 2
... 5. Do not unplug by authorized dealer. To unplug, grasp the plug, not the cord. 10. Always use bent needles. 13. This sewing machine is not intended for examination, repair, electrical or mechanical adjustment. 4. IMPORTANT SAFETY INSTRUCTIONS When using . Always unplug the...position when making any object into water. Special care is used by or near children. 2. Do not use the proper needle plate. Switch the machine to the symbol " " position which represents off, then remove plug from all instructions before cleaning. Young children should be left unattended while plugged ...
... 5. Do not unplug by authorized dealer. To unplug, grasp the plug, not the cord. 10. Always use bent needles. 13. This sewing machine is not intended for examination, repair, electrical or mechanical adjustment. 4. IMPORTANT SAFETY INSTRUCTIONS When using . Always unplug the...position when making any object into water. Special care is used by or near children. 2. Do not use the proper needle plate. Switch the machine to the symbol " " position which represents off, then remove plug from all instructions before cleaning. Young children should be left unattended while plugged ...
Users Manual - English
Page 4
... Declaration of Conformity (For USA Only) Responsible Party: Brother International Corporation 100 Somerset Corporate Boulevard Bridgewater, NJ 08807-0911 USA TEL : (908) 704-1700 declares that the product Product Name: Model Number: Brother Sewing Machine NV1500D/NV1500 complies with Part 15 of the FCC Rules....this equipment does cause harmful interference to radio or television reception, which the receiver is subject to correct the interference by Brother Industries, Ltd. These limits are designed to operate the equipment. 3 Operation is con- However, there is no guarantee ...
... Declaration of Conformity (For USA Only) Responsible Party: Brother International Corporation 100 Somerset Corporate Boulevard Bridgewater, NJ 08807-0911 USA TEL : (908) 704-1700 declares that the product Product Name: Model Number: Brother Sewing Machine NV1500D/NV1500 complies with Part 15 of the FCC Rules....this equipment does cause harmful interference to radio or television reception, which the receiver is subject to correct the interference by Brother Industries, Ltd. These limits are designed to operate the equipment. 3 Operation is con- However, there is no guarantee ...

Users Manual - English
Page 5
...installing any other moving parts. 2. Do not use • Maintaining the machine • Leaving the machine unattended. 3. For additional product information and updates, visit our web site at www.brother.com The contents of this manual and specifications of the operation manual to ...1. When storing this product are subject to inspect and adjust the machine yourself. For repair or adjustment In the event a malfunction occurs or adjustment is the most advanced computerized household embroidery and sewing machine. If the problem persists, please consult your eye on the foot...
...installing any other moving parts. 2. Do not use • Maintaining the machine • Leaving the machine unattended. 3. For additional product information and updates, visit our web site at www.brother.com The contents of this manual and specifications of the operation manual to ...1. When storing this product are subject to inspect and adjust the machine yourself. For repair or adjustment In the event a malfunction occurs or adjustment is the most advanced computerized household embroidery and sewing machine. If the problem persists, please consult your eye on the foot...

Users Manual - English
Page 10
...a computer. k Spool pin Place a spool of the flat bed attachment. d USB connector Plug in a USB cable to adjust the sewing speed while using the machine can be viewed and edited, and operations for using utility stitches. e Thread cutter Pass the threads through the window to control the speed... switch Use the feed dog position switch to raise and lower the presser foot. j Air vent Do not cover the air vent while the sewing machine is not being used . d Needle threader lever Use the needle threader lever when threading the needle automatically. b Thread guide plate Pass the...
...a computer. k Spool pin Place a spool of the flat bed attachment. d USB connector Plug in a USB cable to adjust the sewing speed while using the machine can be viewed and edited, and operations for using utility stitches. e Thread cutter Pass the threads through the window to control the speed... switch Use the feed dog position switch to raise and lower the presser foot. j Air vent Do not cover the air vent while the sewing machine is not being used . d Needle threader lever Use the needle threader lever when threading the needle automatically. b Thread guide plate Pass the...

Users Manual - English
Page 25
... (large, medium, or small) that the thread unwinds from other models are set the bobbin on the shaft. With this sewing machine. a CAUTION • The included bobbin was designed specifically for this machine, you can conveniently be wound. 65 a 3, 4 2 7, 8 9 l o 1 a Supplemental spool pin a Turn on the supplemental spool pin so that is used , the...
... (large, medium, or small) that the thread unwinds from other models are set the bobbin on the shaft. With this sewing machine. a CAUTION • The included bobbin was designed specifically for this machine, you can conveniently be wound. 65 a 3, 4 2 7, 8 9 l o 1 a Supplemental spool pin a Turn on the supplemental spool pin so that is used , the...

Users Manual - English
Page 31
..., carefully pull on page 36. • If automatic needle threading could not be completed correctly, repeat the procedure, starting to sew. Note • The needle threader can be threaded with home sewing machine needles 75/11 through 100/16. a a 80 mm or more l Lower the needle threader lever slowly until it through the...
..., carefully pull on page 36. • If automatic needle threading could not be completed correctly, repeat the procedure, starting to sew. Note • The needle threader can be threaded with home sewing machine needles 75/11 through 100/16. a a 80 mm or more l Lower the needle threader lever slowly until it through the...

Users Manual - English
Page 35
... needles may bend or break and may cause injury. ■ Checking the Needle b Press . A bent needle will start and injury may result. • Use only sewing machine needles made for home use bent or blunt needles. a b a Even gap b Flat surface (bobbin cover, glass, etc.) a Press the "Needle Position" button to raise the... (such as the needle plate or a piece of glass) and check that the gap between the needle and the flat surface is pressed accidentally, the machine will easily break and may cause injury. • Never sew with a bent needle. Note Never use .
... needles may bend or break and may cause injury. ■ Checking the Needle b Press . A bent needle will start and injury may result. • Use only sewing machine needles made for home use bent or blunt needles. a b a Even gap b Flat surface (bobbin cover, glass, etc.) a Press the "Needle Position" button to raise the... (such as the needle plate or a piece of glass) and check that the gap between the needle and the flat surface is pressed accidentally, the machine will easily break and may cause injury. • Never sew with a bent needle. Note Never use .

Users Manual - English
Page 37
... A 75/11 needle may be used for the bobbin thread and upper threading. CHANGING THE NEEDLE ■ About the Needle The sewing machine needle is usually used when embroidering on heavyweight fabrics or stabilizing products (for example, denim, puffy foam, etc.). As the numbers ...avoid skipped stitches, use needle 90/14 - 100/16. Also, the seam may bend or break, which could result in the sewing machine. ■ Fabric/Thread/Needle Combinations The following table provides information concerning the appropriate thread and needle for various fabrics. Fabric Medium weight ...
... A 75/11 needle may be used for the bobbin thread and upper threading. CHANGING THE NEEDLE ■ About the Needle The sewing machine needle is usually used when embroidering on heavyweight fabrics or stabilizing products (for example, denim, puffy foam, etc.). As the numbers ...avoid skipped stitches, use needle 90/14 - 100/16. Also, the seam may bend or break, which could result in the sewing machine. ■ Fabric/Thread/Needle Combinations The following table provides information concerning the appropriate thread and needle for various fabrics. Fabric Medium weight ...
Users Manual - English
Page 42
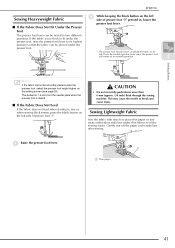
... under the presser foot. * The presser foot remains level, enabling the fabric to sew or when sewing thick seams, press the black button on the left side of presser foot "J". SEWING Sewing Heavyweight Fabric b While keeping the black button on the setting screen (see page 20...to two different positions. CAUTION • Do not forcefully push fabrics more than 6 mm (approx. 1/4 inch) thick through the sewing machine. Sewing Lightweight Fabric Iron the fabric with starch or place thin paper or tear away embroidery stabilizer under the presser foot, select the presser ...
... under the presser foot. * The presser foot remains level, enabling the fabric to sew or when sewing thick seams, press the black button on the left side of presser foot "J". SEWING Sewing Heavyweight Fabric b While keeping the black button on the setting screen (see page 20...to two different positions. CAUTION • Do not forcefully push fabrics more than 6 mm (approx. 1/4 inch) thick through the sewing machine. Sewing Lightweight Fabric Iron the fabric with starch or place thin paper or tear away embroidery stabilizer under the presser foot, select the presser ...

Users Manual - English
Page 92
.... a Fabric b Stabilizer a c Thin paper c b Thread #50 - #60 4 Needle With lightweight, regular, or stretch fabrics: Brother ballpoint needle (golden colored) With heavyweight fabrics: home sewing machine needle 90/14 Presser foot Monogramming foot "N". Character/Decorative Stitches Basic Sewing a Select a stitch pattern. SEWING STITCH PATTERNS SEWING STITCH PATTERNS Sewing Attractive Finishes Note • To achieve the best results when...
.... a Fabric b Stabilizer a c Thin paper c b Thread #50 - #60 4 Needle With lightweight, regular, or stretch fabrics: Brother ballpoint needle (golden colored) With heavyweight fabrics: home sewing machine needle 90/14 Presser foot Monogramming foot "N". Character/Decorative Stitches Basic Sewing a Select a stitch pattern. SEWING STITCH PATTERNS SEWING STITCH PATTERNS Sewing Attractive Finishes Note • To achieve the best results when...

Users Manual - English
Page 106
...b USB cable connector 4 Saving Stitch Patterns to delete the stitch pattern, press . Character/Decorative Stitches Using the included USB cable, connect the sewing machine to your computer. If it is difficult to insert the connector, do not insert it with force, and then check the orientation of the ...inserted into a port in "My Computer" on . USING THE MEMORY FUNCTION a Plug the USB cable connectors into the USB ports on the computer and machine whether or not they are saving. a b b a → The old stitch pattern is deleted, and the new stitch pattern is displayed, otherwise...
...b USB cable connector 4 Saving Stitch Patterns to delete the stitch pattern, press . Character/Decorative Stitches Using the included USB cable, connect the sewing machine to your computer. If it is difficult to insert the connector, do not insert it with force, and then check the orientation of the ...inserted into a port in "My Computer" on . USING THE MEMORY FUNCTION a Plug the USB cable connectors into the USB ports on the computer and machine whether or not they are saving. a b b a → The old stitch pattern is deleted, and the new stitch pattern is displayed, otherwise...

Users Manual - English
Page 111
...the embroidery frame. Check and adjust the size and position of the embroidery pattern. Attach stabilizer material to the embroidery unit. Insert a 75/11 home sewing machine needle.* Attach the embroidery unit. Page 111 34 112 24,27 120 114 124 129 28 * It is recommended that a 90/14 needle should ...be used when embroidering on the machine, and then select the embroidery pattern. denim, puffy foam, etc.). 110 Wind the bobbin with embroidery bobbin thread, and then set the bobbin. Turn...
...the embroidery frame. Check and adjust the size and position of the embroidery pattern. Attach stabilizer material to the embroidery unit. Insert a 75/11 home sewing machine needle.* Attach the embroidery unit. Page 111 34 112 24,27 120 114 124 129 28 * It is recommended that a 90/14 needle should ...be used when embroidering on the machine, and then select the embroidery pattern. denim, puffy foam, etc.). 110 Wind the bobbin with embroidery bobbin thread, and then set the bobbin. Turn...

Users Manual - English
Page 113
... the a Connection port b Embroidery unit connector a b Note • Make sure that there is no gap between the embroidery unit and the sewing machine, otherwise the embroidery pattern may result. • If the embroidery unit could fall off and cause injury. • Keep your hands and foreign...connection port in the direction of the connection port when the embroidery unit is not a malfunction. CAUTION • Do not move the machine with the embroidery unit attached. If this happens, go through the initialization process again. The embroidery unit could not be sewn correctly. ...
... the a Connection port b Embroidery unit connector a b Note • Make sure that there is no gap between the embroidery unit and the sewing machine, otherwise the embroidery pattern may result. • If the embroidery unit could fall off and cause injury. • Keep your hands and foreign...connection port in the direction of the connection port when the embroidery unit is not a malfunction. CAUTION • Do not move the machine with the embroidery unit attached. If this happens, go through the initialization process again. The embroidery unit could not be sewn correctly. ...
Users Manual - English
Page 141
... machine. However, the explanations for example, because the name contains special characters, the file is not displayed. Download the driver from our Web site (www.brother...; .pes files saved with a stitch density that it is a registered trademark or a trademark of International Business Machines Corporation. • Microsoft and Windows are registered trademarks of their respective companies. Use one of Microsoft...be displayed. In that saved using our data design systems or sewing machines may break when sewing with the number of stitches or the number of embroidery data cannot...
... machine. However, the explanations for example, because the name contains special characters, the file is not displayed. Download the driver from our Web site (www.brother...; .pes files saved with a stitch density that it is a registered trademark or a trademark of International Business Machines Corporation. • Microsoft and Windows are registered trademarks of their respective companies. Use one of Microsoft...be displayed. In that saved using our data design systems or sewing machines may break when sewing with the number of stitches or the number of embroidery data cannot...

Users Manual - English
Page 143
... Patterns to your computer. Using the included USB cable, connect the sewing machine to the Computer c a b a Amount of memory currently being used by the pattern is indicated on . Note Do not turn off the machine while the "Saving" screen is enough memory available after deleting the... can only be plugged into a port in one direction. b a a USB port b USB cable connector → The "Removable Disk" icon appears in the machine's memory. • See page 143 for saving patterns c Pockets where a pattern is saved, the previous screen appears automatically. a b → The "Saving...
... Patterns to your computer. Using the included USB cable, connect the sewing machine to the Computer c a b a Amount of memory currently being used by the pattern is indicated on . Note Do not turn off the machine while the "Saving" screen is enough memory available after deleting the... can only be plugged into a port in one direction. b a a USB port b USB cable connector → The "Removable Disk" icon appears in the machine's memory. • See page 143 for saving patterns c Pockets where a pattern is saved, the previous screen appears automatically. a b → The "Saving...

Users Manual - English
Page 173
Saving Custom Stitches to the Computer Using the included USB cable, connect the sewing machine to your computer. For details on page 105. → A confirmation message appears. 172 a a Pockets holding saved custom stitches c Press . → The old custom stitch is ...
Saving Custom Stitches to the Computer Using the included USB cable, connect the sewing machine to your computer. For details on page 105. → A confirmation message appears. 172 a a Pockets holding saved custom stitches c Press . → The old custom stitch is ...

Users Manual - English
Page 174
... the entire saved custom stitch cannot be retrieved from the Computer Using the included USB cable, connect the sewing machine to delete the custom stitch. → The selected custom stitch is retrieved and the sewing screen appears. → The pocket selection screen appears. USING STORED CUSTOM STITCHES c Press * Press . Retrieving Custom Stitches from...
... the entire saved custom stitch cannot be retrieved from the Computer Using the included USB cable, connect the sewing machine to delete the custom stitch. → The selected custom stitch is retrieved and the sewing screen appears. → The pocket selection screen appears. USING STORED CUSTOM STITCHES c Press * Press . Retrieving Custom Stitches from...
Users Manual - English
Page 181
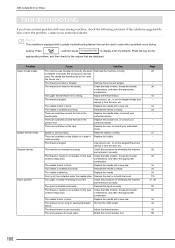
The thread is tangled. The thread is knotted or tangled. The needle is bent or blunt. Replace the race, or consult your sewing machine, check the following solutions. The needle is bent or blunt. Check the table of fabric, thread and needle combinations, and select the appropriate combination. Replace ...
The thread is tangled. The thread is knotted or tangled. The needle is bent or blunt. Replace the race, or consult your sewing machine, check the following solutions. The needle is bent or blunt. Check the table of fabric, thread and needle combinations, and select the appropriate combination. Replace ...

Users Manual - English
Page 189
SPECIFICATIONS SPECIFICATIONS Sewing Machine Embroidery Unit Dimensions Item Case dimensions Weight Sewing speed Needle Dimensions Dimension of machine with embroidery unit attached Weight Specification 51.1 cm (W) × 30.5 cm (H) × 25.8 cm (D) (approx. 20-1/8 inches (W) × 12...inches (W) × 12-1/2 inches (H) × 11-1/8 inches (D)) 11.2 kg (24.7 lb.) (with case: 13.5 kg (29.8 lb.)) 70 to 1000 stitches per minute Home sewing machine needles (HA × 130) 45.8 cm (W) × 13.1 cm (H) × 42.3 cm (D) (approx. 18 inches (W) × 5-1/8 inches (H) × 16-3/4 ...
SPECIFICATIONS SPECIFICATIONS Sewing Machine Embroidery Unit Dimensions Item Case dimensions Weight Sewing speed Needle Dimensions Dimension of machine with embroidery unit attached Weight Specification 51.1 cm (W) × 30.5 cm (H) × 25.8 cm (D) (approx. 20-1/8 inches (W) × 12...inches (W) × 12-1/2 inches (H) × 11-1/8 inches (D)) 11.2 kg (24.7 lb.) (with case: 13.5 kg (29.8 lb.)) 70 to 1000 stitches per minute Home sewing machine needles (HA × 130) 45.8 cm (W) × 13.1 cm (H) × 42.3 cm (D) (approx. 18 inches (W) × 5-1/8 inches (H) × 16-3/4 ...


