

Accessory Catalog
Page 4
... slide the presser foot so that the needle fits on the opening on the edge of zipper/piping, avoiding the non-flat parts of zipper/piping, and presses the fabric with a screwdriver. 5. SA161 All Brother home-use sewing machines www.brother.com Use these utility presser feet and accessories to add a professional finish to your...
... slide the presser foot so that the needle fits on the opening on the edge of zipper/piping, avoiding the non-flat parts of zipper/piping, and presses the fabric with a screwdriver. 5. SA161 All Brother home-use sewing machines www.brother.com Use these utility presser feet and accessories to add a professional finish to your...

Accessory Catalog
Page 6
...rolling around the curled part of the foot. 5. Position the edge of the fabric. Overlock Foot For vertical bobbin machines only. Lower the presser foot so that the foot guide is Project Book (See page 50 for details.) www.brother.com Brother General Sewing Accessories 09 Narrow ...Hemmer Foot Non Stick Foot Overlock Foot Picot Foot Brother General Sewing Accessories 10 SA126 ABCDEFJKMN...
...rolling around the curled part of the foot. 5. Position the edge of the fabric. Overlock Foot For vertical bobbin machines only. Lower the presser foot so that the foot guide is Project Book (See page 50 for details.) www.brother.com Brother General Sewing Accessories 09 Narrow ...Hemmer Foot Non Stick Foot Overlock Foot Picot Foot Brother General Sewing Accessories 10 SA126 ABCDEFJKMN...
Users Manual - English
Page 3
...service life 1. For repair or adjustment In the event a malfunction occurs or adjustment is one of the most advanced computerized household sewing machines. Plug the machine directly into the wall. Use only neutral soaps or detergents to change without notice. 2 To fully enjoy all the features,... manual to keep your local authorized Brother dealer. PLEASE READ BEFORE USING THIS MACHINE For safe operation 1. up lever, needle, or other hot objects. 2. Do not use or store the machine near a space heater, iron, halogen lamp, or other moving parts. 2. Benzene, thinner, and scouring...
...service life 1. For repair or adjustment In the event a malfunction occurs or adjustment is one of the most advanced computerized household sewing machines. Plug the machine directly into the wall. Use only neutral soaps or detergents to change without notice. 2 To fully enjoy all the features,... manual to keep your local authorized Brother dealer. PLEASE READ BEFORE USING THIS MACHINE For safe operation 1. up lever, needle, or other hot objects. 2. Do not use or store the machine near a space heater, iron, halogen lamp, or other moving parts. 2. Benzene, thinner, and scouring...

Users Manual - English
Page 4
KNOWING YOUR SEWING MACHINE 5 NAMES OF MACHINE PARTS AND THEIR FUNCTIONS 5 The main parts ...5 Needle and presser foot section ...6 Operation buttons ...6 Operation panel ...7 Flat bed attachment ...7 ACCESSORIES ...8 Optional accessories ...8 USING YOUR SEWING MACHINE 9 Power supply precautions ...9 Power supply ...9 Foot controller ...10 Sewing speed controller (for models equipped with the start/stop button 10 Changing the needle stop position ...10...
KNOWING YOUR SEWING MACHINE 5 NAMES OF MACHINE PARTS AND THEIR FUNCTIONS 5 The main parts ...5 Needle and presser foot section ...6 Operation buttons ...6 Operation panel ...7 Flat bed attachment ...7 ACCESSORIES ...8 Optional accessories ...8 USING YOUR SEWING MACHINE 9 Power supply precautions ...9 Power supply ...9 Foot controller ...10 Sewing speed controller (for models equipped with the start/stop button 10 Changing the needle stop position ...10...

Users Manual - English
Page 6
... the jack/ socket connector. q Foot controller (page 10) You can turn the main power and sewing light switch on and off. 1 KNOWING YOUR SEWING MACHINE 1 NAMES OF MACHINE PARTS AND THEIR FUNCTIONS The main parts a Bobbin winder (page 11) This winds the thread onto the bobbin for use this to control... the sewing speed, and to start and stop sewing. 5 c Hole for extra spool pin (page 23) This holds ...
... the jack/ socket connector. q Foot controller (page 10) You can turn the main power and sewing light switch on and off. 1 KNOWING YOUR SEWING MACHINE 1 NAMES OF MACHINE PARTS AND THEIR FUNCTIONS The main parts a Bobbin winder (page 11) This winds the thread onto the bobbin for use this to control... the sewing speed, and to start and stop sewing. 5 c Hole for extra spool pin (page 23) This holds ...
Users Manual - English
Page 9
... SA125 F001N: XC1944-002 No. KNOWING YOUR SEWING MACHINE ACCESSORIES The following machine models: CS-100, CS-6000, CS-6000i, CS-4000, ES-2400, ES-2000, EX-660, CE-4000, BC-1000, HS-1000, XR-7700 G The screw of the presser foot holder is available through your authorized dealer. (Part code: 132730-122) 1. 2. 3. 4. 5. 6. 7. 8. 9. 10. 11. 12. 13...
... SA125 F001N: XC1944-002 No. KNOWING YOUR SEWING MACHINE ACCESSORIES The following machine models: CS-100, CS-6000, CS-6000i, CS-4000, ES-2400, ES-2000, EX-660, CE-4000, BC-1000, HS-1000, XR-7700 G The screw of the presser foot holder is available through your authorized dealer. (Part code: 132730-122) 1. 2. 3. 4. 5. 6. 7. 8. 9. 10. 11. 12. 13...

Users Manual - English
Page 12
...the spool pin. Pass the end of thread is not in the right place, the thread may cause damage to the machine. ● We designed the bobbin that comes with this sewing machine. b CAUTION ● If the spool of the thread through the hole on c the bobbin from other bobbins may ... been designed for this machine or bobbins of the bobbin Turn on the shaft b Groove of the same type (part code: SA156, SFB: XA5539-151). Turn the bobbin clockwise, by hand, until the spring on the shaft slides into the groove of the bobbin. 1 2 a Spring on the sewing machine. Using other models, ...
...the spool pin. Pass the end of thread is not in the right place, the thread may cause damage to the machine. ● We designed the bobbin that comes with this sewing machine. b CAUTION ● If the spool of the thread through the hole on c the bobbin from other bobbins may ... been designed for this machine or bobbins of the bobbin Turn on the shaft b Groove of the same type (part code: SA156, SFB: XA5539-151). Turn the bobbin clockwise, by hand, until the spring on the shaft slides into the groove of the bobbin. 1 2 a Spring on the sewing machine. Using other models, ...

Users Manual - English
Page 15
...If bobbins from other models are used with your finger, and then pass the thread through the tension-adjusting spring of the same type (part code: SA156, SFB: XA5539-151). If you accidentally step on Slide the button and open the cover. Use only the enclosed bobbin or...with the needle position button), and raise the presser foot lever. 14 1 a Tension-adjusting spring Replace the bobbin cover. KNOWING YOUR SEWING MACHINE Memo ● When the sewing machine is started or the handwheel is not a malfunction. ● The needle bar does not move when you slide the bobbin winding shaft...
...If bobbins from other models are used with your finger, and then pass the thread through the tension-adjusting spring of the same type (part code: SA156, SFB: XA5539-151). If you accidentally step on Slide the button and open the cover. Use only the enclosed bobbin or...with the needle position button), and raise the presser foot lever. 14 1 a Tension-adjusting spring Replace the bobbin cover. KNOWING YOUR SEWING MACHINE Memo ● When the sewing machine is started or the handwheel is not a malfunction. ● The needle bar does not move when you slide the bobbin winding shaft...

Users Manual - English
Page 23
...securely tighten the needle clamp screw with the end of the sewing machine may fall off. a Screwdriver b Needle clamp screw • Do not apply strong force when loosening or tightening the needle clamp screw, otherwise certain parts of the needle bar, and then tighten the needle clamp screw... until it clockwise. a Needle bar b Needle holder c Needle clamp screw d Align 22 Note ● The needle can be damaged. KNOWING YOUR SEWING MACHINE Hold the needle with your left hand, f use a screwdriver to turn . (If the needle clamp screw is loosened too much .) Install the ...
...securely tighten the needle clamp screw with the end of the sewing machine may fall off. a Screwdriver b Needle clamp screw • Do not apply strong force when loosening or tightening the needle clamp screw, otherwise certain parts of the needle bar, and then tighten the needle clamp screw... until it clockwise. a Needle bar b Needle holder c Needle clamp screw d Align 22 Note ● The needle can be damaged. KNOWING YOUR SEWING MACHINE Hold the needle with your left hand, f use a screwdriver to turn . (If the needle clamp screw is loosened too much .) Install the ...

Users Manual - English
Page 24
...back. CAUTION ● When using the twin needle, be sure to attach zigzag foot "J", otherwise the needle may break or the machine may be sewn with this machine (part code: 131096-121). You can use the needle threader to thread the twin needle. If the fabric is turned while the needle ... needle bar thread guide. For details on the top of thread onto the extra spool pin. The needle could break, and damage the machine. ● Do not sew with a needle threader ● You cannot use the same color or two different colors of the needle bar thread guide. Instead, thread...
...back. CAUTION ● When using the twin needle, be sure to attach zigzag foot "J", otherwise the needle may break or the machine may be sewn with this machine (part code: 131096-121). You can use the needle threader to thread the twin needle. If the fabric is turned while the needle ... needle bar thread guide. For details on the top of thread onto the extra spool pin. The needle could break, and damage the machine. ● Do not sew with a needle threader ● You cannot use the same color or two different colors of the needle bar thread guide. Instead, thread...

Users Manual - English
Page 27
...from all moving parts such as the needle and handwheel, otherwise injuries may occur. ● Do not pull or push the fabric too hard while sewing, otherwise injuries may occur or the needle may break or bend. For details on turning on the machine. Position the fabric... in operation, pay special attention to "Selecting stitching" (page 27). ↓ 3 Attach the presser foot. Before operating the sewing machine, read the following precautions. When sewing is in injuries. ● Make sure that the needle does not strike basting pins, otherwise the needle may break. ●...
...from all moving parts such as the needle and handwheel, otherwise injuries may occur. ● Do not pull or push the fabric too hard while sewing, otherwise injuries may occur or the needle may break or bend. For details on turning on the machine. Position the fabric... in operation, pay special attention to "Selecting stitching" (page 27). ↓ 3 Attach the presser foot. Before operating the sewing machine, read the following precautions. When sewing is in injuries. ● Make sure that the needle does not strike basting pins, otherwise the needle may break. ●...
Users Manual - English
Page 39
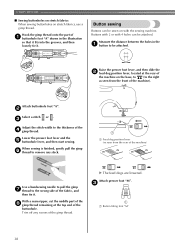
...dogs are lowered. Buttons with 2 or with the sewing machine. When sewing is finished, gently pull the gimp f thread to remove any excess of the machine). With a seam ripper, cut the middle part of the h gimp thread remaining at the rear of the machine on the base, to (to the right as... a stitch or . Lower the presser foot lever and the e buttonhole lever, and then start sewing. c 1 a Button fitting foot "M" 38 Hook the gimp thread onto the part of the fabric, and then tie it . Button sewing Buttons can be sewn on stretch fabrics, use a gimp thread. UTILITY STITCHES ■...
...dogs are lowered. Buttons with 2 or with the sewing machine. When sewing is finished, gently pull the gimp f thread to remove any excess of the machine). With a seam ripper, cut the middle part of the h gimp thread remaining at the rear of the machine on the base, to (to the right as... a stitch or . Lower the presser foot lever and the e buttonhole lever, and then start sewing. c 1 a Button fitting foot "M" 38 Hook the gimp thread onto the part of the fabric, and then tie it . Button sewing Buttons can be sewn on stretch fabrics, use a gimp thread. UTILITY STITCHES ■...

Users Manual - English
Page 64
... stitch 32 main parts 5 main power switch 9 A , monogramming 49 51 accessories 8 appliqués 42 N needle 20 B bar tack 46 basic stitching 33 blind hem stitching 34 bobbin 14 , bobbin case 14 57 , bobbin cover 6 14 bobbin , winder 11 59, 62 button sewing 38 needle bar ... 6 H handwheel 5 heirloom stitching 51 J joining 51 , joining stitch 42 48 L LCD 7 S scallop stitching 49 seam ripper 37 sewing machine needles 20 sewing speed controller 6 sleeve holes 46 smocking 50 , spool pin 11 16 , start/stop button 6 28 stitch length 27 stitch selection key ...
... stitch 32 main parts 5 main power switch 9 A , monogramming 49 51 accessories 8 appliqués 42 N needle 20 B bar tack 46 basic stitching 33 blind hem stitching 34 bobbin 14 , bobbin case 14 57 , bobbin cover 6 14 bobbin , winder 11 59, 62 button sewing 38 needle bar ... 6 H handwheel 5 heirloom stitching 51 J joining 51 , joining stitch 42 48 L LCD 7 S scallop stitching 49 seam ripper 37 sewing machine needles 20 sewing speed controller 6 sleeve holes 46 smocking 50 , spool pin 11 16 , start/stop button 6 28 stitch length 27 stitch selection key ...


