

Accessory Catalog
Page 11
... select zigzag stitch with brother sewing machines of seams or pattern markings are desired. Attach the presser foot onto the machine. 5. Perfect for quilting appliqué! 1. Place cord under the presser foot. 3. SA110 ABCDEFJKMN SA148 GHILOP Cording Foot (5-hole) Used for embellishing 1 to 5 cords or decorative threads. Insert cords or threads into each hole on the presser foot. 2. Line up the cords, and select zigzag stitch with maximum stitch width. Attach the presser foot and select a stitch from the right of 7 mm feed width. 1. Slip a cord from satin or...
... select zigzag stitch with brother sewing machines of seams or pattern markings are desired. Attach the presser foot onto the machine. 5. Perfect for quilting appliqué! 1. Place cord under the presser foot. 3. SA110 ABCDEFJKMN SA148 GHILOP Cording Foot (5-hole) Used for embellishing 1 to 5 cords or decorative threads. Insert cords or threads into each hole on the presser foot. 2. Line up the cords, and select zigzag stitch with maximum stitch width. Attach the presser foot and select a stitch from the right of 7 mm feed width. 1. Slip a cord from satin or...

Accessory Catalog
Page 12
... needle area. Sew a few stitches to more than 5 mm. 2. Select a straight stitch, left needle position. 2. Adding decorative stitches over seams or patterns: Line up the center guide mark (red) of the presser foot to the edge of the foot. 3. Also used for clothing as well as knits. 1. Mark a guideline to follow on thin to medium weight fabrics. Works best on your fabric. 3. Requires Low Shank Adapter for details.) Brother Embellishment Feet Open...
... needle area. Sew a few stitches to more than 5 mm. 2. Select a straight stitch, left needle position. 2. Adding decorative stitches over seams or patterns: Line up the center guide mark (red) of the presser foot to the edge of the foot. 3. Also used for clothing as well as knits. 1. Mark a guideline to follow on thin to medium weight fabrics. Works best on your fabric. 3. Requires Low Shank Adapter for details.) Brother Embellishment Feet Open...

Accessory Catalog
Page 13
... presser foot. 1. Use a stiff card to get started. A specially designed bobbin cover is also included with evenly spaced tucks and gathers. Further rows can be evenly spaced by trying different combinations of tuck or gather by placing the completed row in the center position. 3. Sew slowly for details.) Brother Embellishment Feet Pin Tuck Foot 24 Ruffler Foot Pin Tuck Foot This presser foot has 7 grooves and produces perfect pin tucks and corded pin tucks using a twin needle...
... presser foot. 1. Use a stiff card to get started. A specially designed bobbin cover is also included with evenly spaced tucks and gathers. Further rows can be evenly spaced by trying different combinations of tuck or gather by placing the completed row in the center position. 3. Sew slowly for details.) Brother Embellishment Feet Pin Tuck Foot 24 Ruffler Foot Pin Tuck Foot This presser foot has 7 grooves and produces perfect pin tucks and corded pin tucks using a twin needle...

Accessory Catalog
Page 15
... fabric and the walking foot with the open front when greater visibility is finished, sew about four locking stitches. 8. Screw on the Open Toe Quilting Foot, with both hands are created. 1. When quilting is needed. 1. Lower the feed dogs. 2. Requires Low Shank Adapter for straight stitch. 3. Lower the feed dogs. 3. Set the fabric under the presser foot. 6. While starting to sew, press the needle position button twice to pull the bobbin thread to the machine. 2. Select a straight stitch or your preferred stitch such as the machine's lower feed dogs to hold fabric...
... fabric and the walking foot with the open front when greater visibility is finished, sew about four locking stitches. 8. Screw on the Open Toe Quilting Foot, with both hands are created. 1. When quilting is needed. 1. Lower the feed dogs. 2. Requires Low Shank Adapter for straight stitch. 3. Lower the feed dogs. 3. Set the fabric under the presser foot. 6. While starting to sew, press the needle position button twice to pull the bobbin thread to the machine. 2. Select a straight stitch or your preferred stitch such as the machine's lower feed dogs to hold fabric...

Accessory Catalog
Page 17
... Embroidery Card Reader is compatible with the entire library of designs will work beautifully in USB port on your QuattroTM 6000D. Includes three new free-motion presser feet: Free-motion quilting foot "C" for more features to embroider beautiful motifs continuously as embroidery. Change your LCD screen background color for the Innov-is 4000D this upgrade adds outstanding quilting features, updated embroidery functionality and enhanced USB capability. Accepts USB mouse* to embroider 150 decorative sewing stitches within...
... Embroidery Card Reader is compatible with the entire library of designs will work beautifully in USB port on your QuattroTM 6000D. Includes three new free-motion presser feet: Free-motion quilting foot "C" for more features to embroider beautiful motifs continuously as embroidery. Change your LCD screen background color for the Innov-is 4000D this upgrade adds outstanding quilting features, updated embroidery functionality and enhanced USB capability. Accepts USB mouse* to embroider 150 decorative sewing stitches within...

Accessory Catalog
Page 33
... SA560 QuattroTM 6000D Embroidery Machine Hoops Select hoops appropriate for your machine to provide 10 vertical spool pins for thread delivery or bobbin storage. Spend less time changing threads, and more on our website for details, www.brother.com. Some hoops can easily be used thread colors. Place your next embroidery, quilting or sewing project. The spool pins can be removed to accommodate a variety of spool sizes. Ten Spool Thread Stand This 10-Spool Thread Stand snaps securely...
... SA560 QuattroTM 6000D Embroidery Machine Hoops Select hoops appropriate for your machine to provide 10 vertical spool pins for thread delivery or bobbin storage. Spend less time changing threads, and more on our website for details, www.brother.com. Some hoops can easily be used thread colors. Place your next embroidery, quilting or sewing project. The spool pins can be removed to accommodate a variety of spool sizes. Ten Spool Thread Stand This 10-Spool Thread Stand snaps securely...

Accessory Catalog
Page 34
... straight, zig zag or decorative stitches. SA519 Iron-on the wall for greater utility and space saving. Individual colors are included in the most intricate designs. Polyester retains its color beauty and quality even in the 61 color set of needle and stabilizer types. Brother Embroidery Accessories PacesetterTM Polyester Threads 65 Brother Country Yarn Embroidery Threads Metallic Threads For the best embroidery results, use these embroidery threads especially designed for Brother sewing and embroidering machines...
... straight, zig zag or decorative stitches. SA519 Iron-on the wall for greater utility and space saving. Individual colors are included in the most intricate designs. Polyester retains its color beauty and quality even in the 61 color set of needle and stabilizer types. Brother Embroidery Accessories PacesetterTM Polyester Threads 65 Brother Country Yarn Embroidery Threads Metallic Threads For the best embroidery results, use these embroidery threads especially designed for Brother sewing and embroidering machines...

Accessory Catalog
Page 36
... fur. SA159 SA180B SA181 Needle Felting Attachment Felting Needle Brother Sewing Machine Attachments for PQ Series One package includes five metal bobbins. Comes with the feed dogs and can attach it . 1. Draw a rough sketch on the fabric under the Needle Felting Attachment. 4. Felting Needle Needle Felted Cap & Scarf www.brother.com No thread is required to maintain contact with Dust Box and Needle Guide. SA173 Ver y Narrow Foot Very convenient for PQ...
... fur. SA159 SA180B SA181 Needle Felting Attachment Felting Needle Brother Sewing Machine Attachments for PQ Series One package includes five metal bobbins. Comes with the feed dogs and can attach it . 1. Draw a rough sketch on the fabric under the Needle Felting Attachment. 4. Felting Needle Needle Felted Cap & Scarf www.brother.com No thread is required to maintain contact with Dust Box and Needle Guide. SA173 Ver y Narrow Foot Very convenient for PQ...

Accessory Catalog
Page 40
... Fold fabric and set through the holder). 4. Set T1/T2 presser foot. 2. SA224CV SA221CV Hemming Set Finishes hems easily and quickly. Set up your machine for a cover stitch, with 3 or 6 mm wide cover stitch. 3. Sew as folding them. Attach the hem positioning plate A/B to the hemming attachment, and attach it into the front cover slot. 3. Attaching 6 mm (approx. 1/4") bias tape: Use the small bias tape sliding plate with 3 or 6 mm (approx. 1/8 or 1/4 inch) wide cover stitch. 1. Brother Cover Stitch Feet 78 Top Stitching Foot Set Top Stitching Foot Set Use included presser foot...
... Fold fabric and set through the holder). 4. Set T1/T2 presser foot. 2. SA224CV SA221CV Hemming Set Finishes hems easily and quickly. Set up your machine for a cover stitch, with 3 or 6 mm wide cover stitch. 3. Sew as folding them. Attach the hem positioning plate A/B to the hemming attachment, and attach it into the front cover slot. 3. Attaching 6 mm (approx. 1/4") bias tape: Use the small bias tape sliding plate with 3 or 6 mm (approx. 1/8 or 1/4 inch) wide cover stitch. 1. Brother Cover Stitch Feet 78 Top Stitching Foot Set Top Stitching Foot Set Use included presser foot...
Users Manual - English
Page 3
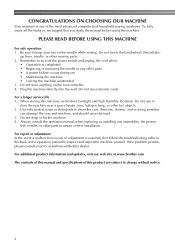
... manual and specifications of the most advanced computerized household sewing machines. Be sure to keep your local authorized Brother dealer. Do not store anything on the needle while sewing. Remember to turn off the power switch and unplug the cord when: • Operation is completed • Replacing or removing the needle or any assemblies, the presser feet, needle, or other parts • A power failure occurs during use • Maintaining the machine...
... manual and specifications of the most advanced computerized household sewing machines. Be sure to keep your local authorized Brother dealer. Do not store anything on the needle while sewing. Remember to turn off the power switch and unplug the cord when: • Operation is completed • Replacing or removing the needle or any assemblies, the presser feet, needle, or other parts • A power failure occurs during use • Maintaining the machine...

Users Manual - English
Page 4
... ...31 Sewing stretch fabrics ...31 Using a free-arm style ...31 3 CONTENTS 1. KNOWING YOUR SEWING MACHINE 5 NAMES OF MACHINE PARTS AND THEIR FUNCTIONS 5 The main parts ...5 Needle and presser foot section ...6 Operation buttons ...6 Operation panel ...7 Flat bed attachment ...7 ACCESSORIES ...8 Optional accessories ...8 USING YOUR SEWING MACHINE 9 Power supply precautions ...9 Power supply ...9 Foot controller ...10 Sewing speed controller (for models equipped with the start/stop button 10 Changing the needle stop position ...10 THREADING THE MACHINE 11 Winding the bobbin ...11 Lower...
... ...31 Sewing stretch fabrics ...31 Using a free-arm style ...31 3 CONTENTS 1. KNOWING YOUR SEWING MACHINE 5 NAMES OF MACHINE PARTS AND THEIR FUNCTIONS 5 The main parts ...5 Needle and presser foot section ...6 Operation buttons ...6 Operation panel ...7 Flat bed attachment ...7 ACCESSORIES ...8 Optional accessories ...8 USING YOUR SEWING MACHINE 9 Power supply precautions ...9 Power supply ...9 Foot controller ...10 Sewing speed controller (for models equipped with the start/stop button 10 Changing the needle stop position ...10 THREADING THE MACHINE 11 Winding the bobbin ...11 Lower...

Users Manual - English
Page 6
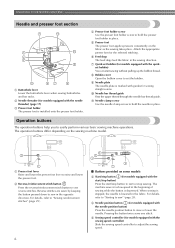
... manually raise and lower the needle. k Handwheel Used to raise and lower the presser foot. q Foot controller (page 10) You can turn the main power and sewing light switch on the sewing machine model. o Feed dog position lever (pages 38 and 45) Use the feed dog position lever to cut them. 1 KNOWING YOUR SEWING MACHINE 1 NAMES OF MACHINE PARTS AND THEIR FUNCTIONS The main parts a Bobbin winder (page 11) This winds the thread onto the bobbin for sewing with accessory compartment (pages 7 and 31) i Operation buttons (page 6) The operation buttons...
... manually raise and lower the needle. k Handwheel Used to raise and lower the presser foot. q Foot controller (page 10) You can turn the main power and sewing light switch on the sewing machine model. o Feed dog position lever (pages 38 and 45) Use the feed dog position lever to cut them. 1 KNOWING YOUR SEWING MACHINE 1 NAMES OF MACHINE PARTS AND THEIR FUNCTIONS The main parts a Bobbin winder (page 11) This winds the thread onto the bobbin for sewing with accessory compartment (pages 7 and 31) i Operation buttons (page 6) The operation buttons...
Users Manual - English
Page 7
... direction. e Presser foot The presser foot applies pressure consistently on the sewing machine model. g Quick-set the bobbin. i Needle plate The needle plate is depressed. For details, refer to "Starting to raise and lower the presser foot. e Sewing speed controller (for models equipped with guides for the selected stitching. k Needle clamp screw Use the needle clamp screw to sew reverse stitches. Reverse stitches are sewn by keeping the button pressed down to easily perform various basic sewing machine operations. Operation buttons The operation buttons help...
... direction. e Presser foot The presser foot applies pressure consistently on the sewing machine model. g Quick-set the bobbin. i Needle plate The needle plate is depressed. For details, refer to "Starting to raise and lower the presser foot. e Sewing speed controller (for models equipped with guides for the selected stitching. k Needle clamp screw Use the needle clamp screw to sew reverse stitches. Reverse stitches are sewn by keeping the button pressed down to easily perform various basic sewing machine operations. Operation buttons The operation buttons help...

Users Manual - English
Page 15
Lower threading Install the bobbin wound with this machine. Actual size 11.5 mm (7/16 inch) This model Other models • Only use bobbins that the thread is correctly inserted through the tension-adjusting spring of the same type (part code: SA156, SFB: XA5539-151). Hold the end of the thread, push the bobbin d down with the needle position button), and raise the presser foot lever. 14 1 a Tension-adjusting spring Replace the bobbin cover. Raise the needle to the right. If bobbins from other models are used with...
Lower threading Install the bobbin wound with this machine. Actual size 11.5 mm (7/16 inch) This model Other models • Only use bobbins that the thread is correctly inserted through the tension-adjusting spring of the same type (part code: SA156, SFB: XA5539-151). Hold the end of the thread, push the bobbin d down with the needle position button), and raise the presser foot lever. 14 1 a Tension-adjusting spring Replace the bobbin cover. Raise the needle to the right. If bobbins from other models are used with...
Users Manual - English
Page 39
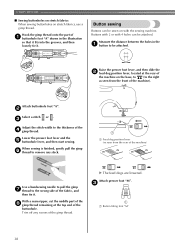
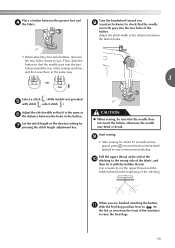
Buttons with 2 or with the sewing machine. Raise the presser foot lever, and then slide the b feed dog position lever, located at the top end of the gimp thread. When sewing is finished, gently pull the gimp f thread to the thickness of the fabric, and then tie it . Trim off any slack. Attach presser foot "M". UTILITY STITCHES ■ Sewing buttonholes on stretch fabrics When sewing buttonholes on with 4 holes can be sewn on stretch fabrics, use a gimp thread. c Adjust the stitch width...
Buttons with 2 or with the sewing machine. Raise the presser foot lever, and then slide the b feed dog position lever, located at the top end of the gimp thread. When sewing is finished, gently pull the gimp f thread to the thickness of the fabric, and then tie it . Trim off any slack. Attach presser foot "M". UTILITY STITCHES ■ Sewing buttonholes on stretch fabrics When sewing buttonholes on with 4 holes can be sewn on stretch fabrics, use a gimp thread. c Adjust the stitch width...
Users Manual - English
Page 40
... speed, press (reverse/reinforcement stitch button) to the left as f the distance between the holes in the same way. 3 Select a stitch . (With models not provided e with the bobbin thread. When you are finished attaching the button, k slide the feed dog position lever to (to sew reinforcement stitches. Turn the handwheel toward the rear of the machine) to the wrong side of the fabric, and then tie it with stitch , select stitch .) Adjust...
... speed, press (reverse/reinforcement stitch button) to the left as f the distance between the holes in the same way. 3 Select a stitch . (With models not provided e with the bobbin thread. When you are finished attaching the button, k slide the feed dog position lever to (to sew reinforcement stitches. Turn the handwheel toward the rear of the machine) to the wrong side of the fabric, and then tie it with stitch , select stitch .) Adjust...

Users Manual - English
Page 61
... service center. Incorrect bobbins will not work properly. Fit the spool properly. Choose a thread and needle that has been designed for this machine. Adjust the tension of the upper thread. APPENDIX Symptom The upper thread breaks. The lower thread is scratched. The area around the hole in the needle plate is tangled or breaks. The bobbin is too thick. If you are appropriate for the type of fabric, thread and needle. Replace the bobbin case. Wind the bobbin thread properly. Replace the bobbin. Only use a bobbin...
... service center. Incorrect bobbins will not work properly. Fit the spool properly. Choose a thread and needle that has been designed for this machine. Adjust the tension of the upper thread. APPENDIX Symptom The upper thread breaks. The lower thread is scratched. The area around the hole in the needle plate is tangled or breaks. The bobbin is too thick. If you are appropriate for the type of fabric, thread and needle. Replace the bobbin case. Wind the bobbin thread properly. Replace the bobbin. Only use a bobbin...
Users Manual - English
Page 62
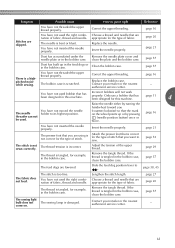
... 16 Stitches are lowered. You have not threaded the upper thread properly. Replace the needle. You have not moved the needle The needle holder to its highest position. Attach the presser foot that is tangled, for this machine. The thread is correct for the type of stitch that has been designed for example, in the bobbin case. page 29 page 57 The feed dogs are skipped. You have not used the right combination of fabric. come...
... 16 Stitches are lowered. You have not threaded the upper thread properly. Replace the needle. You have not moved the needle The needle holder to its highest position. Attach the presser foot that is tangled, for this machine. The thread is correct for the type of stitch that has been designed for example, in the bobbin case. page 29 page 57 The feed dogs are skipped. You have not used the right combination of fabric. come...
Users Manual - English
Page 63
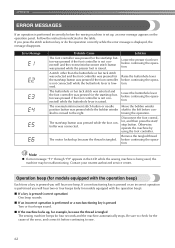
... correct it before continuing to the left before continuing the operation. APPENDIX ERROR MESSAGES If an operation is performed incorrectly before the sewing machine is moved to the right. Remove the tangled thread before continuing the operation. The reverse/reinforcement stitch button or needle position button was pressed while the bobbin winder shaft is set up because the thread is displayed, the message disappears. Otherwise, operate the machine by using the foot controller.
... correct it before continuing to the left before continuing the operation. APPENDIX ERROR MESSAGES If an operation is performed incorrectly before the sewing machine is moved to the right. Remove the tangled thread before continuing the operation. The reverse/reinforcement stitch button or needle position button was pressed while the bobbin winder shaft is set up because the thread is displayed, the message disappears. Otherwise, operate the machine by using the foot controller.

Users Manual - English
Page 64
...point zigzag stitch 32 main parts 5 main power switch 9 A , monogramming 49 51 accessories 8 appliqués 42 N needle 20 B bar tack 46 basic stitching 33 blind hem stitching 34 bobbin 14 , bobbin case 14 57 , bobbin cover 6 14 bobbin , winder 11 59, 62 button sewing 38 needle bar thread guide 6 , needle clamp screw 6 22 needle plate 6 needle plate cover 57 needle position 33 needle position button 6 needle threader 17 O buttonhole foot 36 openings 46 buttonhole , lever 6 37, 47 buttonhole sewing 35 operation beep 62 operation buttons 6 4 operation...
...point zigzag stitch 32 main parts 5 main power switch 9 A , monogramming 49 51 accessories 8 appliqués 42 N needle 20 B bar tack 46 basic stitching 33 blind hem stitching 34 bobbin 14 , bobbin case 14 57 , bobbin cover 6 14 bobbin , winder 11 59, 62 button sewing 38 needle bar thread guide 6 , needle clamp screw 6 22 needle plate 6 needle plate cover 57 needle position 33 needle position button 6 needle threader 17 O buttonhole foot 36 openings 46 buttonhole , lever 6 37, 47 buttonhole sewing 35 operation beep 62 operation buttons 6 4 operation...


