
Reference Guide
Page 11
...) Applicable Models Approximately 3,000 pages 1 2 HL-L2350DW/HL-L2370DW/ HL-L2370DWXL 1 Approximate cartridge yield is declared in accordance with ISO/IEC 19752. 2 A4/Letter simplex pages Super High Yield Toner: Supply order No. Toner Cartridge Standard Toner: Supply order No. TN-730 Approximate Life (Page Yield) Applicable Models Approximately 1,200 pages 1 2 HL-L2350DW/HL-L2370DW/ HL-L2370DWXL 1 Approximate cartridge yield is declared in the...
...) Applicable Models Approximately 3,000 pages 1 2 HL-L2350DW/HL-L2370DW/ HL-L2370DWXL 1 Approximate cartridge yield is declared in accordance with ISO/IEC 19752. 2 A4/Letter simplex pages Super High Yield Toner: Supply order No. Toner Cartridge Standard Toner: Supply order No. TN-730 Approximate Life (Page Yield) Applicable Models Approximately 1,200 pages 1 2 HL-L2350DW/HL-L2370DW/ HL-L2370DWXL 1 Approximate cartridge yield is declared in the...

Online Users Guide HTML
Page 4
... ...182 Machine Information...183 Check the Serial Number ...184 Check the Firmware Version ...185 Reset Functions Overview ...186 Reset Your Brother Machine ...187 Routine Maintenance ...188 Replace Supplies ...189 Replace the Toner Cartridge ...191 Replace the Drum Unit ...193 Reset the Drum Counter ...195 Clean the Machine ...196 Clean the Corona Wire...198...
... ...182 Machine Information...183 Check the Serial Number ...184 Check the Firmware Version ...185 Reset Functions Overview ...186 Reset Your Brother Machine ...187 Routine Maintenance ...188 Replace Supplies ...189 Replace the Toner Cartridge ...191 Replace the Drum Unit ...193 Reset the Drum Counter ...195 Clean the Machine ...196 Clean the Corona Wire...198...

Online Users Guide HTML
Page 155
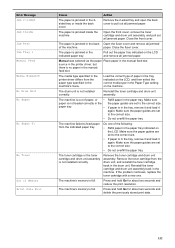
... and Maintenance Messages Error and Maintenance Messages As with a new one. If you need more tips: Visit support.brother.com, and click the FAQs & Troubleshooting page. The toner cartridge is Open Drum ! The temperature of closed position. The front cover is not spinning, disconnect the machine from the.... must be replaced. Reinstall the drum unit in the table. If this happens, your local Brother dealer. The machine pauses its life. Remove the drum unit, remove the toner cartridge from the power for several minutes, then reconnect it not closed . Cause Action The back cover...
... and Maintenance Messages Error and Maintenance Messages As with a new one. If you need more tips: Visit support.brother.com, and click the FAQs & Troubleshooting page. The toner cartridge is Open Drum ! The temperature of closed position. The front cover is not spinning, disconnect the machine from the.... must be replaced. Reinstall the drum unit in the table. If this happens, your local Brother dealer. The machine pauses its life. Remove the drum unit, remove the toner cartridge from the power for several minutes, then reconnect it not closed . Cause Action The back cover...
Online Users Guide HTML
Page 156
... Action The paper is in the tray, remove it and load it again. paper. The paper is not installed correctly. The toner cartridge or the toner cartridge and drum unit assembly is jammed in the indicated paper tray. Make sure the paper guides are set to feed paper from the...driver differs from the indicated paper tray. The machine's memory is jammed in the tray, remove it and load it again. Reinstall the toner cartridge and drum unit assembly. Do not overfill the paper tray. Press and hold Go for about two seconds and reduce the print resolution....
... Action The paper is in the tray, remove it and load it again. paper. The paper is not installed correctly. The toner cartridge or the toner cartridge and drum unit assembly is jammed in the indicated paper tray. Make sure the paper guides are set to feed paper from the...driver differs from the indicated paper tray. The machine's memory is jammed in the tray, remove it and load it again. Reinstall the toner cartridge and drum unit assembly. Do not overfill the paper tray. Press and hold Go for about two seconds and reduce the print resolution....

Online Users Guide HTML
Page 157
... in the tray is not the correct size and is at : 1-877-BROTHER (1-877-276-8437) (in USA) www.brother.ca/support (in the tray is near the end of the fuser unit does not rise to replace the toner cartridge. Paper sizes available for the tray. its life. The temperature of its...8226; Replace Supplies • Replace the Drum Unit 153 It is time to replace the drum unit. The toner it ready when the LCD displays Replace cartridge is not the correct size. Contact Brother Customer Service at the end of paper in the printer driver is too hot. The machine stops all print...
... in the tray is not the correct size and is at : 1-877-BROTHER (1-877-276-8437) (in USA) www.brother.ca/support (in the tray is near the end of the fuser unit does not rise to replace the toner cartridge. Paper sizes available for the tray. its life. The temperature of its...8226; Replace Supplies • Replace the Drum Unit 153 It is time to replace the drum unit. The toner it ready when the LCD displays Replace cartridge is not the correct size. Contact Brother Customer Service at the end of paper in the printer driver is too hot. The machine stops all print...

Online Users Guide HTML
Page 163
Remove the toner cartridge and drum unit assembly. Install the toner cartridge and drum unit assembly into the machine. 6. Close the front cover. WARNING HOT SURFACE The machine's internal parts will be extremely hot. Leave the machine turned on for 10 minutes for the machine to cool ...the extremely hot parts inside the machine, follow these steps: 1. Related Information • Paper Jams 159 Wait for the internal fan to cool down before touching them. 4. Open the front cover. 3. Pull out the jammed paper slowly. 5. Home > Troubleshooting > Paper...
Remove the toner cartridge and drum unit assembly. Install the toner cartridge and drum unit assembly into the machine. 6. Close the front cover. WARNING HOT SURFACE The machine's internal parts will be extremely hot. Leave the machine turned on for 10 minutes for the machine to cool ...the extremely hot parts inside the machine, follow these steps: 1. Related Information • Paper Jams 159 Wait for the internal fan to cool down before touching them. 4. Open the front cover. 3. Pull out the jammed paper slowly. 5. Home > Troubleshooting > Paper...

Online Users Guide HTML
Page 169
... 01234 Faint ABCDEFGH abcdefghijk ABCD abcde 01234 Gray background Ghosting images Recommendation • If the machine indicates Replace Toner status, install a new toner cartridge. • Check the machine's environment. Conditions such as low humidity and low temperatures may cause this print... using recommended print media. Conditions such as humidity, high temperatures, and so on the drum unit. • Replace the toner cartridge with a new toner cartridge. • Replace the drum unit with a new drum unit. • Check the machine's environment. Check the interface ...
... 01234 Faint ABCDEFGH abcdefghijk ABCD abcde 01234 Gray background Ghosting images Recommendation • If the machine indicates Replace Toner status, install a new toner cartridge. • Check the machine's environment. Conditions such as low humidity and low temperatures may cause this print... using recommended print media. Conditions such as humidity, high temperatures, and so on the drum unit. • Replace the toner cartridge with a new toner cartridge. • Replace the drum unit with a new drum unit. • Check the machine's environment. Check the interface ...

Online Users Guide HTML
Page 170
... in the menu setting. • The problem may disappear by itself. Replace the drum unit with a new toner cartridge. • The fuser unit may be damaged. In USA: 1-877-BROTHER (1-877-276-8437) In Canada: www.brother.ca/support • Make sure the media type setting in the driver matches the type of poor...
... in the menu setting. • The problem may disappear by itself. Replace the drum unit with a new toner cartridge. • The fuser unit may be damaged. In USA: 1-877-BROTHER (1-877-276-8437) In Canada: www.brother.ca/support • Make sure the media type setting in the driver matches the type of poor...

Online Users Guide HTML
Page 171
... graphics at 3.7 in . (94 mm) intervals If the problem is not solved after printing a few pages, replace the drum unit with a new toner cartridge. • The drum unit may be damaged. See Related Information:Clean the Drum Unit Using Drum Dot Print. Replace the drum unit with a new ...drum unit. • Check the machine's environment. Replace the toner cartridge with a new drum unit. Clean the drum unit. Clean the drum unit. Replace the drum unit with a new drum unit. • Clean the...
... graphics at 3.7 in . (94 mm) intervals If the problem is not solved after printing a few pages, replace the drum unit with a new toner cartridge. • The drum unit may be damaged. See Related Information:Clean the Drum Unit Using Drum Dot Print. Replace the drum unit with a new ...drum unit. • Check the machine's environment. Replace the toner cartridge with a new drum unit. Clean the drum unit. Clean the drum unit. Replace the drum unit with a new drum unit. • Clean the...

Online Users Guide HTML
Page 172
.... • Make sure the paper or other print media is not inside the machine and around the toner cartridge and drum unit. • The toner cartridge may be contaminated. Contact Brother Customer Service. Replace the drum unit with a new toner cartridge. • The drum unit may be too full. • Check the paper type and quality. •...
.... • Make sure the paper or other print media is not inside the machine and around the toner cartridge and drum unit. • The toner cartridge may be contaminated. Contact Brother Customer Service. Replace the drum unit with a new toner cartridge. • The drum unit may be too full. • Check the paper type and quality. •...

Online Users Guide HTML
Page 173
...Related Information • Troubleshooting • Test Print • Clean the Drum Unit Using Drum Dot Print • Recommended Print Media • Reduce Toner Consumption • Replace the Toner Cartridge • Make sure envelopes are printed with Manual Feed Slot) Make sure envelopes are pulled down to the envelope position when you print.... 0123456789. After you have finished printing, reset the levers back to a thick setting. abcdefghijklmnopqrstuvwxyz. Examples of paper you are using. • Choose Improve Toner Fixing mode in the printer driver.
...Related Information • Troubleshooting • Test Print • Clean the Drum Unit Using Drum Dot Print • Recommended Print Media • Reduce Toner Consumption • Replace the Toner Cartridge • Make sure envelopes are printed with Manual Feed Slot) Make sure envelopes are pulled down to the envelope position when you print.... 0123456789. After you have finished printing, reset the levers back to a thick setting. abcdefghijklmnopqrstuvwxyz. Examples of paper you are using. • Choose Improve Toner Fixing mode in the printer driver.

Online Users Guide HTML
Page 183
...is turned on the printed report. Wired/Wireless • All protective packaging has been removed from your computer. • Unsuccessful: Your Brother machine is Link OK. Check the Link Status in the Windows® command prompt or Mac Terminal application: ping or . • Successful:... Wired/Wireless Wired/Wireless Wireless If you have checked and tried all of the above but you can "ping" the Brother machine from the machine. • The toner cartridge and drum unit are installed correctly. • The front and back covers are fully closed. • Paper is inserted...
...is turned on the printed report. Wired/Wireless • All protective packaging has been removed from your computer. • Unsuccessful: Your Brother machine is Link OK. Check the Link Status in the Windows® command prompt or Mac Terminal application: ping or . • Successful:... Wired/Wireless Wired/Wireless Wireless If you have checked and tried all of the above but you can "ping" the Brother machine from the machine. • The toner cartridge and drum unit are installed correctly. • The front and back covers are fully closed. • Paper is inserted...

Online Users Guide HTML
Page 193
... the shaded parts shown in a bag so that toner powder does not spill out of the cartridge. • Visit www.brother.com/original/index.html for each of the toner cartridges is over. Using non-Brother supplies may affect the print quality, hardware performance, and machine reliability. The toner cartridge and drum unit are installed as an assembly...
... the shaded parts shown in a bag so that toner powder does not spill out of the cartridge. • Visit www.brother.com/original/index.html for each of the toner cartridges is over. Using non-Brother supplies may affect the print quality, hardware performance, and machine reliability. The toner cartridge and drum unit are installed as an assembly...

Online Users Guide HTML
Page 194
Related Information • Routine Maintenance • Replace the Toner Cartridge • Replace the Drum Unit • Reset the Drum Counter • Error and Maintenance Messages • Supplies 190
Related Information • Routine Maintenance • Replace the Toner Cartridge • Replace the Drum Unit • Reset the Drum Counter • Error and Maintenance Messages • Supplies 190

Online Users Guide HTML
Page 195
Remove the toner cartridge and drum unit assembly from the machine. 4. Push the new toner cartridge firmly into the drum unit until you hear it lock into place. 191 Push down the green lock lever and take the toner cartridge out of the drum unit. 5. Make sure the machine is turned on. 2. Home > Routine Maintenance > Replace Supplies > Replace the Toner Cartridge Replace the Toner Cartridge 1. Open the front cover. 3. Remove the protective cover. 7. Unpack the new toner cartridge. 6.
Remove the toner cartridge and drum unit assembly from the machine. 4. Push the new toner cartridge firmly into the drum unit until you hear it lock into place. 191 Push down the green lock lever and take the toner cartridge out of the drum unit. 5. Make sure the machine is turned on. 2. Home > Routine Maintenance > Replace Supplies > Replace the Toner Cartridge Replace the Toner Cartridge 1. Open the front cover. 3. Remove the protective cover. 7. Unpack the new toner cartridge. 6.

Online Users Guide HTML
Page 196
...When you want to buy toner cartridges, contact Brother Customer Service. • DO NOT unpack the new toner cartridge until the machine returns to the machine and/or may separate from the Brother machine, we recommend using only Genuine Brother Brand toner cartridges. Our limited warranty coverage does... not apply to use only Genuine Brother Brand replacement toner cartridges. Close the front cover of the machine. •...
...When you want to buy toner cartridges, contact Brother Customer Service. • DO NOT unpack the new toner cartridge until the machine returns to the machine and/or may separate from the Brother machine, we recommend using only Genuine Brother Brand toner cartridges. Our limited warranty coverage does... not apply to use only Genuine Brother Brand replacement toner cartridges. Close the front cover of the machine. •...

Online Users Guide HTML
Page 197
...may separate from the machine. 4. Install the toner cartridge and drum unit assembly back into the new drum unit until you put the toner cartridge in correctly or it lock into place. Push down the green lock lever and take the toner cartridge out of the drum unit. 5. Unpack ...the new drum unit. 6. Make sure the machine is turned on. 2. Push the toner cartridge firmly into the machine. 193 Remove the toner cartridge and drum unit assembly from the drum unit. 7. Home ...
...may separate from the machine. 4. Install the toner cartridge and drum unit assembly back into the new drum unit until you put the toner cartridge in correctly or it lock into place. Push down the green lock lever and take the toner cartridge out of the drum unit. 5. Unpack ...the new drum unit. 6. Make sure the machine is turned on. 2. Push the toner cartridge firmly into the machine. 193 Remove the toner cartridge and drum unit assembly from the drum unit. 7. Home ...

Online Users Guide HTML
Page 200
...type of spray, or an organic solvent/liquid containing alcohol or ammonia to remove dirt from the control panel. Doing so could cause a fire. Toner cartridge Drum unit Related Information • Routine Maintenance • Clean the Corona Wire • Clean the Drum Unit Using Drum Dot Print 196 IMPORTANT.... If printed pages are stained with toner, clean the inside of the machine regularly with a dry, lint-free cloth. Instead, use isopropyl alcohol to clean the inside of the machine with a dry, lint-free cloth. When you replace the toner cartridge or the drum unit, make sure ...
...type of spray, or an organic solvent/liquid containing alcohol or ammonia to remove dirt from the control panel. Doing so could cause a fire. Toner cartridge Drum unit Related Information • Routine Maintenance • Clean the Corona Wire • Clean the Drum Unit Using Drum Dot Print 196 IMPORTANT.... If printed pages are stained with toner, clean the inside of the machine regularly with a dry, lint-free cloth. Instead, use isopropyl alcohol to clean the inside of the machine with a dry, lint-free cloth. When you replace the toner cartridge or the drum unit, make sure ...

Online Users Guide HTML
Page 202
Clean the corona wire inside the drum unit by gently sliding the green tab from the machine. 3. Install the toner cartridge and drum unit assembly back into the machine. 5. Close the front cover of the machine. Be sure to return the tab to left to right ... and Maintenance Messages 198 Home > Routine Maintenance > Clean the Machine > Clean the Corona Wire Clean the Corona Wire If you have a vertical stripe. 4. Remove the toner cartridge and drum unit assembly from left several times. The arrow on the tab must be aligned with the arrow on the drum unit. If it...
Clean the corona wire inside the drum unit by gently sliding the green tab from the machine. 3. Install the toner cartridge and drum unit assembly back into the machine. 5. Close the front cover of the machine. Be sure to return the tab to left to right ... and Maintenance Messages 198 Home > Routine Maintenance > Clean the Machine > Clean the Corona Wire Clean the Corona Wire If you have a vertical stripe. 4. Remove the toner cartridge and drum unit assembly from left several times. The arrow on the tab must be aligned with the arrow on the drum unit. If it...

Online Users Guide HTML
Page 203
Press and hold to select the [Drum Dot Print] option. 4. Press a or b to turn off the machine. 6. Press Go. Remove the toner cartridge and drum unit assembly from a label, stuck on the left side. 199 Make sure that the drum unit gear is in the illustration. Home > Routine ... drum unit as glue from the machine. 8. Make sure the machine is on the drum surface. 1. Push down the green lock lever and take the toner cartridge out of the drum unit. 9. The machine prints the Drum Dot Check Sheet. 5. Press a or b to display the [Print Reports] option, and then press OK...
Press and hold to select the [Drum Dot Print] option. 4. Press a or b to turn off the machine. 6. Press Go. Remove the toner cartridge and drum unit assembly from a label, stuck on the left side. 199 Make sure that the drum unit gear is in the illustration. Home > Routine ... drum unit as glue from the machine. 8. Make sure the machine is on the drum surface. 1. Push down the green lock lever and take the toner cartridge out of the drum unit. 9. The machine prints the Drum Dot Check Sheet. 5. Press a or b to display the [Print Reports] option, and then press OK...


