
Quick Setup Guide - English
Page 4
... the guides are loading in the tray and make sure: The paper is face down output tray. b While pressing the green paper-guide release lever a, slide the paper guides to avoid paper jams and misfeeds. d Put the paper in the tray. Over filling the paper tray will feed properly. f Lift up the support flap a to prevent...
... the guides are loading in the tray and make sure: The paper is face down output tray. b While pressing the green paper-guide release lever a, slide the paper guides to avoid paper jams and misfeeds. d Put the paper in the tray. Over filling the paper tray will feed properly. f Lift up the support flap a to prevent...
User's Guide - English
Page 5
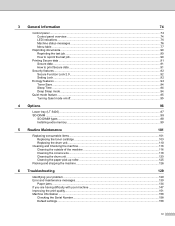
... the machine 116 Cleaning the corona wire...118 Cleaning the drum unit ...120 Cleaning the paper pick-up roller...125 Packing and shipping the machine ...126 6 Troubleshooting 129 Identifying your problem ...129 Error and maintenance messages...130 Paper jams ...134 If you are having difficulty with your machine 147 Improving the print quality...
... the machine 116 Cleaning the corona wire...118 Cleaning the drum unit ...120 Cleaning the paper pick-up roller...125 Packing and shipping the machine ...126 6 Troubleshooting 129 Identifying your problem ...129 Error and maintenance messages...130 Paper jams ...134 If you are having difficulty with your machine 147 Improving the print quality...
User's Guide - English
Page 8
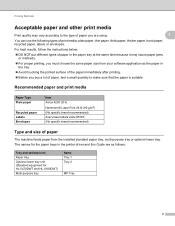
... types of print media: plain paper, thin paper, thick paper, thicker paper, bond paper, recycled paper, labels or envelopes. Printing Methods Acceptable paper and other print media 1 Print quality may cause paper jams or misfeeds. For proper printing, you buy a lot of paper, test a small quantity to the type of paper you are as the paper in the tray. Avoid...
... types of print media: plain paper, thin paper, thick paper, thicker paper, bond paper, recycled paper, labels or envelopes. Printing Methods Acceptable paper and other print media 1 Print quality may cause paper jams or misfeeds. For proper printing, you buy a lot of paper, test a small quantity to the type of paper you are as the paper in the tray. Avoid...
User's Guide - English
Page 10
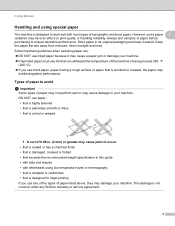
... it may cause a paper jam or damage your machine. Preprinted paper must use ink that is not covered under any of the types of paper listed above, they may cause damage to your machine. Types of paper to avoid 1 Important Some types of paper may not perform well ... °F (200 °C). If you use any Brother warranty or service agreement. 4 Some important guidelines when selecting paper are: DO NOT use inkjet paper because it sealed. Always test samples of xerographic and bond paper. Store paper in this guide • with tabs and staples • with...
... it may cause a paper jam or damage your machine. Preprinted paper must use ink that is not covered under any of the types of paper listed above, they may cause damage to your machine. Types of paper to avoid 1 Important Some types of paper may not perform well ... °F (200 °C). If you use any Brother warranty or service agreement. 4 Some important guidelines when selecting paper are: DO NOT use inkjet paper because it sealed. Always test samples of xerographic and bond paper. Store paper in this guide • with tabs and staples • with...
User's Guide - English
Page 12
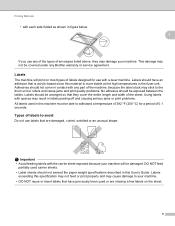
..., because the label stock may cause damage to the drum unit or rollers and cause jams and print quality problems. No adhesive should have an adhesive that is acrylic-based since ...Guide. Labels 1 The machine will be exposed between the labels. Labels should not exceed the paper weight specifications described in this machine must be able to avoid 1 Do not use labels that ... shape. DO NOT feed partially used carrier sheets. • Label sheets should be covered under any Brother warranty or service agreement. Using labels with spaces may damage your machine. • DO NOT reuse ...
..., because the label stock may cause damage to the drum unit or rollers and cause jams and print quality problems. No adhesive should have an adhesive that is acrylic-based since ...Guide. Labels 1 The machine will be exposed between the labels. Labels should not exceed the paper weight specifications described in this machine must be able to avoid 1 Do not use labels that ... shape. DO NOT feed partially used carrier sheets. • Label sheets should be covered under any Brother warranty or service agreement. Using labels with spaces may damage your machine. • DO NOT reuse ...

User's Guide - English
Page 15
Printing Methods b While pressing the green paper-guide release lever (1), slide the paper guides to avoid paper jams and misfeeds. 9 Make sure that the guides are firmly in the slots. 1 1 1 Note 1 For Legal or Folio size paper, press the release button (1) in the bottom of the paper tray and then pull out the back of the paper tray. (Legal and Folio size paper are not available in some regions.) c Fan the stack of paper well to fit the paper you are loading in the tray.
Printing Methods b While pressing the green paper-guide release lever (1), slide the paper guides to avoid paper jams and misfeeds. 9 Make sure that the guides are firmly in the slots. 1 1 1 Note 1 For Legal or Folio size paper, press the release button (1) in the bottom of the paper tray and then pull out the back of the paper tray. (Legal and Folio size paper are not available in some regions.) c Fan the stack of paper well to fit the paper you are loading in the tray.

User's Guide - English
Page 16
Make sure that it will cause paper jams. ) (1). 1 The side to prevent paper from sliding off the face-down . The paper guides touch the sides of the machine. 1 10 Printing Methods d Put paper in the tray and make sure: The paper is completely inserted into the machine. f Lift up the support flap (1) to be printed on must be face down output tray, or remove each page as soon as it comes out of the paper so it is below the maximum paper mark ( Over filling the paper tray will feed properly. 1 e Put the paper tray firmly back in the machine.
Make sure that it will cause paper jams. ) (1). 1 The side to prevent paper from sliding off the face-down . The paper guides touch the sides of the machine. 1 10 Printing Methods d Put paper in the tray and make sure: The paper is completely inserted into the machine. f Lift up the support flap (1) to be printed on must be face down output tray, or remove each page as soon as it comes out of the paper so it is below the maximum paper mark ( Over filling the paper tray will feed properly. 1 e Put the paper tray firmly back in the machine.

User's Guide - English
Page 23
... temperature. • If the envelopes are creased after they are not listed in the drop-down lists may cause them to jam or curl. • If envelopes or thick paper get smudged during printing set the Media Type to Env. Note • Remove each envelope as soon as Envelope #9 or ...(for Windows® printer driver), PostScript Custom Page Size (for BR-Script printer driver for Windows®) or Custom Page Sizes (for Macintosh) from the Paper Size drop-down list. • For other settings, see Driver and Software in the MP tray. • Envelope joints that are printed, see Improving...
... temperature. • If the envelopes are creased after they are not listed in the drop-down lists may cause them to jam or curl. • If envelopes or thick paper get smudged during printing set the Media Type to Env. Note • Remove each envelope as soon as Envelope #9 or ...(for Windows® printer driver), PostScript Custom Page Size (for BR-Script printer driver for Windows®) or Custom Page Sizes (for Macintosh) from the Paper Size drop-down list. • For other settings, see Driver and Software in the MP tray. • Envelope joints that are printed, see Improving...
User's Guide - English
Page 24
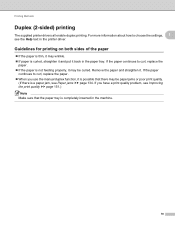
... to curl, replace the paper. If the paper is a paper jam, see Paper jams uu page 134. If the paper continues to choose the settings, 1 see Improving the print quality uu page 151.) Note Make sure that there may be paper jams or poor print quality. (If there is not feeding properly, it may be... curled. Guidelines for printing on both sides of the paper 1 If the paper is thin, it may wrinkle. If paper is completely inserted in the machine. 18 ...
... to curl, replace the paper. If the paper is a paper jam, see Paper jams uu page 134. If the paper continues to choose the settings, 1 see Improving the print quality uu page 151.) Note Make sure that there may be paper jams or poor print quality. (If there is not feeding properly, it may be... curled. Guidelines for printing on both sides of the paper 1 If the paper is thin, it may wrinkle. If paper is completely inserted in the machine. 18 ...
User's Guide - English
Page 27
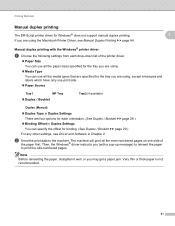
...Printing uu page 64. 1 1 Manual duplex printing with a pop-up message) to reinsert the paper to the machine. Then, the Windows® driver instructs you may get a paper jam. Note Before reinserting the paper, straighten it well, or you (with the Windows® printer driver 1 a Choose the following ...for Windows® does not support manual duplex printing. The machine will print all the even-numbered pages on one print side. Paper Source Tray1 MP Tray Duplex / Booklet Tray2 (if available) Duplex (Manual) Duplex Type in Duplex Settings There are ...
...Printing uu page 64. 1 1 Manual duplex printing with a pop-up message) to reinsert the paper to the machine. Then, the Windows® driver instructs you may get a paper jam. Note Before reinserting the paper, straighten it well, or you (with the Windows® printer driver 1 a Choose the following ...for Windows® does not support manual duplex printing. The machine will print all the even-numbered pages on one print side. Paper Source Tray1 MP Tray Duplex / Booklet Tray2 (if available) Duplex (Manual) Duplex Type in Duplex Settings There are ...

User's Guide - English
Page 59
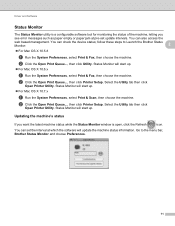
...a configurable software tool for monitoring the status of one or more devices, allowing you to get immediate notification of error messages such as paper empty or paper jam. 2 You can check the device status at anytime by double-clicking the icon in the tasktray or by choosing Status Monitor located in... the taskbar. Driver and Software Status Monitor 2 The Status Monitor utility is active. 53 The Status Monitor icon will appear in Start/All Programs/Brother/HL-XXXX on your PC. (Windows® 7) If you have set the Enable Status Monitor on startup during installation, you will find the button...
...a configurable software tool for monitoring the status of one or more devices, allowing you to get immediate notification of error messages such as paper empty or paper jam. 2 You can check the device status at anytime by double-clicking the icon in the tasktray or by choosing Status Monitor located in... the taskbar. Driver and Software Status Monitor 2 The Status Monitor utility is active. 53 The Status Monitor icon will appear in Start/All Programs/Brother/HL-XXXX on your PC. (Windows® 7) If you have set the Enable Status Monitor on startup during installation, you will find the button...
User's Guide - English
Page 77
... start up. For Mac OS X 10.6.x a Run the System Preferences, select Print & Fax, then choose the machine. Go to Launch the Brother Status Monitor: 2 For Mac OS X 10.5.8 a Run the System Preferences, select Print & Fax, then choose the machine. Driver and Software ...Printer Setup. Select the Utility tab then click Open Printer Utility. Updating the machine's status 2 If you see error messages such as paper empty or paper jam at which the software will update the machine status information. Status Monitor will start up . For Mac OS X 10.7.x ...
... start up. For Mac OS X 10.6.x a Run the System Preferences, select Print & Fax, then choose the machine. Go to Launch the Brother Status Monitor: 2 For Mac OS X 10.5.8 a Run the System Preferences, select Print & Fax, then choose the machine. Driver and Software ...Printer Setup. Select the Utility tab then click Open Printer Utility. Updating the machine's status 2 If you see error messages such as paper empty or paper jam at which the software will update the machine status information. Status Monitor will start up . For Mac OS X 10.7.x ...

User's Guide - English
Page 131
... of the machine to remove dust. 1 f Put the paper tray back in lukewarm water, and then wipe the separator pad (1) of the paper tray with it to remove dust. 5 1 e Wipe the two pick-up roller periodically may prevent paper jams by insuring the proper feeding of the machine. h Turn... on the machine's power switch. 125 g Plug the machine's power cord back into the AC power outlet first, and then connect the interface cables. c Pull the paper tray completely out of paper. a Turn off...
... of the machine to remove dust. 1 f Put the paper tray back in lukewarm water, and then wipe the separator pad (1) of the paper tray with it to remove dust. 5 1 e Wipe the two pick-up roller periodically may prevent paper jams by insuring the proper feeding of the machine. h Turn... on the machine's power switch. 125 g Plug the machine's power cord back into the AC power outlet first, and then connect the interface cables. c Pull the paper tray completely out of paper. a Turn off...
User's Guide - English
Page 136
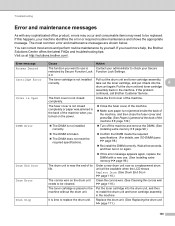
... Error and maintenance messages 6 As with a new one. (See Installing extra memory uu page 99.) The drum unit is not closed completely or paper was jammed in the machine. take out the toner cartridge, and put it on again. If this happens, your Secure restricted by yourself. Close... correctly. Turn off the machine and remove the DIMM. (See Installing extra memory uu page 99.) The DIMM is jammed at http://solutions.brother.com/. re-install the drum unit and toner cartridge assembly in the Put the toner cartridge into the 6 drum unit again. If you...
... Error and maintenance messages 6 As with a new one. (See Installing extra memory uu page 99.) The drum unit is not closed completely or paper was jammed in the machine. take out the toner cartridge, and put it on again. If this happens, your Secure restricted by yourself. Close... correctly. Turn off the machine and remove the DIMM. (See Installing extra memory uu page 99.) The DIMM is jammed at http://solutions.brother.com/. re-install the drum unit and toner cartridge assembly in the Put the toner cartridge into the 6 drum unit again. If you...
User's Guide - English
Page 137
... the MP tray uu page 134. uu page 143. Jam MP Tray The paper is jammed in the MP tray See Paper is jammed in the MP tray as the paper source when there was reached. Jam Tray 1 Jam Tray 2 The paper is jammed in the paper See Paper is not correctly loaded in Paper Tray 1 or Tray 2 tray of the machine. The...
... the MP tray uu page 134. uu page 143. Jam MP Tray The paper is jammed in the MP tray See Paper is jammed in the MP tray as the paper source when there was reached. Jam Tray 1 Jam Tray 2 The paper is jammed in the paper See Paper is not correctly loaded in Paper Tray 1 or Tray 2 tray of the machine. The...

User's Guide - English
Page 140
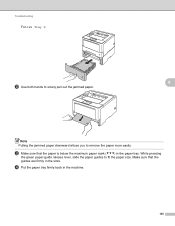
... feeding through the machine at one time and prevents paper jams. Paper is jammed in the MP tray 6 If the LCD shows Jam MP Tray, follow these steps: a Remove the paper from the paper tray and straighten the stack when you add new paper. Troubleshooting Paper jams 6 Always remove all paper from the MP tray. e Press Go to resume printing. This...
... feeding through the machine at one time and prevents paper jams. Paper is jammed in the MP tray 6 If the LCD shows Jam MP Tray, follow these steps: a Remove the paper from the paper tray and straighten the stack when you add new paper. Troubleshooting Paper jams 6 Always remove all paper from the MP tray. e Press Go to resume printing. This...
User's Guide - English
Page 141
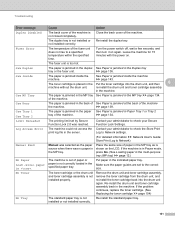
Troubleshooting For Jam Tray 2: 6 b Use both hands to fit the paper size. While pressing the green paper-guide release lever, slide the paper guides to slowly pull out the jammed paper. Make sure that the paper is below the maximum paper mark ( ) in the paper tray. Note Pulling the jammed paper downward allows you to remove the paper more easily. c Make sure that the guides are firmly in the machine. 135 d Put the paper tray firmly back in the slots.
Troubleshooting For Jam Tray 2: 6 b Use both hands to fit the paper size. While pressing the green paper-guide release lever, slide the paper guides to slowly pull out the jammed paper. Make sure that the paper is below the maximum paper mark ( ) in the paper tray. Note Pulling the jammed paper downward allows you to remove the paper more easily. c Make sure that the guides are firmly in the machine. 135 d Put the paper tray firmly back in the slots.

User's Guide - English
Page 142
b Pull the paper tray completely out of the machine. 136 Wait for the internal fan to cool down before you have just used the machine, some internal parts of the machine will be extremely hot. WARNING After you touch the internal parts of the machine. 6 c Open the back cover. Troubleshooting Paper is jammed in the Duplex tray 6 If the LCD shows Jam Duplex, follow these steps: a Leave the machine turned on for 10 minutes for the machine to cool the extremely hot parts inside the machine.
b Pull the paper tray completely out of the machine. 136 Wait for the internal fan to cool down before you have just used the machine, some internal parts of the machine will be extremely hot. WARNING After you touch the internal parts of the machine. 6 c Open the back cover. Troubleshooting Paper is jammed in the Duplex tray 6 If the LCD shows Jam Duplex, follow these steps: a Leave the machine turned on for 10 minutes for the machine to cool the extremely hot parts inside the machine.

User's Guide - English
Page 145
The jammed paper may release the paper so you touch the internal parts of the machine. Follow these steps: a Leave the machine turned on for 10 minutes for the machine to cool the extremely hot parts inside ... can pull it out from inside the machine. WARNING After you have just used the machine, some internal parts of the machine 6 If the LCD shows Jam Rear, a paper jam occurred behind the back cover. Troubleshooting Paper is jammed at the back of the machine will be pulled out with the drum unit and toner cartridge...
The jammed paper may release the paper so you touch the internal parts of the machine. Follow these steps: a Leave the machine turned on for 10 minutes for the machine to cool the extremely hot parts inside ... can pull it out from inside the machine. WARNING After you have just used the machine, some internal parts of the machine 6 If the LCD shows Jam Rear, a paper jam occurred behind the back cover. Troubleshooting Paper is jammed at the back of the machine will be pulled out with the drum unit and toner cartridge...
User's Guide - English
Page 171
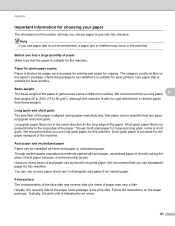
... information in this section will help you choose paper to use with this machine is aligned during paper manufacturing. Note If you use paper A that you use varies in the machine. Check the package to see whether it is not recommended, a paper jam or misfeed may vary a little. We recommend ...that weighs 20 to 24 lb (75 to cope with thinner or thicker paper than these weights. Long grain and short grain A The pulp fiber of the paper ream package is the print side. However,...
... information in this section will help you choose paper to use with this machine is aligned during paper manufacturing. Note If you use paper A that you use varies in the machine. Check the package to see whether it is not recommended, a paper jam or misfeed may vary a little. We recommend ...that weighs 20 to 24 lb (75 to cope with thinner or thicker paper than these weights. Long grain and short grain A The pulp fiber of the paper ream package is the print side. However,...


