Network User's Guide - English
Page 84
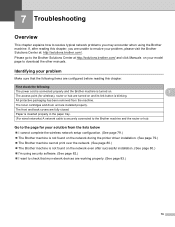
...the other manuals. The access point (for your model page to the Brother Solutions Center at : http://solutions.brother.com/. Paper is inserted properly in the paper tray. (For wired networks) A network cable is securely connected to the Brother machine and the router or hub. 7 7 Go to check that the... following : The power cord is connected properly and the Brother machine is not found on . The toner ...
...the other manuals. The access point (for your model page to the Brother Solutions Center at : http://solutions.brother.com/. Paper is inserted properly in the paper tray. (For wired networks) A network cable is securely connected to the Brother machine and the router or hub. 7 7 Go to check that the... following : The power cord is connected properly and the Brother machine is not found on . The toner ...

Quick Setup Guide - English
Page 2
...these bags away from babies and children and dispose of your machine, carefully repack the machine in the original packaging to the Lower Tray. Buy the appropriate interface cable for 10BASE-T, 100BASE-TX Fast Ethernet Network or 1000BASE-T Gigabit Ethernet Network. CAUTION indicates a potentially hazardous... the Lower Tray as shown in the illustration. 150 mm (6 in.) 150 mm (6 in.) 150 mm (6 in.) 150 mm (6 in.) • The components included in the box may differ depending on the HL-5470DW. • The interface cable is not a standard accessory. For HL-6180DW(T), use a...
...these bags away from babies and children and dispose of your machine, carefully repack the machine in the original packaging to the Lower Tray. Buy the appropriate interface cable for 10BASE-T, 100BASE-TX Fast Ethernet Network or 1000BASE-T Gigabit Ethernet Network. CAUTION indicates a potentially hazardous... the Lower Tray as shown in the illustration. 150 mm (6 in.) 150 mm (6 in.) 150 mm (6 in.) 150 mm (6 in.) • The components included in the box may differ depending on the HL-5470DW. • The interface cable is not a standard accessory. For HL-6180DW(T), use a...
Quick Setup Guide - English
Page 3
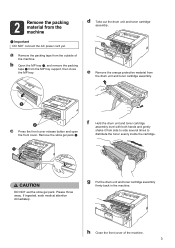
b Open the MP tray a, and remove the packing tape b from the drum unit and toner cartridge assembly. Remove the silica gel pack a. If ingested, seek medical attention immediately. c Press ... firmly back in the machine. d Take out the drum unit and toner cartridge assembly. e Remove the orange protective material from the MP tray support, then close the MP tray. f Hold the drum unit and toner cartridge assembly level with both hands and gently shake it from the machine Important DO NOT connect...
b Open the MP tray a, and remove the packing tape b from the drum unit and toner cartridge assembly. Remove the silica gel pack a. If ingested, seek medical attention immediately. c Press ... firmly back in the machine. d Take out the drum unit and toner cartridge assembly. e Remove the orange protective material from the MP tray support, then close the MP tray. f Hold the drum unit and toner cartridge assembly level with both hands and gently shake it from the machine Important DO NOT connect...

Quick Setup Guide - English
Page 4
...paper jams and misfeeds. Note For Legal or Folio size paper, press the release button a in the bottom of the paper tray and then pull out the back of the paper tray. (Legal or Folio size paper are loading in the machine. b While pressing the green paper-guide release lever a, slide ...the paper guides to be printed on is face down output tray. e Put the paper tray firmly back in the tray. Over filling the paper tray will feed properly. 3 Load paper in the tray and make sure: The paper is below the maximum paper mark (bbb) a. c Fan the ...
...paper jams and misfeeds. Note For Legal or Folio size paper, press the release button a in the bottom of the paper tray and then pull out the back of the paper tray. (Legal or Folio size paper are loading in the machine. b While pressing the green paper-guide release lever a, slide ...the paper guides to be printed on is face down output tray. e Put the paper tray firmly back in the tray. Over filling the paper tray will feed properly. 3 Load paper in the tray and make sure: The paper is below the maximum paper mark (bbb) a. c Fan the ...
Quick Setup Guide - English
Page 33
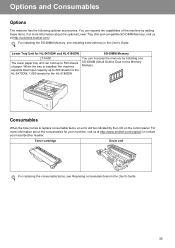
... us at http://www.brother.com/original/ or contact your local Brother reseller. Toner cartridge Drum unit For replacing the consumable items, see Installing extra memory in the User's Guide. 33 For more information about the consumables for the HL-6180DW. For installing the SO...-DIMM Memory, see Replacing consumable items in the User's Guide. Options and Consumables Options The machine has the following optional accessories. Lower Tray Unit for HL-5470DW and HL-6180DW LT-5400 The lower paper tray unit can expand...
... us at http://www.brother.com/original/ or contact your local Brother reseller. Toner cartridge Drum unit For replacing the consumable items, see Installing extra memory in the User's Guide. 33 For more information about the consumables for the HL-6180DW. For installing the SO...-DIMM Memory, see Replacing consumable items in the User's Guide. Options and Consumables Options The machine has the following optional accessories. Lower Tray Unit for HL-5470DW and HL-6180DW LT-5400 The lower paper tray unit can expand...
User's Guide - English
Page 4
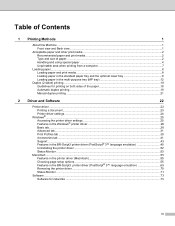
... ...4 Unprintable area when printing from a computer 7 Loading paper...8 Loading paper and print media...8 Loading paper in the standard paper tray and the optional lower tray 8 Loading paper in the multi-purpose tray (MP tray 12 Duplex (2-sided) printing...18 Guidelines for printing on both sides of the paper 18 Automatic duplex printing ...19 Manual...
... ...4 Unprintable area when printing from a computer 7 Loading paper...8 Loading paper and print media...8 Loading paper in the standard paper tray and the optional lower tray 8 Loading paper in the multi-purpose tray (MP tray 12 Duplex (2-sided) printing...18 Guidelines for printing on both sides of the paper 18 Automatic duplex printing ...19 Manual...
User's Guide - English
Page 5
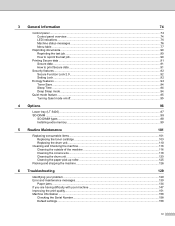
... features ...94 Toner Save ...94 Sleep Time ...94 Deep Sleep mode...94 Quiet mode feature ...95 Turning Quiet mode on/off...95 4 Options 96 Lower tray (LT-5400) ...97 SO-DIMM ...98 SO-DIMM types ...98 Installing extra memory ...99 5 Routine Maintenance 101 Replacing consumable items...101 Replacing the toner cartridge...
... features ...94 Toner Save ...94 Sleep Time ...94 Deep Sleep mode...94 Quiet mode feature ...95 Turning Quiet mode on/off...95 4 Options 96 Lower tray (LT-5400) ...97 SO-DIMM ...98 SO-DIMM types ...98 Installing extra memory ...99 5 Routine Maintenance 101 Replacing consumable items...101 Replacing the toner cartridge...

User's Guide - English
Page 7
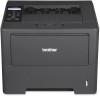
Note Most of the illustrations in this Machine Front view and Back view 1 2 7 9 3 4 5 10 11 6 12 8 1 Front cover release button 2 Control panel with a Liquid Crystal Display (LCD) 3 Face-down output tray support flap (support flap) 4 Front cover 5 Paper tray 6 Power switch 7 Face-down output tray 8 Multi-purpose tray (MP tray) 9 Back cover (Face-up output tray when open) 10 AC power connector 11 USB port 12 10BASE-T / 100BASE-TX / 1000BASE-T port 1 1 1000BASE-T is available for HL-6180DW(T). 1 Printing Methods About this User's Guide show the HL-5470DW. 1 1 1 1 1
Note Most of the illustrations in this Machine Front view and Back view 1 2 7 9 3 4 5 10 11 6 12 8 1 Front cover release button 2 Control panel with a Liquid Crystal Display (LCD) 3 Face-down output tray support flap (support flap) 4 Front cover 5 Paper tray 6 Power switch 7 Face-down output tray 8 Multi-purpose tray (MP tray) 9 Back cover (Face-up output tray when open) 10 AC power connector 11 USB port 12 10BASE-T / 100BASE-TX / 1000BASE-T port 1 1 1000BASE-T is available for HL-6180DW(T). 1 Printing Methods About this User's Guide show the HL-5470DW. 1 1 1 1 1
User's Guide - English
Page 8
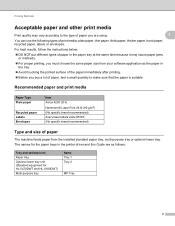
... use the following types of print media: plain paper, thin paper, thick paper, thicker paper, bond paper, recycled paper, labels or envelopes. The names for HL-5470DWT and HL-6180DWT) Multi-purpose tray Name Tray 1 Tray 2 MP Tray 2 For best results, follow the instructions below: DO NOT put different types of paper in the...
... use the following types of print media: plain paper, thin paper, thick paper, thicker paper, bond paper, recycled paper, labels or envelopes. The names for HL-5470DWT and HL-6180DWT) Multi-purpose tray Name Tray 1 Tray 2 MP Tray 2 For best results, follow the instructions below: DO NOT put different types of paper in the...
User's Guide - English
Page 9
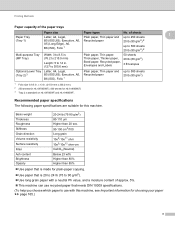
... machine can use recycled paper that meets DIN 19309 specifications. (To help you choose which paper to use with this machine, see Important information for HL-6180DW(T) 3 Tray 2 is 8.5 in. × 13 in . (127 to 355.6 mm) Letter, A4, Legal, B5 (ISO/JIS), Executive, A5, B6 (ISO), Folio 1 Paper ... Plain paper, Thin paper and up to 500 sheets Recycled paper 20 lb (80 g/m2) 1 Folio size is standard on HL-5470DWT and HL-6180DWT. Printing Methods Paper capacity of the paper trays Paper Tray (Tray 1) Paper size Letter, A4, Legal, B5 (ISO/JIS), Executive, A5, A5 (Long Edge), A6, B6 (ISO),...
... machine can use recycled paper that meets DIN 19309 specifications. (To help you choose which paper to use with this machine, see Important information for HL-6180DW(T) 3 Tray 2 is 8.5 in. × 13 in . (127 to 355.6 mm) Letter, A4, Legal, B5 (ISO/JIS), Executive, A5, B6 (ISO), Folio 1 Paper ... Plain paper, Thin paper and up to 500 sheets Recycled paper 20 lb (80 g/m2) 1 Folio size is standard on HL-5470DWT and HL-6180DWT. Printing Methods Paper capacity of the paper trays Paper Tray (Tray 1) Paper size Letter, A4, Legal, B5 (ISO/JIS), Executive, A5, A5 (Long Edge), A6, B6 (ISO),...
User's Guide - English
Page 14
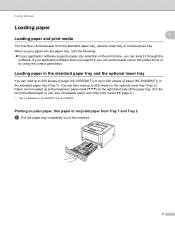
... the recommended paper to use, see Acceptable paper and other print media uu page 2.) 1 Tray 2 is standard on HL-5470DWT and HL-6180DWT. Paper can also load up to 500 sheets in the optional lower tray (Tray 2) 1. If your application software supports paper size selection on plain paper, thin paper or... Loading paper 1 1 Loading paper and print media 1 The machine can load up to 250 sheets of paper (HL-5470DW(T)) or up to 500 sheets of paper (HL-6180DW(T)) in the standard paper tray (Tray 1). Printing on the print menu, you can select it , you can set the paper size in the printer ...
... the recommended paper to use, see Acceptable paper and other print media uu page 2.) 1 Tray 2 is standard on HL-5470DWT and HL-6180DWT. Paper can also load up to 500 sheets in the optional lower tray (Tray 2) 1. If your application software supports paper size selection on plain paper, thin paper or... Loading paper 1 1 Loading paper and print media 1 The machine can load up to 250 sheets of paper (HL-5470DW(T)) or up to 500 sheets of paper (HL-6180DW(T)) in the standard paper tray (Tray 1). Printing on the print menu, you can select it , you can set the paper size in the printer ...

User's Guide - English
Page 15
Printing Methods b While pressing the green paper-guide release lever (1), slide the paper guides to avoid paper jams and misfeeds. 9 Make sure that the guides are firmly in the slots. 1 1 1 Note 1 For Legal or Folio size paper, press the release button (1) in the bottom of the paper tray and then pull out the back of paper well to fit the paper you are not available in some regions.) c Fan the stack of the paper tray. (Legal and Folio size paper are loading in the tray.
Printing Methods b While pressing the green paper-guide release lever (1), slide the paper guides to avoid paper jams and misfeeds. 9 Make sure that the guides are firmly in the slots. 1 1 1 Note 1 For Legal or Folio size paper, press the release button (1) in the bottom of the paper tray and then pull out the back of paper well to fit the paper you are not available in some regions.) c Fan the stack of the paper tray. (Legal and Folio size paper are loading in the tray.

User's Guide - English
Page 16
Printing Methods d Put paper in the tray and make sure: The paper is completely inserted into the machine. f Lift up the support flap (1) to prevent paper from sliding off the face-down output tray, or remove each page as soon as it comes out of the paper so it is below the maximum paper mark ( Over filling the paper tray will feed properly. 1 e Put the paper tray firmly back in the machine. Make sure that it will cause paper jams. ) (1). 1 The side to be printed on must be face down. The paper guides touch the sides of the machine. 1 10
Printing Methods d Put paper in the tray and make sure: The paper is completely inserted into the machine. f Lift up the support flap (1) to prevent paper from sliding off the face-down output tray, or remove each page as soon as it comes out of the paper so it is below the maximum paper mark ( Over filling the paper tray will feed properly. 1 e Put the paper tray firmly back in the machine. Make sure that it will cause paper jams. ) (1). 1 The side to be printed on must be face down. The paper guides touch the sides of the machine. 1 10

User's Guide - English
Page 17
... options in the drop-down list of the printer driver. Paper Size 1 A4 Letter Legal Executive A5 B5 B6 Folio A5 Long Edge A6 (Tray 1 only) (Tray 1 only) For the acceptable paper sizes, see Type and size of paper uu page 2. Media Type Plain Paper Paper Source Thin Paper...
... options in the drop-down list of the printer driver. Paper Size 1 A4 Letter Legal Executive A5 B5 B6 Folio A5 Long Edge A6 (Tray 1 only) (Tray 1 only) For the acceptable paper sizes, see Type and size of paper uu page 2. Media Type Plain Paper Paper Source Thin Paper...

User's Guide - English
Page 18
Printing Methods Loading paper in the multi-purpose tray (MP tray) 1 You can load up to 3 envelopes or special print media in the MP tray or up to use, see Acceptable paper and other print media uu page 2.) Printing on thick paper, bond paper, labels or envelopes. (For the recommended paper to 50 sheets of plain paper. Use 1 this tray to print on plain paper, thin paper, recycled paper and bond paper from the MP tray 1 a Open the MP tray and lower it gently. b Pull out the MP tray support (1) and unfold the flap (2). 2 1 12
Printing Methods Loading paper in the multi-purpose tray (MP tray) 1 You can load up to 3 envelopes or special print media in the MP tray or up to use, see Acceptable paper and other print media uu page 2.) Printing on thick paper, bond paper, labels or envelopes. (For the recommended paper to 50 sheets of plain paper. Use 1 this tray to print on plain paper, thin paper, recycled paper and bond paper from the MP tray 1 a Open the MP tray and lower it gently. b Pull out the MP tray support (1) and unfold the flap (2). 2 1 12

User's Guide - English
Page 19
Printing Methods c Put paper in the MP tray and make sure: The paper stays under the maximum paper mark (1). The side to be printed on must be face up with the leading edge (top of the paper) in first. 1 The paper guides touch the sides of the paper so it will feed properly. 1 d Lift up the support flap to prevent paper from sliding off the face-down output tray, or remove each page as soon as it comes out of the machine. 13
Printing Methods c Put paper in the MP tray and make sure: The paper stays under the maximum paper mark (1). The side to be printed on must be face up with the leading edge (top of the paper) in first. 1 The paper guides touch the sides of the paper so it will feed properly. 1 d Lift up the support flap to prevent paper from sliding off the face-down output tray, or remove each page as soon as it comes out of the machine. 13

User's Guide - English
Page 20
... paper sizes, see Type and size of paper uu page 2. Media Type Plain Paper Paper Source Thin Paper Recycled Paper Bond Paper MP Tray For any other settings, see Driver and Software in Macintosh printer drivers.
... paper sizes, see Type and size of paper uu page 2. Media Type Plain Paper Paper Source Thin Paper Recycled Paper Bond Paper MP Tray For any other settings, see Driver and Software in Macintosh printer drivers.

User's Guide - English
Page 21
c Pull out the MP tray support (1) and unfold the flap (2). 2 1 15 Printing Methods Printing on thick paper, labels and envelopes from the MP tray Before loading, press the corners and sides of the envelopes to make them as flat as possible. 1 1 a Open the back cover (face-up output tray). b Open the MP tray and lower it gently.
c Pull out the MP tray support (1) and unfold the flap (2). 2 1 15 Printing Methods Printing on thick paper, labels and envelopes from the MP tray Before loading, press the corners and sides of the envelopes to make them as flat as possible. 1 1 a Open the back cover (face-up output tray). b Open the MP tray and lower it gently.

User's Guide - English
Page 22
... Defined... in Windows® printer driver, PostScript Custom Page Size in BR-Script printer driver for Windows®, or Custom Page Sizes in the MP tray does not exceed 3. The paper, labels or envelopes stay under the maximum paper mark (1). 1 The side to be printed on must be face...
... Defined... in Windows® printer driver, PostScript Custom Page Size in BR-Script printer driver for Windows®, or Custom Page Sizes in the MP tray does not exceed 3. The paper, labels or envelopes stay under the maximum paper mark (1). 1 The side to be printed on must be face...

User's Guide - English
Page 23
Thick MP Tray For any other envelopes that are sealed by the manufacturer should be properly folded without wrinkles or creases. Printing Methods ... to jam or curl. • If envelopes or thick paper get smudged during printing, put only one sheet at a time in the MP tray. • Envelope joints that are printed, see Driver and Software in the printer driver, such as it has been printed. Note •...your thick paper curls during printing set the Media Type to the machine. g Close the back cover (face-up output tray). 17 f Send the print data to Env. Thin Env.
Thick MP Tray For any other envelopes that are sealed by the manufacturer should be properly folded without wrinkles or creases. Printing Methods ... to jam or curl. • If envelopes or thick paper get smudged during printing, put only one sheet at a time in the MP tray. • Envelope joints that are printed, see Driver and Software in the printer driver, such as it has been printed. Note •...your thick paper curls during printing set the Media Type to the machine. g Close the back cover (face-up output tray). 17 f Send the print data to Env. Thin Env.


