Network User's Guide - English
Page 17
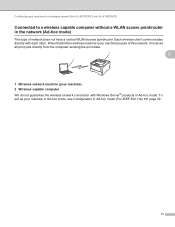
Configuring your machine for a wireless network (For HL-5470DW(T) and HL-6180DW(T)) Connected to a wireless capable computer without a WLAN access point/router in the network (Ad-hoc mode) 3 This type of this network, it receives all print ... directly with Windows Server® products in Ad-hoc mode (For IEEE 802.11b) uu page 32. 11 To set up your machine) is part of network does not have a central WLAN access point/router. When the Brother wireless machine (your machine in Ad-hoc mode, see Configuration in Ad-hoc mode.
Configuring your machine for a wireless network (For HL-5470DW(T) and HL-6180DW(T)) Connected to a wireless capable computer without a WLAN access point/router in the network (Ad-hoc mode) 3 This type of this network, it receives all print ... directly with Windows Server® products in Ad-hoc mode (For IEEE 802.11b) uu page 32. 11 To set up your machine) is part of network does not have a central WLAN access point/router. When the Brother wireless machine (your machine in Ad-hoc mode, see Configuration in Ad-hoc mode.

Network User's Guide - English
Page 60
If the Kerberos server is part of a domain, please input the username in one of the following styles: user@domain or domain\user. Password Enter the password for the authentication ...
If the Kerberos server is part of a domain, please input the username in one of the following styles: user@domain or domain\user. Password Enter the password for the authentication ...
Network User's Guide - English
Page 62
... for about 30 seconds. 56 Using Web Based Management, confirm that : • The Username 1 and Password in Authentication Setting are correct. 1 If the username is part of a domain, please input the username in one of the following styles: user@domain or domain\user. • The time of your machine or Connection...
... for about 30 seconds. 56 Using Web Based Management, confirm that : • The Username 1 and Password in Authentication Setting are correct. 1 If the username is part of a domain, please input the username in one of the following styles: user@domain or domain\user. • The time of your machine or Connection...

Network User's Guide - English
Page 99
If your Network Administrator. 93 What this part of the address. The router knows where to configure the Gateway IP address. If a destination is a network point that arrives at this means in the ...
If your Network Administrator. 93 What this part of the address. The router knows where to configure the Gateway IP address. If a destination is a network point that arrives at this means in the ...
User's Guide - English
Page 3
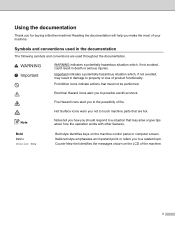
.... Hot Surface icons warn you to a related topic. Italicized style emphasizes an important point or refers you not to touch machine parts that must not be performed. ii Using the documentation Thank you to possible electrical shock. Important indicates a potentially hazardous situation which ...avoided, may arise or give tips about how the operation works with other features. Electrical Hazard icons alert you for buying a Brother machine! Courier New font identifies the messages shown on the machine control panel or computer screen. Prohibition icons indicate actions that are...
.... Hot Surface icons warn you to a related topic. Italicized style emphasizes an important point or refers you not to touch machine parts that must not be performed. ii Using the documentation Thank you to possible electrical shock. Important indicates a potentially hazardous situation which ...avoided, may arise or give tips about how the operation works with other features. Electrical Hazard icons alert you for buying a Brother machine! Courier New font identifies the messages shown on the machine control panel or computer screen. Prohibition icons indicate actions that are...
User's Guide - English
Page 12
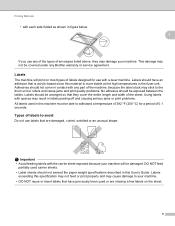
...8226; Label sheets should be exposed between the labels. Adhesives should be arranged so that they may stick to avoid 1 Do not use with any Brother warranty or service agreement. Labels exceeding this User's Guide. Labels 1 The machine will be able to your machine. Types of the machine, because...that are missing a few labels on most types of labels designed for a period of 0.1 seconds. This damage may not be covered under any part of labels to the drum unit or rollers and cause jams and print quality problems. No adhesive should not come in contact with a laser ...
...8226; Label sheets should be exposed between the labels. Adhesives should be arranged so that they may stick to avoid 1 Do not use with any Brother warranty or service agreement. Labels exceeding this User's Guide. Labels 1 The machine will be able to your machine. Types of the machine, because...that are missing a few labels on most types of labels designed for a period of 0.1 seconds. This damage may not be covered under any part of labels to the drum unit or rollers and cause jams and print quality problems. No adhesive should not come in contact with a laser ...
User's Guide - English
Page 84
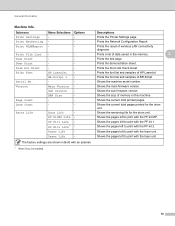
... the memory. 3 Prints the test page. Shows the pages left to print with an asterisk. 1 When Tray 2 is installed. 3 Descriptions Prints the Printer Settings page. Parts Life Drum Life - Shows the remaining life for the drum unit. Submenu Print Settings Print NetSetting Print WLANReport Menu Selections - Print File List Test Print...
... the memory. 3 Prints the test page. Shows the pages left to print with an asterisk. 1 When Tray 2 is installed. 3 Descriptions Prints the Printer Settings page. Parts Life Drum Life - Shows the remaining life for the drum unit. Submenu Print Settings Print NetSetting Print WLANReport Menu Selections - Print File List Test Print...
User's Guide - English
Page 107
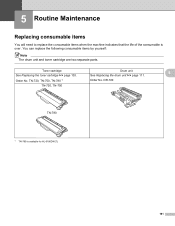
Order No. DR-720 TN-720, TN-750 TN-780 1 TN-780 is over. TN-720, TN-750, TN-780 1 Order No. 5 Routine Maintenance 5 Replacing consumable items 5 You will need to replace the consumable items when the machine indicates that the life of the consumable is available for HL-6180DW(T). 101 Toner cartridge Drum unit 5 See Replacing the toner cartridge uu page 103. See Replacing the drum unit uu page 111. You can replace the following consumable items by yourself: Note The drum unit and toner cartridge are two separate parts.
Order No. DR-720 TN-720, TN-750 TN-780 1 TN-780 is over. TN-720, TN-750, TN-780 1 Order No. 5 Routine Maintenance 5 Replacing consumable items 5 You will need to replace the consumable items when the machine indicates that the life of the consumable is available for HL-6180DW(T). 101 Toner cartridge Drum unit 5 See Replacing the toner cartridge uu page 103. See Replacing the drum unit uu page 111. You can replace the following consumable items by yourself: Note The drum unit and toner cartridge are two separate parts.
User's Guide - English
Page 108
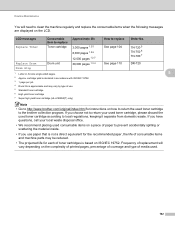
... is approximate and may be reduced. • The projected life for instructions on how to return the used toner cartridge to the brother collection program. Frequency of replacement will need to clean the machine regularly and replace the consumable items when the following messages are displayed... cartridge 7 Super high yield toner cartridge (HL-6180DW(T) only) Note • Go to http://www.brother.com/original/index.html for each of toner cartridges is not a direct equivalent for the recommended paper, the life of consumable items and machine parts may vary by type of use paper that...
... is approximate and may be reduced. • The projected life for instructions on how to return the used toner cartridge to the brother collection program. Frequency of replacement will need to clean the machine regularly and replace the consumable items when the following messages are displayed... cartridge 7 Super high yield toner cartridge (HL-6180DW(T) only) Note • Go to http://www.brother.com/original/index.html for each of toner cartridges is not a direct equivalent for the recommended paper, the life of consumable items and machine parts may vary by type of use paper that...
User's Guide - English
Page 110
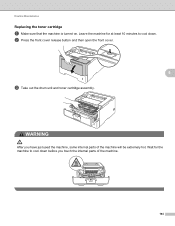
b Press the front cover release button and then open the front cover. 5 c Take out the drum unit and toner cartridge assembly. Leave the machine for the machine to cool down before you have just used the machine, some internal parts of the machine. 104 Routine Maintenance Replacing the toner cartridge 5 a Make sure that the machine is turned on. WARNING After you touch the internal parts of the machine will be extremely hot. Wait for at least 10 minutes to cool down .
b Press the front cover release button and then open the front cover. 5 c Take out the drum unit and toner cartridge assembly. Leave the machine for the machine to cool down before you have just used the machine, some internal parts of the machine. 104 Routine Maintenance Replacing the toner cartridge 5 a Make sure that the machine is turned on. WARNING After you touch the internal parts of the machine will be extremely hot. Wait for at least 10 minutes to cool down .
User's Guide - English
Page 112
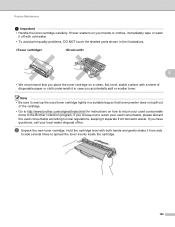
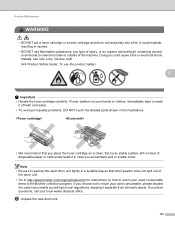
...Important • Handle the toner cartridge carefully. Hold the cartridge level with a sheet of the cartridge. • Go to http://www.brother.com/original/index.html for instructions on how to return your used consumable according to spread the toner evenly inside the cartridge. 106 If ... cold water. • To avoid print quality problems, DO NOT touch the shaded parts shown in a suitable bag so that you have questions, call your used consumable, please discard the used consumable items to the Brother collection program. e Unpack the new toner cartridge. Note • Be sure to ...
...Important • Handle the toner cartridge carefully. Hold the cartridge level with a sheet of the cartridge. • Go to http://www.brother.com/original/index.html for instructions on how to return your used consumable according to spread the toner evenly inside the cartridge. 106 If ... cold water. • To avoid print quality problems, DO NOT touch the shaded parts shown in a suitable bag so that you have questions, call your used consumable, please discard the used consumable items to the Brother collection program. e Unpack the new toner cartridge. Note • Be sure to ...
User's Guide - English
Page 113
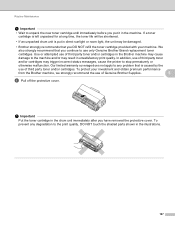
Use or attempted use of third party toner and/or cartridges. In addition, use of third party toner and/or cartridges in the Brother machine may cause damage to the machine and/or may trigger incorrect status messages, cause the printer to stop prematurely or otherwise malfunction. To ...protect your machine. Our limited warranty coverage does not apply to any degradation to the print quality, DO NOT touch the shaded parts shown in the illustrations. 107 We also strongly recommend that is put it in the machine. Important Put the toner cartridge in the drum unit...
Use or attempted use of third party toner and/or cartridges. In addition, use of third party toner and/or cartridges in the Brother machine may cause damage to the machine and/or may trigger incorrect status messages, cause the printer to stop prematurely or otherwise malfunction. To ...protect your machine. Our limited warranty coverage does not apply to any degradation to the print quality, DO NOT touch the shaded parts shown in the illustrations. 107 We also strongly recommend that is put it in the machine. Important Put the toner cartridge in the drum unit...
User's Guide - English
Page 118
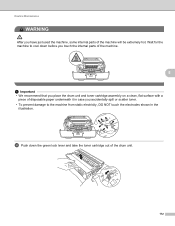
... for the machine to the machine from static electricity, DO NOT touch the electrodes shown in the illustration. d Push down before you touch the internal parts of the machine. 5 Important • We recommend that you place the drum unit and toner cartridge assembly on a clean, flat surface with ...a piece of disposable paper underneath it in case you have just used the machine, some internal parts of the drum unit. 112 Routine Maintenance WARNING After you accidentally spill or scatter toner. • To prevent damage to cool down the ...
... for the machine to the machine from static electricity, DO NOT touch the electrodes shown in the illustration. d Push down before you touch the internal parts of the machine. 5 Important • We recommend that you place the drum unit and toner cartridge assembly on a clean, flat surface with ...a piece of disposable paper underneath it in case you have just used the machine, some internal parts of the drum unit. 112 Routine Maintenance WARNING After you accidentally spill or scatter toner. • To prevent damage to cool down the ...
User's Guide - English
Page 119
...explode, resulting in case you place the toner cartridge on how to return your used consumable, please discard the used consumable according to http://www.brother.com/original/index.html for instructions on a clean, flat, level, stable surface with cold water. • To avoid print quality problems,... DO NOT touch the shaded parts shown in the illustrations. • We recommend that toner powder does not spill out of the drum unit. • Go to local regulations, ...
...explode, resulting in case you place the toner cartridge on how to return your used consumable, please discard the used consumable according to http://www.brother.com/original/index.html for instructions on a clean, flat, level, stable surface with cold water. • To avoid print quality problems,... DO NOT touch the shaded parts shown in the illustrations. • We recommend that toner powder does not spill out of the drum unit. • Go to local regulations, ...

User's Guide - English
Page 124
WARNING After you touch the internal parts of the machine will be extremely hot. Wait for the internal fan to cool down before you have just used the machine, some internal parts of the machine. 118 Routine Maintenance Cleaning the corona wire 5 If you have print quality problems, clean the corona wire as follows: a Leave the machine turned on for 10 minutes for the machine to cool the extremely hot parts inside the machine. b Press the front cover release button and then open the front cover. 5 c Take out the drum unit and toner cartridge assembly.
WARNING After you touch the internal parts of the machine will be extremely hot. Wait for the internal fan to cool down before you have just used the machine, some internal parts of the machine. 118 Routine Maintenance Cleaning the corona wire 5 If you have print quality problems, clean the corona wire as follows: a Leave the machine turned on for 10 minutes for the machine to cool the extremely hot parts inside the machine. b Press the front cover release button and then open the front cover. 5 c Take out the drum unit and toner cartridge assembly.

User's Guide - English
Page 126
... the machine is in . (94 mm) intervals, the drum may have foreign material, such as glue from a label stuck on for 10 minutes for the internal fan to print the drum dot check sheet. b Press a or b to choose Drum Dot Print. Press OK to cool the extremely hot... parts inside the machine. g Take out the drum unit and toner cartridge assembly. 120 d Leave the machine turned on the drum surface. Follow the steps below ...
... the machine is in . (94 mm) intervals, the drum may have foreign material, such as glue from a label stuck on for 10 minutes for the internal fan to print the drum dot check sheet. b Press a or b to choose Drum Dot Print. Press OK to cool the extremely hot... parts inside the machine. g Take out the drum unit and toner cartridge assembly. 120 d Leave the machine turned on the drum surface. Follow the steps below ...

User's Guide - English
Page 127
h Push down before you touch the internal parts of the machine. 5 Important • We recommend that you put the drum unit and toner cartridge assembly on your hands or clothes, immediately wipe or .... Wait for the machine to the machine from static electricity, DO NOT touch the electrodes shown in case you have just used the machine, some internal parts of disposable paper or cloth in the illustration.
h Push down before you touch the internal parts of the machine. 5 Important • We recommend that you put the drum unit and toner cartridge assembly on your hands or clothes, immediately wipe or .... Wait for the machine to the machine from static electricity, DO NOT touch the electrodes shown in case you have just used the machine, some internal parts of disposable paper or cloth in the illustration.

User's Guide - English
Page 135
Most problems can be easily resolved by yourself. HL-6180DW(T) in the paper tray. The interface cables are still problems. Print quality (See Improving the print quality uu page 151.) Printout is ... power cord, see Other difficulties uu page 150. All of the protective parts have been removed. 6 Paper is a problem with the above checks, identify your problem and then go to the Brother Solutions Center at http://solutions.brother.com/ and click Manuals on both the machine and your computer. LCD...
Most problems can be easily resolved by yourself. HL-6180DW(T) in the paper tray. The interface cables are still problems. Print quality (See Improving the print quality uu page 151.) Printout is ... power cord, see Other difficulties uu page 150. All of the protective parts have been removed. 6 Paper is a problem with the above checks, identify your problem and then go to the Brother Solutions Center at http://solutions.brother.com/ and click Manuals on both the machine and your computer. LCD...

User's Guide - English
Page 142
Troubleshooting Paper is jammed in the Duplex tray 6 If the LCD shows Jam Duplex, follow these steps: a Leave the machine turned on for 10 minutes for the machine to cool the extremely hot parts inside the machine. b Pull the paper tray completely out of the machine. 136 Wait for the internal fan to cool down before you have just used the machine, some internal parts of the machine will be extremely hot. WARNING After you touch the internal parts of the machine. 6 c Open the back cover.
Troubleshooting Paper is jammed in the Duplex tray 6 If the LCD shows Jam Duplex, follow these steps: a Leave the machine turned on for 10 minutes for the machine to cool the extremely hot parts inside the machine. b Pull the paper tray completely out of the machine. 136 Wait for the internal fan to cool down before you have just used the machine, some internal parts of the machine will be extremely hot. WARNING After you touch the internal parts of the machine. 6 c Open the back cover.

User's Guide - English
Page 145
... be pulled out with the drum unit and toner cartridge assembly, or this may release the paper so you have just used the machine, some internal parts of the machine. b Press the front cover release button and then open the front cover. 6 c Slowly take out the drum unit and toner ...cartridge assembly. The jammed paper may be extremely hot. Wait for the internal fan to cool down before you touch the internal parts of the machine 6 If the LCD shows Jam Rear, a paper jam occurred behind the back cover. Troubleshooting Paper is jammed at...
... be pulled out with the drum unit and toner cartridge assembly, or this may release the paper so you have just used the machine, some internal parts of the machine. b Press the front cover release button and then open the front cover. 6 c Slowly take out the drum unit and toner ...cartridge assembly. The jammed paper may be extremely hot. Wait for the internal fan to cool down before you touch the internal parts of the machine 6 If the LCD shows Jam Rear, a paper jam occurred behind the back cover. Troubleshooting Paper is jammed at...


