Network User's Guide - English
Page 84
...network problems you are unable to resolve your problem, please visit the Brother Solutions Center at http://solutions.brother.com/ and click Manuals on and its link button is blinking. The toner cartridges and drum unit are fully closed. The front and back covers are installed properly. ...If, after successful installation. (See page 80.) I cannot complete the wireless network setup configuration. (See page 79.) The Brother machine is not found on the...
...network problems you are unable to resolve your problem, please visit the Brother Solutions Center at http://solutions.brother.com/ and click Manuals on and its link button is blinking. The toner cartridges and drum unit are fully closed. The front and back covers are installed properly. ...If, after successful installation. (See page 80.) I cannot complete the wireless network setup configuration. (See page 79.) The Brother machine is not found on the...
Quick Setup Guide - English
Page 1
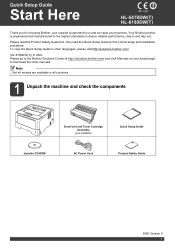
...the Quick Setup Guide in other manuals. Your Brother product is important to us and we value your model page to deliver reliable performance, day-in all countries. 1 Unpack the machine and check the components Drum Unit and Toner Cartridge Assembly (pre-installed) Quick ...to download the other languages, please visit http://solutions.brother.com/. (HL-6180DW(T)) In USA: Please go to the Brother Solutions Center at http://solutions.brother.com/ and click Manuals on your business. Quick Setup Guide Start Here HL-5470DW(T) HL-6180DW(T) Thank you for the correct setup and installation ...
...the Quick Setup Guide in other manuals. Your Brother product is important to us and we value your model page to deliver reliable performance, day-in all countries. 1 Unpack the machine and check the components Drum Unit and Toner Cartridge Assembly (pre-installed) Quick ...to download the other languages, please visit http://solutions.brother.com/. (HL-6180DW(T)) In USA: Please go to the Brother Solutions Center at http://solutions.brother.com/ and click Manuals on your business. Quick Setup Guide Start Here HL-5470DW(T) HL-6180DW(T) Thank you for the correct setup and installation ...
Quick Setup Guide - English
Page 3
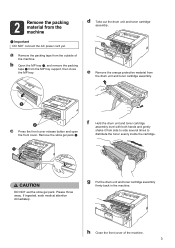
... cartridge assembly level with both hands and gently shake it from the machine Important DO NOT connect the AC power cord yet. g Put the drum unit and toner cartridge assembly firmly back in the machine. c Press the front cover release button and open the front cover. Please throw away.... to side several times to distribute the toner evenly inside the cartridge. b Open the MP tray a, and remove the packing tape b from the drum unit and toner cartridge assembly. e Remove the orange protective material from the MP tray support, then close the MP tray. a Remove the packing tape...
... cartridge assembly level with both hands and gently shake it from the machine Important DO NOT connect the AC power cord yet. g Put the drum unit and toner cartridge assembly firmly back in the machine. c Press the front cover release button and open the front cover. Please throw away.... to side several times to distribute the toner evenly inside the cartridge. b Open the MP tray a, and remove the packing tape b from the drum unit and toner cartridge assembly. e Remove the orange protective material from the MP tray support, then close the MP tray. a Remove the packing tape...
Quick Setup Guide - English
Page 33
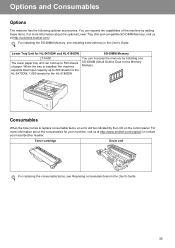
... You can increase the memory by adding these items. For more information about the optional Lower Tray Unit and compatible SO-DIMM Memory, visit us at http://solutions.brother.com/. When the tray is installed, the machine expands total input capacity up to 500 sheets of...can hold up to replace consumable items, an error will be indicated by the LCD on the control panel. Lower Tray Unit for the HL-6180DW. Toner cartridge Drum unit For replacing the consumable items, see Installing extra memory in the User's Guide. 33 Options and Consumables Options The machine...
... You can increase the memory by adding these items. For more information about the optional Lower Tray Unit and compatible SO-DIMM Memory, visit us at http://solutions.brother.com/. When the tray is installed, the machine expands total input capacity up to 500 sheets of...can hold up to replace consumable items, an error will be indicated by the LCD on the control panel. Lower Tray Unit for the HL-6180DW. Toner cartridge Drum unit For replacing the consumable items, see Installing extra memory in the User's Guide. 33 Options and Consumables Options The machine...
User's Guide - English
Page 5
...98 SO-DIMM types ...98 Installing extra memory ...99 5 Routine Maintenance 101 Replacing consumable items...101 Replacing the toner cartridge ...103 Replacing the drum unit...110 Cleaning and Checking the machine ...116 Cleaning the outside of the machine 116 Cleaning the corona wire...118 Cleaning the... drum unit ...120 Cleaning the paper pick-up roller...125 Packing and shipping the machine ...126 6 Troubleshooting 129 Identifying your problem ...129 Error and ...
...98 SO-DIMM types ...98 Installing extra memory ...99 5 Routine Maintenance 101 Replacing consumable items...101 Replacing the toner cartridge ...103 Replacing the drum unit...110 Cleaning and Checking the machine ...116 Cleaning the outside of the machine 116 Cleaning the corona wire...118 Cleaning the... drum unit ...120 Cleaning the paper pick-up roller...125 Packing and shipping the machine ...126 6 Troubleshooting 129 Identifying your problem ...129 Error and ...
User's Guide - English
Page 12
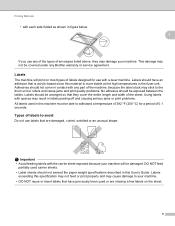
Labels should be covered under any Brother warranty or service agreement. Printing Methods • with each side folded as shown in figure below 1 If you use any... peeling off and causing serious jams or print problems. All labels used carrier sheets. • Label sheets should be able to the drum unit or rollers and cause jams and print quality problems. No adhesive should have an adhesive that have previously been used or are damaged, ...material is more stable at the high temperatures in this User's Guide. DO NOT feed partially used in the fuser unit. Types of 0.1 seconds.
Labels should be covered under any Brother warranty or service agreement. Printing Methods • with each side folded as shown in figure below 1 If you use any... peeling off and causing serious jams or print problems. All labels used carrier sheets. • Label sheets should be able to the drum unit or rollers and cause jams and print quality problems. No adhesive should have an adhesive that have previously been used or are damaged, ...material is more stable at the high temperatures in this User's Guide. DO NOT feed partially used in the fuser unit. Types of 0.1 seconds.
User's Guide - English
Page 84
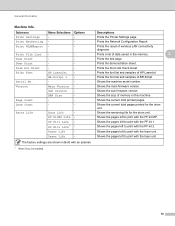
... Life - Fuser Life - Laser Life - Shows the machine serial number. Shows the main firmware version. Shows the current total pages printed for the drum unit. Shows the pages left to print with the PF kit MP. Shows the pages left to print with the PF kit 2. RAM Size - - ... Prints the font list and samples of BR-Script. Shows the size of wireless LAN connectivity diagnosis. Shows the remaining life for the drum unit. Shows the pages left to print with the PF kit 1. General Information Machine Info. Submenu Print Settings Print NetSetting Print WLANReport Menu ...
... Life - Fuser Life - Laser Life - Shows the machine serial number. Shows the main firmware version. Shows the current total pages printed for the drum unit. Shows the pages left to print with the PF kit MP. Shows the pages left to print with the PF kit 2. RAM Size - - ... Prints the font list and samples of BR-Script. Shows the size of wireless LAN connectivity diagnosis. Shows the remaining life for the drum unit. Shows the pages left to print with the PF kit 1. General Information Machine Info. Submenu Print Settings Print NetSetting Print WLANReport Menu ...
User's Guide - English
Page 107
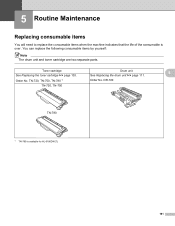
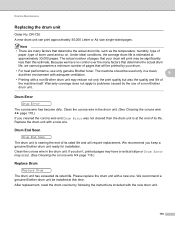
Order No. Toner cartridge Drum unit 5 See Replacing the toner cartridge uu page 103. DR-720 TN-720, TN-750 TN-780 1 TN-780 is over. See Replacing the drum unit uu page 111. TN-720, TN-750, TN-780 1 Order No. 5 Routine Maintenance 5 Replacing consumable items 5 You will need to replace the consumable items when the machine indicates that the life of the consumable is available for HL-6180DW(T). 101 You can replace the following consumable items by yourself: Note The drum unit and toner cartridge are two separate parts.
Order No. Toner cartridge Drum unit 5 See Replacing the toner cartridge uu page 103. DR-720 TN-720, TN-750 TN-780 1 TN-780 is over. See Replacing the drum unit uu page 111. TN-720, TN-750, TN-780 1 Order No. 5 Routine Maintenance 5 Replacing consumable items 5 You will need to replace the consumable items when the machine indicates that the life of the consumable is available for HL-6180DW(T). 101 You can replace the following consumable items by yourself: Note The drum unit and toner cartridge are two separate parts.
User's Guide - English
Page 108
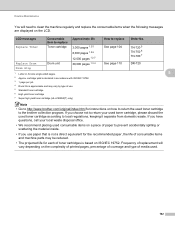
... and may vary by type of use. 5 Standard toner cartridge 6 High yield toner cartridge 7 Super high yield toner cartridge (HL-6180DW(T) only) Note • Go to http://www.brother.com/original/index.html for instructions on how to return the used toner cartridge to clean the machine regularly and replace the... used. 102 Replace Toner Toner cartridge 3,000 pages 1 2 5 8,000 pages 1 2 6 12,000 pages 1 2 7 See page 104 TN-720 5 TN-750 6 TN-780 7 Replace Drum Drum unit 30,000 pages 1 3 4 See page 110 DR-720 Drum Stop 1 Letter or A4 size single-sided pages. 5 2 Approx.
... and may vary by type of use. 5 Standard toner cartridge 6 High yield toner cartridge 7 Super high yield toner cartridge (HL-6180DW(T) only) Note • Go to http://www.brother.com/original/index.html for instructions on how to return the used toner cartridge to clean the machine regularly and replace the... used. 102 Replace Toner Toner cartridge 3,000 pages 1 2 5 8,000 pages 1 2 6 12,000 pages 1 2 7 See page 104 TN-720 5 TN-750 6 TN-780 7 Replace Drum Drum unit 30,000 pages 1 3 4 See page 110 DR-720 Drum Stop 1 Letter or A4 size single-sided pages. 5 2 Approx.
User's Guide - English
Page 110
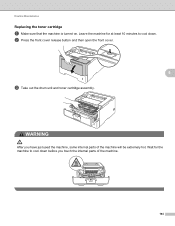
WARNING After you touch the internal parts of the machine will be extremely hot. Leave the machine for the machine to cool down before you have just used the machine, some internal parts of the machine. 104 b Press the front cover release button and then open the front cover. 5 c Take out the drum unit and toner cartridge assembly. Routine Maintenance Replacing the toner cartridge 5 a Make sure that the machine is turned on. Wait for at least 10 minutes to cool down .
WARNING After you touch the internal parts of the machine will be extremely hot. Leave the machine for the machine to cool down before you have just used the machine, some internal parts of the machine. 104 b Press the front cover release button and then open the front cover. 5 c Take out the drum unit and toner cartridge assembly. Routine Maintenance Replacing the toner cartridge 5 a Make sure that the machine is turned on. Wait for at least 10 minutes to cool down .
User's Guide - English
Page 111
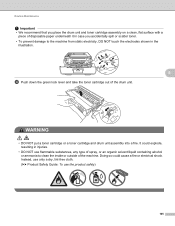
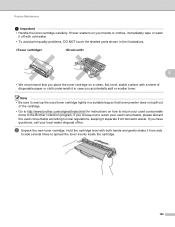
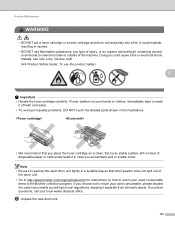
.... Doing so could explode, resulting in injuries. • DO NOT use the product safely) 105 Routine Maintenance Important • We recommend that you place the drum unit and toner cartridge assembly on a clean, flat surface with a piece of disposable paper underneath it in case you accidentally spill or scatter toner. • To...
.... Doing so could explode, resulting in injuries. • DO NOT use the product safely) 105 Routine Maintenance Important • We recommend that you place the drum unit and toner cartridge assembly on a clean, flat surface with a piece of disposable paper underneath it in case you accidentally spill or scatter toner. • To...
User's Guide - English
Page 112
... the toner cartridge carefully. Hold the cartridge level with a sheet of the cartridge. • Go to the Brother collection program. Note • Be sure to seal up the used consumable items to http://www.brother.com/original/index.html for instructions on a clean, flat, level, stable surface with both hands and gently...
... the toner cartridge carefully. Hold the cartridge level with a sheet of the cartridge. • Go to the Brother collection program. Note • Be sure to seal up the used consumable items to http://www.brother.com/original/index.html for instructions on a clean, flat, level, stable surface with both hands and gently...
User's Guide - English
Page 113
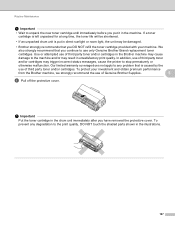
...parts shown in the illustrations. 107 Important Put the toner cartridge in the drum unit immediately after you DO NOT refill the toner cartridge provided with your investment and obtain premium performance from the Brother machine, we strongly recommend the use of third party toner and/or ... cartridge is left unpacked for a long time, the toner life will be damaged. • Brother strongly recommends that you put in the Brother machine may be shortened. • If an unpacked drum unit is caused by the use of third party toner and/or cartridges. In addition, use of third...
...parts shown in the illustrations. 107 Important Put the toner cartridge in the drum unit immediately after you DO NOT refill the toner cartridge provided with your investment and obtain premium performance from the Brother machine, we strongly recommend the use of third party toner and/or ... cartridge is left unpacked for a long time, the toner life will be damaged. • Brother strongly recommends that you put in the Brother machine may be shortened. • If an unpacked drum unit is caused by the use of third party toner and/or cartridges. In addition, use of third...
User's Guide - English
Page 114
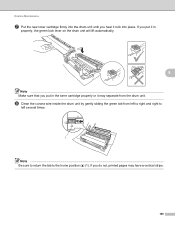
Routine Maintenance g Put the new toner cartridge firmly into place. If you hear it may have a vertical stripe. 108 h Clean the corona wire inside the drum unit by gently sliding the green tab from the drum unit. If you put it in properly, the green lock lever on the drum unit will lift automatically. 5 Note Make sure that you put in the toner cartridge properly or it lock into the drum unit until you do not, printed pages may separate from left to right and right to left several times. 1 Note Be sure to return the tab to the home position (a) (1).
Routine Maintenance g Put the new toner cartridge firmly into place. If you hear it may have a vertical stripe. 108 h Clean the corona wire inside the drum unit by gently sliding the green tab from the drum unit. If you put it in properly, the green lock lever on the drum unit will lift automatically. 5 Note Make sure that you put in the toner cartridge properly or it lock into the drum unit until you do not, printed pages may separate from left to right and right to left several times. 1 Note Be sure to return the tab to the home position (a) (1).
User's Guide - English
Page 115
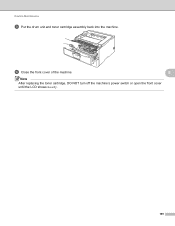
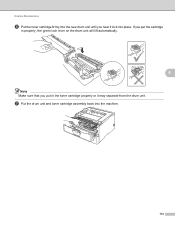
j Close the front cover of the machine. 5 Note After replacing the toner cartridge, DO NOT turn off the machine's power switch or open the front cover until the LCD shows Ready. 109 Routine Maintenance i Put the drum unit and toner cartridge assembly back into the machine.
j Close the front cover of the machine. 5 Note After replacing the toner cartridge, DO NOT turn off the machine's power switch or open the front cover until the LCD shows Ready. 109 Routine Maintenance i Put the drum unit and toner cartridge assembly back into the machine.
User's Guide - English
Page 116
... you cleaned the corona wire and Drum Error was not cleared then the drum unit is nearing the end of toner used only in the drum unit. We recommend you keep a genuine Brother drum unit ready for installation. We recommend a genuine Brother drum unit be significantly less than this time. Drum End Soon 5 Drum End Soon The drum unit is at the end of the...
... you cleaned the corona wire and Drum Error was not cleared then the drum unit is nearing the end of toner used only in the drum unit. We recommend you keep a genuine Brother drum unit ready for installation. We recommend a genuine Brother drum unit be significantly less than this time. Drum End Soon 5 Drum End Soon The drum unit is at the end of the...
User's Guide - English
Page 117
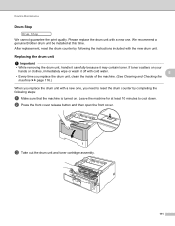
... front cover release button and then open the front cover. Replacing the drum unit 5 Important • While removing the drum unit, handle it carefully because it off with the new drum unit. We recommend a genuine Brother drum unit be installed at least 10 minutes to reset the drum counter by following steps: a Make sure that the machine is turned on...
... front cover release button and then open the front cover. Replacing the drum unit 5 Important • While removing the drum unit, handle it carefully because it off with the new drum unit. We recommend a genuine Brother drum unit be installed at least 10 minutes to reset the drum counter by following steps: a Make sure that the machine is turned on...
User's Guide - English
Page 118
d Push down before you touch the internal parts of the machine. 5 Important • We recommend that you place the drum unit and toner cartridge assembly on a clean, flat surface with a piece of disposable paper underneath it in the illustration. Wait for the machine to the ...machine from static electricity, DO NOT touch the electrodes shown in case you have just used the machine, some internal parts of the drum unit. 112 Routine Maintenance WARNING After you accidentally spill or scatter toner. • To prevent damage to cool down the green lock lever and...
d Push down before you touch the internal parts of the machine. 5 Important • We recommend that you place the drum unit and toner cartridge assembly on a clean, flat surface with a piece of disposable paper underneath it in the illustration. Wait for the machine to the ...machine from static electricity, DO NOT touch the electrodes shown in case you have just used the machine, some internal parts of the drum unit. 112 Routine Maintenance WARNING After you accidentally spill or scatter toner. • To prevent damage to cool down the green lock lever and...
User's Guide - English
Page 119
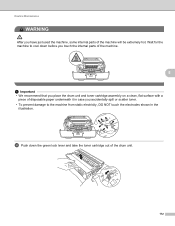
..., any type of spray, or an organic solvent/liquid containing alcohol or ammonia to the Brother collection program. If you choose not to return your used consumable, please discard the used drum unit tightly in a suitable bag so that you place the toner cartridge on how to return ... toner. Routine Maintenance WARNING • DO NOT put a toner cartridge or a toner cartridge and drum unit assembly into a fire. Note • Be sure to seal up the used consumable according to http://www.brother.com/original/index.html for instructions on a clean, flat, level, stable surface with a sheet ...
..., any type of spray, or an organic solvent/liquid containing alcohol or ammonia to the Brother collection program. If you choose not to return your used consumable, please discard the used drum unit tightly in a suitable bag so that you place the toner cartridge on how to return ... toner. Routine Maintenance WARNING • DO NOT put a toner cartridge or a toner cartridge and drum unit assembly into a fire. Note • Be sure to seal up the used consumable according to http://www.brother.com/original/index.html for instructions on a clean, flat, level, stable surface with a sheet ...
User's Guide - English
Page 120
Routine Maintenance f Put the toner cartridge firmly into the new drum unit until you put in the toner cartridge properly or it lock into the machine. 114 g Put the drum unit and toner cartridge assembly back into place. If you put the cartridge in properly, the green lock lever on the drum unit will lift automatically. 5 Note Make sure that you hear it may separate from the drum unit.
Routine Maintenance f Put the toner cartridge firmly into the new drum unit until you put in the toner cartridge properly or it lock into the machine. 114 g Put the drum unit and toner cartridge assembly back into place. If you put the cartridge in properly, the green lock lever on the drum unit will lift automatically. 5 Note Make sure that you hear it may separate from the drum unit.


