User's Guide - English
Page 5
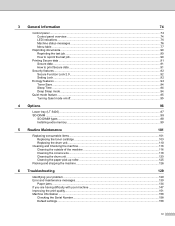
... Maintenance 101 Replacing consumable items...101 Replacing the toner cartridge ...103 Replacing the drum unit...110 Cleaning and Checking the machine ...116 Cleaning the outside of the machine 116 Cleaning the corona wire...118 Cleaning the drum unit ...120 Cleaning the paper pick-up roller...125 Packing and shipping the machine ...126 6 Troubleshooting 129 Identifying...
... Maintenance 101 Replacing consumable items...101 Replacing the toner cartridge ...103 Replacing the drum unit...110 Cleaning and Checking the machine ...116 Cleaning the outside of the machine 116 Cleaning the corona wire...118 Cleaning the drum unit ...120 Cleaning the paper pick-up roller...125 Packing and shipping the machine ...126 6 Troubleshooting 129 Identifying...
User's Guide - English
Page 108
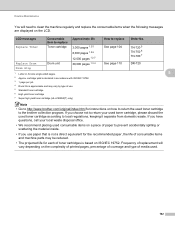
... for the recommended paper, the life of consumable items and machine parts may vary by type of media used toner cartridge according to clean the machine regularly and replace the consumable items when the following messages are displayed on ISO/IEC 19752. LCD messages Consumable Approximate life ...toner cartridge, please discard the used . 102 If you use . 5 Standard toner cartridge 6 High yield toner cartridge 7 Super high yield toner cartridge (HL-6180DW(T) only) Note • Go to http://www.brother.com/original/index.html for each of toner cartridges is based on the LCD.
... for the recommended paper, the life of consumable items and machine parts may vary by type of media used toner cartridge according to clean the machine regularly and replace the consumable items when the following messages are displayed on ISO/IEC 19752. LCD messages Consumable Approximate life ...toner cartridge, please discard the used . 102 If you use . 5 Standard toner cartridge 6 High yield toner cartridge 7 Super high yield toner cartridge (HL-6180DW(T) only) Note • Go to http://www.brother.com/original/index.html for each of toner cartridges is based on the LCD.
User's Guide - English
Page 109
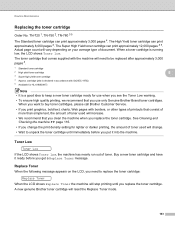
...machine will stop printing until you use when you see the Toner Low warning. • To ensure high quality printing, we recommend that you clean the machine when you print graphics, bold text, charts, Web pages with the machine will need to unpack the toner cartridge until immediately before...of toner used will increase. • We recommend that you replace the toner cartridge. A new genuine Brother toner cartridge will vary depending on the LCD, you need to keep a new toner cartridge ready for HL-6180DW(T) Note • It is running low, the LCD shows Toner Low. TN-720 1, TN-...
...machine will stop printing until you use when you see the Toner Low warning. • To ensure high quality printing, we recommend that you clean the machine when you print graphics, bold text, charts, Web pages with the machine will need to unpack the toner cartridge until immediately before...of toner used will increase. • We recommend that you replace the toner cartridge. A new genuine Brother toner cartridge will vary depending on the LCD, you need to keep a new toner cartridge ready for HL-6180DW(T) Note • It is running low, the LCD shows Toner Low. TN-720 1, TN-...
User's Guide - English
Page 111
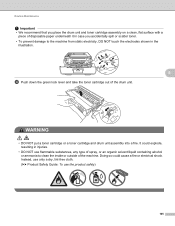
... take the toner cartridge out of the machine. Routine Maintenance Important • We recommend that you place the drum unit and toner cartridge assembly on a clean, flat surface with a piece of disposable paper underneath it in case you accidentally spill or scatter toner. • To prevent damage to...
... take the toner cartridge out of the machine. Routine Maintenance Important • We recommend that you place the drum unit and toner cartridge assembly on a clean, flat surface with a piece of disposable paper underneath it in case you accidentally spill or scatter toner. • To prevent damage to...
User's Guide - English
Page 112
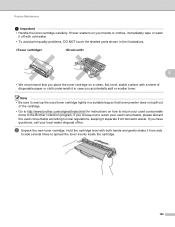
... with cold water. • To avoid print quality problems, DO NOT touch the shaded parts shown in case you choose not to the Brother collection program. If you have questions, call your used consumable, please discard the used toner cartridge tightly in a suitable bag so that toner... it in the illustrations. 5 • We recommend that you place the toner cartridge on a clean, flat, level, stable surface with a sheet of the cartridge. • Go to http://www.brother.com/original/index.html for instructions on your used consumable items to return your local waste disposal office...
... with cold water. • To avoid print quality problems, DO NOT touch the shaded parts shown in case you choose not to the Brother collection program. If you have questions, call your used consumable, please discard the used toner cartridge tightly in a suitable bag so that toner... it in the illustrations. 5 • We recommend that you place the toner cartridge on a clean, flat, level, stable surface with a sheet of the cartridge. • Go to http://www.brother.com/original/index.html for instructions on your used consumable items to return your local waste disposal office...
User's Guide - English
Page 114
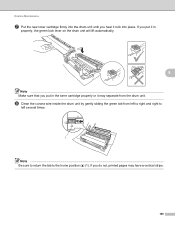
h Clean the corona wire inside the drum unit by gently sliding the green tab from the drum unit. If you put it in properly, the green lock lever on the drum unit will lift automatically. 5 Note Make sure that you put in the toner cartridge properly or it lock into the drum unit until you do not, printed pages may separate from left to right and right to left several times. 1 Note Be sure to return the tab to the home position (a) (1). Routine Maintenance g Put the new toner cartridge firmly into place. If you hear it may have a vertical stripe. 108
h Clean the corona wire inside the drum unit by gently sliding the green tab from the drum unit. If you put it in properly, the green lock lever on the drum unit will lift automatically. 5 Note Make sure that you put in the toner cartridge properly or it lock into the drum unit until you do not, printed pages may separate from left to right and right to left several times. 1 Note Be sure to return the tab to the home position (a) (1). Routine Maintenance g Put the new toner cartridge firmly into place. If you hear it may have a vertical stripe. 108
User's Guide - English
Page 116
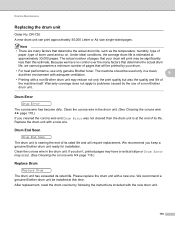
... the drum unit 5 Order No. Drum End Soon 5 Drum End Soon The drum unit is nearing the end of a non-Brother drum unit. Clean the corona wire in a clean, dust-free environment with adequate ventilation. 5 • Printing with the new drum unit. 110 Warranty coverage does not apply to problems...uu page 118.) If you cleaned the corona wire and Drum Error was not cleared then the drum unit is estimated at this estimate. Because we have a vertical stripe or Drum Error may be used only in the drum unit. If you keep a genuine Brother drum unit ready for installation...
... the drum unit 5 Order No. Drum End Soon 5 Drum End Soon The drum unit is nearing the end of a non-Brother drum unit. Clean the corona wire in a clean, dust-free environment with adequate ventilation. 5 • Printing with the new drum unit. 110 Warranty coverage does not apply to problems...uu page 118.) If you cleaned the corona wire and Drum Error was not cleared then the drum unit is estimated at this estimate. Because we have a vertical stripe or Drum Error may be used only in the drum unit. If you keep a genuine Brother drum unit ready for installation...
User's Guide - English
Page 117
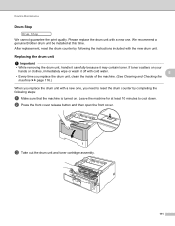
... While removing the drum unit, handle it carefully because it off with cold water. 5 • Every time you replace the drum unit, clean the inside of the machine. (See Cleaning and Checking the machine uu page 116.) When you need to cool down. c Take out the drum unit and toner cartridge assembly... with a new one . Please replace the drum unit with a new one , you replace the drum unit with the new drum unit. We recommend a genuine Brother drum unit be installed at least 10 minutes to reset the drum counter by following steps: a Make sure that the machine is turned on your...
... While removing the drum unit, handle it carefully because it off with cold water. 5 • Every time you replace the drum unit, clean the inside of the machine. (See Cleaning and Checking the machine uu page 116.) When you need to cool down. c Take out the drum unit and toner cartridge assembly... with a new one . Please replace the drum unit with a new one , you replace the drum unit with the new drum unit. We recommend a genuine Brother drum unit be installed at least 10 minutes to reset the drum counter by following steps: a Make sure that the machine is turned on your...
User's Guide - English
Page 118
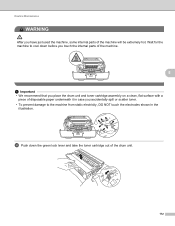
... of the machine. 5 Important • We recommend that you have just used the machine, some internal parts of the machine will be extremely hot. Wait for the machine to cool down the green lock lever and take the toner cartridge out ... static electricity, DO NOT touch the electrodes shown in the illustration. Routine Maintenance WARNING After you place the drum unit and toner cartridge assembly on a clean, flat surface with a piece of the drum unit. 112
... of the machine. 5 Important • We recommend that you have just used the machine, some internal parts of the machine will be extremely hot. Wait for the machine to cool down the green lock lever and take the toner cartridge out ... static electricity, DO NOT touch the electrodes shown in the illustration. Routine Maintenance WARNING After you place the drum unit and toner cartridge assembly on a clean, flat surface with a piece of the drum unit. 112
User's Guide - English
Page 119
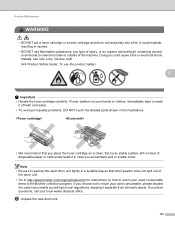
.... • We recommend that toner powder does not spill out of the drum unit. • Go to http://www.brother.com/original/index.html for instructions on a clean, flat, level, stable surface with a sheet of the machine. If toner scatters on your hands or clothes, immediately wipe...Handle the toner cartridge carefully. If you accidentally spill or scatter toner. Note • Be sure to seal up the used consumable according to clean the inside or outside of disposable paper or cloth underneath it separate from domestic waste. e Unpack the new drum unit. 113 It could ...
.... • We recommend that toner powder does not spill out of the drum unit. • Go to http://www.brother.com/original/index.html for instructions on a clean, flat, level, stable surface with a sheet of the machine. If toner scatters on your hands or clothes, immediately wipe...Handle the toner cartridge carefully. If you accidentally spill or scatter toner. Note • Be sure to seal up the used consumable according to clean the inside or outside of disposable paper or cloth underneath it separate from domestic waste. e Unpack the new drum unit. 113 It could ...
User's Guide - English
Page 122
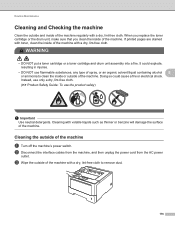
... use flammable substances, any type of spray, or an organic solvent/liquid containing alcohol 5 or ammonia to remove dust. 116 Cleaning the outside of the machine with toner, clean the inside of the machine 5 a Turn off the machine's power switch. If printed pages are stained with a dry, lint...of the machine. When you replace the toner cartridge or the drum unit, make sure that you clean the inside of the machine with a dry, lint-free cloth. Routine Maintenance Cleaning and Checking the machine 5 Clean the outside and inside of the machine regularly with a dry, lint-free cloth to...
... use flammable substances, any type of spray, or an organic solvent/liquid containing alcohol 5 or ammonia to remove dust. 116 Cleaning the outside of the machine with toner, clean the inside of the machine 5 a Turn off the machine's power switch. If printed pages are stained with a dry, lint...of the machine. When you replace the toner cartridge or the drum unit, make sure that you clean the inside of the machine with a dry, lint-free cloth. Routine Maintenance Cleaning and Checking the machine 5 Clean the outside and inside of the machine regularly with a dry, lint-free cloth to...

User's Guide - English
Page 124
Routine Maintenance Cleaning the corona wire 5 If you have just used the machine, some internal parts of the machine. 118 b Press the front cover release button and then open the front cover. 5 c Take out the drum unit and toner cartridge assembly. WARNING After you touch the internal parts of the machine will be extremely hot. Wait for the internal fan to cool down before you have print quality problems, clean the corona wire as follows: a Leave the machine turned on for 10 minutes for the machine to cool the extremely hot parts inside the machine.
Routine Maintenance Cleaning the corona wire 5 If you have just used the machine, some internal parts of the machine. 118 b Press the front cover release button and then open the front cover. 5 c Take out the drum unit and toner cartridge assembly. WARNING After you touch the internal parts of the machine will be extremely hot. Wait for the internal fan to cool down before you have print quality problems, clean the corona wire as follows: a Leave the machine turned on for 10 minutes for the machine to cool the extremely hot parts inside the machine.

User's Guide - English
Page 125
... electrodes shown in case you do not, printed pages may have a vertical stripe. f Close the front cover of disposable paper or cloth in the illustration. 5 d Clean the corona wire inside the drum unit by gently sliding the green tab from left to right and right to left several times. 1 Note Be...
... electrodes shown in case you do not, printed pages may have a vertical stripe. f Close the front cover of disposable paper or cloth in the illustration. 5 d Clean the corona wire inside the drum unit by gently sliding the green tab from left to right and right to left several times. 1 Note Be...

User's Guide - English
Page 126
c Press a or b to choose Machine Info.. g Take out the drum unit and toner cartridge assembly. 120 Routine Maintenance Cleaning the drum unit 5 If your printout has white or black dots at 3.7 in Ready mode. b Press a or b to choose Drum Dot Print. Press OK to ... the machine is in . (94 mm) intervals, the drum may have foreign material, such as glue from a label stuck on for 10 minutes for the internal fan to cool the extremely hot parts inside the machine.
c Press a or b to choose Machine Info.. g Take out the drum unit and toner cartridge assembly. 120 Routine Maintenance Cleaning the drum unit 5 If your printout has white or black dots at 3.7 in Ready mode. b Press a or b to choose Drum Dot Print. Press OK to ... the machine is in . (94 mm) intervals, the drum may have foreign material, such as glue from a label stuck on for 10 minutes for the internal fan to cool the extremely hot parts inside the machine.

User's Guide - English
Page 129
Important DO NOT clean the surface of the photosensitive drum with a cotton swab until the mark on the surface comes off. Routine Maintenance k Turn the drum unit gear toward you have found the mark on the drum that matches the drum dot check sheet, wipe the surface 5 of the drum gently with a sharp object or any liquids. 123 l When you by hand while looking at surface of the suspected area.
Important DO NOT clean the surface of the photosensitive drum with a cotton swab until the mark on the surface comes off. Routine Maintenance k Turn the drum unit gear toward you have found the mark on the drum that matches the drum dot check sheet, wipe the surface 5 of the drum gently with a sharp object or any liquids. 123 l When you by hand while looking at surface of the suspected area.

User's Guide - English
Page 131
..., and then connect the interface cables. a Turn off the machine's power switch. c Pull the paper tray completely out of paper. Routine Maintenance Cleaning the paper pick-up roller 5 Cleaning the paper pick-up rollers (1) inside of the machine to remove dust. 1 f Put the paper tray back in lukewarm water, and then wipe...
..., and then connect the interface cables. a Turn off the machine's power switch. c Pull the paper tray completely out of paper. Routine Maintenance Cleaning the paper pick-up roller 5 Cleaning the paper pick-up rollers (1) inside of the machine to remove dust. 1 f Put the paper tray back in lukewarm water, and then wipe...
User's Guide - English
Page 136
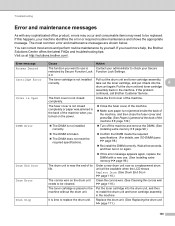
... toner cartridge, and put it on again. If this happens, your Secure restricted by yourself. If the problem continues, call Brother Customer Service. re-install the drum unit and toner cartridge assembly in the Put the toner cartridge into the 6 drum unit again. You...are shown below. The front cover is time to replace the drum unit. Clean the corona wire. (See Cleaning the corona wire uu page 118.) The toner cartridge is Contact your administrator to be cleaned. The most errors and perform routine maintenance by Secure Function Lock Function Lock ...
... toner cartridge, and put it on again. If this happens, your Secure restricted by yourself. If the problem continues, call Brother Customer Service. re-install the drum unit and toner cartridge assembly in the Put the toner cartridge into the 6 drum unit again. You...are shown below. The front cover is time to replace the drum unit. Clean the corona wire. (See Cleaning the corona wire uu page 118.) The toner cartridge is Contact your administrator to be cleaned. The most errors and perform routine maintenance by Secure Function Lock Function Lock ...
User's Guide - English
Page 154
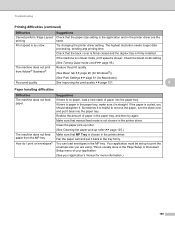
... in the Page Setup or Document Setup menu of paper into the paper tray. Print speed is chosen in the printer driver. Clean the paper pick-up roller. (See Cleaning the paper pick-up to remove the paper, turn the stack over and put it is curled, you are the printing. The...
... in the Page Setup or Document Setup menu of paper into the paper tray. Print speed is chosen in the printer driver. Clean the paper pick-up roller. (See Cleaning the paper pick-up to remove the paper, turn the stack over and put it is curled, you are the printing. The...
User's Guide - English
Page 157
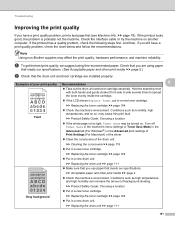
...following steps first. And then, if you still have a print quality problem, print a test page first (see Machine Info. Note Using non-Brother supplies may cause this print fault. a To get the best print quality, we suggest using paper that meets our specifications. (See Acceptable paper... toner cartridge. Troubleshooting Improving the print quality 6 If you have a print quality problem, check the chart below and follow the recommendations. uu Cleaning the corona wire uu page 118 Put in a new drum unit. uu Replacing the drum unit uu page 111 151 Examples of ...
...following steps first. And then, if you still have a print quality problem, print a test page first (see Machine Info. Note Using non-Brother supplies may cause this print fault. a To get the best print quality, we suggest using paper that meets our specifications. (See Acceptable paper... toner cartridge. Troubleshooting Improving the print quality 6 If you have a print quality problem, check the chart below and follow the recommendations. uu Cleaning the corona wire uu page 118 Put in a new drum unit. uu Replacing the drum unit uu page 111 151 Examples of ...
User's Guide - English
Page 158
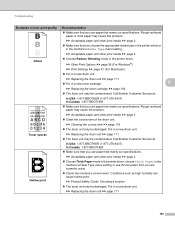
... paper that meets our specifications. Rough-surfaced paper or thick paper may cause the problem. Call Brother Customer Service at : In USA: 1-877-BROTHER (1-877-276-8437) In Canada: 1-877-BROTHER ABCDEFGH abcdefghijk ABCD abcde 01234 Make sure that you use paper that meets our specifications....may be contaminated. uu Acceptable paper and other print media uu page 2 Clean the corona wire of poor print quality Recommendation Make sure that you are currently using. uu Cleaning the corona wire uu page 118 The drum unit may be damaged. uu ...
... paper that meets our specifications. Rough-surfaced paper or thick paper may cause the problem. Call Brother Customer Service at : In USA: 1-877-BROTHER (1-877-276-8437) In Canada: 1-877-BROTHER ABCDEFGH abcdefghijk ABCD abcde 01234 Make sure that you use paper that meets our specifications....may be contaminated. uu Acceptable paper and other print media uu page 2 Clean the corona wire of poor print quality Recommendation Make sure that you are currently using. uu Cleaning the corona wire uu page 118 The drum unit may be damaged. uu ...


