Users Manual - English
Page 9
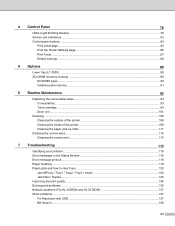
...extra memory ...91 6 Routine Maintenance 93 Replacing the consumable items...93 Consumables...93 Toner cartridge ...94 Drum unit ...101 Cleaning ...106 Cleaning the outside of the printer 106 Cleaning the inside of the printer...108 Cleaning the paper pick-up roller...111 Cleaning the corona wires ...113 Cleaning the corona wire...... MP tray / Tray1 / Tray2 / Tray3 / Inside 120 Jam Rear / Duplex...125 Improving the print quality...129 Solving print problems ...136 Network problems (For HL-5350DN and HL-5370DW 137 Other problems ...137 For Macintosh with USB ...137 BR-Script 3 ...138 viii
...extra memory ...91 6 Routine Maintenance 93 Replacing the consumable items...93 Consumables...93 Toner cartridge ...94 Drum unit ...101 Cleaning ...106 Cleaning the outside of the printer 106 Cleaning the inside of the printer...108 Cleaning the paper pick-up roller...111 Cleaning the corona wires ...113 Cleaning the corona wire...... MP tray / Tray1 / Tray2 / Tray3 / Inside 120 Jam Rear / Duplex...125 Improving the print quality...129 Solving print problems ...136 Network problems (For HL-5350DN and HL-5370DW 137 Other problems ...137 For Macintosh with USB ...137 BR-Script 3 ...138 viii
Users Manual - English
Page 11
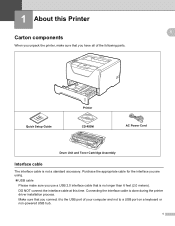
... sure you use a USB 2.0 interface cable that is done during the printer driver installation process. Make sure that you connect it to a USB port on a keyboard or non-powered USB hub. 1 Purchase the appropriate cable for the ... and not to the USB port of the following parts. DO NOT connect the interface cable at this Printer1 1 1 1 Quick Setup Guide Printer CD-ROM AC Power Cord Drum Unit and Toner Cartridge Assembly Interface cable 1 The interface cable is not a standard accessory. Connecting the interface cable is no longer than 6 feet...
... sure you use a USB 2.0 interface cable that is done during the printer driver installation process. Make sure that you connect it to a USB port on a keyboard or non-powered USB hub. 1 Purchase the appropriate cable for the ... and not to the USB port of the following parts. DO NOT connect the interface cable at this Printer1 1 1 1 Quick Setup Guide Printer CD-ROM AC Power Cord Drum Unit and Toner Cartridge Assembly Interface cable 1 The interface cable is not a standard accessory. Connecting the interface cable is no longer than 6 feet...

Users Manual - English
Page 83
... page counts, toner and drum status and the firmware version. The BRPrint Auditor utility also supports E-mail notification for Windows®) 3 The BRPrint Auditor software brings the monitoring power of Brother network management tools to Brother network management applications this utility can view the status of the Hewlett-Packard LaserJet laser printer. The remote PC...
... page counts, toner and drum status and the firmware version. The BRPrint Auditor utility also supports E-mail notification for Windows®) 3 The BRPrint Auditor software brings the monitoring power of Brother network management tools to Brother network management applications this utility can view the status of the Hewlett-Packard LaserJet laser printer. The remote PC...
Users Manual - English
Page 86
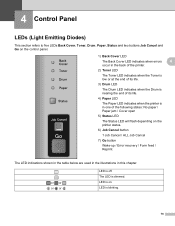
... The Back Cover LED indicates when errors 4 occur in the back of the printer. 2) Toner LED The Toner LED indicates when the Toner is low or at the end of its life. 3) Drum LED The Drum LED indicates when the Drum is nearing the end of its life. 4) Paper LED The Paper LED indicates... when the printer is blinking. 76 LED is in this chapter. LED is dimmed. The LED is...
... The Back Cover LED indicates when errors 4 occur in the back of the printer. 2) Toner LED The Toner LED indicates when the Toner is low or at the end of its life. 3) Drum LED The Drum LED indicates when the Drum is nearing the end of its life. 4) Paper LED The Paper LED indicates... when the printer is blinking. 76 LED is in this chapter. LED is dimmed. The LED is...
Users Manual - English
Page 88
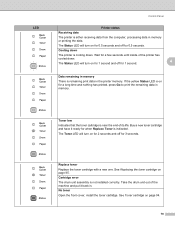
.... The Status LED will turn on for a few seconds until inside of the printer has cooled down . If the yellow Status LED is not installed correctly. Cartridge error The drum unit assembly is on for 1 second and off for 1 second. See Replacing the toner cartridge on page 94. 78... Cooling down The printer is cooling down . 4 The Status LED will turn on for 0.5 seconds and...
.... The Status LED will turn on for a few seconds until inside of the printer has cooled down . If the yellow Status LED is not installed correctly. Cartridge error The drum unit assembly is on for 1 second and off for 1 second. See Replacing the toner cartridge on page 94. 78... Cooling down The printer is cooling down . 4 The Status LED will turn on for 0.5 seconds and...
Users Manual - English
Page 89
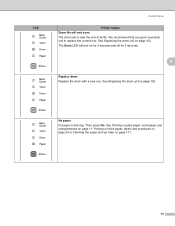
... paper pick-up roller on page 102. See Replacing the drum unit on page 111. 79 The Drum LED will end soon The drum unit is near the end of its life. See Replacing the drum unit on page 102. LED Control Panel Printer status Drum life will turn on for 2 seconds and off for 3 ...seconds. 4 Replace drum Replace the drum with a new one . We recommend that you get a new drum unit to replace the current one . No paper Put paper...
... paper pick-up roller on page 102. See Replacing the drum unit on page 111. 79 The Drum LED will end soon The drum unit is near the end of its life. See Replacing the drum unit on page 102. LED Control Panel Printer status Drum life will turn on for 2 seconds and off for 3 ...seconds. 4 Replace drum Replace the drum with a new one . We recommend that you get a new drum unit to replace the current one . No paper Put paper...
Users Manual - English
Page 91
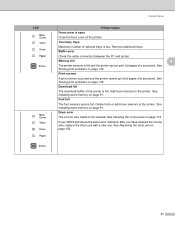
... 91. See Installing extra memory on page 136. See Replacing the drum unit on page 136. Drum error The corona wire needs to the printer. LED Control Panel Printer status Front cover is open Close the front cover of the printer is full. Remove additional trays. Download full The download buffer of ... Cleaning the corona wire on page 91. Delete fonts or add more memory to the printer. If your LED's still shows the same error indication after you have cleaned the corona wire, replace the drum unit with a new one. Font full The font memory area is two. See Installing...
... 91. See Installing extra memory on page 136. See Replacing the drum unit on page 136. Drum error The corona wire needs to the printer. LED Control Panel Printer status Front cover is open Close the front cover of the printer is full. Remove additional trays. Download full The download buffer of ... Cleaning the corona wire on page 91. Delete fonts or add more memory to the printer. If your LED's still shows the same error indication after you have cleaned the corona wire, replace the drum unit with a new one. Font full The font memory area is two. See Installing...
Users Manual - English
Page 92
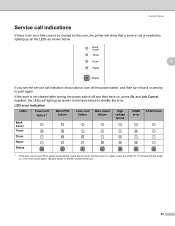
... as shown below to print again. LED error indication 4 LEDs Back Cover Toner Fuser unit failure 1 Main PCB failure Laser unit failure Main motor failure High voltage failure DIMM error FAN Failure Drum Paper Status 1 If this error occurs, turn off and then back on, press Go and Job Cancel together, the... LEDs will show that cannot be cleared by the user, the printer will light up all the LEDs as shown in the table below . 4 If you see the service call your dealer or Brother Customer Service. 82
... as shown below to print again. LED error indication 4 LEDs Back Cover Toner Fuser unit failure 1 Main PCB failure Laser unit failure Main motor failure High voltage failure DIMM error FAN Failure Drum Paper Status 1 If this error occurs, turn off and then back on, press Go and Job Cancel together, the... LEDs will show that cannot be cleared by the user, the printer will light up all the LEDs as shown in the table below . 4 If you see the service call your dealer or Brother Customer Service. 82
Users Manual - English
Page 95
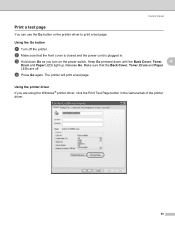
.... b Make sure that the Back Cover, Toner, Drum and Paper LEDs are using the Windows® printer driver, click the Print Test Page button in . c Hold down until the Back Cover, Toner, 4 Drum and Paper LEDs light up. Release Go. Using the printer driver 4 If you turn on the power switch. ...Control Panel Print a test page 4 You can use the Go button or the printer driver to print a test page. Keep Go pressed down...
.... b Make sure that the Back Cover, Toner, Drum and Paper LEDs are using the Windows® printer driver, click the Print Test Page button in . c Hold down until the Back Cover, Toner, 4 Drum and Paper LEDs light up. Release Go. Using the printer driver 4 If you turn on the power switch. ...Control Panel Print a test page 4 You can use the Go button or the printer driver to print a test page. Keep Go pressed down...
Users Manual - English
Page 97
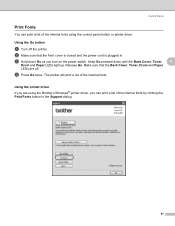
...internal fonts using the Brother's Windows® printer driver, you turn on the power switch. Keep Go pressed down Go as you can print a list of the internal fonts by clicking the Print Fonts button in . Using the printer driver 4 If you are off the printer. b Make sure that the Back Cover, Toner, Drum... and Paper LEDs are using the control panel button or printer driver. The printer will print a list of the internal fonts. Make sure that the...
...internal fonts using the Brother's Windows® printer driver, you turn on the power switch. Keep Go pressed down Go as you can print a list of the internal fonts by clicking the Print Fonts button in . Using the printer driver 4 If you are off the printer. b Make sure that the Back Cover, Toner, Drum... and Paper LEDs are using the control panel button or printer driver. The printer will print a list of the internal fonts. Make sure that the...
Users Manual - English
Page 103
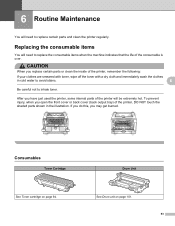
...hot. Routine Maintenance6 6 Routine Maintenance 6 You will need to inhale toner. To prevent injury, when you have just used the printer, some internal parts of the printer, remember the following: If your clothes are smeared with toner, wipe off the toner with a dry cloth and immediately wash ...the clothes in the illustration. Consumables Toner Cartridge See Toner cartridge on page 94. 6 Drum Unit See Drum unit on page 101. 93...
...hot. Routine Maintenance6 6 Routine Maintenance 6 You will need to inhale toner. To prevent injury, when you have just used the printer, some internal parts of the printer, remember the following: If your clothes are smeared with toner, wipe off the toner with a dry cloth and immediately wash ...the clothes in the illustration. Consumables Toner Cartridge See Toner cartridge on page 94. 6 Drum Unit See Drum unit on page 101. 93...
Users Manual - English
Page 106
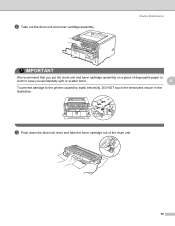
b Take out the drum unit and toner cartridge assembly. Routine Maintenance IMPORTANT We recommend that you put the drum unit and toner cartridge assembly on a piece of the drum unit. 96 c Push down the blue lock lever and take the toner cartridge out of disposable paper or cloth in case you accidentally spill or scatter toner. 6 To prevent damage to the printer caused by static electricity, DO NOT touch the electrodes shown in the illustration.
b Take out the drum unit and toner cartridge assembly. Routine Maintenance IMPORTANT We recommend that you put the drum unit and toner cartridge assembly on a piece of the drum unit. 96 c Push down the blue lock lever and take the toner cartridge out of disposable paper or cloth in case you accidentally spill or scatter toner. 6 To prevent damage to the printer caused by static electricity, DO NOT touch the electrodes shown in the illustration.
Users Manual - English
Page 108
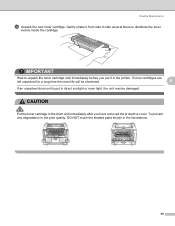
...the unit may be damaged. If toner cartridges are left unpacked for a long time the toner life will be shortened. 6 If an unpacked drum unit is put it from side to side several times to distribute the toner evenly inside the cartridge. Routine Maintenance d Unpack the new toner... cartridge. To prevent any degradation to unpack the toner cartridge until immediately before you put in the drum unit immediately after you have removed the protective cover. Gently shake it in the illustrations. 98 IMPORTANT Wait to the print quality, DO ...
...the unit may be damaged. If toner cartridges are left unpacked for a long time the toner life will be shortened. 6 If an unpacked drum unit is put it from side to side several times to distribute the toner evenly inside the cartridge. Routine Maintenance d Unpack the new toner... cartridge. To prevent any degradation to unpack the toner cartridge until immediately before you put in the drum unit immediately after you have removed the protective cover. Gently shake it in the illustrations. 98 IMPORTANT Wait to the print quality, DO ...
Users Manual - English
Page 109
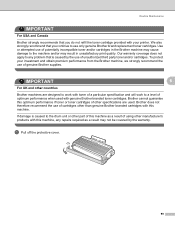
...toner or toner cartridges of other countries Brother machines are used with genuine Brother branded toner cartridges. e Pull off the protective cover. 99 If damage is caused by the warranty. We also strongly recommend that is caused to the drum unit or other part of optimum ...incompatible toner and/or cartridges in the Brother machine may cause damage to the machine and/or may not be covered by the use of genuine Brother supplies. To protect your printer. Routine Maintenance IMPORTANT For USA and Canada Brother strongly recommends that you continue to use...
...toner or toner cartridges of other countries Brother machines are used with genuine Brother branded toner cartridges. e Pull off the protective cover. 99 If damage is caused by the warranty. We also strongly recommend that is caused to the drum unit or other part of optimum ...incompatible toner and/or cartridges in the Brother machine may cause damage to the machine and/or may not be covered by the use of genuine Brother supplies. To protect your printer. Routine Maintenance IMPORTANT For USA and Canada Brother strongly recommends that you continue to use...
Users Manual - English
Page 110
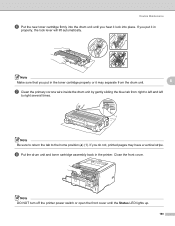
... lever will lift automatically. If you hear it lock into the drum unit until the Status LED lights up. 100 Close the front cover. Routine Maintenance f Put the new toner cartridge firmly into place. Note DO NOT turn off the printer power switch or open the front cover until you do not..., printed pages may separate from the drum unit. 6 g Clean the primary corona wire inside the drum unit by gently sliding the blue tab from right to left and left...
... lever will lift automatically. If you hear it lock into the drum unit until the Status LED lights up. 100 Close the front cover. Routine Maintenance f Put the new toner cartridge firmly into place. Note DO NOT turn off the printer power switch or open the front cover until you do not..., printed pages may separate from the drum unit. 6 g Clean the primary corona wire inside the drum unit by gently sliding the blue tab from right to left and left...
Users Manual - English
Page 111
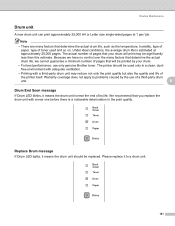
... reduce not only the print quality but also the quality and life of a third-party drum unit. 6 Drum End Soon message 6 If Drum LED blinks, it to problems caused by your drum will be replaced. The printer should be printed by the use only genuine Brother toner. The actual number of pages that determine the actual...
... reduce not only the print quality but also the quality and life of a third-party drum unit. 6 Drum End Soon message 6 If Drum LED blinks, it to problems caused by your drum will be replaced. The printer should be printed by the use only genuine Brother toner. The actual number of pages that determine the actual...
Users Manual - English
Page 112
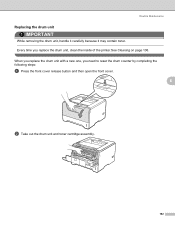
Routine Maintenance Replacing the drum unit 6 IMPORTANT While removing the drum unit, handle it carefully because it may contain toner. When you replace the drum unit with a new one, you replace the drum unit, clean the inside of the printer.See Cleaning on page 106. Every time you need to reset the drum counter by completing the following steps: a Press the front cover release button and then open the front cover. 6 b Take out the drum unit and toner cartridge assembly. 102
Routine Maintenance Replacing the drum unit 6 IMPORTANT While removing the drum unit, handle it carefully because it may contain toner. When you replace the drum unit with a new one, you replace the drum unit, clean the inside of the printer.See Cleaning on page 106. Every time you need to reset the drum counter by completing the following steps: a Press the front cover release button and then open the front cover. 6 b Take out the drum unit and toner cartridge assembly. 102
Users Manual - English
Page 113
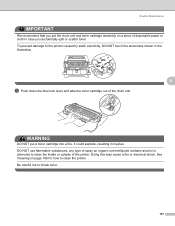
... you put a toner cartridge into a fire. See Cleaning on a piece of disposable paper or cloth in injuries. Be careful not to clean the printer. Routine Maintenance IMPORTANT We recommend that you accidentally spill or scatter toner. To prevent damage to clean the inside or outside of the.... WARNING DO NOT put the drum unit and toner cartridge assembly on page 106 for how to inhale toner. 103 DO NOT use flammable substances, any type of spray an organic solvent/liquids contains alcohol or ammonia to the printer caused by static electricity, DO NOT touch the electrodes shown...
... you put a toner cartridge into a fire. See Cleaning on a piece of disposable paper or cloth in injuries. Be careful not to clean the printer. Routine Maintenance IMPORTANT We recommend that you accidentally spill or scatter toner. To prevent damage to clean the inside or outside of the.... WARNING DO NOT put the drum unit and toner cartridge assembly on page 106 for how to inhale toner. 103 DO NOT use flammable substances, any type of spray an organic solvent/liquids contains alcohol or ammonia to the printer caused by static electricity, DO NOT touch the electrodes shown...
Users Manual - English
Page 114
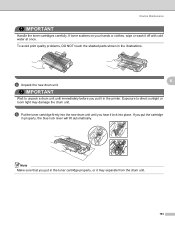
To avoid print quality problems, DO NOT touch the shaded parts shown in the printer. e Put the toner cartridge firmly into place. If you put it off with cold water at once. Exposure to unpack a drum unit until immediately before you put the cartridge in the toner cartridge properly, or ...in properly, the blue lock lever will lift automatically. Note Make sure that you hear it may damage the drum unit. IMPORTANT Wait to direct sunlight or room light may separate from the drum unit. 104 If toner scatters on your hands or clothes, wipe or wash it in the illustrations. 6...
To avoid print quality problems, DO NOT touch the shaded parts shown in the printer. e Put the toner cartridge firmly into place. If you put it off with cold water at once. Exposure to unpack a drum unit until immediately before you put the cartridge in the toner cartridge properly, or ...in properly, the blue lock lever will lift automatically. Note Make sure that you hear it may damage the drum unit. IMPORTANT Wait to direct sunlight or room light may separate from the drum unit. 104 If toner scatters on your hands or clothes, wipe or wash it in the illustrations. 6...
Users Manual - English
Page 115
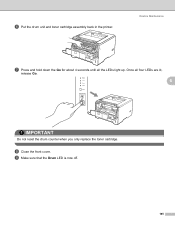
h Close the front cover. i Make sure that the Drum LED is now off. 105 Once all the LEDs light up. f Put the drum unit and toner cartridge assembly back in the printer. Routine Maintenance g Press and hold down the Go for about 4 seconds until all four LEDs are lit, release Go. 6 IMPORTANT Do not reset the drum counter when you only replace the toner cartridge.
h Close the front cover. i Make sure that the Drum LED is now off. 105 Once all the LEDs light up. f Put the drum unit and toner cartridge assembly back in the printer. Routine Maintenance g Press and hold down the Go for about 4 seconds until all four LEDs are lit, release Go. 6 IMPORTANT Do not reset the drum counter when you only replace the toner cartridge.


