
Users Manual - English
Page 10
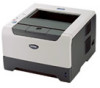
Front view 1 2 3 4 7 6 5 8 1 Front cover release button 2 Control panel 3 Face-down output tray support flap (support flap) 4 Front cover 5 Paper tray 6 Power switch 7 Face-down output tray 8 Multi-purpose Tray (MP Tray) 1. About this Printer 2
Front view 1 2 3 4 7 6 5 8 1 Front cover release button 2 Control panel 3 Face-down output tray support flap (support flap) 4 Front cover 5 Paper tray 6 Power switch 7 Face-down output tray 8 Multi-purpose Tray (MP Tray) 1. About this Printer 2

Users Manual - English
Page 13
... to 10 sheets Up to the page for each printing method by clicking p in the printer driver and this guide are as follows: Paper tray Multi-purpose tray Optional lower tray unit Duplex tray for automatic duplex printing (For HL-5250DN) Tray 1 MP Tray Tray 2 / Tray 3 DX When looking at this page on the CD-ROM, you can jump to 10 sheets...
... to 10 sheets Up to the page for each printing method by clicking p in the printer driver and this guide are as follows: Paper tray Multi-purpose tray Optional lower tray unit Duplex tray for automatic duplex printing (For HL-5250DN) Tray 1 MP Tray Tray 2 / Tray 3 DX When looking at this page on the CD-ROM, you can jump to 10 sheets...

Users Manual - English
Page 15
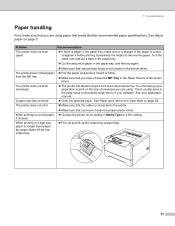
...use envelopes that cannot be suitable for your printer. You should buy quality envelopes from your application as the paper in the paper tray at the same time because it may damage your printer. If you will be arranged when put different types of paper. Printing Methods Types of baggy or flimsy ...; For proper printing, you want. This damage is not covered under any of the types of paper that the print results are responsible for the printer. „ Do not use any Brother warranty or service agreement. Before you print a lot of envelopes, test one to the way they...
...use envelopes that cannot be suitable for your printer. You should buy quality envelopes from your application as the paper in the paper tray at the same time because it may damage your printer. If you will be arranged when put different types of paper. Printing Methods Types of baggy or flimsy ...; For proper printing, you want. This damage is not covered under any of the types of paper that the print results are responsible for the printer. „ Do not use any Brother warranty or service agreement. Before you print a lot of envelopes, test one to the way they...

Users Manual - English
Page 18
For legal size paper 1, press in the paper-guide release lever and pull out the back of the printer. 2. d Put paper in the slots. Make sure that the guides are firmly in the tray, and below the maximum paper mark (b). 10 b Pull the paper tray completely out of the paper tray. 1 Legal size paper is not available in some regions outside the USA and Canada. Printing Methods c While pressing the blue paper-guide release lever, slide the paper guides to fit the paper size.
For legal size paper 1, press in the paper-guide release lever and pull out the back of the printer. 2. d Put paper in the slots. Make sure that the guides are firmly in the tray, and below the maximum paper mark (b). 10 b Pull the paper tray completely out of the paper tray. 1 Legal size paper is not available in some regions outside the USA and Canada. Printing Methods c While pressing the blue paper-guide release lever, slide the paper guides to fit the paper size.

Users Manual - English
Page 19
Stacking the printed transparencies may cause a paper jam or the transparency to be printed on must be face down output tray, or remove each transparency at once after printing. f Lift up the support flap to the printer. Note • The side to curl. 11 Printing Methods e Put the paper tray firmly back in the printer. g Send the print data to prevent paper from sliding off the face-down . • When printing on transparencies, remove each page as soon as it is completely inserted into the printer. Make sure that it comes out of the printer. 2.
Stacking the printed transparencies may cause a paper jam or the transparency to be printed on must be face down output tray, or remove each transparency at once after printing. f Lift up the support flap to the printer. Note • The side to curl. 11 Printing Methods e Put the paper tray firmly back in the printer. g Send the print data to prevent paper from sliding off the face-down . • When printing on transparencies, remove each page as soon as it is completely inserted into the printer. Make sure that it comes out of the printer. 2.

Users Manual - English
Page 27
2. Manual duplex printing from the paper tray a In the printer driver choose the Advanced tab, then choose the Manual Duplex printing mode, and from the output tray and put it back in the paper tray or the MP tray. „ If the paper is not feeding properly, it may be Tray1. c Remove the printed even-numbered pages from the...
2. Manual duplex printing from the paper tray a In the printer driver choose the Advanced tab, then choose the Manual Duplex printing mode, and from the output tray and put it back in the paper tray or the MP tray. „ If the paper is not feeding properly, it may be Tray1. c Remove the printed even-numbered pages from the...

Users Manual - English
Page 29
... on the second side, put the paper face down, with the leading edge (top) of paper. Printing Methods Paper orientation for manual duplex printing The printer prints the second page first. When doing manual duplex printing, the paper must be put in the paper tray in the following way: „ For the paper tray: • Put the side to...
... on the second side, put the paper face down, with the leading edge (top) of paper. Printing Methods Paper orientation for manual duplex printing The printer prints the second page first. When doing manual duplex printing, the paper must be put in the paper tray in the following way: „ For the paper tray: • Put the side to...
Users Manual - English
Page 30
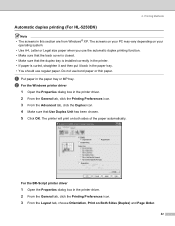
... Orientation, Print on both sides of the paper automatically. a Put paper in this section are from Windows® XP. The printer will print on Both Sides (Duplex) and Page Order. 22 Printing Methods Automatic duplex printing (For HL-5250DN) Note • The screens in the paper tray or MP tray. The screens on your PC may vary depending...
... Orientation, Print on both sides of the paper automatically. a Put paper in this section are from Windows® XP. The printer will print on Both Sides (Duplex) and Page Order. 22 Printing Methods Automatic duplex printing (For HL-5250DN) Note • The screens in the paper tray or MP tray. The screens on your PC may vary depending...
Users Manual - English
Page 31
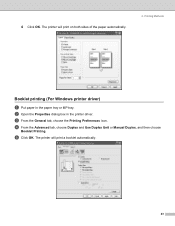
b Open the Properties dialog box in the paper tray or MP tray. d From the Advanced tab, choose Duplex and Use Duplex Unit or Manual Duplex, and then choose Booklet Printing. 4 Click OK. The printer will print a booklet automatically. 23 e Click OK. The printer will print on both sides of the paper automatically. 2. c From the General tab, choose the Printing Preferences icon. Printing Methods Booklet printing (For Windows printer driver) a Put paper in the printer driver.
b Open the Properties dialog box in the paper tray or MP tray. d From the Advanced tab, choose Duplex and Use Duplex Unit or Manual Duplex, and then choose Booklet Printing. 4 Click OK. The printer will print a booklet automatically. 23 e Click OK. The printer will print on both sides of the paper automatically. 2. c From the General tab, choose the Printing Preferences icon. Printing Methods Booklet printing (For Windows printer driver) a Put paper in the printer driver.

Users Manual - English
Page 40
Right-click the Brother HL-5240/5250DN series icon and select Properties to access the Accessories tab. 1 Printers and Faxes for each paper tray. • Paper Size This setting allows you to the tray. Choose the Default Source from the correct tray. • Default Source This setting allows you click Auto Detect, options that your document will be listed. 3. When...
Right-click the Brother HL-5240/5250DN series icon and select Properties to access the Accessories tab. 1 Printers and Faxes for each paper tray. • Paper Size This setting allows you to the tray. Choose the Default Source from the correct tray. • Default Source This setting allows you click Auto Detect, options that your document will be listed. 3. When...
Users Manual - English
Page 81
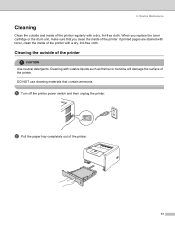
... with toner, clean the inside of the printer regularly with a dry, lint-free cloth. b Pull the paper tray completely out of the printer CAUTION Use neutral detergents. DO NOT use cleaning materials that you clean the inside of the printer. Cleaning the outside and inside of the printer with volatile liquids such as thinner or benzine...
... with toner, clean the inside of the printer regularly with a dry, lint-free cloth. b Pull the paper tray completely out of the printer CAUTION Use neutral detergents. DO NOT use cleaning materials that you clean the inside of the printer. Cleaning the outside and inside of the printer with volatile liquids such as thinner or benzine...

Users Manual - English
Page 82
f Put the paper tray back in , and then turn on the power switch. Routine Maintenance d Remove anything that is stuck inside of the paper tray with a dry, lint-free cloth to remove dust. g Plug the printer back in the printer. c Wipe the outside of the printer a Turn off the printer power switch and then unplug the printer. 74 Cleaning the inside of the printer with a dry, lint-free cloth to remove dust. 6. e Wipe the inside the paper tray.
f Put the paper tray back in , and then turn on the power switch. Routine Maintenance d Remove anything that is stuck inside of the paper tray with a dry, lint-free cloth to remove dust. g Plug the printer back in the printer. c Wipe the outside of the printer a Turn off the printer power switch and then unplug the printer. 74 Cleaning the inside of the printer with a dry, lint-free cloth to remove dust. 6. e Wipe the inside the paper tray.

Users Manual - English
Page 87
... on page 45. „ Status Monitor Error Message appears See Error messages in the paper tray. „ The interface cable is securely connected to the printer and the computer. „ The correct driver for the printer has been chosen and is installed. „ The PC is set up to connect ...Monitor on page 80. „ Printer printed an Error Message See Error message printout on page 82. „ Paper handling See Paper handling on page 83 and Paper jams and how to the correct printer port. Printer does not print: If you need additional help, the Brother Solutions Center offers the latest FAQs ...
... on page 45. „ Status Monitor Error Message appears See Error messages in the paper tray. „ The interface cable is securely connected to the printer and the computer. „ The correct driver for the printer has been chosen and is installed. „ The PC is set up to connect ...Monitor on page 80. „ Printer printed an Error Message See Error message printout on page 82. „ Paper handling See Paper handling on page 83 and Paper jams and how to the correct printer port. Printer does not print: If you need additional help, the Brother Solutions Center offers the latest FAQs ...
Users Manual - English
Page 88
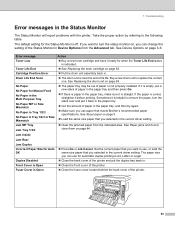
...in the Status Monitor The Status Monitor will report problems with the printer. If it is empty, put a new stack of paper in the paper tray and then press Go. „ If there is paper in the paper tray, make sure it is curled, straighten it ready for the Status... paper that meets Brother's recommended paper specifications. If you can use paper that you selected in Tray 1/2/3 or Size Mismatch Jam MP Tray Jam Tray 1/2/3 Action „ Buy a new toner cartridge and have it before printing. The paper size you want to replace the current one. Sometimes it back in the paper tray....
...in the Status Monitor The Status Monitor will report problems with the printer. If it is empty, put a new stack of paper in the paper tray and then press Go. „ If there is paper in the paper tray, make sure it is curled, straighten it ready for the Status... paper that meets Brother's recommended paper specifications. If you can use paper that you selected in Tray 1/2/3 or Size Mismatch Jam MP Tray Jam Tray 1/2/3 Action „ Buy a new toner cartridge and have it before printing. The paper size you want to replace the current one. Sometimes it back in the paper tray....
Users Manual - English
Page 91
... First, make sure it back in the paper tray. „ Cut the amount of paper in the paper tray, and then try again. „ Make sure that manual feed mode is connected to the printer. „ Make sure that meets Brother recommended paper specifications. The printer does not feed paper from the multi-purpose tray. When printing on page 84. „...
... First, make sure it back in the paper tray. „ Cut the amount of paper in the paper tray, and then try again. „ Make sure that manual feed mode is connected to the printer. „ Make sure that meets Brother recommended paper specifications. The printer does not feed paper from the multi-purpose tray. When printing on page 84. „...

Users Manual - English
Page 92
... shown below , you have just used the printer, some internal parts of the printer, DO NOT touch the shaded parts shown in the illustrations. Note Always remove all the remaining jammed paper has been removed from the printer. This helps prevent multiple sheets of paper from the paper tray and straighten the stack when you open the front...
... shown below , you have just used the printer, some internal parts of the printer, DO NOT touch the shaded parts shown in the illustrations. Note Always remove all the remaining jammed paper has been removed from the printer. This helps prevent multiple sheets of paper from the paper tray and straighten the stack when you open the front...

Users Manual - English
Page 94
Troubleshooting 86 e Pull the jammed paper up and out of the printer. f Open the front cover again. 7. c Pull the paper tray completely out of the printer. d Close the front cover.
Troubleshooting 86 e Pull the jammed paper up and out of the printer. f Open the front cover again. 7. c Pull the paper tray completely out of the printer. d Close the front cover.

Users Manual - English
Page 98
Troubleshooting p Put the paper tray firmly back in the printer. 7. r Make sure that the Paper LED is now off and the printer is ready. 90 q Close the front cover. o Put the drum unit and toner cartridge assembly back in the printer.
Troubleshooting p Put the paper tray firmly back in the printer. 7. r Make sure that the Paper LED is now off and the printer is ready. 90 q Close the front cover. o Put the drum unit and toner cartridge assembly back in the printer.
Users Manual - English
Page 102
...Call your dealer or Brother Customer Service. „ Make sure that the paper or other print media is loaded properly in the paper tray too long. See About paper on page 9. „ Check the paper type and quality. See Replacing the drum unit on page 12. „ The paper tray may be smudged. .... See About paper on page 9. „ If you use the printer often, the paper may be too full. See About paper on page 77. „ Make sure the primary corona wire cleaner is in the paper tray. Put in the paper tray. Also, fan the paper stack and then rotate the paper 180° ...
...Call your dealer or Brother Customer Service. „ Make sure that the paper or other print media is loaded properly in the paper tray too long. See About paper on page 9. „ Check the paper type and quality. See Replacing the drum unit on page 12. „ The paper tray may be smudged. .... See About paper on page 9. „ If you use the printer often, the paper may be too full. See About paper on page 77. „ Make sure the primary corona wire cleaner is in the paper tray. Put in the paper tray. Also, fan the paper stack and then rotate the paper 180° ...

Users Manual - English
Page 108
A Appendix Printer specifications Engine Model Technology Print speed First print time Resolution Windows® 95/98/Me, Windows NT® 4.0 and Windows® 2000/XP DOS Mac OS® Linux HL-5240 HL-5250DN Electrophotographic Up to 30 ppm (Letter size) 1, Up to 28 ppm (A4 size) 1 Less than 8.5 sec 1200 dpi 2 HQ1200 600 dpi 300 dpi 600 dpi 1200 dpi 2 HQ1200 600 dpi 300 dpi 600 dpi 300 dpi 1 From standard paper tray and optional paper tray 2 2 If you use the high quality 1200 dpi setting (1200 × 1200 dpi) the print speed will be slower. 100
A Appendix Printer specifications Engine Model Technology Print speed First print time Resolution Windows® 95/98/Me, Windows NT® 4.0 and Windows® 2000/XP DOS Mac OS® Linux HL-5240 HL-5250DN Electrophotographic Up to 30 ppm (Letter size) 1, Up to 28 ppm (A4 size) 1 Less than 8.5 sec 1200 dpi 2 HQ1200 600 dpi 300 dpi 600 dpi 1200 dpi 2 HQ1200 600 dpi 300 dpi 600 dpi 300 dpi 1 From standard paper tray and optional paper tray 2 2 If you use the high quality 1200 dpi setting (1200 × 1200 dpi) the print speed will be slower. 100


