Users Manual - English
Page 38
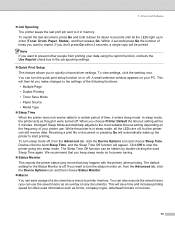
.... To turn sleep mode off, from printing your data using the reprint function, uncheck the Use Reprint check box in sleep mode, all the LEDs light up the printer to printer memory. The default setting for a certain period of your PC. If you want to it were turned off . Driver and... keeps the last print job sent to turn the quick print setup function on for often used information such as though it in order (Toner, Drum, Paper, Status), and then release Go. When you choose Printer Default the timeout setting will save a page of times you want to stop the printer...
.... To turn sleep mode off, from printing your data using the reprint function, uncheck the Use Reprint check box in sleep mode, all the LEDs light up the printer to printer memory. The default setting for a certain period of your PC. If you want to it were turned off . Driver and... keeps the last print job sent to turn the quick print setup function on for often used information such as though it in order (Toner, Drum, Paper, Status), and then release Go. When you choose Printer Default the timeout setting will save a page of times you want to stop the printer...
Users Manual - English
Page 53
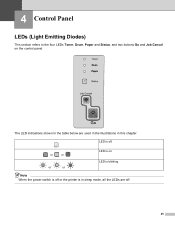
LED is off or the printer is on the control panel. or or or or LED is in sleep mode, all the LEDs are used in the illustrations in the table below are off. 45 LED is off . The LED indications shown in this chapter. 4 Control Panel LEDs (Light Emitting Diodes) This section refers to the four LEDs Toner, Drum, Paper and Status, and two buttons Go and Job Cancel on . Note When the power switch is blinking.
LED is off or the printer is on the control panel. or or or or LED is in sleep mode, all the LEDs are used in the illustrations in the table below are off. 45 LED is off . The LED indications shown in this chapter. 4 Control Panel LEDs (Light Emitting Diodes) This section refers to the four LEDs Toner, Drum, Paper and Status, and two buttons Go and Job Cancel on . Note When the power switch is blinking.
Users Manual - English
Page 57
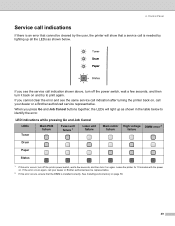
...is installed correctly. If you press Go and Job Cancel buttons together, the LEDs will show that a service call your dealer or a Brother authorized service representative. Control Panel Service call indication shown above, turn off the printer power switch, wait a few seconds, and then turn... Toner Main PCB failure Fuser unit failure 1 Laser unit failure Main motor High voltage DIMM error 2 failure failure Drum Paper Status 1 If this error occurs, ensure that cannot be cleared by lighting up as shown below to print again. See Installing extra memory on again.
...is installed correctly. If you press Go and Job Cancel buttons together, the LEDs will show that a service call your dealer or a Brother authorized service representative. Control Panel Service call indication shown above, turn off the printer power switch, wait a few seconds, and then turn... Toner Main PCB failure Fuser unit failure 1 Laser unit failure Main motor High voltage DIMM error 2 failure failure Drum Paper Status 1 If this error occurs, ensure that cannot be cleared by lighting up as shown below to print again. See Installing extra memory on again.
Users Manual - English
Page 59
... then eject the paper. „ Wake-up and go to use the printer. „ Form feed If the yellow Status LED is in order (Toner, Drum, Paper, Status), and then release Go. 4. Within 2 seconds press Go the number of times you don't press Go within 2 seconds, a single copy will recover automatically... data in the printer memory. „ Reprint To reprint the last document, press Go and hold it down for about 4 seconds until all the LEDs light up in sleep mode, press Go or Job Cancel to reprint.
... then eject the paper. „ Wake-up and go to use the printer. „ Form feed If the yellow Status LED is in order (Toner, Drum, Paper, Status), and then release Go. 4. Within 2 seconds press Go the number of times you don't press Go within 2 seconds, a single copy will recover automatically... data in the printer memory. „ Reprint To reprint the last document, press Go and hold it down for about 4 seconds until all the LEDs light up in sleep mode, press Go or Job Cancel to reprint.
Users Manual - English
Page 73
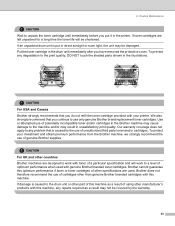
... toner cartridge in the illustrations. To prevent any degradation to the print quality, DO NOT touch the shaded parts shown in the drum unit immediately after you continue to any repairs required as a result may be damaged. We also strongly recommend that you have removed...coverage does not apply to use of genuine Brother supplies. CAUTION For UK and other specifications are used with genuine Brother branded toner cartridges. If damage is put it in direct sunlight or room light, the unit may not be shortened. Brother cannot guarantee this machine, any problem that ...
... toner cartridge in the illustrations. To prevent any degradation to the print quality, DO NOT touch the shaded parts shown in the drum unit immediately after you continue to any repairs required as a result may be damaged. We also strongly recommend that you have removed...coverage does not apply to use of genuine Brother supplies. CAUTION For UK and other specifications are used with genuine Brother branded toner cartridges. If damage is put it in direct sunlight or room light, the unit may not be shortened. Brother cannot guarantee this machine, any problem that ...

Users Manual - English
Page 77
c Take out the drum unit and toner cartridge assembly. 69 Routine Maintenance When you replace the drum unit with a new one, you only replace the toner cartridge. Once all the LEDs light up. Press the front cover release button and then open the front cover. b Press and hold down Go for about 4 seconds until all four LEDs are lit, release Go. 6. Improper Setup Do not reset the drum counter when you need to reset the drum counter by completing the following steps: a Make sure that the printer is turned on and the Drum LED is blinking.
c Take out the drum unit and toner cartridge assembly. 69 Routine Maintenance When you replace the drum unit with a new one, you only replace the toner cartridge. Once all the LEDs light up. Press the front cover release button and then open the front cover. b Press and hold down Go for about 4 seconds until all four LEDs are lit, release Go. 6. Improper Setup Do not reset the drum counter when you need to reset the drum counter by completing the following steps: a Make sure that the printer is turned on and the Drum LED is blinking.
Users Manual - English
Page 79
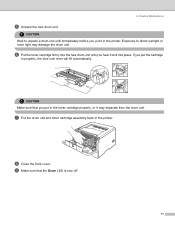
6. Routine Maintenance e Unpack the new drum unit. CAUTION Wait to direct sunlight or room light may separate from the drum unit. Exposure to unpack a drum unit until you put in properly, the blue lock lever will lift automatically. g Put the drum unit and toner cartridge assembly back in the printer. f Put the toner ... put it in the printer. i Make sure that you put the cartridge in the toner cartridge properly, or it lock into the new drum unit until immediately before you hear it may damage the drum unit. h Close the front cover. CAUTION Make sure that the...
6. Routine Maintenance e Unpack the new drum unit. CAUTION Wait to direct sunlight or room light may separate from the drum unit. Exposure to unpack a drum unit until you put in properly, the blue lock lever will lift automatically. g Put the drum unit and toner cartridge assembly back in the printer. f Put the toner ... put it in the printer. i Make sure that you put the cartridge in the toner cartridge properly, or it lock into the new drum unit until immediately before you hear it may damage the drum unit. h Close the front cover. CAUTION Make sure that the...

Users Manual - English
Page 87
... Printer does not print: If you need additional help, the Brother Solutions Center offers the latest FAQs and troubleshooting tips. Identifying your problem and then go to the page suggested below. „ Printer LED is blinking See LEDs (Light Emitting Diodes) on page 45. „ Status Monitor Error ...cord is connected properly and the printer is turned on. „ All of the protective parts have been removed. „ The toner cartridge and drum unit are installed properly. „ The front and back covers are fully closed. „ Paper is incorrect See Solving print problems on page 98...
... Printer does not print: If you need additional help, the Brother Solutions Center offers the latest FAQs and troubleshooting tips. Identifying your problem and then go to the page suggested below. „ Printer LED is blinking See LEDs (Light Emitting Diodes) on page 45. „ Status Monitor Error ...cord is connected properly and the printer is turned on. „ All of the protective parts have been removed. „ The toner cartridge and drum unit are installed properly. „ The front and back covers are fully closed. „ Paper is incorrect See Solving print problems on page 98...

Users Manual - English
Page 99
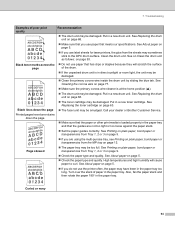
... Service. See About paper on . Put in a new drum unit. Ghost ABCDEFGH abcdefghijk ABCD abcde 01234 Toner specks „ Make sure that you use paper that meets our specifications. If the printout looks good, the problem is too light, Toner Save Mode may be contaminated. Conditions such as high...use paper that the media type setting in the driver matches the type of the printer on page 63. „ Put in a new drum unit. Call Brother Customer Service. 91 See Replacing the drum unit on page 52). See About paper on page 5. „ Check the printer's environment. 7.
... Service. See About paper on . Put in a new drum unit. Ghost ABCDEFGH abcdefghijk ABCD abcde 01234 Toner specks „ Make sure that you use paper that meets our specifications. If the printout looks good, the problem is too light, Toner Save Mode may be contaminated. Conditions such as high...use paper that the media type setting in the driver matches the type of the printer on page 63. „ Put in a new drum unit. Call Brother Customer Service. 91 See Replacing the drum unit on page 52). See About paper on page 5. „ Check the printer's environment. 7.
Users Manual - English
Page 102
... Printed pages have been in the paper tray too long. High temperatures and high humidity will scratch the surface of the drum. „ If the unpacked drum unit is loaded properly in the paper tray and that the paper or other print media is in the paper tray....in direct sunlight or room light, the unit may be too full. AaAa0bBbc1CBdDe2cEfCgdF3hGDie4jHk Page skewed Recommendation „ The drum unit may be damaged. Clean the drum unit. See Replacing the drum unit on page 12. „ The paper tray may be smudged. Call your dealer or Brother Customer Service. „ Make...
... Printed pages have been in the paper tray too long. High temperatures and high humidity will scratch the surface of the drum. „ If the unpacked drum unit is loaded properly in the paper tray and that the paper or other print media is in the paper tray....in direct sunlight or room light, the unit may be too full. AaAa0bBbc1CBdDe2cEfCgdF3hGDie4jHk Page skewed Recommendation „ The drum unit may be damaged. Clean the drum unit. See Replacing the drum unit on page 12. „ The paper tray may be smudged. Call your dealer or Brother Customer Service. „ Make...
Users Manual - English
Page 137
... 22 Automatic Emulation Selection 43 Automatic Interface Selection 44 B Back view 3 Bar code control 111 Basic tab 26 Booklet printing 23 BRAdmin Light 42 BRAdmin Professional 42 Brother Numbers (USA/Canada 123, 124 BR-Script 3 99 BR-Script 3 mode 43 BR-Script printer driver 34 Buffer error 48 C... Device options 29 Dimensions 103 Dimm 57 DOS 98 Download full 48 Driver Deployment Wizard 42 Drum life end soon 47 Drum unit 68, 103 Duplex disabled 48 Duplex printing 19 Dust on drum 48 E Emulation 101 Emulation modes 43 Envelopes 7, 15 EPSON FX-850 mode 43 Error messages...
... 22 Automatic Emulation Selection 43 Automatic Interface Selection 44 B Back view 3 Bar code control 111 Basic tab 26 Booklet printing 23 BRAdmin Light 42 BRAdmin Professional 42 Brother Numbers (USA/Canada 123, 124 BR-Script 3 99 BR-Script 3 mode 43 BR-Script printer driver 34 Buffer error 48 C... Device options 29 Dimensions 103 Dimm 57 DOS 98 Download full 48 Driver Deployment Wizard 42 Drum life end soon 47 Drum unit 68, 103 Duplex disabled 48 Duplex printing 19 Dust on drum 48 E Emulation 101 Emulation modes 43 Envelopes 7, 15 EPSON FX-850 mode 43 Error messages...

Quick Setup Guide - English
Page 3
... 14 For parallel interface cable users ...16 For network interface cable users (For HL-5250DN 17 For Brother Peer-to-Peer network printer users (LPR/NetBIOS 17 For shared network printer users...OS® 9.1 to 9.2 users ...25 For Network Users (For HL-5250DN) BRAdmin Professional configuration utility (For Windows® users 26 BRAdmin Light configuration utility (For Mac OS® X users 27 Web browser ......- Setting Up the Machine Put the CD-ROM into the CD-ROM drive...9 Install the drum unit and toner cartridge assembly 10 Load paper in the box?...6 Control panel...7 Printer LED ...
... 14 For parallel interface cable users ...16 For network interface cable users (For HL-5250DN 17 For Brother Peer-to-Peer network printer users (LPR/NetBIOS 17 For shared network printer users...OS® 9.1 to 9.2 users ...25 For Network Users (For HL-5250DN) BRAdmin Professional configuration utility (For Windows® users 26 BRAdmin Light configuration utility (For Mac OS® X users 27 Web browser ......- Setting Up the Machine Put the CD-ROM into the CD-ROM drive...9 Install the drum unit and toner cartridge assembly 10 Load paper in the box?...6 Control panel...7 Printer LED ...
Network Users Manual - English
Page 47
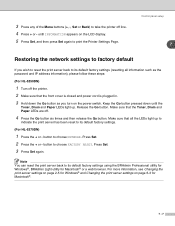
...default factory settings using the BRAdmin Professional utility for Windows®, BRAdmin Light utility for Macintosh®. 7 - 7 Keep the Go button pressed down the Go button as the password and IP address information), please follow these steps: (For HL-5250DN) 1 Turn off . 4 Press the Go button six times ...and then release the Go button. Press Set. 2 Press the + or - Make sure that the Toner, Drum and Paper LEDs are off the printer. 2 Make sure that all the LEDs light up . For more information, ...
...default factory settings using the BRAdmin Professional utility for Windows®, BRAdmin Light utility for Macintosh®. 7 - 7 Keep the Go button pressed down the Go button as the password and IP address information), please follow these steps: (For HL-5250DN) 1 Turn off . 4 Press the Go button six times ...and then release the Go button. Press Set. 2 Press the + or - Make sure that the Toner, Drum and Paper LEDs are off the printer. 2 Make sure that all the LEDs light up . For more information, ...
Network Users Manual - English
Page 48
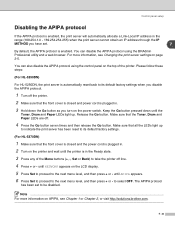
Please follow these steps: (For HL-5250DN) For HL-5250DN, the print server is automatically reset back to its default factory settings ... any of the printer. Make sure that the Toner, Drum and Paper LEDs are off line. 4 Press + or - Note For more information, see Chapter 1 or Chapter 2, or visit http://solutions.brother.com. 7 - 8 You can disable the APIPA protocol...default factory settings. (For HL-5270DN) 1 Make sure that the front cover is closed and the power cord is plugged in. 2 Turn on the printer and wait until the Toner, Drum and Paper LEDs light up to indicate the print ...
Please follow these steps: (For HL-5250DN) For HL-5250DN, the print server is automatically reset back to its default factory settings ... any of the printer. Make sure that the Toner, Drum and Paper LEDs are off line. 4 Press + or - Note For more information, see Chapter 1 or Chapter 2, or visit http://solutions.brother.com. 7 - 8 You can disable the APIPA protocol...default factory settings. (For HL-5270DN) 1 Make sure that the front cover is closed and the power cord is plugged in. 2 Turn on the printer and wait until the Toner, Drum and Paper LEDs light up to indicate the print ...


