Users Manual - English
Page 6
...Not available for HL-5130 4-4 Print server (NC-2100p) ...4-5 5 Routine maintenance ...5-1 Toner cartridge ...5-2 Toner Low message ...5-2 Toner Empty message ...5-3 Replacing the toner cartridge 5-3 Drum unit ...5-8 Change Drum message ...5-8 Replacing the drum unit ...5-9 Cleaning ...5-12 Replacing periodic maintenance ... ...A-1 Printer specifications ...A-1 Important information for choosing your paper A-6 8 Appendix (For Europe and Other Countries B-1 Brother Numbers ...B-1 Important information: Regulations B-2 Radio interference (220 to 240 volt model only B-2 International ENERGY ...
...Not available for HL-5130 4-4 Print server (NC-2100p) ...4-5 5 Routine maintenance ...5-1 Toner cartridge ...5-2 Toner Low message ...5-2 Toner Empty message ...5-3 Replacing the toner cartridge 5-3 Drum unit ...5-8 Change Drum message ...5-8 Replacing the drum unit ...5-9 Cleaning ...5-12 Replacing periodic maintenance ... ...A-1 Printer specifications ...A-1 Important information for choosing your paper A-6 8 Appendix (For Europe and Other Countries B-1 Brother Numbers ...B-1 Important information: Regulations B-2 Radio interference (220 to 240 volt model only B-2 International ENERGY ...

Users Manual - English
Page 79
... alternates turning on page 5-9. LED Toner Drum Paper Status Figure 3-6 Toner Drum Paper Status Figure 3-7 Toner Drum Paper Status Figure 3-8 Toner Drum Paper Status Figure 3-9 Printer status Data remaining in memory Print data remains in the printer memory. Purchase a new toner cartridge and have it ready for 3 seconds. See Replacing the drum unit on for 2 seconds and off...
... alternates turning on page 5-9. LED Toner Drum Paper Status Figure 3-6 Toner Drum Paper Status Figure 3-7 Toner Drum Paper Status Figure 3-8 Toner Drum Paper Status Figure 3-9 Printer status Data remaining in memory Print data remains in the printer memory. Purchase a new toner cartridge and have it ready for 3 seconds. See Replacing the drum unit on for 2 seconds and off...
Users Manual - English
Page 93
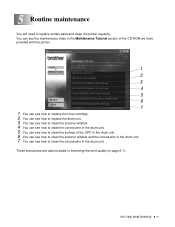
... see the maintenance video in the Maintenance Tutorial section of the CD-ROM we have provided with the printer. 1 2 3 4 5 6 7 1 You can see how to replace the toner cartridge. 2 You can see how to replace the drum unit. 3 You can see how to clean the scanner window. 4 You can see how to clean the ...corona wire in the drum unit. 5 You can see how to clean the surface of the OPC in the drum unit. 6 You can see how to clean the scanner window and the corona wire in the drum unit. 7 You can see how to replace certain parts and clean the printer regularly. ROUTINE MAINTENANCE 5 - 1...
... see the maintenance video in the Maintenance Tutorial section of the CD-ROM we have provided with the printer. 1 2 3 4 5 6 7 1 You can see how to replace the toner cartridge. 2 You can see how to replace the drum unit. 3 You can see how to clean the scanner window. 4 You can see how to clean the ...corona wire in the drum unit. 5 You can see how to clean the surface of the OPC in the drum unit. 6 You can see how to clean the scanner window and the corona wire in the drum unit. 7 You can see how to replace certain parts and clean the printer regularly. ROUTINE MAINTENANCE 5 - 1...

Users Manual - English
Page 94
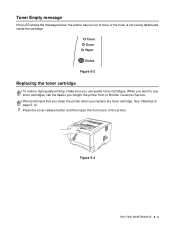
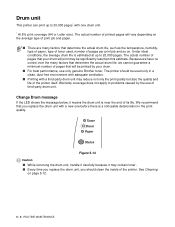
...immediately before you install it ready before you get a Toner Empty message. Buy a new toner cartridge and have it in the toner cartridge, see Replacing the toner cartridge on for 2 seconds and off for lighter or darker printing, the amount of toner. Toner LED will change the print density ...setting for 3 seconds. Toner Low message Toner Drum Paper Status The Toner LED alternates turning on page 5-3. Figure 5-1 If the LED shows this message, the toner cartridge has nearly run out of...
...immediately before you install it ready before you get a Toner Empty message. Buy a new toner cartridge and have it in the toner cartridge, see Replacing the toner cartridge on for 2 seconds and off for lighter or darker printing, the amount of toner. Toner LED will change the print density ...setting for 3 seconds. Toner Low message Toner Drum Paper Status The Toner LED alternates turning on page 5-3. Figure 5-1 If the LED shows this message, the toner cartridge has nearly run out of...
Users Manual - English
Page 95
... the front cover of toner or the toner is not evenly distributed inside the cartridge. Toner Drum Paper Status Figure 5-2 Replacing the toner cartridge To ensure high quality printing, make sure you bought the printer from or Brother Customer Service. We recommend that you clean the printer when you replace the toner cartridge. Figure 5-3 ROUTINE MAINTENANCE 5 - 3
... the front cover of toner or the toner is not evenly distributed inside the cartridge. Toner Drum Paper Status Figure 5-2 Replacing the toner cartridge To ensure high quality printing, make sure you bought the printer from or Brother Customer Service. We recommend that you clean the printer when you replace the toner cartridge. Figure 5-3 ROUTINE MAINTENANCE 5 - 3

Users Manual - English
Page 97
...result in unsatisfactory print quality. 4 Unpack the new toner cartridge. Our warranty coverage does not apply to the printer itself . To protect your investment and guarantee your printer may cause damage to any problem that you continue to spread the toner evenly inside the cartridge. If toner... for a long time the toner life will be shortened. ■ If an unpacked drum unit is put it in your print quality please continue to replace consumed toner cartridges with only Genuine Brother Branded Supplies. ■ Printing with both hands and gently rock it may reduce not ...
...result in unsatisfactory print quality. 4 Unpack the new toner cartridge. Our warranty coverage does not apply to the printer itself . To protect your investment and guarantee your printer may cause damage to any problem that you continue to spread the toner evenly inside the cartridge. If toner... for a long time the toner life will be shortened. ■ If an unpacked drum unit is put it in your print quality please continue to replace consumed toner cartridges with only Genuine Brother Branded Supplies. ■ Printing with both hands and gently rock it may reduce not ...
Users Manual - English
Page 100
...is a noticeable deterioration in the print quality. See Cleaning on . Drum unit This printer can print up to 20,000 pages. The actual number of printed pages will be printed by the use only genuine Brother toner. The actual number of pages per print job and so on... pages* with a third-party drum unit may contain toner. ■ Every time you replace the drum unit, you replace the drum unit with a new one drum unit. * At 5% print coverage (A4 or Letter size). The printer should clean the inside of the printer itself. We recommend that your drum. ■ For best performance,...
...is a noticeable deterioration in the print quality. See Cleaning on . Drum unit This printer can print up to 20,000 pages. The actual number of printed pages will be printed by the use only genuine Brother toner. The actual number of pages per print job and so on... pages* with a third-party drum unit may contain toner. ■ Every time you replace the drum unit, you replace the drum unit with a new one drum unit. * At 5% print coverage (A4 or Letter size). The printer should clean the inside of the printer itself. We recommend that your drum. ■ For best performance,...
Users Manual - English
Page 101
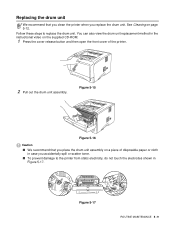
... disposable paper or cloth in case you accidentally spill or scatter toner. ■ To prevent damage to replace the drum unit. Replacing the drum unit We recommend that you place the drum unit assembly on a piece of the printer. 2 Pull out the drum unit assembly. Figure 5-15 Figure 5-16 Caution ■ We recommend that you clean the...
... disposable paper or cloth in case you accidentally spill or scatter toner. ■ To prevent damage to replace the drum unit. Replacing the drum unit We recommend that you place the drum unit assembly on a piece of the printer. 2 Pull out the drum unit assembly. Figure 5-15 Figure 5-16 Caution ■ We recommend that you clean the...
Users Manual - English
Page 103
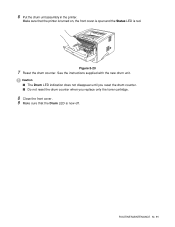
6 Put the drum unit assembly in the printer. Make sure that the Drum LED is red. See the instructions supplied with the new drum unit. Caution ■ The Drum LED indication does not disappear until you reset the drum counter. ■ Do not reset the drum counter when you replace only the toner cartridge. 8 Close the front cover. 9 Make sure that the printer is turned on, the front cover is open and the Status LED is now off. Figure 5-20 7 Reset the drum counter. ROUTINE MAINTENANCE 5 - 11
6 Put the drum unit assembly in the printer. Make sure that the Drum LED is red. See the instructions supplied with the new drum unit. Caution ■ The Drum LED indication does not disappear until you reset the drum counter. ■ Do not reset the drum counter when you replace only the toner cartridge. 8 Close the front cover. 9 Make sure that the printer is turned on, the front cover is open and the Status LED is now off. Figure 5-20 7 Reset the drum counter. ROUTINE MAINTENANCE 5 - 11
Users Manual - English
Page 104
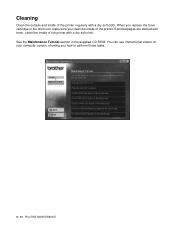
When you replace the toner cartridge or the drum unit, make sure you how to perform these tasks. 5 - 12 ROUTINE MAINTENANCE See the Maintenance Tutorial section in the supplied CD-ROM. Cleaning Clean the outside and inside of the printer regularly with a dry soft cloth. If printed pages are stained with toner, clean the inside of the printer with a dry soft cloth. You can see instructional videos on your computer screen, showing you clean the inside of the printer.
When you replace the toner cartridge or the drum unit, make sure you how to perform these tasks. 5 - 12 ROUTINE MAINTENANCE See the Maintenance Tutorial section in the supplied CD-ROM. Cleaning Clean the outside and inside of the printer regularly with a dry soft cloth. If printed pages are stained with toner, clean the inside of the printer with a dry soft cloth. You can see instructional videos on your computer screen, showing you clean the inside of the printer.
Users Manual - English
Page 116
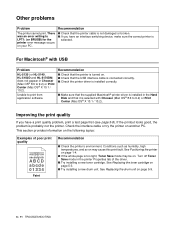
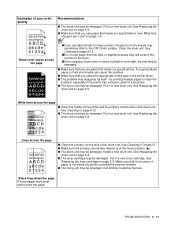
...See Replacing the drum unit on page 5-3. ■ Try installing a new drum unit. Recommendation ■ Check that the printer cable is not damaged or broken. ■ If you have an interface-switching device, make sure the correct printer is probably not the printer. See Positioning the printer ...whole page is selected with USB Problem HL-5130 (or HL-5140, HL-5150D and HL-5170DN) does not appear in the printer Properties tab of poor print quality ABCDEFGH abcdefghijk ABCD abcde 01234 Faint Recommendation ■ Check the printer's environment. Recommendation ■ Check that...
...See Replacing the drum unit on page 5-3. ■ Try installing a new drum unit. Recommendation ■ Check that the printer cable is not damaged or broken. ■ If you have an interface-switching device, make sure the correct printer is probably not the printer. See Positioning the printer ...whole page is selected with USB Problem HL-5130 (or HL-5140, HL-5150D and HL-5170DN) does not appear in the printer Properties tab of poor print quality ABCDEFGH abcdefghijk ABCD abcde 01234 Faint Recommendation ■ Check the printer's environment. Recommendation ■ Check that...
Users Manual - English
Page 117
...that you use ? See What kind of paper can I use paper that you choose the appropriate media type in the printer driver, or use ? See Replacing the drum unit on page 5-9. ■ Make sure you use paper that meets our specifications. See What kind of paper can ...you use ? See Positioning the printer on page 5-9. See What kind of paper can I use ? on page 1-4. See Replacing the toner cartridge in Chapter 1. ■ Check the printer's environment - See What kind of background shading. in Chapter 5. ■ Use a new drum unit. Rough-surfaced paper may ...
...that you use ? See What kind of paper can I use paper that you choose the appropriate media type in the printer driver, or use ? See Replacing the drum unit on page 5-9. ■ Make sure you use paper that meets our specifications. See What kind of paper can ...you use ? See Positioning the printer on page 5-9. See What kind of paper can I use ? on page 1-4. See Replacing the toner cartridge in Chapter 1. ■ Check the printer's environment - See What kind of background shading. in Chapter 5. ■ Use a new drum unit. Rough-surfaced paper may ...
Users Manual - English
Page 118
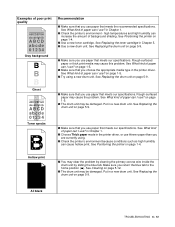
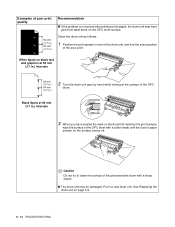
... while looking at 94 mm (3.7 in.) intervals 3 When you have glue from label stock on the OPC drum surface. See Replacing the drum unit on page 5-9. 6 - 13 TROUBLESHOOTING Put in front of the drum unit, and find the exact position of the poor print. Black Spots at the surface of the OPC... drum. Examples of poor print quality 94 mm (3.7 in.) 94 mm (3.7 in.) Recommendation ■ If the problem is ...
... while looking at 94 mm (3.7 in.) intervals 3 When you have glue from label stock on the OPC drum surface. See Replacing the drum unit on page 5-9. 6 - 13 TROUBLESHOOTING Put in front of the drum unit, and find the exact position of the poor print. Black Spots at the surface of the OPC... drum. Examples of poor print quality 94 mm (3.7 in.) 94 mm (3.7 in.) Recommendation ■ If the problem is ...
Users Manual - English
Page 119
... clear this problem, especially if the printer has not been used for laser printers, the glue from the sheets may sometimes stick to the OPC drum surface. See Cleaning in direct sunlight or room light, the unit may be damaged. See Replacing the toner cartridge on page 5-9. &#... pages have toner stains down the page. See Replacing the drum unit on page 5-3. Install a new drum unit. Put in a new drum unit. Call Brother Customer Service. Put in a new toner cartridge. Clean the drum unit. Put in a new drum unit. Examples of poor print quality ABCDEFGH abcdefghijk ...
... clear this problem, especially if the printer has not been used for laser printers, the glue from the sheets may sometimes stick to the OPC drum surface. See Cleaning in direct sunlight or room light, the unit may be damaged. See Replacing the toner cartridge on page 5-9. &#... pages have toner stains down the page. See Replacing the drum unit on page 5-3. Install a new drum unit. Put in a new drum unit. Call Brother Customer Service. Put in a new toner cartridge. Clean the drum unit. Put in a new drum unit. Examples of poor print quality ABCDEFGH abcdefghijk ...
Quick Setup Guide - English
Page 25
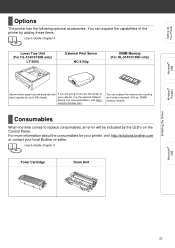
...Memory (For HL-5140/5150D only) Second lower paper tray unit expands total input capacity by the LED's on the Control Panel. Consumables When the time comes to replace consumables, an error will be indicated by up to your local Brother re-seller. Toner Cartridge Drum Unit Installing the... consumables for your printer, visit http://solutions.brother.com or contact your network, buy the optional Network device. You can expand the capabilities of the printer by installing an industry standard (100-pin DIMM) memory module. If you are going to connect the printer to 250 sheets....
...Memory (For HL-5140/5150D only) Second lower paper tray unit expands total input capacity by the LED's on the Control Panel. Consumables When the time comes to replace consumables, an error will be indicated by up to your local Brother re-seller. Toner Cartridge Drum Unit Installing the... consumables for your printer, visit http://solutions.brother.com or contact your network, buy the optional Network device. You can expand the capabilities of the printer by installing an industry standard (100-pin DIMM) memory module. If you are going to connect the printer to 250 sheets....


