Users Manual - English
Page 3
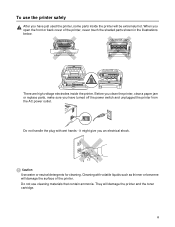
... or back cover of the printer. Do not handle the plug with volatile liquids such as thinner or benzene will damage the surface of the printer, never touch the shaded parts shown in the illustrations below. Before you clean the printer, clear a paper jam or replace parts, make sure... you have just used the printer, some parts inside the printer. They will be extremely hot. To use cleaning materials that contain ammonia. II Cleaning with wet hands...
... or back cover of the printer. Do not handle the plug with volatile liquids such as thinner or benzene will damage the surface of the printer, never touch the shaded parts shown in the illustrations below. Before you clean the printer, clear a paper jam or replace parts, make sure... you have just used the printer, some parts inside the printer. They will be extremely hot. To use cleaning materials that contain ammonia. II Cleaning with wet hands...
Users Manual - English
Page 17
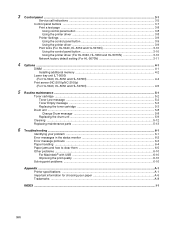
...printer driver ...3-8 Printer Settings ...3-9 Using the control panel button 3-9 Using the printer driver ...3-9 Print fonts (For HL-5040, HL-5050 and HL-5070N 3-10 Using the control panel button 3-10 Using the printer driver (For HL-5040, HL-5050 and HL-5070N 3-10 Network factory default setting (For HL... printouts ...6-3 Paper handling ...6-4 Paper jams and how to clear them 6-5 Other problems ...6-10 For Macintosh® with USB ...6-10 Improving the print quality ...6-10 Solving print problems ...6-16 Appendix ...A-1 Printer specifications ...A-1 Important information for choosing ...
...printer driver ...3-8 Printer Settings ...3-9 Using the control panel button 3-9 Using the printer driver ...3-9 Print fonts (For HL-5040, HL-5050 and HL-5070N 3-10 Using the control panel button 3-10 Using the printer driver (For HL-5040, HL-5050 and HL-5070N 3-10 Network factory default setting (For HL... printouts ...6-3 Paper handling ...6-4 Paper jams and how to clear them 6-5 Other problems ...6-10 For Macintosh® with USB ...6-10 Improving the print quality ...6-10 Solving print problems ...6-16 Appendix ...A-1 Printer specifications ...A-1 Important information for choosing ...
Users Manual - English
Page 23
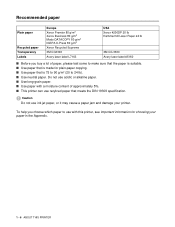
... Xerox Business 80 g/m2 Modo DATACOPY 80 g/m2 IGEPA X-Press 80 g/m2 Xerox Recycled Supreme 3M CG3300 Avery laser label L7163 USA Xerox 4200DP 20 lb Hammermill Laser Paper 24 lb 3M CG 3300 Avery laser label #5160 ■ Before you choose which paper to use with a moisture content of paper, please test... make sure that the paper is suitable. ■ Use paper that meets the DIN 19309 specification. To help you buy a lot of approximately 5%. ■ This printer can use ink jet paper, or it may cause a paper jam and damage your paper in the Appendix. 1 - 6 ABOUT THIS...
... Xerox Business 80 g/m2 Modo DATACOPY 80 g/m2 IGEPA X-Press 80 g/m2 Xerox Recycled Supreme 3M CG3300 Avery laser label L7163 USA Xerox 4200DP 20 lb Hammermill Laser Paper 24 lb 3M CG 3300 Avery laser label #5160 ■ Before you choose which paper to use with a moisture content of paper, please test... make sure that the paper is suitable. ■ Use paper that meets the DIN 19309 specification. To help you buy a lot of approximately 5%. ■ This printer can use ink jet paper, or it may cause a paper jam and damage your paper in the Appendix. 1 - 6 ABOUT THIS...
Users Manual - English
Page 27
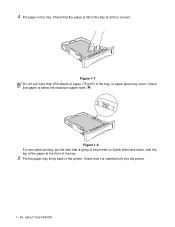
Check that is below the maximum paper mark (▼). Figure 1-8 For two-sided printing, put more than 250 sheets of the tray. 5 Put the paper tray firmly back in the tray. 4 Put paper in the printer. Check that it is flat in the tray at the front of paper (75 g/m2) in the tray, or paper jams may occur. Figure 1-7 Do not put the side that paper is going to be printed on (blank side) face down, with the top of the paper at all four corners. Check that the paper is inserted fully into the printer. 1 - 10 ABOUT THIS PRINTER
Check that is below the maximum paper mark (▼). Figure 1-8 For two-sided printing, put more than 250 sheets of the tray. 5 Put the paper tray firmly back in the tray. 4 Put paper in the printer. Check that it is flat in the tray at the front of paper (75 g/m2) in the tray, or paper jams may occur. Figure 1-7 Do not put the side that paper is going to be printed on (blank side) face down, with the top of the paper at all four corners. Check that the paper is inserted fully into the printer. 1 - 10 ABOUT THIS PRINTER
Users Manual - English
Page 30
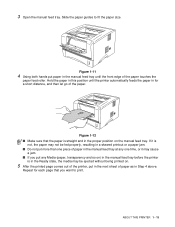
... more than one piece of paper as in the proper position on the manual feed tray. ABOUT THIS PRINTER 1 - 13 If it may be fed properly, resulting in a skewed printout or a paper jam. ■ Do not put in the next sheet of paper in the manual feed tray at any Media (paper..., transparency and so on) in the manual feed tray before the printer is straight and in Step 4 above. Slide the paper guides...
... more than one piece of paper as in the proper position on the manual feed tray. ABOUT THIS PRINTER 1 - 13 If it may be fed properly, resulting in a skewed printout or a paper jam. ■ Do not put in the next sheet of paper in the manual feed tray at any Media (paper..., transparency and so on) in the manual feed tray before the printer is straight and in Step 4 above. Slide the paper guides...
Users Manual - English
Page 32
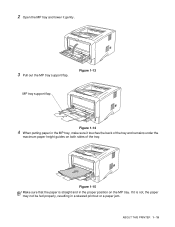
Figure 1-15 Make sure that the paper is not, the paper may not be fed properly, resulting in a skewed printout or a paper jam. If it is straight and in the MP tray, make sure it gently. 3 Pull out the MP tray support flap. Figure 1-13 MP tray support flap Figure 1-14 4 When putting paper in the proper position on both sides of the tray and remains under the maximum paper height guides on the MP tray. ABOUT THIS PRINTER 1 - 15 2 Open the MP tray and lower it touches the back of the tray.
Figure 1-15 Make sure that the paper is not, the paper may not be fed properly, resulting in a skewed printout or a paper jam. If it is straight and in the MP tray, make sure it gently. 3 Pull out the MP tray support flap. Figure 1-13 MP tray support flap Figure 1-14 4 When putting paper in the proper position on both sides of the tray and remains under the maximum paper height guides on the MP tray. ABOUT THIS PRINTER 1 - 15 2 Open the MP tray and lower it touches the back of the tray.
Users Manual - English
Page 36
...may be fed properly, resulting in a skewed printout or a paper jam. ■ Do not put in the next sheet of paper in the manual feed tray at any one piece of paper as in Step 5 above. Figure 1-21 ABOUT THIS PRINTER 1 - 19 Repeat for each sheet immediately after printing. Caution Remove... each page that the paper is in the Ready state, the media may cause a paper jam or the paper to print. 7 Close the back output tray. ■ ...
...may be fed properly, resulting in a skewed printout or a paper jam. ■ Do not put in the next sheet of paper in the manual feed tray at any one piece of paper as in Step 5 above. Figure 1-21 ABOUT THIS PRINTER 1 - 19 Repeat for each sheet immediately after printing. Caution Remove... each page that the paper is in the Ready state, the media may cause a paper jam or the paper to print. 7 Close the back output tray. ■ ...
Users Manual - English
Page 39
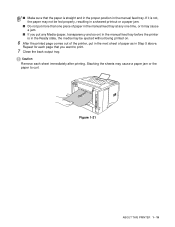
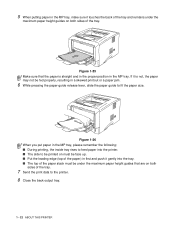
... in the proper position in the MP tray. Figure 1-25 Make sure that are on both sides of the paper) in a skewed printout or a paper jam. 6 While pressing the paper-guide release lever, slide the paper guide to be printed on must be under the maximum paper height guides on both... paper stack must be face up. ■ Put the leading edge (top of the tray. 7 Send the print data to the printer. 8 Close the back output tray. 1 - 22 ABOUT THIS PRINTER Figure 1-26 When you put paper in the MP tray, please remember the following; ■ During printing, the inside tray rises...
... in the proper position in the MP tray. Figure 1-25 Make sure that are on both sides of the paper) in a skewed printout or a paper jam. 6 While pressing the paper-guide release lever, slide the paper guide to be printed on must be under the maximum paper height guides on both... paper stack must be face up. ■ Put the leading edge (top of the tray. 7 Send the print data to the printer. 8 Close the back output tray. 1 - 22 ABOUT THIS PRINTER Figure 1-26 When you put paper in the MP tray, please remember the following; ■ During printing, the inside tray rises...
Users Manual - English
Page 40
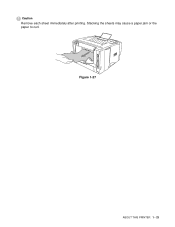
Figure 1-27 ABOUT THIS PRINTER 1 - 23 Stacking the sheets may cause a paper jam or the paper to curl. Caution Remove each sheet immediately after printing.
Figure 1-27 ABOUT THIS PRINTER 1 - 23 Stacking the sheets may cause a paper jam or the paper to curl. Caution Remove each sheet immediately after printing.
Users Manual - English
Page 41
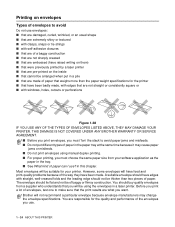
... a laser printer. You should not be using manual duplex printing. ■ For proper printing, you will not recommend a particular envelope because envelope manufacturers may cause paper jams or misfeeds. ■ Do not print envelopes using the envelopes in the paper tray at the same time because it may change the envelope specifications. Brother will...
... a laser printer. You should not be using manual duplex printing. ■ For proper printing, you will not recommend a particular envelope because envelope manufacturers may cause paper jams or misfeeds. ■ Do not print envelopes using the envelopes in the paper tray at the same time because it may change the envelope specifications. Brother will...
Users Manual - English
Page 45
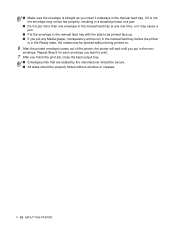
... envelope in the manual feed tray at any Media (paper, transparency and so on) in the manual feed tray before the printer is straight as you insert it may cause a jam. ■ Put the envelope in the manual feed tray with the side to print. 7 After you finish the print job, close... the back output tray. ■ Envelope joints that are sealed by the manufacturer should be secure. ■ All sides should be ejected without wrinkles or creases. 1 - 28 ABOUT THIS PRINTER...
... envelope in the manual feed tray at any Media (paper, transparency and so on) in the manual feed tray before the printer is straight as you insert it may cause a jam. ■ Put the envelope in the manual feed tray with the side to print. 7 After you finish the print job, close... the back output tray. ■ Envelope joints that are sealed by the manufacturer should be secure. ■ All sides should be ejected without wrinkles or creases. 1 - 28 ABOUT THIS PRINTER...

Users Manual - English
Page 48
... their original position. Envelopes that they touch the back of the tray and remain under the maximum paper height guides on both sides of the printer, open the back output tray and push down the blue tabs at any one time, or it may not be fed properly, resulting in a skewed... printout or a jam. ABOUT THIS PRINTER 1 - 31 Figure 1-38 Make sure that the envelopes are not, the envelopes may cause a jam. When you have been printed: At the back of the tray. If they are neatly stacked and...
... their original position. Envelopes that they touch the back of the tray and remain under the maximum paper height guides on both sides of the printer, open the back output tray and push down the blue tabs at any one time, or it may not be fed properly, resulting in a skewed... printout or a jam. ABOUT THIS PRINTER 1 - 31 Figure 1-38 Make sure that the envelopes are not, the envelopes may cause a jam. When you have been printed: At the back of the tray. If they are neatly stacked and...
Users Manual - English
Page 51
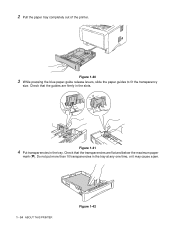
Check that the guides are flat and below the maximum paper mark (▼). 2 Pull the paper tray completely out of the printer. Figure 1-41 4 Put transparencies in the tray at any one time, or it may cause a jam. 1 - 34 ABOUT THIS PRINTER Figure 1-42 Do not put more than 10 transparencies in the tray. Figure 1-40 3 While pressing the blue paper-guide release levers, slide the paper guides to fit the transparency size. Check that the transparencies are firmly in the slots.
Check that the guides are flat and below the maximum paper mark (▼). 2 Pull the paper tray completely out of the printer. Figure 1-41 4 Put transparencies in the tray at any one time, or it may cause a jam. 1 - 34 ABOUT THIS PRINTER Figure 1-42 Do not put more than 10 transparencies in the tray. Figure 1-40 3 While pressing the blue paper-guide release levers, slide the paper guides to fit the transparency size. Check that the transparencies are firmly in the slots.
Users Manual - English
Page 55
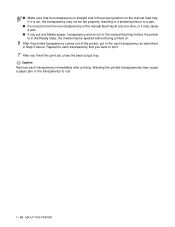
... transparency immediately after printing. Caution Remove each transparency that the transparency is straight and in the Ready state, the media may cause a paper jam or the transparency to print 7 After you put any one transparency in the manual feed tray at any Media (paper, transparency and so on... not, the transparency may not be ejected without being printed on. 6 After the printed transparency comes out of the printer, put more than one time, or it may cause a jam. ■ If you finish the print job, close the back output tray. ■ Make sure that you want to curl. 1...
... transparency immediately after printing. Caution Remove each transparency that the transparency is straight and in the Ready state, the media may cause a paper jam or the transparency to print 7 After you put any one transparency in the manual feed tray at any Media (paper, transparency and so on... not, the transparency may not be ejected without being printed on. 6 After the printed transparency comes out of the printer, put more than one time, or it may cause a jam. ■ If you finish the print job, close the back output tray. ■ Make sure that you want to curl. 1...

Users Manual - English
Page 58
... under the maximum paper height guides on both sides of the tray. Figure 1-53 Make sure that the transparencies are not, the transparencies may cause a jam. Figure 1-52 6 When putting transparencies in the MP tray, make sure they are straight and in the proper position in the MP tray at any... one time, or it may not be fed properly, resulting in a skewed printout or a jam. 7 While pressing the paper-guide release lever, slide the paper guide to fit the transparency size. Do not put more than 10 transparencies in the...
... under the maximum paper height guides on both sides of the tray. Figure 1-53 Make sure that the transparencies are not, the transparencies may cause a jam. Figure 1-52 6 When putting transparencies in the MP tray, make sure they are straight and in the proper position in the MP tray at any... one time, or it may not be fed properly, resulting in a skewed printout or a jam. 7 While pressing the paper-guide release lever, slide the paper guide to fit the transparency size. Do not put more than 10 transparencies in the...

Users Manual - English
Page 59
Stacking the printed transparencies may cause a paper jam or the transparency to be printed on must be face up. ■ Put the leading edge (top of the transparencies) in the MP tray, please remember the following: ■ The side to curl. 1 - 42 ABOUT THIS PRINTER When you put transparencies in first and push it gently into the tray. ■ The top of the transparency stack must be under the maximum paper height guides that are on both sides of the tray. 8 After you finish printing, close the back output tray. Caution Remove each transparency immediately after printing.
Stacking the printed transparencies may cause a paper jam or the transparency to be printed on must be face up. ■ Put the leading edge (top of the transparencies) in the MP tray, please remember the following: ■ The side to curl. 1 - 42 ABOUT THIS PRINTER When you put transparencies in first and push it gently into the tray. ■ The top of the transparency stack must be under the maximum paper height guides that are on both sides of the tray. 8 After you finish printing, close the back output tray. Caution Remove each transparency immediately after printing.

Users Manual - English
Page 61
... Duplex printing mode from the Advanced tab, and from the manual feed tray (For HL-5030 and HL-5040) Caution ■ Before you put the paper in the manual feed tray with the side that there may get paper jams. ■ You should not use very thin or very thick paper. ■ When you... jams and how to clear them in the same order back into the manual feed tray. Figure 1-57 4 Repeat Step 3 until you have printed all the even-numbered pages. Repeat this step until you have printed all the odd-numbered pages on the other side of the paper. 1 - 44 ABOUT THIS PRINTER...
... Duplex printing mode from the Advanced tab, and from the manual feed tray (For HL-5030 and HL-5040) Caution ■ Before you put the paper in the manual feed tray with the side that there may get paper jams. ■ You should not use very thin or very thick paper. ■ When you... jams and how to clear them in the same order back into the manual feed tray. Figure 1-57 4 Repeat Step 3 until you have printed all the even-numbered pages. Repeat this step until you have printed all the odd-numbered pages on the other side of the paper. 1 - 44 ABOUT THIS PRINTER...
Users Manual - English
Page 62
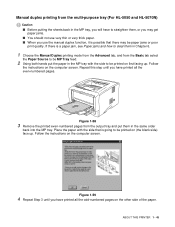
Manual duplex printing from the multi-purpose tray (For HL-5050 and HL-5070N) Caution ■ Before putting the sheets back in the MP tray, you will have to straighten them in the MP tray with the side that there may get paper jams. ■ You should not use very thin or very thick... the other side of the paper. Figure 1-58 3 Remove the printed even-numbered pages from the Basic tab select the Paper Source to be paper jams or poor print quality. ABOUT THIS PRINTER 1 - 45 Figure 1-59 4 Repeat Step 3 until you use the manual duplex function, it is possible that is a paper...
Manual duplex printing from the multi-purpose tray (For HL-5050 and HL-5070N) Caution ■ Before putting the sheets back in the MP tray, you will have to straighten them in the MP tray with the side that there may get paper jams. ■ You should not use very thin or very thick... the other side of the paper. Figure 1-58 3 Remove the printed even-numbered pages from the Basic tab select the Paper Source to be paper jams or poor print quality. ABOUT THIS PRINTER 1 - 45 Figure 1-59 4 Repeat Step 3 until you use the manual duplex function, it is possible that is a paper...
Users Manual - English
Page 86
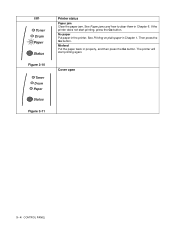
See Printing on plain paper in the printer. Cover open 3 - 4 CONTROL PANEL No paper Put paper in Chapter 1. LED Toner Drum Paper Status Figure 3-10 Toner Drum Paper Status Figure 3-11 Printer status Paper jam Clear the paper jam. See Paper jams and how to clear them in properly, and then press the Go button. Then press the Go button. Misfeed Put the paper back in Chapter 6. The printer will start printing, press the Go button. If the printer does not start printing again.
See Printing on plain paper in the printer. Cover open 3 - 4 CONTROL PANEL No paper Put paper in Chapter 1. LED Toner Drum Paper Status Figure 3-10 Toner Drum Paper Status Figure 3-11 Printer status Paper jam Clear the paper jam. See Paper jams and how to clear them in properly, and then press the Go button. Then press the Go button. Misfeed Put the paper back in Chapter 6. The printer will start printing, press the Go button. If the printer does not start printing again.
Users Manual - English
Page 112
... an Error Message See Error message printouts in this chapter. Paper handling See Paper handling or Paper jams and how to the section listed: Printer LED is blinking See Control panel in this chapter. Pages are printed, however there are installed properly. ■ The front ...this chapter. TROUBLESHOOTING 6 - 1 6 Troubleshooting Identifying your problem First, check the following: ■ The power plug is connected properly and the printer is turned on. ■ All of the protective parts have been removed. ■ The toner cartridge and drum unit are problems with the above...
... an Error Message See Error message printouts in this chapter. Paper handling See Paper handling or Paper jams and how to the section listed: Printer LED is blinking See Control panel in this chapter. Pages are printed, however there are installed properly. ■ The front ...this chapter. TROUBLESHOOTING 6 - 1 6 Troubleshooting Identifying your problem First, check the following: ■ The power plug is connected properly and the printer is turned on. ■ All of the protective parts have been removed. ■ The toner cartridge and drum unit are problems with the above...

