Users Manual - English
Page 7
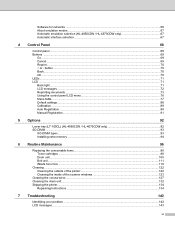
Software for networks ...66 About emulation modes...67 Automatic emulation selection (HL-4050CDN / HL-4070CDW only 67 Automatic interface selection...67 4 Control Panel 68 Control panel ...68 Buttons ...69 Go ...69 Cancel ...69 Reprint ...70 + or - button ......tray (LT-100CL) (HL-4050CDN / HL-4070CDW only 92 SO-DI M M ...93 SO-DIMM types ...93 Installing extra memory ...94 6 Routine Maintenance 96 Replacing the consumable items...96 Toner cartridges ...98 Drum unit ...105 Belt unit...111 Waste toner box ...116 Cleaning ...122 Cleaning the outside of the printer 122 Cleaning the inside...
Software for networks ...66 About emulation modes...67 Automatic emulation selection (HL-4050CDN / HL-4070CDW only 67 Automatic interface selection...67 4 Control Panel 68 Control panel ...68 Buttons ...69 Go ...69 Cancel ...69 Reprint ...70 + or - button ......tray (LT-100CL) (HL-4050CDN / HL-4070CDW only 92 SO-DI M M ...93 SO-DIMM types ...93 Installing extra memory ...94 6 Routine Maintenance 96 Replacing the consumable items...96 Toner cartridges ...98 Drum unit ...105 Belt unit...111 Waste toner box ...116 Cleaning ...122 Cleaning the outside of the printer 122 Cleaning the inside...
Users Manual - English
Page 10
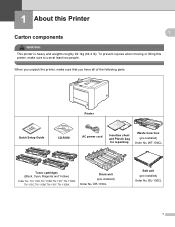
... to use at least two people. WT-100CL Toner cartridges (Black, Cyan, Magenta and Yellow) Order No. 1 About this printer, make sure that you have all of the following parts. DR-110CL Belt unit (pre-installed) Order No. TN-110C,TN-110M,TN-110Y,TN-110BK TN-115C,TN-115M,TN-115Y...,TN-115BK Drum unit (pre-installed) Order No. To prevent injuries when moving or lifting this Printer 1 1 Carton components 1 WA RNING This printer is heavy and weights roughly...
... to use at least two people. WT-100CL Toner cartridges (Black, Cyan, Magenta and Yellow) Order No. 1 About this printer, make sure that you have all of the following parts. DR-110CL Belt unit (pre-installed) Order No. TN-110C,TN-110M,TN-110Y,TN-110BK TN-115C,TN-115M,TN-115Y...,TN-115BK Drum unit (pre-installed) Order No. To prevent injuries when moving or lifting this Printer 1 1 Carton components 1 WA RNING This printer is heavy and weights roughly...
Users Manual - English
Page 87
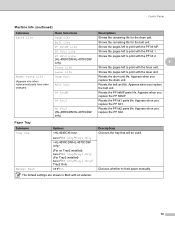
... replacement parts have been changed) Menu Selections Drum Life Belt Life PF KitMP Life PF Kit1 Life PF Kit2 Life (HL-4050CDN/HL-4070CDW only) Fuser Life Laser Life Drum Unit Belt Unit PF KitMP PF Kit1 PF Kit2 (HL-4050CDN/HL-4070CDW only) Descriptions Shows the remaining life for the belt unit. Shows the remaining life for the drum...
... replacement parts have been changed) Menu Selections Drum Life Belt Life PF KitMP Life PF Kit1 Life PF Kit2 Life (HL-4050CDN/HL-4070CDW only) Fuser Life Laser Life Drum Unit Belt Unit PF KitMP PF Kit1 PF Kit2 (HL-4050CDN/HL-4070CDW only) Descriptions Shows the remaining life for the belt unit. Shows the remaining life for the drum...
Users Manual - English
Page 106
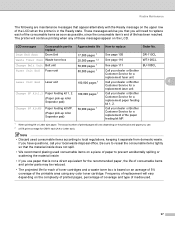
...material inside . • If you will continue printing when any color toner cartridge. Routine Maintenance The following are maintenance messages that appear alternately with the Ready message on the upper row of the LCD when the printer is not a direct equivalent for the recommended paper, the life of...20,000 pages 1 2 See page 116 WT-100CL Change Belt Unit Belt unit 50,000 pages 1 See page 111 BU-100CL Fuser Unit End Fuser unit 80,000 pages 1 Call your dealer or Brother Customer Service for a replacement laser unit. The actual number of printed pages will vary depending on...
...material inside . • If you will continue printing when any color toner cartridge. Routine Maintenance The following are maintenance messages that appear alternately with the Ready message on the upper row of the LCD when the printer is not a direct equivalent for the recommended paper, the life of...20,000 pages 1 2 See page 116 WT-100CL Change Belt Unit Belt unit 50,000 pages 1 See page 111 BU-100CL Fuser Unit End Fuser unit 80,000 pages 1 Call your dealer or Brother Customer Service for a replacement laser unit. The actual number of printed pages will vary depending on...
Users Manual - English
Page 120
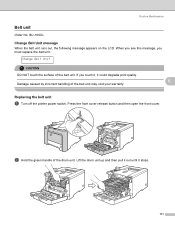
Replacing the belt unit 6 a Turn off the printer power switch. Press the front cover release button and then open the front cover. Lift the drum unit up and then pull it out until it could degrade print quality. 6 Damage caused by incorrect handling of the belt unit may void your warranty. If you must...
Replacing the belt unit 6 a Turn off the printer power switch. Press the front cover release button and then open the front cover. Lift the drum unit up and then pull it out until it could degrade print quality. 6 Damage caused by incorrect handling of the belt unit may void your warranty. If you must...

Users Manual - English
Page 121
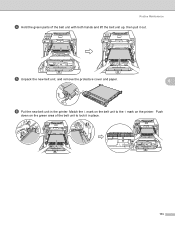
... static electricity, DO NOT touch the electrodes shown in case you place the drum unit and belt unit on the left side of the printer. We recommend that is on a clean, flat surface with a piece of disposable paper underneath it . DO NOT hold the sides of the drum unit when ... the illustration. 112 Routine Maintenance c Release the gray lock lever (1) that you accidentally spill or scatter toner. Pull the drum unit completely out of the printer using the green handles on the drum unit. 1 6 CA UTI ON Hold the green handles of the drum unit.
... static electricity, DO NOT touch the electrodes shown in case you place the drum unit and belt unit on the left side of the printer. We recommend that is on a clean, flat surface with a piece of disposable paper underneath it . DO NOT hold the sides of the drum unit when ... the illustration. 112 Routine Maintenance c Release the gray lock lever (1) that you accidentally spill or scatter toner. Pull the drum unit completely out of the printer using the green handles on the drum unit. 1 6 CA UTI ON Hold the green handles of the drum unit.
Users Manual - English
Page 122
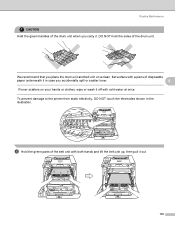
e Unpack the new belt unit, and remove the protective cover and paper. 6 f Put the new belt unit in place. 113 Match the h mark on the belt unit to the g mark on the green area of the belt unit with both hands and lift the belt unit up, then pull it in the printer. Push down on the printer. Routine Maintenance d Hold the green parts of the belt unit to lock it out.
e Unpack the new belt unit, and remove the protective cover and paper. 6 f Put the new belt unit in place. 113 Match the h mark on the belt unit to the g mark on the green area of the belt unit with both hands and lift the belt unit up, then pull it in the printer. Push down on the printer. Routine Maintenance d Hold the green parts of the belt unit to lock it out.

Users Manual - English
Page 124
Routine Maintenance When you replace the belt unit with a new one, you need to choose Belt Unit. b Press the + or - d Press OK, and then press the + button to reset the belt unit counter by completing the following steps: a Turn the printer power switch back on. button to the next menu level, and then press the + or - c Press OK to proceed to choose Machine Info.. e Press OK two times. 6 115 button to choose Reset Parts Life.
Routine Maintenance When you replace the belt unit with a new one, you need to choose Belt Unit. b Press the + or - d Press OK, and then press the + button to reset the belt unit counter by completing the following steps: a Turn the printer power switch back on. button to the next menu level, and then press the + or - c Press OK to proceed to choose Machine Info.. e Press OK two times. 6 115 button to choose Reset Parts Life.
Users Manual - English
Page 127
... sides of the drum unit. To prevent damage to the printer from static electricity, DO NOT touch the electrodes shown in case you accidentally spill or scatter toner. 6 If toner scatters on a clean, flat surface with both hands and lift the belt unit up, then pull it out. 118 d Hold the... green parts of the belt unit with a piece of disposable paper underneath it in the illustration. We recommend that you carry it. Routine ...
... sides of the drum unit. To prevent damage to the printer from static electricity, DO NOT touch the electrodes shown in case you accidentally spill or scatter toner. 6 If toner scatters on a clean, flat surface with both hands and lift the belt unit up, then pull it out. 118 d Hold the... green parts of the belt unit with a piece of disposable paper underneath it in the illustration. We recommend that you carry it. Routine ...

Users Manual - English
Page 129
Routine Maintenance g Put the belt unit back in the printer. h Put the drum unit back in the printer as follows. 1 Make sure that the gray lock lever (1) is in the up position and put the drum unit in the printer, match the green guides (1) of the drum unit handle to the green arrows (2) on both sides of the belt unit to the g mark on the printer. Push 6 down on the belt unit to lock it in place. Match the h mark on the green area of the machine. 2 1 2 1 120 Push down the gray lock lever (1). 1 1 Note When you put the drum unit in the printer.
Routine Maintenance g Put the belt unit back in the printer. h Put the drum unit back in the printer as follows. 1 Make sure that the gray lock lever (1) is in the up position and put the drum unit in the printer, match the green guides (1) of the drum unit handle to the green arrows (2) on both sides of the belt unit to the g mark on the printer. Push 6 down on the belt unit to lock it in place. Match the h mark on the green area of the machine. 2 1 2 1 120 Push down the gray lock lever (1). 1 1 Note When you put the drum unit in the printer.
Users Manual - English
Page 143
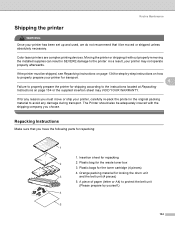
...supplies can result in the original packing material to protect the belt unit (Please prepare by -step instructions on page 134 or the supplied insertion sheet may not operate properly afterwards. Color laser printers are complex printing devices. Insertion sheet for the waste toner box... 3. Plastic bags for locking the drum unit and the belt unit (4 pieces) 5. Orange packing material for the toner cartridge (4 ...
...supplies can result in the original packing material to protect the belt unit (Please prepare by -step instructions on page 134 or the supplied insertion sheet may not operate properly afterwards. Color laser printers are complex printing devices. Insertion sheet for the waste toner box... 3. Plastic bags for locking the drum unit and the belt unit (4 pieces) 5. Orange packing material for the toner cartridge (4 ...
Users Manual - English
Page 147
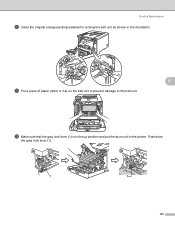
...recommend that you accidentally spill or scatter toner. Match the h mark on the printer. h Remove the waste toner box from the printer using the green handle and place it into the plastic bag included in the printer. i Put the belt unit back in the carton. Push down on the green area of disposable ...paper underneath it in case you put the belt unit on a clean, flat surface with both hands and lift the belt unit up, then pull it out. Routine...
...recommend that you accidentally spill or scatter toner. Match the h mark on the printer. h Remove the waste toner box from the printer using the green handle and place it into the plastic bag included in the printer. i Put the belt unit back in the carton. Push down on the green area of disposable ...paper underneath it in case you put the belt unit on a clean, flat surface with both hands and lift the belt unit up, then pull it out. Routine...
Users Manual - English
Page 148
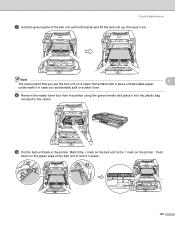
l Make sure that the gray lock lever (1) is in the up position and put the drum unit in the illustration 6 k Put a piece of paper (letter or A4) on the belt unit to prevent damage to the belt unit. Push down the gray lock lever (1). 1 1 139 Routine Maintenance j Insert the original orange packing material for locking the belt unit as shown in the printer.
l Make sure that the gray lock lever (1) is in the up position and put the drum unit in the illustration 6 k Put a piece of paper (letter or A4) on the belt unit to prevent damage to the belt unit. Push down the gray lock lever (1). 1 1 139 Routine Maintenance j Insert the original orange packing material for locking the belt unit as shown in the printer.
Users Manual - English
Page 152
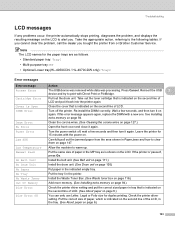
...power switch off the printer. Jam XXX Carefully pull out the jammed paper from or Brother Customer Service. Manual Feed Put the same size of paper in the MP tray as follows. • Standard paper tray: Tray1 • Multi-purpose tray: MP • Optional Lower tray(HL-4050CDN / HL-4070CDW only): Tray2 Error ...jams and how to clear them on page 94. Put the correct size of the LCD, in the printer. Note The LCD names for duplex printing. No Belt Unit Install the belt unit. (See Belt unit on page 111.) No Drum Unit Install the drum unit. (See Drum unit on the LCD ...
...power switch off the printer. Jam XXX Carefully pull out the jammed paper from or Brother Customer Service. Manual Feed Put the same size of paper in the MP tray as follows. • Standard paper tray: Tray1 • Multi-purpose tray: MP • Optional Lower tray(HL-4050CDN / HL-4070CDW only): Tray2 Error ...jams and how to clear them on page 94. Put the correct size of the LCD, in the printer. Note The LCD names for duplex printing. No Belt Unit Install the belt unit. (See Belt unit on page 111.) No Drum Unit Install the drum unit. (See Drum unit on the LCD ...
Users Manual - English
Page 153
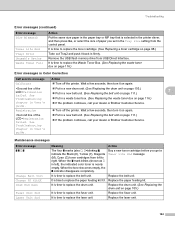
...the problem continues, call your dealer or Brother Customer Service. See Troubleshooting chapter in User's guide. Put in a new belt unit. (See Replacing the belt unit on again. When the toner becomes empty, the o indicator disappears completely. Replace the laser unit. 144 Wait a few seconds, then... (See Replacing the drum unit on page 116.) Error messages in Color Correction Call service message Action Calibrate Turn off the printer. When the o mark blinks (shown as n in left to replace the belt unit. It is time to replace the Waste Toner Box. (See ...
...the problem continues, call your dealer or Brother Customer Service. See Troubleshooting chapter in User's guide. Put in a new belt unit. (See Replacing the belt unit on again. When the toner becomes empty, the o indicator disappears completely. Replace the laser unit. 144 Wait a few seconds, then... (See Replacing the drum unit on page 116.) Error messages in Color Correction Call service message Action Calibrate Turn off the printer. When the o mark blinks (shown as n in left to replace the belt unit. It is time to replace the Waste Toner Box. (See ...
Users Manual - English
Page 171
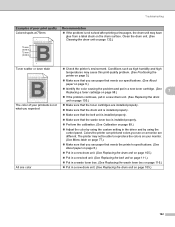
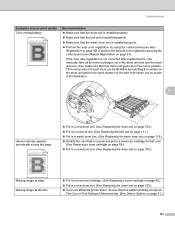
.... (See Cleaning the drum unit on page 77.) Make sure that the waste toner box is installed properly. ABCDEFGHIJKLMNOPQRSTUVWXYZ. 0123456789. Colors the printer can print and colors you use paper that the belt unit is installed properly. abcdefghijklmnopqrstuvwxyz. ABCDEFGHIJKLMNOPQRSTUVWXYZ. 0123456789. Conditions such as high humidity and high temperatures may not be able to reproduce...
.... (See Cleaning the drum unit on page 77.) Make sure that the waste toner box is installed properly. ABCDEFGHIJKLMNOPQRSTUVWXYZ. 0123456789. Colors the printer can print and colors you use paper that the belt unit is installed properly. abcdefghijklmnopqrstuvwxyz. ABCDEFGHIJKLMNOPQRSTUVWXYZ. 0123456789. Conditions such as high humidity and high temperatures may not be able to reproduce...
Users Manual - English
Page 172
.... Put in a new drum unit. (See Replacing the drum unit on page 105.) Put in a new belt unit. (See Replacing the belt unit on page 116.) Identify the color that is installed properly. ABCDEFGHIJKLMNOPQRSTUVWXYZ. 0123456789. abcdefghijklmnopqrstuvwxyz. Recommendation Make sure that the waste toner box is uneven and put... a toner cartridge on page 98.) Put in a new drum unit. (See Replacing the drum unit on page 105.) If you use Windows printer driver, choose Improve pattern printing or Improve Thin Line in a waste toner box. (See Replacing the waste toner box on page 111.) Put ...
.... Put in a new drum unit. (See Replacing the drum unit on page 105.) Put in a new belt unit. (See Replacing the belt unit on page 116.) Identify the color that is installed properly. ABCDEFGHIJKLMNOPQRSTUVWXYZ. 0123456789. abcdefghijklmnopqrstuvwxyz. Recommendation Make sure that the waste toner box is uneven and put... a toner cartridge on page 98.) Put in a new drum unit. (See Replacing the drum unit on page 105.) If you use Windows printer driver, choose Improve pattern printing or Improve Thin Line in a waste toner box. (See Replacing the waste toner box on page 111.) Put ...
Users Manual - English
Page 184
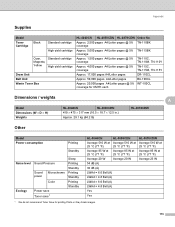
...Toner Cartridge Black Standard cartridge High yield cartridge Cyan, Standard cartridge Magenta, Yellow High yield cartridge Drum Unit Belt Unit Waste Toner Box HL-4040CN HL-4050CDN HL-4070CDW Order No. Approx. 2,500 pages A4/Letter pages @ 5% TN-110BK coverage Approx. 5,000 pages... in.) Approx. 29.1 kg (64.2 lb) HL-4070CDW A A Other A Model Power consumption Printing Standby Noise level Ecology Sound Pressure Sound power Monochrome Color Power save Toner save 1 Sleep Printing Standby Printing Standby Printing Standby HL-4040CN HL-4050CDN Average 510 W at Average 510 W at ...
...Toner Cartridge Black Standard cartridge High yield cartridge Cyan, Standard cartridge Magenta, Yellow High yield cartridge Drum Unit Belt Unit Waste Toner Box HL-4040CN HL-4050CDN HL-4070CDW Order No. Approx. 2,500 pages A4/Letter pages @ 5% TN-110BK coverage Approx. 5,000 pages... in.) Approx. 29.1 kg (64.2 lb) HL-4070CDW A A Other A Model Power consumption Printing Standby Noise level Ecology Sound Pressure Sound power Monochrome Color Power save Toner save 1 Sleep Printing Standby Printing Standby Printing Standby HL-4040CN HL-4050CDN Average 510 W at Average 510 W at ...
Users Manual - English
Page 205
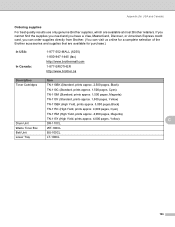
... can visit us online for purchase.) In USA: In Canada: 1-877-552-MALL (6255) 1-800-947-1445 (fax) http://www.brothermall.com 1-877-BROTHER http://www.brother.ca Description Item Toner Cartridges TN-110BK (Standard, prints approx. 2,500 pages, Black) TN-110C (Standard, prints approx. 1,500 pages, Cyan) TN-... approx. 4,000 pages, Magenta) TN-115Y (High Yield, prints approx. 4,000 pages, Yellow) C Drum Unit DR-110CL Waste Toner Box WT-100CL Belt Unit BU-100CL Lower Tray LT-100CL 196 Appendix (for USA and Canada) Ordering supplies C For best quality results use only genuine...
... can visit us online for purchase.) In USA: In Canada: 1-877-552-MALL (6255) 1-800-947-1445 (fax) http://www.brothermall.com 1-877-BROTHER http://www.brother.ca Description Item Toner Cartridges TN-110BK (Standard, prints approx. 2,500 pages, Black) TN-110C (Standard, prints approx. 1,500 pages, Cyan) TN-... approx. 4,000 pages, Magenta) TN-115Y (High Yield, prints approx. 4,000 pages, Yellow) C Drum Unit DR-110CL Waste Toner Box WT-100CL Belt Unit BU-100CL Lower Tray LT-100CL 196 Appendix (for USA and Canada) Ordering supplies C For best quality results use only genuine...
Users Manual - English
Page 210
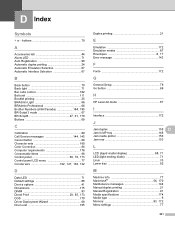
... 67 B Back button 70 Back light 71 Bar code control 182 Belt unit 111 Booklet printing 25 BRAdmin Light 66 BRAdmin Professional 66 Brother Numbers (USA/Canada 194, 195 BR-Script 3 mode 67 BR-...Script3 47, 61, 170 Buttons 69 C Calibration 89 Call Service messages 144, 145 Cancel button 69 Character sets 180 Color ...H HP LaserJet mode 67 I Interface 172 J Jam duplex 150 D Jam in MP tray 148 Jam inside printer 156 Jam rear 153 L LCD (liquid crystal display 68, 71 LED (light-emiting diode 71 Linux 33 Lower...
... 67 B Back button 70 Back light 71 Bar code control 182 Belt unit 111 Booklet printing 25 BRAdmin Light 66 BRAdmin Professional 66 Brother Numbers (USA/Canada 194, 195 BR-Script 3 mode 67 BR-...Script3 47, 61, 170 Buttons 69 C Calibration 89 Call Service messages 144, 145 Cancel button 69 Character sets 180 Color ...H HP LaserJet mode 67 I Interface 172 J Jam duplex 150 D Jam in MP tray 148 Jam inside printer 156 Jam rear 153 L LCD (liquid crystal display 68, 71 LED (light-emiting diode 71 Linux 33 Lower...


