Network Users Manual - English
Page 12
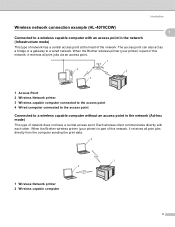
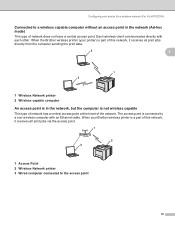
...HL-4070CDW) 1 1 Connected to a wireless capable computer with each other. Each wireless client communicates directly with an access point in the network (Ad-hoc mode) 1 This type of this network, it receives all print jobs directly from the computer sending the print data. 2 1 2 1 Wireless Network printer 2 Wireless capable computer 5 When the Brother wireless printer (your printer...) is part of this network, it receives all print jobs via an...
...HL-4070CDW) 1 1 Connected to a wireless capable computer with each other. Each wireless client communicates directly with an access point in the network (Ad-hoc mode) 1 This type of this network, it receives all print jobs directly from the computer sending the print data. 2 1 2 1 Wireless Network printer 2 Wireless capable computer 5 When the Brother wireless printer (your printer...) is part of this network, it receives all print jobs via an...
Network Users Manual - English
Page 13
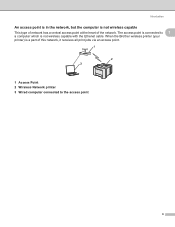
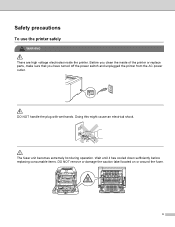
When the Brother wireless printer (your printer) is a part of the network. Introduction An access point is in the network, but the computer is not wireless capable 1 This type of network has a central access point at the heart of this network, it receives all print jobs via an access point. 1 2 3 1 Access Point 2 Wireless Network printer 3 Wired computer connected to 1 a computer which is not wireless capable with the Ethenet cable. The access point is connected to the access point 6
When the Brother wireless printer (your printer) is a part of the network. Introduction An access point is in the network, but the computer is not wireless capable 1 This type of network has a central access point at the heart of this network, it receives all print jobs via an access point. 1 2 3 1 Access Point 2 Wireless Network printer 3 Wired computer connected to 1 a computer which is not wireless capable with the Ethenet cable. The access point is connected to the access point 6

Network Users Manual - English
Page 18
...168.1.3 Subnet Mask:255.255.255.0 Note 0 denotes that begins with other networks, you do not know the Gateway IP address then contact your printer for a network with an Ethernet cable connection Subnet mask Subnet masks restrict network communication. „ Example: Computer 1 can communicate with anything that ...has an IP address that there is no limit to configure the Gateway IP address. If you may need to communication at this part of the address. If a destination is a network point that arrives at an external network, the router transmits data to an exact destination...
...168.1.3 Subnet Mask:255.255.255.0 Note 0 denotes that begins with other networks, you do not know the Gateway IP address then contact your printer for a network with an Ethernet cable connection Subnet mask Subnet masks restrict network communication. „ Example: Computer 1 can communicate with anything that ...has an IP address that there is no limit to configure the Gateway IP address. If you may need to communication at this part of the address. If a destination is a network point that arrives at an external network, the router transmits data to an exact destination...
Network Users Manual - English
Page 24
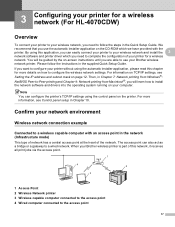
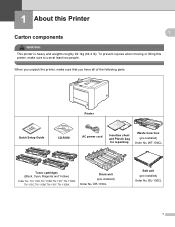
... which we have provided with an access point in Chapter 10. When your Brother wireless printer is part of the network. 3 Configuring your printer for a wireless network (For HL-4070CDW) 3 Overview 3 To connect your printer to your wireless network, you need to complete the configuration of your network environment 3 Wireless network connection example 3 Connected to a wireless capable...
... which we have provided with an access point in Chapter 10. When your Brother wireless printer is part of the network. 3 Configuring your printer for a wireless network (For HL-4070CDW) 3 Overview 3 To connect your printer to your wireless network, you need to complete the configuration of your network environment 3 Wireless network connection example 3 Connected to a wireless capable...
Network Users Manual - English
Page 25
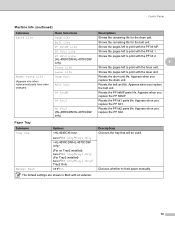
... HL-4070CDW) Connected to a wireless capable computer without an access point in the network, but the computer is not wireless capable 3 This type of network has a central access point at the heart of the network. The access point is connected to the access point 18 When the Brother wireless printer (your Brother wireless printer is a part of...
... HL-4070CDW) Connected to a wireless capable computer without an access point in the network, but the computer is not wireless capable 3 This type of network has a central access point at the heart of the network. The access point is connected to the access point 18 When the Brother wireless printer (your Brother wireless printer is a part of...

Network Users Manual - English
Page 175
Copyright remains Eric Young's, and as the author of the parts of conditions and the following disclaimer in the code are not to be left out if the rouines from the apps directory (application code) you ...
Copyright remains Eric Young's, and as the author of the parts of conditions and the following disclaimer in the code are not to be left out if the rouines from the apps directory (application code) you ...

Users Manual - English
Page 2
... procedures you must follow or avoid to prevent possible damage to a situation that may arise or give tips about how the operation works with the printer. Improper Setup icons alert you to a possible electrical shock. Electrical Hazard icons alert you to devices and operations that are hot. i Hot Surface icons warn... this guide Symbols used in this guide We use the following icons throughout this User's Guide: Warnings tell you what to do to touch machine parts that are not compatible with other objects.
... procedures you must follow or avoid to prevent possible damage to a situation that may arise or give tips about how the operation works with the printer. Improper Setup icons alert you to a possible electrical shock. Electrical Hazard icons alert you to devices and operations that are hot. i Hot Surface icons warn... this guide Symbols used in this guide We use the following icons throughout this User's Guide: Warnings tell you what to do to touch machine parts that are not compatible with other objects.
Users Manual - English
Page 3
Doing this might cause an electrical shock. Wait until it has cooled down sufficiently before replacing consumable items. DO NOT remove or damage the caution label located on or around the fuser. ii The fuser unit becomes extremely hot during operation. Safety precautions To use the printer safely WA RNING There are high voltage electrodes inside of the printer or replace parts, make sure that you have turned off the power switch and unplugged the printer from the AC power outlet. Before you clean the inside the printer. DO NOT handle the plug with wet hands.
Doing this might cause an electrical shock. Wait until it has cooled down sufficiently before replacing consumable items. DO NOT remove or damage the caution label located on or around the fuser. ii The fuser unit becomes extremely hot during operation. Safety precautions To use the printer safely WA RNING There are high voltage electrodes inside of the printer or replace parts, make sure that you have turned off the power switch and unplugged the printer from the AC power outlet. Before you clean the inside the printer. DO NOT handle the plug with wet hands.
Users Manual - English
Page 10
... Yellow) Order No. DR-110CL Belt unit (pre-installed) Order No. When you have all of the following parts. To prevent injuries when moving or lifting this Printer 1 1 Carton components 1 WA RNING This printer is heavy and weights roughly 29.1kg (64.2 lb). BU-100CL 1 TN-110C,TN-110M,TN-110Y,TN...-110BK TN-115C,TN-115M,TN-115Y,TN-115BK Drum unit (pre-installed) Order No. 1 About this printer, make sure that you unpack the printer, make sure to use at least two people. Printer Quick Setup Guide CD-ROM AC power cord Insertion sheet and Plastic bag for repacking Waste toner box...
... Yellow) Order No. DR-110CL Belt unit (pre-installed) Order No. When you have all of the following parts. To prevent injuries when moving or lifting this Printer 1 1 Carton components 1 WA RNING This printer is heavy and weights roughly 29.1kg (64.2 lb). BU-100CL 1 TN-110C,TN-110M,TN-110Y,TN...-110BK TN-115C,TN-115M,TN-115Y,TN-115BK Drum unit (pre-installed) Order No. 1 About this printer, make sure that you unpack the printer, make sure to use at least two people. Printer Quick Setup Guide CD-ROM AC power cord Insertion sheet and Plastic bag for repacking Waste toner box...
Users Manual - English
Page 87
... Machine Info. (continued) Submenu Parts Life Reset Parts Life (Appears only when replacement parts have been changed) Menu Selections Drum Life Belt Life PF KitMP Life PF Kit1 Life PF Kit2 Life (HL-4050CDN/HL-4070CDW only) Fuser Life Laser Life Drum Unit Belt Unit PF KitMP PF Kit1 PF Kit2 (HL-4050CDN/HL-4070CDW only) Descriptions Shows the remaining...
... Machine Info. (continued) Submenu Parts Life Reset Parts Life (Appears only when replacement parts have been changed) Menu Selections Drum Life Belt Life PF KitMP Life PF Kit1 Life PF Kit2 Life (HL-4050CDN/HL-4070CDW only) Fuser Life Laser Life Drum Unit Belt Unit PF KitMP PF Kit1 PF Kit2 (HL-4050CDN/HL-4070CDW only) Descriptions Shows the remaining...

Users Manual - English
Page 96
... to finish the IP address. IP Address 123.0.0.192 g Repeat this process until you have set your IP address. The last digit in the first part of changing a menu setting Setting IP address a Press the + or - TCP / IP BOOT Method d Press the - IP Address Accepted Control Panel 4 4 87 LAN TCP / IP...
... to finish the IP address. IP Address 123.0.0.192 g Repeat this process until you have set your IP address. The last digit in the first part of changing a menu setting Setting IP address a Press the + or - TCP / IP BOOT Method d Press the - IP Address Accepted Control Panel 4 4 87 LAN TCP / IP...
Users Manual - English
Page 105
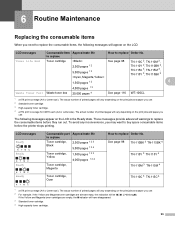
...5% print coverage for CMYK each (A4 or Letter size). These messages provide advanced warnings to replace the consumable items before the printer stops printing. The actual number of printed pages will appear on the print jobs and paper you use . To avoid any ...2 Standard toner cartridge. 3 High-capacity toner cartridge. 4 at 5% print coverage (A4 or Letter size). LCD messages Ready K YMC Ready K YMC Ready K YMC Ready Consumable part Approximate life to replace Toner cartridge, Black 2,500 pages 1 2 3 5,000 pages 1 2 4 Toner cartridge, Yellow 1,500 pages 1 2 3 4,000 pages 1 2 4...
...5% print coverage for CMYK each (A4 or Letter size). These messages provide advanced warnings to replace the consumable items before the printer stops printing. The actual number of printed pages will appear on the print jobs and paper you use . To avoid any ...2 Standard toner cartridge. 3 High-capacity toner cartridge. 4 at 5% print coverage (A4 or Letter size). LCD messages Ready K YMC Ready K YMC Ready K YMC Ready Consumable part Approximate life to replace Toner cartridge, Black 2,500 pages 1 2 3 5,000 pages 1 2 4 Toner cartridge, Yellow 1,500 pages 1 2 3 4,000 pages 1 2 4...
Users Manual - English
Page 106
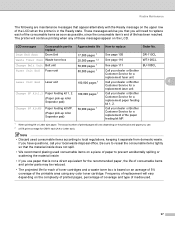
...pick-up roller Separator pad) 100,000 pages 1 Call your dealer or Brother Customer Service for a replacement laser unit. If you use paper that is not a direct equivalent for the recommended paper, the life of consumable items and printer parts may be reduced. • The projected life for a replacement paper feeding...Change PF Kit1,2 Paper feeding kit 1, 2. (Paper pick-up roller Separator pad) 50,000 pages 1 Call your dealer or Brother 6 Customer Service for a replacement fuser unit. The actual number of replacement will continue printing when any color toner cartridge.
...pick-up roller Separator pad) 100,000 pages 1 Call your dealer or Brother Customer Service for a replacement laser unit. If you use paper that is not a direct equivalent for the recommended paper, the life of consumable items and printer parts may be reduced. • The projected life for a replacement paper feeding...Change PF Kit1,2 Paper feeding kit 1, 2. (Paper pick-up roller Separator pad) 50,000 pages 1 Call your dealer or Brother 6 Customer Service for a replacement fuser unit. The actual number of replacement will continue printing when any color toner cartridge.
Users Manual - English
Page 108
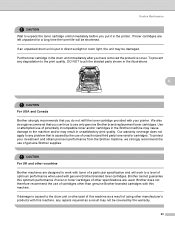
...this machine, any degradation to the print quality, DO NOT touch the shaded parts shown in the illustrations. 6 CA UTI ON For USA and Canada Brother strongly recommends that you put in the printer. Routine Maintenance CA UTI ON Wait to unpack the toner cartridge until immediately ...before you continue to use only genuine Brother brand replacement toner cartridges. We also strongly recommend that you have removed the protective cover. To protect your printer. Put the toner cartridge in the drum unit immediately after you do not...
...this machine, any degradation to the print quality, DO NOT touch the shaded parts shown in the illustrations. 6 CA UTI ON For USA and Canada Brother strongly recommends that you put in the printer. Routine Maintenance CA UTI ON Wait to unpack the toner cartridge until immediately ...before you continue to use only genuine Brother brand replacement toner cartridges. We also strongly recommend that you have removed the protective cover. To protect your printer. Put the toner cartridge in the drum unit immediately after you do not...
Users Manual - English
Page 110
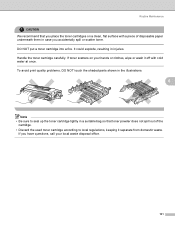
It could explode, resulting in case you accidentally spill or scatter toner. To avoid print quality problems, DO NOT touch the shaded parts shown in the illustrations. 6 Note • Be sure to seal up the toner cartridge tightly in a suitable bag so that you have questions, call your ...
It could explode, resulting in case you accidentally spill or scatter toner. To avoid print quality problems, DO NOT touch the shaded parts shown in the illustrations. 6 Note • Be sure to seal up the toner cartridge tightly in a suitable bag so that you have questions, call your ...

Users Manual - English
Page 116
To avoid print quality problems, DO NOT touch the shaded parts shown in the illustration. Repeat this for all the toner cartridges. 6 CA UTI ON To prevent damage to the printer from static electricity, DO NOT touch the electrodes shown in the illustrations. 107 Routine Maintenance d Hold the handle of the toner cartridge and pull it out of the drum unit.
To avoid print quality problems, DO NOT touch the shaded parts shown in the illustration. Repeat this for all the toner cartridges. 6 CA UTI ON To prevent damage to the printer from static electricity, DO NOT touch the electrodes shown in the illustrations. 107 Routine Maintenance d Hold the handle of the toner cartridge and pull it out of the drum unit.

Users Manual - English
Page 119
d Press OK, and then press the + key to choose Reset Parts Life. key to choose Drum Unit. Routine Maintenance When you replace the drum unit with a new one, you need to choose Machine Info.. key to reset the drum counter by completing the following steps: a Turn the printer power switch back on. e Press OK two times. 6 110 b Press the + or - c Press OK to proceed to the next menu level, and then press the + or -
d Press OK, and then press the + key to choose Reset Parts Life. key to choose Drum Unit. Routine Maintenance When you replace the drum unit with a new one, you need to choose Machine Info.. key to reset the drum counter by completing the following steps: a Turn the printer power switch back on. e Press OK two times. 6 110 b Press the + or - c Press OK to proceed to the next menu level, and then press the + or -
Users Manual - English
Page 122
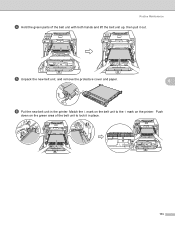
e Unpack the new belt unit, and remove the protective cover and paper. 6 f Put the new belt unit in place. 113 Push down on the green area of the belt unit with both hands and lift the belt unit up, then pull it in the printer. Match the h mark on the printer. Routine Maintenance d Hold the green parts of the belt unit to the g mark on the belt unit to lock it out.
e Unpack the new belt unit, and remove the protective cover and paper. 6 f Put the new belt unit in place. 113 Push down on the green area of the belt unit with both hands and lift the belt unit up, then pull it in the printer. Match the h mark on the printer. Routine Maintenance d Hold the green parts of the belt unit to the g mark on the belt unit to lock it out.

Users Manual - English
Page 124
button to choose Belt Unit. d Press OK, and then press the + button to choose Reset Parts Life. button to reset the belt unit counter by completing the following steps: a Turn the printer power switch back on. b Press the + or - Routine Maintenance When you replace the belt unit with a new one, you need to choose Machine Info.. e Press OK two times. 6 115 c Press OK to proceed to the next menu level, and then press the + or -
button to choose Belt Unit. d Press OK, and then press the + button to choose Reset Parts Life. button to reset the belt unit counter by completing the following steps: a Turn the printer power switch back on. b Press the + or - Routine Maintenance When you replace the belt unit with a new one, you need to choose Machine Info.. e Press OK two times. 6 115 c Press OK to proceed to the next menu level, and then press the + or -
Users Manual - English
Page 127
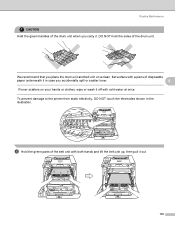
... ON Hold the green handles of the drum unit when you carry it out. 118 d Hold the green parts of the belt unit with cold water at once. To prevent damage to the printer from static electricity, DO NOT touch the electrodes shown in case you place the drum unit and belt...
... ON Hold the green handles of the drum unit when you carry it out. 118 d Hold the green parts of the belt unit with cold water at once. To prevent damage to the printer from static electricity, DO NOT touch the electrodes shown in case you place the drum unit and belt...


