Network Users Manual - English
Page 12
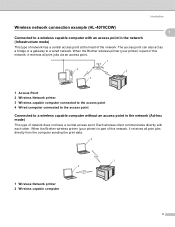
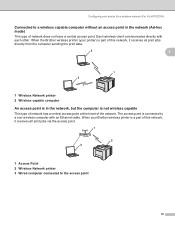
... directly from the computer sending the print data. 2 1 2 1 Wireless Network printer 2 Wireless capable computer 5 Introduction Wireless network connection example (HL-4070CDW) 1 1 Connected to a wireless capable computer with each other. When the Brother wireless printer (your printer) is part of the network. When the Brother wireless printer (your printer) is part of network does not have a central access point. Each wireless...
... directly from the computer sending the print data. 2 1 2 1 Wireless Network printer 2 Wireless capable computer 5 Introduction Wireless network connection example (HL-4070CDW) 1 1 Connected to a wireless capable computer with each other. When the Brother wireless printer (your printer) is part of the network. When the Brother wireless printer (your printer) is part of network does not have a central access point. Each wireless...
Network Users Manual - English
Page 13
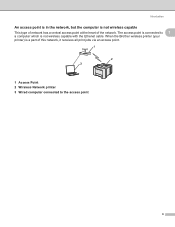
When the Brother wireless printer (your printer) is a part of the network. The access point is not wireless capable 1 This type of network has a central access point at the heart of this network, it receives all print jobs via an access point. 1 2 3 1 Access Point 2 Wireless Network printer 3 Wired computer connected to 1 a computer which is not wireless capable with the Ethenet cable. Introduction An access point is in the network, but the computer is connected to the access point 6
When the Brother wireless printer (your printer) is a part of the network. The access point is not wireless capable 1 This type of network has a central access point at the heart of this network, it receives all print jobs via an access point. 1 2 3 1 Access Point 2 Wireless Network printer 3 Wired computer connected to 1 a computer which is not wireless capable with the Ethenet cable. Introduction An access point is in the network, but the computer is connected to the access point 6

Network Users Manual - English
Page 18
...255.0 • Computer 2 IP Address:192.168.1.3 Subnet Mask:255.255.255.0 Note 0 denotes that there is no limit to communication at this part of the address. If a destination is located at the gateway. The router knows where to direct data that arrives at an external network, the ... not know the Gateway IP address then contact your network communicates with other networks, you may need to configure the Gateway IP address. Configuring your printer for a network with 192.168.1.X. 2 2 Gateway (and router) 2 A gateway is a network point that acts as an entrance to another network and sends...
...255.0 • Computer 2 IP Address:192.168.1.3 Subnet Mask:255.255.255.0 Note 0 denotes that there is no limit to communication at this part of the address. If a destination is located at the gateway. The router knows where to direct data that arrives at an external network, the ... not know the Gateway IP address then contact your network communicates with other networks, you may need to configure the Gateway IP address. Configuring your printer for a network with 192.168.1.X. 2 2 Gateway (and router) 2 A gateway is a network point that acts as an entrance to another network and sends...
Network Users Manual - English
Page 24
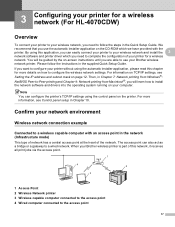
...printer for a wireless network (For HL-4070CDW) 3 Overview 3 To connect your printer to your wireless network, you need to complete the configuration of this chapter for a wireless network. For information on TCP/IP settings, see Control panel setup in the supplied Quick Setup Guide. Note You can configure the printer...computer connected to a wireless capable computer with the printer. When your Brother wireless printer is part of your printer for more information, see Setting the IP address and subnet mask on the printer. You will learn how to install the network ...
...printer for a wireless network (For HL-4070CDW) 3 Overview 3 To connect your printer to your wireless network, you need to complete the configuration of this chapter for a wireless network. For information on TCP/IP settings, see Control panel setup in the supplied Quick Setup Guide. Note You can configure the printer...computer connected to a wireless capable computer with the printer. When your Brother wireless printer is part of your printer for more information, see Setting the IP address and subnet mask on the printer. You will learn how to install the network ...
Network Users Manual - English
Page 25
.... Each wireless client communicates directly with an Ethernet cable. When the Brother wireless printer (your printer) is part of this network, it receives all print jobs via the access point. 1 2 3 1 Access Point 2 Wireless Network printer 3 Wired computer connected to a wireless capable computer without an access ... of network has a central access point at the heart of network does not have a central access point. Configuring your printer for a wireless network (For HL-4070CDW) Connected to the access point 18 The access point is in the network (Ad-hoc mode) 3 This type...
.... Each wireless client communicates directly with an Ethernet cable. When the Brother wireless printer (your printer) is part of this network, it receives all print jobs via the access point. 1 2 3 1 Access Point 2 Wireless Network printer 3 Wired computer connected to a wireless capable computer without an access ... of network has a central access point at the heart of network does not have a central access point. Configuring your printer for a wireless network (For HL-4070CDW) Connected to the access point 18 The access point is in the network (Ad-hoc mode) 3 This type...

Network Users Manual - English
Page 175
... long as the following disclaimer in the documentation and/or other materials provided with this code cannot be given attribution as the author of the parts of source code must include an acknowledgement: "This product includes software written by the same copyright terms except that the following disclaimer. 2. C C This package is...
... long as the following disclaimer in the documentation and/or other materials provided with this code cannot be given attribution as the author of the parts of source code must include an acknowledgement: "This product includes software written by the same copyright terms except that the following disclaimer. 2. C C This package is...

Quick Setup Guide - English
Page 2
... alert you must follow or avoid to prevent possible damage to the printer or other features. Note Notes tell you how you not to touch machine parts that may arise or give tips about how the current operation works with the printer. Caution Cautions specify procedures you to a possible electrical shock. User's Guide...
... alert you must follow or avoid to prevent possible damage to the printer or other features. Note Notes tell you how you not to touch machine parts that may arise or give tips about how the current operation works with the printer. Caution Cautions specify procedures you to a possible electrical shock. User's Guide...
Quick Setup Guide - English
Page 6
...B digital device. Important A shielded interface cable should be used in order to Part 15 of the FCC Rules. The cable must accept any interference received, including interference... with twisted-pair conductors and that the products Product name: Model number: Laser Printer HL-4040CN and HL-4050CDN HL-40C Product option: Lower Tray Unit LT-100CL comply with Canadian ICES-003... uses, and can be more of Conformity (For USA) Responsible Party: Brother International Corporation 100 Somerset Corporate Boulevard P.O. Changes or modifications not expressly approved by turning...
...B digital device. Important A shielded interface cable should be used in order to Part 15 of the FCC Rules. The cable must accept any interference received, including interference... with twisted-pair conductors and that the products Product name: Model number: Laser Printer HL-4040CN and HL-4050CDN HL-40C Product option: Lower Tray Unit LT-100CL comply with Canadian ICES-003... uses, and can be more of Conformity (For USA) Responsible Party: Brother International Corporation 100 Somerset Corporate Boulevard P.O. Changes or modifications not expressly approved by turning...

Users Manual - English
Page 2
... you should respond to a situation that may arise or give tips about how the operation works with the printer. Notes tell you how you not to touch machine parts that are hot. Cautions specify procedures you to devices and operations that are not compatible with other objects.... Improper Setup icons alert you must follow or avoid to prevent possible damage to the printer or other features. i Electrical Hazard ...
... you should respond to a situation that may arise or give tips about how the operation works with the printer. Notes tell you how you not to touch machine parts that are hot. Cautions specify procedures you to devices and operations that are not compatible with other objects.... Improper Setup icons alert you must follow or avoid to prevent possible damage to the printer or other features. i Electrical Hazard ...
Users Manual - English
Page 3
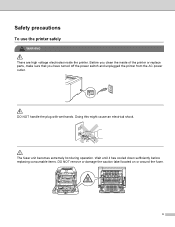
Wait until it has cooled down sufficiently before replacing consumable items. DO NOT remove or damage the caution label located on or around the fuser. ii Doing this might cause an electrical shock. Safety precautions To use the printer safely WA RNING There are high voltage electrodes inside of the printer or replace parts, make sure that you have turned off the power switch and unplugged the printer from the AC power outlet. The fuser unit becomes extremely hot during operation. Before you clean the inside the printer. DO NOT handle the plug with wet hands.
Wait until it has cooled down sufficiently before replacing consumable items. DO NOT remove or damage the caution label located on or around the fuser. ii Doing this might cause an electrical shock. Safety precautions To use the printer safely WA RNING There are high voltage electrodes inside of the printer or replace parts, make sure that you have turned off the power switch and unplugged the printer from the AC power outlet. The fuser unit becomes extremely hot during operation. Before you clean the inside the printer. DO NOT handle the plug with wet hands.
Users Manual - English
Page 10
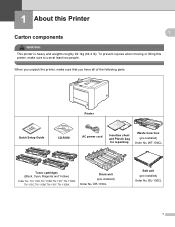
... to use at least two people. 1 About this printer, make sure that you have all of the following parts. To prevent injuries when moving or lifting this Printer 1 1 Carton components 1 WA RNING This printer is heavy and weights roughly 29.1kg (64.2 lb). BU-100CL 1 Printer Quick Setup Guide CD-ROM AC power cord Insertion...
... to use at least two people. 1 About this printer, make sure that you have all of the following parts. To prevent injuries when moving or lifting this Printer 1 1 Carton components 1 WA RNING This printer is heavy and weights roughly 29.1kg (64.2 lb). BU-100CL 1 Printer Quick Setup Guide CD-ROM AC power cord Insertion...
Users Manual - English
Page 87
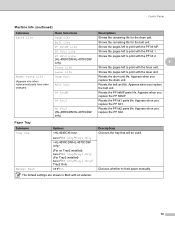
.... Control Panel Machine Info. (continued) Submenu Parts Life Reset Parts Life (Appears only when replacement parts have been changed) Menu Selections Drum Life Belt Life PF KitMP Life PF Kit1 Life PF Kit2 Life (HL-4050CDN/HL-4070CDW only) Fuser Life Laser Life Drum Unit Belt Unit PF KitMP PF ...Kit1 PF Kit2 (HL-4050CDN/HL-4070CDW only) Descriptions Shows the remaining life for the belt unit. Resets the PF kitMP parts life. Resets the PF kit1 parts life. Shows the pages...
.... Control Panel Machine Info. (continued) Submenu Parts Life Reset Parts Life (Appears only when replacement parts have been changed) Menu Selections Drum Life Belt Life PF KitMP Life PF Kit1 Life PF Kit2 Life (HL-4050CDN/HL-4070CDW only) Fuser Life Laser Life Drum Unit Belt Unit PF KitMP PF ...Kit1 PF Kit2 (HL-4050CDN/HL-4070CDW only) Descriptions Shows the remaining life for the belt unit. Resets the PF kitMP parts life. Resets the PF kit1 parts life. Shows the pages...

Users Manual - English
Page 96
... 123.45.67.89 h Press OK or Go to increase or decrease the number. LAN TCP / IP c Press OK. The last digit in the first part of changing a menu setting Setting IP address a Press the + or - IP Address 192.0.0.192 f Press the + or - h Select ab or OK LAN b Press OK. button...
... 123.45.67.89 h Press OK or Go to increase or decrease the number. LAN TCP / IP c Press OK. The last digit in the first part of changing a menu setting Setting IP address a Press the + or - IP Address 192.0.0.192 f Press the + or - h Select ab or OK LAN b Press OK. button...
Users Manual - English
Page 105
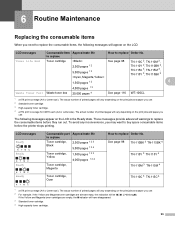
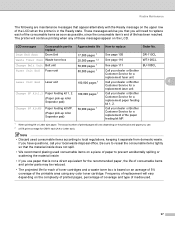
...Magenta toner cartridges are empty, the o indicator will be 'onno' (n=blinking o). LCD messages Ready K YMC Ready K YMC Ready K YMC Ready Consumable part Approximate life to replace Toner cartridge, Black 2,500 pages 1 2 3 5,000 pages 1 2 4 Toner cartridge, Yellow 1,500 pages 1 2 3 4,...000 pages 1 2 4 Toner cartridge, Magenta Toner cartridge, Cyan How to replace the consumable items before the printer stops printing. 6 Routine Maintenance 6 Replacing the consumable items 6 When you need to replace the consumable items, the following messages appear on the ...
...Magenta toner cartridges are empty, the o indicator will be 'onno' (n=blinking o). LCD messages Ready K YMC Ready K YMC Ready K YMC Ready Consumable part Approximate life to replace Toner cartridge, Black 2,500 pages 1 2 3 5,000 pages 1 2 4 Toner cartridge, Yellow 1,500 pages 1 2 3 4,...000 pages 1 2 4 Toner cartridge, Magenta Toner cartridge, Cyan How to replace the consumable items before the printer stops printing. 6 Routine Maintenance 6 Replacing the consumable items 6 When you need to replace the consumable items, the following messages appear on the ...
Users Manual - English
Page 106
...100CL Fuser Unit End Fuser unit 80,000 pages 1 Call your dealer or Brother Customer Service for a replacement laser unit. Be sure to reseal the consumable items tightly so that the material ... printed pages will continue printing when any color toner cartridge. The actual number of the printable area using any of the LCD when the printer is in the Ready state. Note &#...dealer or Brother Customer Service for CMYK each (A4 or Letter size). These messages advise you that is not a direct equivalent for the recommended paper, the life of consumable items and printer parts may be...
...100CL Fuser Unit End Fuser unit 80,000 pages 1 Call your dealer or Brother Customer Service for a replacement laser unit. Be sure to reseal the consumable items tightly so that the material ... printed pages will continue printing when any color toner cartridge. The actual number of the printable area using any of the LCD when the printer is in the Ready state. Note &#...dealer or Brother Customer Service for CMYK each (A4 or Letter size). These messages advise you that is not a direct equivalent for the recommended paper, the life of consumable items and printer parts may be...
Users Manual - English
Page 108
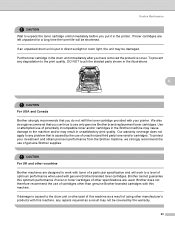
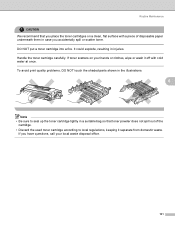
... ON Wait to unpack the toner cartridge until immediately before you have removed the protective cover. To protect your printer. Brother does not therefore recommend the use of genuine Brother supplies. If toner cartridges are left unpacked for a long time the toner life will work with toner of...specifications are designed to the print quality, DO NOT touch the shaded parts shown in the illustrations. 6 CA UTI ON For USA and Canada Brother strongly recommends that is caused by the warranty. 99 Brother cannot guarantee this optimum performance if toner or toner cartridges of other...
... ON Wait to unpack the toner cartridge until immediately before you have removed the protective cover. To protect your printer. Brother does not therefore recommend the use of genuine Brother supplies. If toner cartridges are left unpacked for a long time the toner life will work with toner of...specifications are designed to the print quality, DO NOT touch the shaded parts shown in the illustrations. 6 CA UTI ON For USA and Canada Brother strongly recommends that is caused by the warranty. 99 Brother cannot guarantee this optimum performance if toner or toner cartridges of other...
Users Manual - English
Page 110
... out of disposable paper underneath them in injuries. If you accidentally spill or scatter toner. To avoid print quality problems, DO NOT touch the shaded parts shown in the illustrations. 6 Note • Be sure to seal up the toner cartridge tightly in a suitable bag so that you place the toner cartridges...
... out of disposable paper underneath them in injuries. If you accidentally spill or scatter toner. To avoid print quality problems, DO NOT touch the shaded parts shown in the illustrations. 6 Note • Be sure to seal up the toner cartridge tightly in a suitable bag so that you place the toner cartridges...

Users Manual - English
Page 116
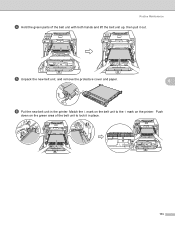
Routine Maintenance d Hold the handle of the toner cartridge and pull it out of the drum unit. Repeat this for all the toner cartridges. 6 CA UTI ON To prevent damage to the printer from static electricity, DO NOT touch the electrodes shown in the illustrations. 107 To avoid print quality problems, DO NOT touch the shaded parts shown in the illustration.
Routine Maintenance d Hold the handle of the toner cartridge and pull it out of the drum unit. Repeat this for all the toner cartridges. 6 CA UTI ON To prevent damage to the printer from static electricity, DO NOT touch the electrodes shown in the illustrations. 107 To avoid print quality problems, DO NOT touch the shaded parts shown in the illustration.

Users Manual - English
Page 119
Routine Maintenance When you replace the drum unit with a new one, you need to choose Reset Parts Life. key to reset the drum counter by completing the following steps: a Turn the printer power switch back on. key to choose Drum Unit. e Press OK two times. 6 110 d Press OK, and then press the + key to choose Machine Info.. c Press OK to proceed to the next menu level, and then press the + or - b Press the + or -
Routine Maintenance When you replace the drum unit with a new one, you need to choose Reset Parts Life. key to reset the drum counter by completing the following steps: a Turn the printer power switch back on. key to choose Drum Unit. e Press OK two times. 6 110 d Press OK, and then press the + key to choose Machine Info.. c Press OK to proceed to the next menu level, and then press the + or - b Press the + or -
Users Manual - English
Page 122
e Unpack the new belt unit, and remove the protective cover and paper. 6 f Put the new belt unit in place. 113 Routine Maintenance d Hold the green parts of the belt unit to the g mark on the green area of the belt unit with both hands and lift the belt unit up, then pull it in the printer. Push down on the printer. Match the h mark on the belt unit to lock it out.
e Unpack the new belt unit, and remove the protective cover and paper. 6 f Put the new belt unit in place. 113 Routine Maintenance d Hold the green parts of the belt unit to the g mark on the green area of the belt unit with both hands and lift the belt unit up, then pull it in the printer. Push down on the printer. Match the h mark on the belt unit to lock it out.


