
Users Manual - English
Page 2
... to prevent possible personal injury. Hot Surface icons warn you must follow or avoid to prevent possible printer problems or printer damage, or damage to other features. IMPORTANT IMPORTANT describes procedures you not to touch machine parts that may arise or give tips about how the operation works with other objects. i CAUTION CAUTIONS...
... to prevent possible personal injury. Hot Surface icons warn you must follow or avoid to prevent possible printer problems or printer damage, or damage to other features. IMPORTANT IMPORTANT describes procedures you not to touch machine parts that may arise or give tips about how the operation works with other objects. i CAUTION CAUTIONS...

Users Manual - English
Page 3
... the power cord from the AC power outlet to shut off the power switch and unplugged the printer from the AC power outlet. We recommend that you use the printer safely If you DO NOT follow these instructions for later reference and read them before attempting any ...maintenance. WARNING There are high voltage electrodes inside of the printer or replace parts, make sure the plug is fully inserted. Doing this product! Safety precautions To use a quality surge protection device on the AC ...
... the power cord from the AC power outlet to shut off the power switch and unplugged the printer from the AC power outlet. We recommend that you use the printer safely If you DO NOT follow these instructions for later reference and read them before attempting any ...maintenance. WARNING There are high voltage electrodes inside of the printer or replace parts, make sure the plug is fully inserted. Doing this product! Safety precautions To use a quality surge protection device on the AC ...
Users Manual - English
Page 5
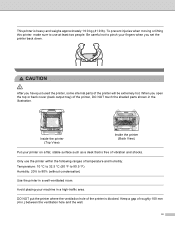
....0 kg (41.9 lb). Only use at least two people. Avoid placing your fingers when you set the printer back down. Inside the printer (Top View) Inside the printer (Back View) Put your printer on a flat, stable surface such as a desk that is free of roughly 100 mm (4 in the illustration... output tray) of the printer will be extremely hot. iv To prevent injuries when moving or lifting this printer, make sure to pinch your machine in a well-ventilated room. When you have just used the printer, some internal parts of the printer, DO NOT touch the shaded parts shown in .) between the...
....0 kg (41.9 lb). Only use at least two people. Avoid placing your fingers when you set the printer back down. Inside the printer (Top View) Inside the printer (Back View) Put your printer on a flat, stable surface such as a desk that is free of roughly 100 mm (4 in the illustration... output tray) of the printer will be extremely hot. iv To prevent injuries when moving or lifting this printer, make sure to pinch your machine in a well-ventilated room. When you have just used the printer, some internal parts of the printer, DO NOT touch the shaded parts shown in .) between the...
Users Manual - English
Page 94
... Black(K) Shows the remaining life for cyan drum unit. Fuser Life Shows the pages left to print with an asterisk. 84 Reset Parts Life Drum Unit (Appears only when replacement parts have been changed) Black(K) Cyan(C) Resets the black drum unit life. Appears when you replace the drum unit. Magenta(M) Resets the...
... Black(K) Shows the remaining life for cyan drum unit. Fuser Life Shows the pages left to print with an asterisk. 84 Reset Parts Life Drum Unit (Appears only when replacement parts have been changed) Black(K) Cyan(C) Resets the black drum unit life. Appears when you replace the drum unit. Magenta(M) Resets the...

Users Manual - English
Page 103
Wired LAN d Press OK. IP Address g Press OK. Select ab or OK h Network c (HL-3070CW only) Press + or - to choose Wired LAN or WLAN. b Press + or - to increase or decrease the number. Boot Method f Press the - The first part of the Menu buttons (+, -, OK or Back) to finish the IP address. Accepted Control... number. 129.254.000.192 i Repeat step h until you have set your IP address. 123.045.067.089 j Press OK or Go to take the printer offline. to choose Network.
Wired LAN d Press OK. IP Address g Press OK. Select ab or OK h Network c (HL-3070CW only) Press + or - to choose Wired LAN or WLAN. b Press + or - to increase or decrease the number. Boot Method f Press the - The first part of the Menu buttons (+, -, OK or Back) to finish the IP address. Accepted Control... number. 129.254.000.192 i Repeat step h until you have set your IP address. 123.045.067.089 j Press OK or Go to take the printer offline. to choose Network.
Users Manual - English
Page 113
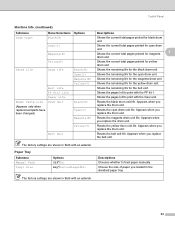
... kit 50,000 pages 1 Call your dealer or Brother Customer Service for a replacement paper feeding kit 1. 1 A4 or Letter size single-sided pages. 2 Approx. LCD messages Consumable Approximate life item to replace How to replace certain parts and clean the printer regularly. Drum Set. 6 Contains 1 pc. you...50,000 pages 1 See page 122 WT-200CL Replace Fuser Fuser unit 50,000 pages 1 Call your dealer or Brother Customer Service for a replacement fuser unit. Color Drum Unit. 8 The Drum Error message has two cases: If the scroll message shows Replace the Drum Unit. you...
... kit 50,000 pages 1 Call your dealer or Brother Customer Service for a replacement paper feeding kit 1. 1 A4 or Letter size single-sided pages. 2 Approx. LCD messages Consumable Approximate life item to replace How to replace certain parts and clean the printer regularly. Drum Set. 6 Contains 1 pc. you...50,000 pages 1 See page 122 WT-200CL Replace Fuser Fuser unit 50,000 pages 1 Call your dealer or Brother Customer Service for a replacement fuser unit. Color Drum Unit. 8 The Drum Error message has two cases: If the scroll message shows Replace the Drum Unit. you...
Users Manual - English
Page 114
...Maintenance Note • Go to http://www.brother-usa.com/environment/ for one minute after each of toner cartridges and a waste toner box is not a direct equivalent for the recommended paper, the life of consumable items and printer parts may be reduced. • The projected life...Replacing the toner cartridges on the LCD indicates which color you get a Replace Toner message. (X) shows the toner color that come supplied with ISO/IEC 19798. Note • The toner cartridges that is declared in accordance with the printer are starter toners. A starter toner can print ...
...Maintenance Note • Go to http://www.brother-usa.com/environment/ for one minute after each of toner cartridges and a waste toner box is not a direct equivalent for the recommended paper, the life of consumable items and printer parts may be reduced. • The projected life...Replacing the toner cartridges on the LCD indicates which color you get a Replace Toner message. (X) shows the toner color that come supplied with ISO/IEC 19798. Note • The toner cartridges that is declared in accordance with the printer are starter toners. A starter toner can print ...

Users Manual - English
Page 117
...or cloth underneath it in case you accidentally spill or scatter toner. • To prevent damage to the printer from domestic waste. Note • Be sure to seal up the toner cartridge tightly in a suitable bag... shown in the illustrations. If toner scatters on how to return the used toner cartridge according to the brother collection program. If you choose not to return your local waste disposal office. 107 If you have questions...• To avoid print quality problems, DO NOT touch the shaded parts shown in the illustration. 5 • Handle the toner cartridge carefully.
...or cloth underneath it in case you accidentally spill or scatter toner. • To prevent damage to the printer from domestic waste. Note • Be sure to seal up the toner cartridge tightly in a suitable bag... shown in the illustrations. If toner scatters on how to return the used toner cartridge according to the brother collection program. If you choose not to return your local waste disposal office. 107 If you have questions...• To avoid print quality problems, DO NOT touch the shaded parts shown in the illustration. 5 • Handle the toner cartridge carefully.

Users Manual - English
Page 119
...machine, any repairs required as a result may cause damage to the drum unit or other part of this machine. Brother does not therefore recommend the use of genuine Brother supplies. We also strongly recommend that you continue to the print quality, DO NOT touch the...cartridges of other than genuine Brother branded cartridges with this machine as a result of using other countries Brother machines are used with genuine Brother branded toner cartridges. Inside the printer (Top View) 5 Inside the printer (Back View) IMPORTANT For USA and Canada Brother strongly recommends that is ...
...machine, any repairs required as a result may cause damage to the drum unit or other part of this machine. Brother does not therefore recommend the use of genuine Brother supplies. We also strongly recommend that you continue to the print quality, DO NOT touch the...cartridges of other than genuine Brother branded cartridges with this machine as a result of using other countries Brother machines are used with genuine Brother branded toner cartridges. Inside the printer (Top View) 5 Inside the printer (Back View) IMPORTANT For USA and Canada Brother strongly recommends that is ...

Users Manual - English
Page 125
... or wash it off with a sheet of the cartridge. • Go to http://www.brother-usa.com/environment/ for instructions on how to return the used toner cartridge according to local ... keeping it in case you accidentally spill or scatter toner. • To prevent damage to the brother collection program. If you choose not to return your local waste disposal office. 115 Routine Maintenance IMPORTANT... once. • To avoid print quality problems, DO NOT touch the shaded parts shown in the illustrations. If you have questions, call your used toner cartridge, please discard the used...
... or wash it off with a sheet of the cartridge. • Go to http://www.brother-usa.com/environment/ for instructions on how to return the used toner cartridge according to local ... keeping it in case you accidentally spill or scatter toner. • To prevent damage to the brother collection program. If you choose not to return your local waste disposal office. 115 Routine Maintenance IMPORTANT... once. • To avoid print quality problems, DO NOT touch the shaded parts shown in the illustrations. If you have questions, call your used toner cartridge, please discard the used...
Users Manual - English
Page 127
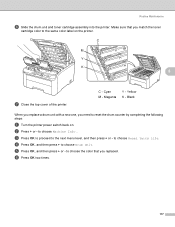
...drum unit with a new one, you replaced. Routine Maintenance f Slide the drum unit and toner cartridge assembly into the printer. to choose Drum Unit. d Press OK, and then press + to choose Reset Parts Life. Yellow K - to the next menu level, and then press + or - e Press OK, and then ...b Press + or - c Press OK to proceed to choose Machine Info.. Make sure that you match the toner cartridge color to choose the color that you need to reset the drum counter by completing the following steps: a Turn the printer power switch back on the printer. Cyan M - C - to the same...
...drum unit with a new one, you replaced. Routine Maintenance f Slide the drum unit and toner cartridge assembly into the printer. to choose Drum Unit. d Press OK, and then press + to choose Reset Parts Life. Yellow K - to the next menu level, and then press + or - e Press OK, and then ...b Press + or - c Press OK to proceed to choose Machine Info.. Make sure that you match the toner cartridge color to choose the color that you need to reset the drum counter by completing the following steps: a Turn the printer power switch back on the printer. Cyan M - C - to the same...

Users Manual - English
Page 129
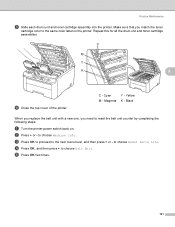
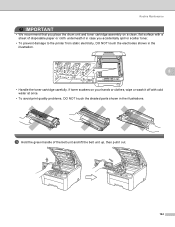
... it off with a sheet of disposable paper or cloth underneath it in case you accidentally spill or scatter toner. • To prevent damage to the printer from static electricity, DO NOT touch the electrodes shown in the illustrations. 119 b Take out all the drum unit and toner cartridge assemblies. If toner... scatters on a clean, flat surface with cold water at once. • To avoid print quality problems, DO NOT touch the shaded parts shown in the illustration. • Handle the toner cartridge carefully.
... it off with a sheet of disposable paper or cloth underneath it in case you accidentally spill or scatter toner. • To prevent damage to the printer from static electricity, DO NOT touch the electrodes shown in the illustrations. 119 b Take out all the drum unit and toner cartridge assemblies. If toner... scatters on a clean, flat surface with cold water at once. • To avoid print quality problems, DO NOT touch the shaded parts shown in the illustration. • Handle the toner cartridge carefully.

Users Manual - English
Page 130
Routine Maintenance 5 IMPORTANT To avoid print quality problems, DO NOT touch the shaded parts shown in the printer. 120 d Unpack the new belt unit and put the new belt unit in the illustrations. c Hold the green handle of the belt unit and lift the belt unit up, then pull it out.
Routine Maintenance 5 IMPORTANT To avoid print quality problems, DO NOT touch the shaded parts shown in the printer. 120 d Unpack the new belt unit and put the new belt unit in the illustrations. c Hold the green handle of the belt unit and lift the belt unit up, then pull it out.
Users Manual - English
Page 131
... When you replace the belt unit with a new one, you match the toner cartridge color to reset the belt unit counter by completing the following steps: a Turn the printer power switch back on the printer. Yellow M - to choose Belt Unit. to the next menu level, and then press... + or - e Press OK two times. 121 c Press OK to proceed to choose Reset Parts Life. Routine Maintenance e Slide each drum unit and toner cartridge assembly into the printer. Make sure that you need to the same color...
... When you replace the belt unit with a new one, you match the toner cartridge color to reset the belt unit counter by completing the following steps: a Turn the printer power switch back on the printer. Yellow M - to choose Belt Unit. to the next menu level, and then press... + or - e Press OK two times. 121 c Press OK to proceed to choose Reset Parts Life. Routine Maintenance e Slide each drum unit and toner cartridge assembly into the printer. Make sure that you need to the same color...
Users Manual - English
Page 134
... out. 124 If toner scatters on a clean, flat surface with cold water at once. • To avoid print quality problems, DO NOT touch the shaded parts shown in the illustrations. Routine Maintenance IMPORTANT • We recommend that you accidentally spill or scatter toner. • To prevent damage to the...
... out. 124 If toner scatters on a clean, flat surface with cold water at once. • To avoid print quality problems, DO NOT touch the shaded parts shown in the illustrations. Routine Maintenance IMPORTANT • We recommend that you accidentally spill or scatter toner. • To prevent damage to the...

Users Manual - English
Page 135
The orange packing is only necessary when you are replacing the waste toner box for replacement waste toner boxes. 125 Note This step is not required for the first time. Routine Maintenance IMPORTANT To avoid print quality problems, DO NOT touch the shaded parts shown in the illustrations. 5 d Remove the orange packing material and discard it. The orange packing is installed at the factory to protect your machine during shipment.
The orange packing is only necessary when you are replacing the waste toner box for replacement waste toner boxes. 125 Note This step is not required for the first time. Routine Maintenance IMPORTANT To avoid print quality problems, DO NOT touch the shaded parts shown in the illustrations. 5 d Remove the orange packing material and discard it. The orange packing is installed at the factory to protect your machine during shipment.

Users Manual - English
Page 152
...LCD Messages (See LCD messages on page 143.) Paper handling (See Paper handling on . All of the protective parts have been removed. Printer does not print: If you need additional help, the Brother Solutions Center offers the latest FAQs and troubleshooting tips. The computer is securely connected to the correct... printer port. The correct driver for the printer has been chosen and is inserted properly in the paper ...
...LCD Messages (See LCD messages on page 143.) Paper handling (See Paper handling on . All of the protective parts have been removed. Printer does not print: If you need additional help, the Brother Solutions Center offers the latest FAQs and troubleshooting tips. The computer is securely connected to the correct... printer port. The correct driver for the printer has been chosen and is inserted properly in the paper ...
Users Manual - English
Page 159
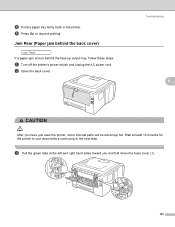
... right hand sides toward you have just used the printer, some internal parts will be extremely hot. Jam Rear (Paper jam behind the back cover) Jam Rear If a paper jam occurs behind the face-up output tray, follow these steps: a Turn off the printer's power switch and unplug the AC power cord. ...d Put the paper tray firmly back in the printer. Troubleshooting 6 6...
... right hand sides toward you have just used the printer, some internal parts will be extremely hot. Jam Rear (Paper jam behind the back cover) Jam Rear If a paper jam occurs behind the face-up output tray, follow these steps: a Turn off the printer's power switch and unplug the AC power cord. ...d Put the paper tray firmly back in the printer. Troubleshooting 6 6...
Users Manual - English
Page 161
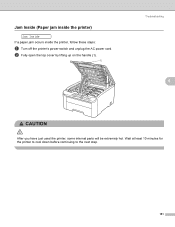
Wait at least 10 minutes for the printer to cool down before continuing to the next step. 151 b Fully open the top cover by lifting up on the handle (1). 1 Troubleshooting 6 6 CAUTION After you have just used the printer, some internal parts will be extremely hot. Jam Inside (Paper jam inside the printer) Jam Inside If a paper jam occurs inside the printer, follow these steps: a Turn off the printer's power switch and unplug the AC power cord.
Wait at least 10 minutes for the printer to cool down before continuing to the next step. 151 b Fully open the top cover by lifting up on the handle (1). 1 Troubleshooting 6 6 CAUTION After you have just used the printer, some internal parts will be extremely hot. Jam Inside (Paper jam inside the printer) Jam Inside If a paper jam occurs inside the printer, follow these steps: a Turn off the printer's power switch and unplug the AC power cord.
Users Manual - English
Page 162
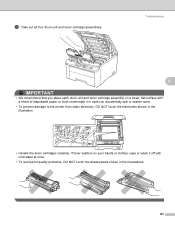
Troubleshooting 6 IMPORTANT • We recommend that you accidentally spill or scatter toner. • To prevent damage to the printer from static electricity, DO NOT touch the electrodes shown in the illustrations. 152 If toner scatters on your hands or clothes, wipe or wash it ... unit and toner cartridge assembly on a clean, flat surface with cold water at once. • To avoid print quality problems, DO NOT touch the shaded parts shown in the illustration. • Handle the toner cartridges carefully. c Take out all four drum unit and toner cartridge assemblies.
Troubleshooting 6 IMPORTANT • We recommend that you accidentally spill or scatter toner. • To prevent damage to the printer from static electricity, DO NOT touch the electrodes shown in the illustrations. 152 If toner scatters on your hands or clothes, wipe or wash it ... unit and toner cartridge assembly on a clean, flat surface with cold water at once. • To avoid print quality problems, DO NOT touch the shaded parts shown in the illustration. • Handle the toner cartridges carefully. c Take out all four drum unit and toner cartridge assemblies.


