
Users Manual - English
Page 9
button ...76 Back...77 OK ...77 LEDs ...77 LCD ...77 Back light (HL-3070CW only) ...78 LCD messages ...78 Reprinting documents...79...the consumable items...102 Toner cartridges ...104 Drum units ...112 Belt unit...118 Waste toner box ...122 Cleaning ...128 Cleaning the outside of the printer 128 Cleaning the LED head ...130 Cleaning the corona wires ...131 Cleaning the ... paper tray 148 Jam Rear (Paper jam behind the back cover 149 Jam Inside (Paper jam inside the printer 151 Improving the print quality...154 Solving print problems ...161 viii 3 Control Panel 75 Control panel ...75 Buttons...
button ...76 Back...77 OK ...77 LEDs ...77 LCD ...77 Back light (HL-3070CW only) ...78 LCD messages ...78 Reprinting documents...79...the consumable items...102 Toner cartridges ...104 Drum units ...112 Belt unit...118 Waste toner box ...122 Cleaning ...128 Cleaning the outside of the printer 128 Cleaning the LED head ...130 Cleaning the corona wires ...131 Cleaning the ... paper tray 148 Jam Rear (Paper jam behind the back cover 149 Jam Inside (Paper jam inside the printer 151 Improving the print quality...154 Solving print problems ...161 viii 3 Control Panel 75 Control panel ...75 Buttons...
Users Manual - English
Page 94
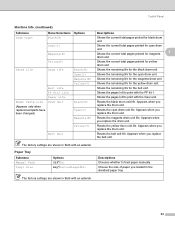
... (Appears only when replacement parts have been changed) Black(K) Cyan(C) Resets the black drum unit life. Appears when you replace the belt unit. Appears when you replace the drum unit. Descriptions Chooses whether to print with an asterisk. 84 Yellow(Y) Shows the remaining life for...for magenta 3 drum unit. Fuser Life Shows the pages left to feed paper manually. Appears when you replace the drum unit. Belt Unit Resets the belt unit life. The factory settings are shown in the standard paper tray. Magenta(M) Resets the magenta drum unit life. Control Panel Machine...
... (Appears only when replacement parts have been changed) Black(K) Cyan(C) Resets the black drum unit life. Appears when you replace the belt unit. Appears when you replace the drum unit. Descriptions Chooses whether to print with an asterisk. 84 Yellow(Y) Shows the remaining life for...for magenta 3 drum unit. Fuser Life Shows the pages left to feed paper manually. Appears when you replace the drum unit. Belt Unit Resets the belt unit life. The factory settings are shown in the standard paper tray. Magenta(M) Resets the magenta drum unit life. Control Panel Machine...
Users Manual - English
Page 112
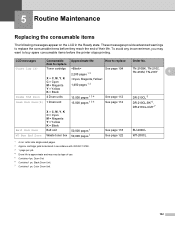
... Drum Unit. 7 Contains 1 pc. LCD messages Consumable Approximate life item to replace How to replace the consumable items before the printer stops printing. Color Drum Unit. 102 These messages provide advanced warnings to replace Order No. 5 Routine Maintenance 5 Replacing the consumable items 5 The ...(X) 1 Drum unit 15,000 pages 1 3 4 See page 112 DR-210CL-BK 6, DR-210CL-CMY 7 X = C, M, Y, K C = Cyan M = Magenta Y = Yellow K = Black Belt End Soon Belt unit 50,000 pages 1 See page 118 BU-200CL WT Box End Soon Waste toner box 50,000 pages 1 See page 122 WT-200CL...
... Drum Unit. 7 Contains 1 pc. LCD messages Consumable Approximate life item to replace How to replace the consumable items before the printer stops printing. Color Drum Unit. 102 These messages provide advanced warnings to replace Order No. 5 Routine Maintenance 5 Replacing the consumable items 5 The ...(X) 1 Drum unit 15,000 pages 1 3 4 See page 112 DR-210CL-BK 6, DR-210CL-CMY 7 X = C, M, Y, K C = Cyan M = Magenta Y = Yellow K = Black Belt End Soon Belt unit 50,000 pages 1 See page 118 BU-200CL WT Box End Soon Waste toner box 50,000 pages 1 See page 122 WT-200CL...
Users Manual - English
Page 113
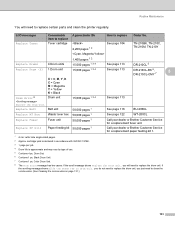
..., you will need to replace certain parts and clean the printer regularly. LCD messages Consumable Approximate life item to replace How...is approximate and may vary by type of use. 5 Contains 4 pc. Color Drum Unit. 8 The Drum Error message has two cases: If the scroll... Cyan M = Magenta Y = Yellow K = Black Drum Error 8 Drum unit Replace the Drum Unit. Replace Belt Belt unit 15,000 pages 1 3 4 50,000 pages 1 See page 113 See page 118 BU-200CL Replace WT ...Fuser unit 50,000 pages 1 Call your dealer or Brother Customer Service for a replacement fuser unit. Routine Maintenance ...
..., you will need to replace certain parts and clean the printer regularly. LCD messages Consumable Approximate life item to replace How...is approximate and may vary by type of use. 5 Contains 4 pc. Color Drum Unit. 8 The Drum Error message has two cases: If the scroll... Cyan M = Magenta Y = Yellow K = Black Drum Error 8 Drum unit Replace the Drum Unit. Replace Belt Belt unit 15,000 pages 1 3 4 50,000 pages 1 See page 113 See page 118 BU-200CL Replace WT ...Fuser unit 50,000 pages 1 Call your dealer or Brother Customer Service for a replacement fuser unit. Routine Maintenance ...
Users Manual - English
Page 128
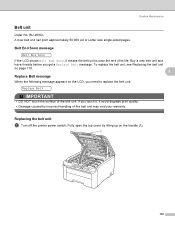
... by incorrect handling of its life. Replacing the belt unit 5 a Turn off the printer power switch. Buy a new belt unit and have it means the belt unit is near the end of the belt unit may void your warranty. Routine Maintenance Belt unit 5 Order No. BU-200CL A new belt unit can print approximately 50,000 A4 or...
... by incorrect handling of its life. Replacing the belt unit 5 a Turn off the printer power switch. Buy a new belt unit and have it means the belt unit is near the end of the belt unit may void your warranty. Routine Maintenance Belt unit 5 Order No. BU-200CL A new belt unit can print approximately 50,000 A4 or...

Users Manual - English
Page 130
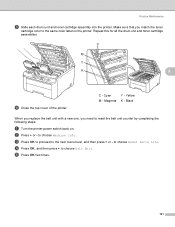
Routine Maintenance 5 IMPORTANT To avoid print quality problems, DO NOT touch the shaded parts shown in the printer. 120 c Hold the green handle of the belt unit and lift the belt unit up, then pull it out. d Unpack the new belt unit and put the new belt unit in the illustrations.
Routine Maintenance 5 IMPORTANT To avoid print quality problems, DO NOT touch the shaded parts shown in the printer. 120 c Hold the green handle of the belt unit and lift the belt unit up, then pull it out. d Unpack the new belt unit and put the new belt unit in the illustrations.
Users Manual - English
Page 131
C M Y K 5 f Close the top cover of the printer. Black When you replace the belt unit with a new one, you match the toner cartridge color to the next menu level, and then press + or - to reset the belt unit counter by completing the following steps: a Turn the printer power switch back on the printer. Make sure that you need...
C M Y K 5 f Close the top cover of the printer. Black When you replace the belt unit with a new one, you match the toner cartridge color to the next menu level, and then press + or - to reset the belt unit counter by completing the following steps: a Turn the printer power switch back on the printer. Make sure that you need...
Users Manual - English
Page 134
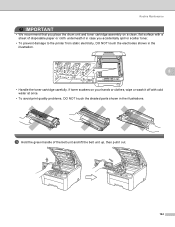
...cartridge assembly on your hands or clothes, wipe or wash it in case you accidentally spill or scatter toner. • To prevent damage to the printer from static electricity, DO NOT touch the electrodes shown in the illustrations. c Hold the green handle of disposable paper or cloth underneath it off ...with a sheet of the belt unit and lift the belt unit up, then pull it out. 124 If toner scatters on a clean, flat surface with cold water at once. • To avoid...
...cartridge assembly on your hands or clothes, wipe or wash it in case you accidentally spill or scatter toner. • To prevent damage to the printer from static electricity, DO NOT touch the electrodes shown in the illustrations. c Hold the green handle of disposable paper or cloth underneath it off ...with a sheet of the belt unit and lift the belt unit up, then pull it out. 124 If toner scatters on a clean, flat surface with cold water at once. • To avoid...
Users Manual - English
Page 137
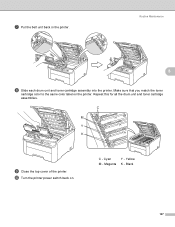
Cyan Y - Magenta K - C M Y K i Close the top cover of the printer. Yellow M - g Put the belt unit back in the printer. Routine Maintenance 5 h Slide each drum unit and toner cartridge assembly into the printer. Make sure that you match the toner cartridge color to the same color label on . j Turn the printer power switch back on the printer. Repeat this for all the drum unit and toner cartridge assemblies. C - Black 127
Cyan Y - Magenta K - C M Y K i Close the top cover of the printer. Yellow M - g Put the belt unit back in the printer. Routine Maintenance 5 h Slide each drum unit and toner cartridge assembly into the printer. Make sure that you match the toner cartridge color to the same color label on . j Turn the printer power switch back on the printer. Repeat this for all the drum unit and toner cartridge assemblies. C - Black 127
Users Manual - English
Page 154
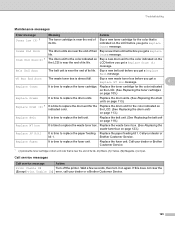
...paper tray and then press Go, or put the paper in the printer driver, and then press Go, or select the size of paper you...Device (HL-3070CW only) A ction Re-install the belt unit. (See Belt unit on the back out put tray. Put in a new belt unit. (See Replacing the belt unit on... page 118.) Put in a new drum unit. (See Replacing the drum units on page 123.) If the problem continues, call your dealer or Brother Customer Service. Identify the colorcausing the problem and put in a waste toner box. (See Replacing the waste toner box on page 113.) To identify the color...
...paper tray and then press Go, or put the paper in the printer driver, and then press Go, or select the size of paper you...Device (HL-3070CW only) A ction Re-install the belt unit. (See Belt unit on the back out put tray. Put in a new belt unit. (See Replacing the belt unit on... page 118.) Put in a new drum unit. (See Replacing the drum units on page 123.) If the problem continues, call your dealer or Brother Customer Service. Identify the colorcausing the problem and put in a waste toner box. (See Replacing the waste toner box on page 113.) To identify the color...
Users Manual - English
Page 155
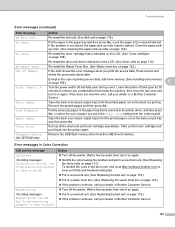
...page 113.) Replace Belt It is time to replace the drum unit for the Replace the drum unit for the color that is near the end of its life. Call service messages Call service message A ction Print Unable ## Turn off the printer. Drums End ...time to replace the fuser unit. Replace the belt unit. (See Replacing the belt unit on again. Brother Customer Service. Call your dealer or Brother Customer Service. 1 (X) shows the toner cartridge or drum unit color that is indicated on indicated color. Replace the fuser unit. Troubleshooting Maintenance messages Error...
...page 113.) Replace Belt It is time to replace the drum unit for the Replace the drum unit for the color that is near the end of its life. Call service messages Call service message A ction Print Unable ## Turn off the printer. Drums End ...time to replace the fuser unit. Replace the belt unit. (See Replacing the belt unit on again. Brother Customer Service. Call your dealer or Brother Customer Service. 1 (X) shows the toner cartridge or drum unit color that is indicated on indicated color. Replace the fuser unit. Troubleshooting Maintenance messages Error...
Users Manual - English
Page 169
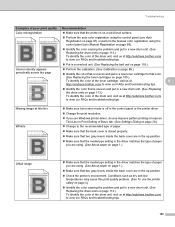
... sure that the media type setting in a new belt unit. (See Replacing the belt unit on page 113.) To identify the color of the drum unit, visit us at http://solutions.brother.com/ to view our FAQs and troubleshooting tips. ABCDEFGHIJKLMNOPQRSTUVWXYZ... ABCDEFGHIJKLMNOPQRSTUVWXYZ. 0123456789. Troubleshooting Examples of poor print quality Recommendation Color misregistration Make sure that the printer is on page 105.) To identify the color of the toner cartridge, visit us at 6 http://solutions.brother.com/ to view our FAQs and troubleshooting tips. ABCDEFGHIJKLMNOPQRSTUVWXYZ....
... sure that the media type setting in a new belt unit. (See Replacing the belt unit on page 113.) To identify the color of the drum unit, visit us at http://solutions.brother.com/ to view our FAQs and troubleshooting tips. ABCDEFGHIJKLMNOPQRSTUVWXYZ... ABCDEFGHIJKLMNOPQRSTUVWXYZ. 0123456789. Troubleshooting Examples of poor print quality Recommendation Color misregistration Make sure that the printer is on page 105.) To identify the color of the toner cartridge, visit us at 6 http://solutions.brother.com/ to view our FAQs and troubleshooting tips. ABCDEFGHIJKLMNOPQRSTUVWXYZ....
Users Manual - English
Page 177
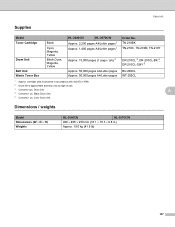
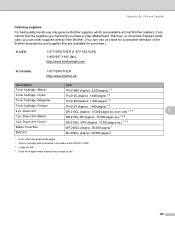
... life is approximate and may vary by type of use. 3 Contains 4 pc. A 4 Contains 1 pc. Color Drum Unit. Appendix Supplies A Model Toner Cartridge Drum Unit Belt Unit Waste Toner Box Black Cyan, Magenta, Yellow Black,Cyan, Magenta, Yellow HL-3040CN HL-3070CW Approx. 2,200 pages A4/Letter pages 1 Approx. 1,400 pages A4/Letter pages 1 Order No...
... life is approximate and may vary by type of use. 3 Contains 4 pc. A 4 Contains 1 pc. Color Drum Unit. Appendix Supplies A Model Toner Cartridge Drum Unit Belt Unit Waste Toner Box Black Cyan, Magenta, Yellow Black,Cyan, Magenta, Yellow HL-3040CN HL-3070CW Approx. 2,200 pages A4/Letter pages 1 Approx. 1,400 pages A4/Letter pages 1 Order No...
Users Manual - English
Page 198
Drum Unit DR-210CL-CMY (Approx. 15,000 pages ea.) 1 3 4 Waste Toner Box WT-200CL (Approx. 50,000 pages) 1 Belt Unit BU-200CL (Approx. 50,000 pages) 1 1 A4 or Letter size single-sided pages. 2 Approx. Drum Unit DR-210CL-BK (Approx. 15,000 pages ea.) ... Visa, MasterCard, Discover, or American Express credit card, you can order supplies directly from Brother. (You can visit us online for a complete selection of use only genuine Brother supplies, which are available for purchase.) In USA: 1-877-BROTHER (1-877-552-6255) 1-800-947-1445 (fax) http://www.brothermall.com/ In Canada...
Drum Unit DR-210CL-CMY (Approx. 15,000 pages ea.) 1 3 4 Waste Toner Box WT-200CL (Approx. 50,000 pages) 1 Belt Unit BU-200CL (Approx. 50,000 pages) 1 1 A4 or Letter size single-sided pages. 2 Approx. Drum Unit DR-210CL-BK (Approx. 15,000 pages ea.) ... Visa, MasterCard, Discover, or American Express credit card, you can order supplies directly from Brother. (You can visit us online for a complete selection of use only genuine Brother supplies, which are available for purchase.) In USA: 1-877-BROTHER (1-877-552-6255) 1-800-947-1445 (fax) http://www.brothermall.com/ In Canada...
Users Manual - English
Page 199
...Automatic Interface Selection 74 B Back button 77 Back light 78 Bar code control 176 Belt unit 118 Booklet printing 22, 39 BRAdmin Light 72 BRAdmin Professional 72 Brother Numbers (Europe and other countries) ...... 185 Brother Numbers (USA/Canada 186, 187, 188 BRPrint Auditor 73 BR-Script 3 mode...messages 145 Cancel button 75 Character sets 173 Cleaning 128 Color Correction 90 Computer requirements 169 Consumable items 102, 103 Control panel 75, 82, 166 Control panel LCD menu 83 Corona wire 108, 131, 133 D Data LED 77 Default settings 94 Dimensions 167 DIMM 99 Direct ...
...Automatic Interface Selection 74 B Back button 77 Back light 78 Bar code control 176 Belt unit 118 Booklet printing 22, 39 BRAdmin Light 72 BRAdmin Professional 72 Brother Numbers (Europe and other countries) ...... 185 Brother Numbers (USA/Canada 186, 187, 188 BRPrint Auditor 73 BR-Script 3 mode...messages 145 Cancel button 75 Character sets 173 Cleaning 128 Color Correction 90 Computer requirements 169 Consumable items 102, 103 Control panel 75, 82, 166 Control panel LCD menu 83 Corona wire 108, 131, 133 D Data LED 77 Default settings 94 Dimensions 167 DIMM 99 Direct ...

Quick Setup Guide - English
Page 1
...languages, please visit http://solutions.brother.com/. Quick Setup Guide Start Here (EU only) HL-3040CN Before you can use the printer, read this Quick Setup Guide for the correct setup and installation. IMPORTANT DO NOT connect the interface cable yet. 1 Unpack the printer and check the components 3... l AC Power Connector m Network Status LEDs (Light Emitting Diodes) n 10/100BASE-TX (Ethernet) port o USB Interface Connector CD-ROM (including User's Guide and Network User's Guide) Quick Setup Guide AC Power Cord Waste Toner Box (pre-installed) Belt Unit (pre-installed) Drum Unit and ...
...languages, please visit http://solutions.brother.com/. Quick Setup Guide Start Here (EU only) HL-3040CN Before you can use the printer, read this Quick Setup Guide for the correct setup and installation. IMPORTANT DO NOT connect the interface cable yet. 1 Unpack the printer and check the components 3... l AC Power Connector m Network Status LEDs (Light Emitting Diodes) n 10/100BASE-TX (Ethernet) port o USB Interface Connector CD-ROM (including User's Guide and Network User's Guide) Quick Setup Guide AC Power Cord Waste Toner Box (pre-installed) Belt Unit (pre-installed) Drum Unit and ...
Quick Setup Guide - English
Page 27
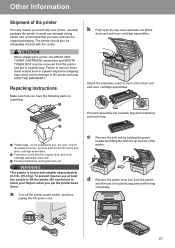
... drum and toner cartridge assembly came with the carrier. Be careful not to pinch your printer, carefully package the printer to avoid any reason you must be supplied by holding the green handle and lifting the belt unit up and out of the drum unit and toner cartridge assemblies. a Plastic bags... - Attach the protective cover to lift the printer. c Remove the belt unit by you, the user; To prevent injuries use the original packaging. one for the waste toner box, and one each bag. ...
... drum and toner cartridge assembly came with the carrier. Be careful not to pinch your printer, carefully package the printer to avoid any reason you must be supplied by holding the green handle and lifting the belt unit up and out of the drum unit and toner cartridge assemblies. a Plastic bags... - Attach the protective cover to lift the printer. c Remove the belt unit by you, the user; To prevent injuries use the original packaging. one for the waste toner box, and one each bag. ...
Quick Setup Guide - English
Page 28
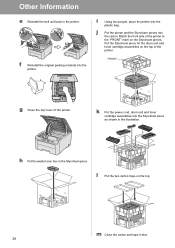
... trays on the Styrofoam pieces. Put the Styrofoam piece for the drum unit and toner cartridge assemblies on the top of the printer. k Put the power cord, drum unit and toner cartridge assemblies into the plastic bag. h Put the waste toner box in the... printer. i Using two people, place the printer into the Styrofoam piece as shown in the illustration. j Put the printer and the Styrofoam pieces into the printer. g Close the top cover of the printer. Other Information e Reinstall the belt unit back in the Styrofoam piece. f Reinstall the...
... trays on the Styrofoam pieces. Put the Styrofoam piece for the drum unit and toner cartridge assemblies on the top of the printer. k Put the power cord, drum unit and toner cartridge assemblies into the plastic bag. h Put the waste toner box in the... printer. i Using two people, place the printer into the Styrofoam piece as shown in the illustration. j Put the printer and the Styrofoam pieces into the printer. g Close the top cover of the printer. Other Information e Reinstall the belt unit back in the Styrofoam piece. f Reinstall the...
Quick Setup Guide - English
Page 31
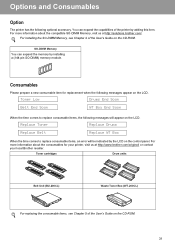
...End Soon When the time comes to replace consumable items, an error will appear on the LCD. Replace Toner Replace Drums Replace Belt Replace WT Box When the time comes to replace consumable items, the following optional accessory. You can expand the memory by the... Please prepare a new consumable item for your printer, visit us at http://www.brother.com/original/ or contact your local Brother reseller. For installing the SO-DIMM Memory, see Chapter 5 of the printer by adding this item. Options and Consumables Option The printer has the following messages will be indicated by...
...End Soon When the time comes to replace consumable items, an error will appear on the LCD. Replace Toner Replace Drums Replace Belt Replace WT Box When the time comes to replace consumable items, the following optional accessory. You can expand the memory by the... Please prepare a new consumable item for your printer, visit us at http://www.brother.com/original/ or contact your local Brother reseller. For installing the SO-DIMM Memory, see Chapter 5 of the printer by adding this item. Options and Consumables Option The printer has the following messages will be indicated by...

