Users Manual - English
Page 3
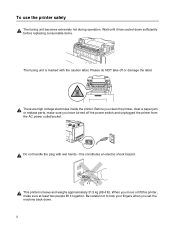
...fusing unit becomes extremely hot during operation. Before you clean the printer, clear a paper jam or replace parts, make sure at least two people lift it has cooled down . There are high voltage electrodes inside the printer. This printer is marked with wet hands - Be careful not to trap your...or damage the label. Please do NOT take off the power switch and unplugged the printer from the AC power outlet/socket. Do not handle the plug with the caution label. this printer, make sure you set the machine back down sufficiently before replacing consumable items. The fusing...
...fusing unit becomes extremely hot during operation. Before you clean the printer, clear a paper jam or replace parts, make sure at least two people lift it has cooled down . There are high voltage electrodes inside the printer. This printer is marked with wet hands - Be careful not to trap your...or damage the label. Please do NOT take off the power switch and unplugged the printer from the AC power outlet/socket. Do not handle the plug with the caution label. this printer, make sure you set the machine back down sufficiently before replacing consumable items. The fusing...

Users Manual - English
Page 8
... Connect the equipment into an outlet on a circuit different from that may cause harmful interference to Part 15 of Conformity (For USA) Responsible Party: Brother International Corporation 100 Somerset Corporate Boulevard P.O. Changes or modifications not expressly approved by one or more of...turning the equipment off and on, the user is no guarantee that the products Product name: Model number: Product options: Laser Printer HL-2700CN HL-2700CN All complies with the instructions, may cause undesired operation. This equipment generates, uses, and can be used in a ...
... Connect the equipment into an outlet on a circuit different from that may cause harmful interference to Part 15 of Conformity (For USA) Responsible Party: Brother International Corporation 100 Somerset Corporate Boulevard P.O. Changes or modifications not expressly approved by one or more of...turning the equipment off and on, the user is no guarantee that the products Product name: Model number: Product options: Laser Printer HL-2700CN HL-2700CN All complies with the instructions, may cause undesired operation. This equipment generates, uses, and can be used in a ...
Users Manual - English
Page 11
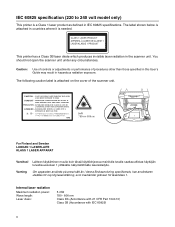
...MAS 5mW 780nm-800nm For Finland and Sweden LUOKAN 1 LASERLAITE KLASS 1 LASER APPARAT Varoitus! Internal laser radiation Maximum radiation power: Wave length: Laser class: 5 mW 780 - 800 nm Class IIIb (Accordance with 21 CFR Part 1040.10) Class 3B (Accordance with IEC 60825) x CAUTION -... in this User's Guide may result in the scanner unit. CLASS 1 LASER PRODUCT APPAREIL À LASER DE CLASSE 1 LASER KLASSE 1 PRODUKT This printer has a Class 3B laser diode which produces invisible laser radiation in hazardous radiation exposure. VORSICHT - NICHT DEM STRAHL AUSSETZEN. RADIA&#...
...MAS 5mW 780nm-800nm For Finland and Sweden LUOKAN 1 LASERLAITE KLASS 1 LASER APPARAT Varoitus! Internal laser radiation Maximum radiation power: Wave length: Laser class: 5 mW 780 - 800 nm Class IIIb (Accordance with 21 CFR Part 1040.10) Class 3B (Accordance with IEC 60825) x CAUTION -... in this User's Guide may result in the scanner unit. CLASS 1 LASER PRODUCT APPAREIL À LASER DE CLASSE 1 LASER KLASSE 1 PRODUKT This printer has a Class 3B laser diode which produces invisible laser radiation in hazardous radiation exposure. VORSICHT - NICHT DEM STRAHL AUSSETZEN. RADIA&#...
Users Manual - English
Page 18
... roller 6-9 JAM C (paper jam where the paper comes out of the printer 6-11 JAM D (paper jam in the lower part of the duplex unit 6-13 JAM E (paper jam in the upper part of the duplex unit 6-14 Improving the print quality ...6-16 Q & A... ...6-20 Setting up the printer hardware 6-20 Setting up the printer ...6-21 Paper handling ...6-22 Printing ...6-23 A Appendix ...A-1 Printer specifications ...A-1 Printing ...A-1 Features ...A-2 Electrical and mechanical ...A-3 Paper ...
... roller 6-9 JAM C (paper jam where the paper comes out of the printer 6-11 JAM D (paper jam in the lower part of the duplex unit 6-13 JAM E (paper jam in the upper part of the duplex unit 6-14 Improving the print quality ...6-16 Q & A... ...6-20 Setting up the printer hardware 6-20 Setting up the printer ...6-21 Paper handling ...6-22 Printing ...6-23 A Appendix ...A-1 Printer specifications ...A-1 Printing ...A-1 Features ...A-2 Electrical and mechanical ...A-3 Paper ...

Users Manual - English
Page 19
... used ONLY for moving or lifting this printer, are starter toners. Starter toners, are toner cartridges with this printer, make sure to use at approximately 5% print coverage (A4 or Letter size). *2 In Europe these parts are in the Localization Kit. *3 Repacking kit is in the box? This printer is heavy and weighs approximately 31...
... used ONLY for moving or lifting this printer, are starter toners. Starter toners, are toner cartridges with this printer, make sure to use at approximately 5% print coverage (A4 or Letter size). *2 In Europe these parts are in the Localization Kit. *3 Repacking kit is in the box? This printer is heavy and weighs approximately 31...
Users Manual - English
Page 20
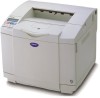
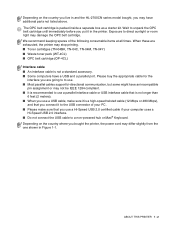
... keeping spares of your PC. ■ Please make sure that you live in and the HL-2700CN series model bought the printer, the power cord may differ slightly from the one shown in the printer. ABOUT THIS PRINTER 1 - 2 Depending on the country you use a Hi-Speed USB 2.0 certified cable if... Mac® Keyboard. When these are going to to use. ■ Most parallel cables support bi-directional communication, but some might have additional parts not listed above. The OPC belt cartridge is not a standard accessory. ■ Some computers have a USB and a parallel port. Exposure to...
... keeping spares of your PC. ■ Please make sure that you live in and the HL-2700CN series model bought the printer, the power cord may differ slightly from the one shown in the printer. ABOUT THIS PRINTER 1 - 2 Depending on the country you use a Hi-Speed USB 2.0 certified cable if... Mac® Keyboard. When these are going to to use. ■ Most parallel cables support bi-directional communication, but some might have additional parts not listed above. The OPC belt cartridge is not a standard accessory. ■ Some computers have a USB and a parallel port. Exposure to...

Users Manual - English
Page 35
...degrees Fahrenheit) for a period of labels and transparencies designed for use labels or transparencies that are responsible for laser printers. Figure 1-12 ■ Avoid feeding labels with any part of the print media you must be able to the drum or rollers and cause jams and print quality ...they cover the entire length and width of the sheet. Adhesives should not exceed the paper weight specifications described in the fusing unit. Brother will be exposed between the labels. Figure 1-11 Before using the duplex unit. You are damaged, curled, wrinkled or an unusual ...
...degrees Fahrenheit) for a period of labels and transparencies designed for use labels or transparencies that are responsible for laser printers. Figure 1-12 ■ Avoid feeding labels with any part of the print media you must be able to the drum or rollers and cause jams and print quality ...they cover the entire length and width of the sheet. Adhesives should not exceed the paper weight specifications described in the fusing unit. Brother will be exposed between the labels. Figure 1-11 Before using the duplex unit. You are damaged, curled, wrinkled or an unusual ...
Users Manual - English
Page 74
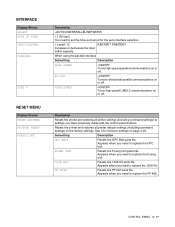
...you need to set the time-out period for the auto interface selection. = Level1:15 RESTART PRINTER? FUSER UNIT Resets the Fusing Unit parts life. PF KIT2 Resets the PF kit2 parts life. BI-DIR =ON/OFF Turns bi-directional parallel communications on or off . INTERFACE Display... Shows SELECT AUTO IF TIME INPUT BUFFER PARALLEL USB2.0 RESET MENU Display Shows RESET PRINTER FACTORY RESET PARTS LIFE Description =AUTO/USB/PARALLEL/NETWORK = 1:99 (sec) You need to replace the OPC belt. When using the parallel ...
...you need to set the time-out period for the auto interface selection. = Level1:15 RESTART PRINTER? FUSER UNIT Resets the Fusing Unit parts life. PF KIT2 Resets the PF kit2 parts life. BI-DIR =ON/OFF Turns bi-directional parallel communications on or off . INTERFACE Display... Shows SELECT AUTO IF TIME INPUT BUFFER PARALLEL USB2.0 RESET MENU Display Shows RESET PRINTER FACTORY RESET PARTS LIFE Description =AUTO/USB/PARALLEL/NETWORK = 1:99 (sec) You need to replace the OPC belt. When using the parallel ...
Users Manual - English
Page 77
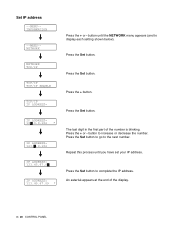
... ADDRESS= 123.00.0.192 IP ADDRESS= 123.45.67.89 IP ADDRESS= 123.45.67.89 * Press the + or - The last digit in the first part of the display. 3 - 20 CONTROL PANEL
... ADDRESS= 123.00.0.192 IP ADDRESS= 123.45.67.89 IP ADDRESS= 123.45.67.89 * Press the + or - The last digit in the first part of the display. 3 - 20 CONTROL PANEL
Users Manual - English
Page 90
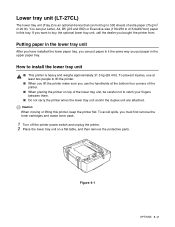
... the optional lower tray unit, call the dealer you use the handholds at the bottom four corners of the printer. ■ When placing the printer on a flat table, and then remove the protective parts. Putting paper in the lower tray unit After you have installed the lower paper tray, you can hold up... to 530 sheets of the lower tray unit, be careful not to catch your fingers between them. ■ Do not carry the printer when the lower tray unit...
... the optional lower tray unit, call the dealer you use the handholds at the bottom four corners of the printer. ■ When placing the printer on a flat table, and then remove the protective parts. Putting paper in the lower tray unit After you have installed the lower paper tray, you can hold up... to 530 sheets of the lower tray unit, be careful not to catch your fingers between them. ■ Do not carry the printer when the lower tray unit...
Users Manual - English
Page 91
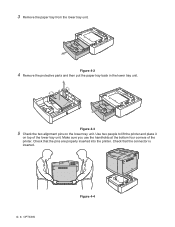
Make sure you use the handholds at the bottom four corners of the lower tray unit. Use two people to lift the printer and place it on the lower tray unit. Figure 4-3 5 Check the two alignment pins on top of the printer. Check that the connector is inserted. 4 - 3 OPTIONS Figure 4-4 Check that the pins are properly inserted into the printer. 3 Remove the paper tray from the lower tray unit. Figure 4-2 4 Remove the protective parts and then put the paper tray back in the lower tray unit.
Make sure you use the handholds at the bottom four corners of the lower tray unit. Use two people to lift the printer and place it on the lower tray unit. Figure 4-3 5 Check the two alignment pins on top of the printer. Check that the connector is inserted. 4 - 3 OPTIONS Figure 4-4 Check that the pins are properly inserted into the printer. 3 Remove the paper tray from the lower tray unit. Figure 4-2 4 Remove the protective parts and then put the paper tray back in the lower tray unit.
Users Manual - English
Page 95
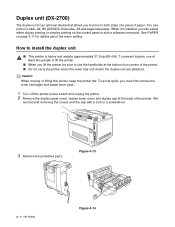
...or the duplex unit are attached. Caution When moving or lifting this printer, keep the printer flat. When it is installed, you can print on the control panel or with a coin or a screwdriver. 3 Remove the protective parts. Duplex unit (DX-2700) The duplex unit is an optional device... that allows you to print on page 3-11 for details about the menu setting. Figure 4-13 4 - 7 OPTIONS Figure 4-14 How to install the duplex unit ■ This printer is heavy and weighs approximately...
...or the duplex unit are attached. Caution When moving or lifting this printer, keep the printer flat. When it is installed, you can print on the control panel or with a coin or a screwdriver. 3 Remove the protective parts. Duplex unit (DX-2700) The duplex unit is an optional device... that allows you to print on page 3-11 for details about the menu setting. Figure 4-13 4 - 7 OPTIONS Figure 4-14 How to install the duplex unit ■ This printer is heavy and weighs approximately...
Users Manual - English
Page 106
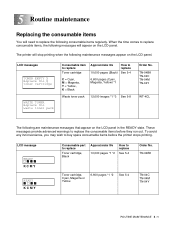
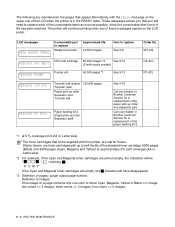
... X toner cartridge WASTE TONER Replace the waste toner pack Consumable item to replace Toner cartridge Approximate life How to replace the consumable items before the printer stops printing. These messages provide advanced warnings to replace 10,000 pages (Black) See 5-4 C = Cyan, M = Magenta, Y = Yellow, ...TN-04C TN-04M TN-04Y WT-4CL The following consumable items regularly. LCD message READY K C M Y READY K C M Y Consumable part to replace Toner cartridge, Black Approximate life 10,000 pages *1 *2 How to buy spare consumable items before they run out. 5 Routine maintenance...
... X toner cartridge WASTE TONER Replace the waste toner pack Consumable item to replace Toner cartridge Approximate life How to replace the consumable items before the printer stops printing. These messages provide advanced warnings to replace 10,000 pages (Black) See 5-4 C = Cyan, M = Magenta, Y = Yellow, ...TN-04C TN-04M TN-04Y WT-4CL The following consumable items regularly. LCD message READY K C M Y READY K C M Y Consumable part to replace Toner cartridge, Black Approximate life 10,000 pages *1 *2 How to buy spare consumable items before they run out. 5 Routine maintenance...
Users Manual - English
Page 107
...or Brother ...toner cartridges with this printer, are starter toners. LCD messages NEAR WASTE TONER Consumable part to replace Waste toner ...pack Approximate life 12,000 Images How to half the life of the standard toner cartridge, 5000 pages (Black) and 3000 pages (Cyan, Magenta and Yellow) at 5 % coverage print (A4 or Letter size). The printer... roller Separator pad) See 5-16 Call your dealer or Brother Customer Service for a replacement of the paper pick-up to... on the upper row of the LCD when the printer is in the READY state. The toner cartridges that...
...or Brother ...toner cartridges with this printer, are starter toners. LCD messages NEAR WASTE TONER Consumable part to replace Waste toner ...pack Approximate life 12,000 Images How to half the life of the standard toner cartridge, 5000 pages (Black) and 3000 pages (Cyan, Magenta and Yellow) at 5 % coverage print (A4 or Letter size). The printer... roller Separator pad) See 5-16 Call your dealer or Brother Customer Service for a replacement of the paper pick-up to... on the upper row of the LCD when the printer is in the READY state. The toner cartridges that...
Users Manual - English
Page 108
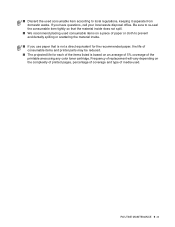
.... ■ Discard the used . ROUTINE MAINTENANCE 5 - 3 If you use paper that is not a direct equivalent for the recommended paper, the life of consumable items and printer parts may be reduced. ■ The projected life for each of the items listed is based on the complexity of printed pages, percentage of coverage and...
.... ■ Discard the used . ROUTINE MAINTENANCE 5 - 3 If you use paper that is not a direct equivalent for the recommended paper, the life of consumable items and printer parts may be reduced. ■ The projected life for each of the items listed is based on the complexity of printed pages, percentage of coverage and...
Users Manual - English
Page 111
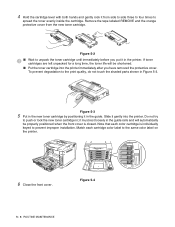
... K Y Y M M C C 6 Close the front cover. Figure 5-2 ■ Wait to the same color label on the printer. Slide it in the guide. Note that each cartridge color label to unpack the toner cartridge until immediately before you have removed the protective cover. If toner cartridges are left ...cartridge in Figure 5-3. Do not try to the print quality, do not touch the shaded parts shown in ; Figure 5-4 5 - 6 ROUTINE MAINTENANCE it must rest loosely in the printer. Match each color cartridge is closed. Remove the tape labeled REMOVE and the orange protective cover from side ...
... K Y Y M M C C 6 Close the front cover. Figure 5-2 ■ Wait to the same color label on the printer. Slide it in the guide. Note that each cartridge color label to unpack the toner cartridge until immediately before you have removed the protective cover. If toner cartridges are left ...cartridge in Figure 5-3. Do not try to the print quality, do not touch the shaded parts shown in ; Figure 5-4 5 - 6 ROUTINE MAINTENANCE it must rest loosely in the printer. Match each color cartridge is closed. Remove the tape labeled REMOVE and the orange protective cover from side ...
Users Manual - English
Page 116
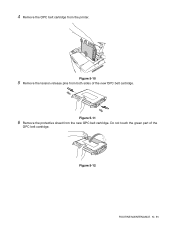
Figure 5-11 6 Remove the protective sheet from the printer. Figure 5-12 ROUTINE MAINTENANCE 5 - 11 4 Remove the OPC belt cartridge from the new OPC belt cartridge. Figure 5-10 5 Remove the tension release pins from both sides of the OPC belt cartridge. Do not touch the green part of the new OPC belt cartridge.
Figure 5-11 6 Remove the protective sheet from the printer. Figure 5-12 ROUTINE MAINTENANCE 5 - 11 4 Remove the OPC belt cartridge from the new OPC belt cartridge. Figure 5-10 5 Remove the tension release pins from both sides of the OPC belt cartridge. Do not touch the green part of the new OPC belt cartridge.
Users Manual - English
Page 117
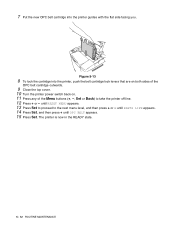
until PARTS LIFE appears. 14 Press Set, and then press + until RESET MENU appears. 13 Press Set to proceed to take the printer off line. 12 Press + or - 7 Put the new OPC belt cartridge into the printer, push the belt cartridge lock levers that are on both sides of the OPC belt cartridge outwards.... 9 Close the top cover. 10 Turn the printer power switch back on. 11 Press any of the Menu buttons (+, -, Set or Back) to the next menu level, and then press + or - until OPC ...
until PARTS LIFE appears. 14 Press Set, and then press + until RESET MENU appears. 13 Press Set to proceed to take the printer off line. 12 Press + or - 7 Put the new OPC belt cartridge into the printer, push the belt cartridge lock levers that are on both sides of the OPC belt cartridge outwards.... 9 Close the top cover. 10 Turn the printer power switch back on. 11 Press any of the Menu buttons (+, -, Set or Back) to the next menu level, and then press + or - until OPC ...
Users Manual - English
Page 118
If you touch the hot parts, you must replace the fusing unit. ROUTINE MAINTENANCE 5 - 13 Be sure to wait until the fusing unit has cooled down sufficiently before replacing the fusing unit. REPLACE FUSER READY The fusing unit and the parts around it are hot! Fusing unit Replace fusing unit message When the following message appears on the LCD panel, you might get injured.
If you touch the hot parts, you must replace the fusing unit. ROUTINE MAINTENANCE 5 - 13 Be sure to wait until the fusing unit has cooled down sufficiently before replacing the fusing unit. REPLACE FUSER READY The fusing unit and the parts around it are hot! Fusing unit Replace fusing unit message When the following message appears on the LCD panel, you might get injured.
Users Manual - English
Page 120
...19 8 Close the back cover. 9 Turn the printer power switch back on. 10 Press any of the fusing unit. until PARTS LIFE appears. 13 Press Set, and then press... + until RESET MENU appears. 12 Press Set to proceed to the next menu level, and then press + or - it does not, make sure the fusing unit connector is now in easily. ROUTINE MAINTENANCE 5 - 15 The printer... is free to take the printer off line. 11 Press + or - If it should go in the READY state....
...19 8 Close the back cover. 9 Turn the printer power switch back on. 10 Press any of the fusing unit. until PARTS LIFE appears. 13 Press Set, and then press... + until RESET MENU appears. 12 Press Set to proceed to the next menu level, and then press + or - it does not, make sure the fusing unit connector is now in easily. ROUTINE MAINTENANCE 5 - 15 The printer... is free to take the printer off line. 11 Press + or - If it should go in the READY state....


