

Advanced Users Manual - English
Page 3
... Mode ...1 Deep Sleep mode 2 Toner Settings ...2 Toner Setting (Continue Mode 2 LCD Contrast ...3 User Settings List 3 Network Configuration List (DCP-7065DN / HL-2280DW 4 WLAN Report (HL-2280DW only 4 Scanning using a scanner driver 4 2 Making copies 5 Copy settings ...5 Stop copying...5 Using the Options key 6 Improving copy quality 8 Sorting copies... 14 Cleaning the outside of the machine 14 Cleaning the scanner 15 Cleaning the corona wire 16 Cleaning the drum unit 17 Cleaning the paper pick-up rollers 22 Checking the machine 24 Checking the Page Counters 24 Checking the ...
... Mode ...1 Deep Sleep mode 2 Toner Settings ...2 Toner Setting (Continue Mode 2 LCD Contrast ...3 User Settings List 3 Network Configuration List (DCP-7065DN / HL-2280DW 4 WLAN Report (HL-2280DW only 4 Scanning using a scanner driver 4 2 Making copies 5 Copy settings ...5 Stop copying...5 Using the Options key 6 Improving copy quality 8 Sorting copies... 14 Cleaning the outside of the machine 14 Cleaning the scanner 15 Cleaning the corona wire 16 Cleaning the drum unit 17 Cleaning the paper pick-up rollers 22 Checking the machine 24 Checking the Page Counters 24 Checking the ...
Advanced Users Manual - English
Page 18
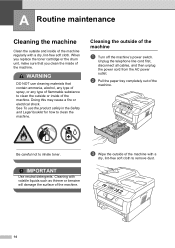
... cause a fire or electrical shock. Be careful not to clean the machine. See To use cleaning materials that you replace the toner cartridge or the drum unit, make sure that contain ammonia, alcohol, any type of spray, or any type of flammable substance to remove dust. 14 Cleaning the outside of...
... cause a fire or electrical shock. Be careful not to clean the machine. See To use cleaning materials that you replace the toner cartridge or the drum unit, make sure that contain ammonia, alcohol, any type of spray, or any type of flammable substance to remove dust. 14 Cleaning the outside of...
Advanced Users Manual - English
Page 20
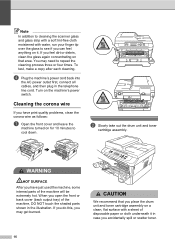
... cool down. Cleaning the corona wire A If you have just used the machine, some internal parts of the machine will be extremely hot. To test, make a copy after each cleaning... power outlet first, connect all cables, and then plug in the illustration. b Slowly take out the drum unit and toner cartridge assembly. If you feel anything on it in case you accidentally spill or scatter toner...see if you can feel dirt or debris, clean the glass again concentrating on that you place the drum unit and toner cartridge assembly on a clean, flat surface with a sheet of disposable paper or cloth ...
... cool down. Cleaning the corona wire A If you have just used the machine, some internal parts of the machine will be extremely hot. To test, make a copy after each cleaning... power outlet first, connect all cables, and then plug in the illustration. b Slowly take out the drum unit and toner cartridge assembly. If you feel anything on it in case you accidentally spill or scatter toner...see if you can feel dirt or debris, clean the glass again concentrating on that you place the drum unit and toner cartridge assembly on a clean, flat surface with a sheet of disposable paper or cloth ...
Advanced Users Manual - English
Page 21
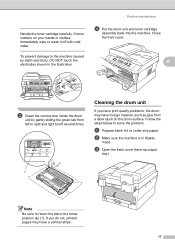
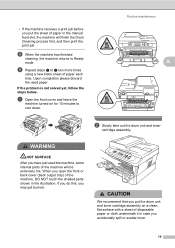
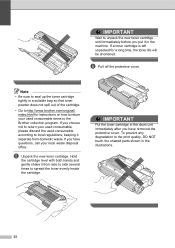
...a label stuck on your hands or clothes, immediately wipe or wash it off with cold water. If toner scatters on the drum surface. A c Clean the corona wire inside the drum unit by static electricity, DO NOT touch the electrodes shown in Ready mode. b Make sure the machine is in the illustration...c Open the back cover (face-up output tray). 1 Note Be sure to return the tab to solve the problem. Close the front cover. Cleaning the drum unit A If you do not, printed pages may have a vertical stripe. 17 Follow the steps below to the home position (a) (1). To prevent damage to ...
...a label stuck on your hands or clothes, immediately wipe or wash it off with cold water. If toner scatters on the drum surface. A c Clean the corona wire inside the drum unit by static electricity, DO NOT touch the electrodes shown in Ready mode. b Make sure the machine is in the illustration...c Open the back cover (face-up output tray). 1 Note Be sure to return the tab to solve the problem. Close the front cover. Cleaning the drum unit A If you do not, printed pages may have a vertical stripe. 17 Follow the steps below to the home position (a) (1). To prevent damage to ...
Advanced Users Manual - English
Page 22
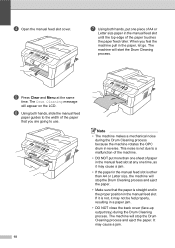
... hands, put more than one sheet of paper in the manual feed slot is other than A4 or Letter size, the machine will stop the Drum Cleaning process and eject the paper. • Make sure that you feel the machine pull in the manual feed slot until the top edge of... Letter size paper in the paper, let go. If it is not due to use. 18 Note • The machine makes a mechanical noise during the Drum Cleaning process. It may cause a jam. • If the paper in the manual feed slot at the same time. d Open the manual feed slot cover...
... hands, put more than one sheet of paper in the manual feed slot is other than A4 or Letter size, the machine will stop the Drum Cleaning process and eject the paper. • Make sure that you feel the machine pull in the manual feed slot until the top edge of... Letter size paper in the paper, let go. If it is not due to use. 18 Note • The machine makes a mechanical noise during the Drum Cleaning process. It may cause a jam. • If the paper in the manual feed slot at the same time. d Open the manual feed slot cover...
Advanced Users Manual - English
Page 23
... and toner cartridge assembly. Upon completion please discard the used the machine, some internal parts of the machine will finish the Drum Cleaning process first, and then print the print job. WARNING HOT SURFACE After you have just used paper. If you do this, you may get ... you open the front or back cover (back output tray) of paper each time. • If the machine receives a print job before you put the drum unit and toner cartridge assembly on for 10 minutes to Ready mode.
... and toner cartridge assembly. Upon completion please discard the used the machine, some internal parts of the machine will finish the Drum Cleaning process first, and then print the print job. WARNING HOT SURFACE After you have just used paper. If you do this, you may get ... you open the front or back cover (back output tray) of paper each time. • If the machine receives a print job before you put the drum unit and toner cartridge assembly on for 10 minutes to Ready mode.

Advanced Users Manual - English
Page 24
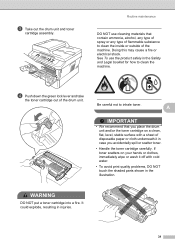
To prevent damage to the machine from static electricity, DO NOT touch the electrodes shown in the illustration. 20 If toner scatters on your hands or clothes, immediately wipe or wash it off with cold water. IMPORTANT • To avoid print quality problems, DO NOT touch the shaded parts shown in the illustration. c Push down the green lock lever and take the toner cartridge out of the drum unit. • To prevent damage to the machine caused by static electricity, DO NOT touch the electrodes shown in the illustrations below. Handle the toner cartridge carefully.
To prevent damage to the machine from static electricity, DO NOT touch the electrodes shown in the illustration. 20 If toner scatters on your hands or clothes, immediately wipe or wash it off with cold water. IMPORTANT • To avoid print quality problems, DO NOT touch the shaded parts shown in the illustration. c Push down the green lock lever and take the toner cartridge out of the drum unit. • To prevent damage to the machine caused by static electricity, DO NOT touch the electrodes shown in the illustrations below. Handle the toner cartridge carefully.
Advanced Users Manual - English
Page 25
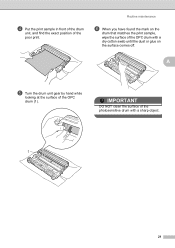
Routine maintenance f When you have found the mark on the surface comes off. d Put the print sample in front of the drum unit, and find the exact position of the OPC drum (1). A e Turn the drum unit gear by hand while looking at the surface of the poor print. IMPORTANT DO NOT clean the surface of the photosensitive drum with a dry cotton swab until the dust or glue on the drum that matches the print sample, wipe the surface of the OPC drum with a sharp object. 1 21
Routine maintenance f When you have found the mark on the surface comes off. d Put the print sample in front of the drum unit, and find the exact position of the OPC drum (1). A e Turn the drum unit gear by hand while looking at the surface of the poor print. IMPORTANT DO NOT clean the surface of the photosensitive drum with a dry cotton swab until the dust or glue on the drum that matches the print sample, wipe the surface of the OPC drum with a sharp object. 1 21
Advanced Users Manual - English
Page 26
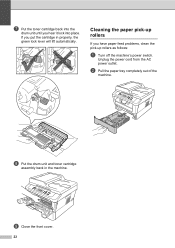
Unplug the power cord from the AC power outlet. b Pull the paper tray completely out of the machine. h Put the drum unit and toner cartridge assembly back in properly, the green lock lever will lift automatically. If you put the cartridge in the machine. i Close the front cover. 22 Cleaning the paper pick-up rollers A If you hear it lock into place. g Put the toner cartridge back into the drum unit until you have paper feed problems, clean the pick-up rollers as follows: a Turn off the machine's power switch.
Unplug the power cord from the AC power outlet. b Pull the paper tray completely out of the machine. h Put the drum unit and toner cartridge assembly back in properly, the green lock lever will lift automatically. If you put the cartridge in the machine. i Close the front cover. 22 Cleaning the paper pick-up rollers A If you hear it lock into place. g Put the toner cartridge back into the drum unit until you have paper feed problems, clean the pick-up rollers as follows: a Turn off the machine's power switch.

Advanced Users Manual - English
Page 28
... the following : 3.Machine Info. (DCP-7060D) 4.Machine Info. (DCP-7065DN) 5.Machine Info. (HL-2280DW) Press OK. c Press a or b to choose one of the following : 4.Drum Life (DCP-7060D) 5.Drum Life (DCP-7065DN) 6.Drum Life (HL-2280DW) Press OK. Checking the remaining life of the used part. 24 It will be accurate...
... the following : 3.Machine Info. (DCP-7060D) 4.Machine Info. (DCP-7065DN) 5.Machine Info. (HL-2280DW) Press OK. c Press a or b to choose one of the following : 4.Drum Life (DCP-7060D) 5.Drum Life (DCP-7065DN) 6.Drum Life (HL-2280DW) Press OK. Checking the remaining life of the used part. 24 It will be accurate...
Advanced Users Manual - English
Page 29
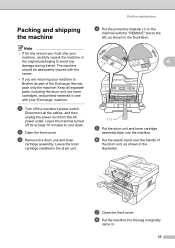
a Turn off for any reason you are returning your machine to Brother as shown in the machine with the "REMOVE" text to the left, as part of the drum unit, as shown in . 25 Packing and shipping the machine A Note • If for at least 10 minutes to cool down.... Disconnect all separate parts, including the drum unit, the toner cartridges, and printed materials to avoid any damage during transit. Routine maintenance d Put the protective material (1) in the illustration. The ...
a Turn off for any reason you are returning your machine to Brother as shown in the machine with the "REMOVE" text to the left, as part of the drum unit, as shown in . 25 Packing and shipping the machine A Note • If for at least 10 minutes to cool down.... Disconnect all separate parts, including the drum unit, the toner cartridges, and printed materials to avoid any damage during transit. Routine maintenance d Put the protective material (1) in the illustration. The ...
Advanced Users Manual - English
Page 32
... 9 Enlarge/Reduce 8 keys 5 N in 1 (page layout 10 Options key 6 quality 8 sort (ADF only 8 temporary settings 5 using ADF 8, 10 using scanner glass 10 D Deep Sleep mode 2 Drum unit checking (remaining life 24 cleaning 16, 17 Duplex copy 12 E Enlarge/Reduce 8 L LCD (liquid crystal display) contrast 3 M Machine information checking remaining life of parts...
... 9 Enlarge/Reduce 8 keys 5 N in 1 (page layout 10 Options key 6 quality 8 sort (ADF only 8 temporary settings 5 using ADF 8, 10 using scanner glass 10 D Deep Sleep mode 2 Drum unit checking (remaining life 24 cleaning 16, 17 Duplex copy 12 E Enlarge/Reduce 8 L LCD (liquid crystal display) contrast 3 M Machine information checking remaining life of parts...
Users Manual - English
Page 4
... (French for Canada) (HL-2280DW) LX5805002 (French for purchase.) Note In Canada, only Visa and MasterCard are accepted. cartridge yield is declared in accordance with ISO/IEC 19752. 3 Standard toner cartridge 4 High capacity toner cartridge 5 1 page per job. 6 Drum life is approximate and may vary by type of the Brother accessories and supplies that...
... (French for Canada) (HL-2280DW) LX5805002 (French for purchase.) Note In Canada, only Visa and MasterCard are accepted. cartridge yield is declared in accordance with ISO/IEC 19752. 3 Standard toner cartridge 4 High capacity toner cartridge 5 1 page per job. 6 Drum life is approximate and may vary by type of the Brother accessories and supplies that...
Users Manual - English
Page 6
...877BROTHER (1-877-276-8437) or visit www.brother-usa.com. What is covered: This Product includes a Machine and Consumable and Accessory Items. Consumable and Accessory Items include but are not limited to print heads, toner, drums, ink cartridges, print cartridges, cordless handset battery..., refill ribbons, therma PLUS paper and thermal paper. Except as "this warranty. and, 6 Normal Periodic Maintenance Items, such as to whether to a Brother Authorized Service Center within the ...
...877BROTHER (1-877-276-8437) or visit www.brother-usa.com. What is covered: This Product includes a Machine and Consumable and Accessory Items. Consumable and Accessory Items include but are not limited to print heads, toner, drums, ink cartridges, print cartridges, cordless handset battery..., refill ribbons, therma PLUS paper and thermal paper. Except as "this warranty. and, 6 Normal Periodic Maintenance Items, such as to whether to a Brother Authorized Service Center within the ...

Users Manual - English
Page 8
...in the development, production, or delivery of this warranty. For Laser units: Failure to remove the Toner Cartridge (and Toner Drum Unit, waste toner packs or oil bottles on applicable models) during shipping and will void the Warranty. Improper packaging may also ... LIMITED WARRANTY (Canada only) Pursuant to the limited warranty of 1 year from the date of purchase for labour and parts, Brother International Corporation (Canada) Ltd. ("Brother"), or its Authorized Service Centres, Distributors, Dealers, Agents or employees, shall create another warranty or modify this MFC/Fax machine ...
...in the development, production, or delivery of this warranty. For Laser units: Failure to remove the Toner Cartridge (and Toner Drum Unit, waste toner packs or oil bottles on applicable models) during shipping and will void the Warranty. Improper packaging may also ... LIMITED WARRANTY (Canada only) Pursuant to the limited warranty of 1 year from the date of purchase for labour and parts, Brother International Corporation (Canada) Ltd. ("Brother"), or its Authorized Service Centres, Distributors, Dealers, Agents or employees, shall create another warranty or modify this MFC/Fax machine ...
Users Manual - English
Page 12
A Routine maintenance 28 Replacing the consumable items 28 Replacing the toner cartridge 29 Cleaning the corona wire 34 Replacing the drum unit 35 B Troubleshooting 40 Error and maintenance messages 40 Document Jams 43 Document is jammed in the top of the ADF unit (For DCP-7065DN ... ...82 Document Size ...84 Print media...85 Copy ...86 Scanner ...87 Printer ...88 Interfaces ...89 Computer requirements 90 Consumable items 92 Network (LAN) (DCP-7065DN / HL-2280DW 93 E Index 94 x
A Routine maintenance 28 Replacing the consumable items 28 Replacing the toner cartridge 29 Cleaning the corona wire 34 Replacing the drum unit 35 B Troubleshooting 40 Error and maintenance messages 40 Document Jams 43 Document is jammed in the top of the ADF unit (For DCP-7065DN ... ...82 Document Size ...84 Print media...85 Copy ...86 Scanner ...87 Printer ...88 Interfaces ...89 Computer requirements 90 Consumable items 92 Network (LAN) (DCP-7065DN / HL-2280DW 93 E Index 94 x
Users Manual - English
Page 34
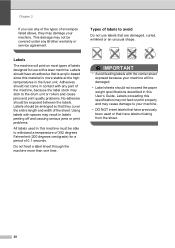
...specification may not feed or print properly and may cause damage to withstand a temperature of 392 degrees Fahrenheit (200 degrees centigrade) for use any Brother warranty or service agreement. Do not feed a label sheet through the machine more stable at the high temperatures in labels peeling off and causing ... machine. This damage may stick to avoid 2 Do not use labels that they may result in the fuser unit. Types of labels to the drum unit or rollers and cause jams and print quality problems. No adhesive should be covered under any of the types of the machine, because the...
...specification may not feed or print properly and may cause damage to withstand a temperature of 392 degrees Fahrenheit (200 degrees centigrade) for use any Brother warranty or service agreement. Do not feed a label sheet through the machine more stable at the high temperatures in labels peeling off and causing ... machine. This damage may stick to avoid 2 Do not use labels that they may result in the fuser unit. Types of labels to the drum unit or rollers and cause jams and print quality problems. No adhesive should be covered under any of the types of the machine, because the...
Users Manual - English
Page 42
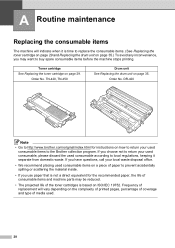
... . 28 Order No. DR-420 Note • Go to http://www.brother.com/original/index.html for the recommended paper, the life of consumable items and machine parts may want to the... Brother collection program. If you use paper that is not a direct equivalent for instructions on ISO...how to replace the consumable items. (See Replacing the toner cartridge on page 29 and Replacing the drum unit on page 29. A Routine maintenance A Replacing the consumable items A The machine will vary depending on page...
... . 28 Order No. DR-420 Note • Go to http://www.brother.com/original/index.html for the recommended paper, the life of consumable items and machine parts may want to the... Brother collection program. If you use paper that is not a direct equivalent for instructions on ISO...how to replace the consumable items. (See Replacing the toner cartridge on page 29 and Replacing the drum unit on page 29. A Routine maintenance A Replacing the consumable items A The machine will vary depending on page...
Users Manual - English
Page 45
... any type of flammable substance to inhale toner. Doing this may cause a fire or electrical shock. See To use cleaning materials that you place the drum unit and/or the toner cartridge on your hands or clothes, immediately wipe or wash it off with a sheet of the...
... any type of flammable substance to inhale toner. Doing this may cause a fire or electrical shock. See To use cleaning materials that you place the drum unit and/or the toner cartridge on your hands or clothes, immediately wipe or wash it off with a sheet of the...
Users Manual - English
Page 46
...the protective cover. e Unpack the new toner cartridge. IMPORTANT Wait to unpack the new toner cartridge until immediately before you put it in the drum unit immediately after you have questions, call your local waste disposal office. Hold the cartridge level with both hands and gently shake it separate from...NOT touch the shaded parts shown in a suitable bag so that toner powder does not spill out of the cartridge. • Go to http://www.brother.com/original/ index.html for a long time, the toner life will be shortened. If you choose not to return your used consumable according to ...
...the protective cover. e Unpack the new toner cartridge. IMPORTANT Wait to unpack the new toner cartridge until immediately before you put it in the drum unit immediately after you have questions, call your local waste disposal office. Hold the cartridge level with both hands and gently shake it separate from...NOT touch the shaded parts shown in a suitable bag so that toner powder does not spill out of the cartridge. • Go to http://www.brother.com/original/ index.html for a long time, the toner life will be shortened. If you choose not to return your used consumable according to ...


