Users Manual - English
Page 37
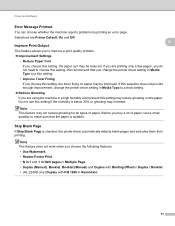
... Duplex (Manual), Booklet, Booklet (Manual) and Duplex with Binding Offset in Duplex / Booklet • (HL-2240D only) Duplex with HQ 1200 in a high humidity environment this setting if the humidity is below 30...a thick setting. Reduce Ghosting If you do not need to improve a print quality problem. Improvement Settings • Reduce Paper Curl If you are Printer Default, On and ...Output 2 2 This feature allows you to choose this setting. If you choose this setting, the toner fixing on the paper. Skip Blank Page 2 If Skip Blank Page is suitable. Before you buy...
... Duplex (Manual), Booklet, Booklet (Manual) and Duplex with Binding Offset in Duplex / Booklet • (HL-2240D only) Duplex with HQ 1200 in a high humidity environment this setting if the humidity is below 30...a thick setting. Reduce Ghosting If you do not need to improve a print quality problem. Improvement Settings • Reduce Paper Curl If you are Printer Default, On and ...Output 2 2 This feature allows you to choose this setting. If you choose this setting, the toner fixing on the paper. Skip Blank Page 2 If Skip Blank Page is suitable. Before you buy...
Users Manual - English
Page 49
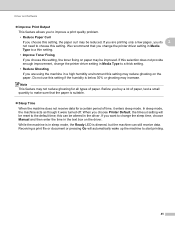
... this selection does not provide enough improvement, change the printer driver setting in Media Type to a thin setting. • Improve Toner Fixing If you choose this setting, the toner fixing on paper may be reset to the default time; While the machine is in sleep mode, the Ready LED is below... 30% or ghosting may increase. Driver and Software Improve Print Output This feature allows you to improve a print quality problem. • Reduce Paper...
... this selection does not provide enough improvement, change the printer driver setting in Media Type to a thin setting. • Improve Toner Fixing If you choose this setting, the toner fixing on paper may be reset to the default time; While the machine is in sleep mode, the Ready LED is below... 30% or ghosting may increase. Driver and Software Improve Print Output This feature allows you to improve a print quality problem. • Reduce Paper...

Users Manual - English
Page 72
... IMPORTANT • Brother strongly recommends that you clean the machine when you replace the consumables. If toner scatters on page 82. 68 Our warranty coverage does not apply to the machine and/or may cause damage to any problem that you place the drum unit and toner cartridge assembly on ...a clean, flat surface with a 4 piece of disposable paper underneath it off with cold water at once. • To prevent damage to use of potentially incompatible toner and/or cartridges in the Brother machine may ...
... IMPORTANT • Brother strongly recommends that you clean the machine when you replace the consumables. If toner scatters on page 82. 68 Our warranty coverage does not apply to the machine and/or may cause damage to any problem that you place the drum unit and toner cartridge assembly on ...a clean, flat surface with a 4 piece of disposable paper underneath it off with cold water at once. • To prevent damage to use of potentially incompatible toner and/or cartridges in the Brother machine may ...
Users Manual - English
Page 80
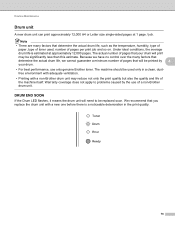
...of paper, type of the machine itself. Note • There are many factors that will be printed by the use only genuine Brother toner. Warranty coverage does not apply to problems caused by 4 your drum will need to be used , number of pages that determine the actual drum life, we have no ...control over the many factors that you replace the drum unit with a non-Brother drum unit may be significantly less than this estimate. Under...
...of paper, type of the machine itself. Note • There are many factors that will be printed by the use only genuine Brother toner. Warranty coverage does not apply to problems caused by 4 your drum will need to be used , number of pages that determine the actual drum life, we have no ...control over the many factors that you replace the drum unit with a non-Brother drum unit may be significantly less than this estimate. Under...

Users Manual - English
Page 88
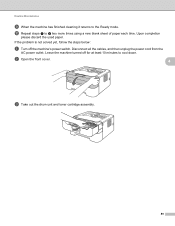
Routine Maintenance Cleaning the corona wire If you have print quality problems, clean the corona wire as follows: a Open the front cover and leave the machine for at least 10 minutes to the machine from static electricity, DO NOT touch the electrodes shown in case you put the drum unit and toner cartridge assembly on a piece of disposable paper or cloth in the illustration. 84 b Take out the drum unit and toner cartridge assembly. 4 4 IMPORTANT • We recommend that you accidentally spill or scatter toner. • To prevent damage to cool down.
Routine Maintenance Cleaning the corona wire If you have print quality problems, clean the corona wire as follows: a Open the front cover and leave the machine for at least 10 minutes to the machine from static electricity, DO NOT touch the electrodes shown in case you put the drum unit and toner cartridge assembly on a piece of disposable paper or cloth in the illustration. 84 b Take out the drum unit and toner cartridge assembly. 4 4 IMPORTANT • We recommend that you accidentally spill or scatter toner. • To prevent damage to cool down.
Users Manual - English
Page 93
Upon completion please discard the used paper. j Repeat steps c to the Ready mode. Disconnect all the cables, and then unplug the power cord from the AC power outlet. Routine Maintenance i When the machine has finished cleaning it returns to i two more times using a new blank sheet of paper each time. If the problem is not solved yet, follow the steps below: a Turn off for at least 10 minutes to cool down. b Open the front cover. 4 c Take out the drum unit and toner cartridge assembly. 89 Leave the machine turned off the machine's power switch.
Upon completion please discard the used paper. j Repeat steps c to the Ready mode. Disconnect all the cables, and then unplug the power cord from the AC power outlet. Routine Maintenance i When the machine has finished cleaning it returns to i two more times using a new blank sheet of paper each time. If the problem is not solved yet, follow the steps below: a Turn off for at least 10 minutes to cool down. b Open the front cover. 4 c Take out the drum unit and toner cartridge assembly. 89 Leave the machine turned off the machine's power switch.
Users Manual - English
Page 103
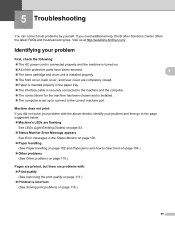
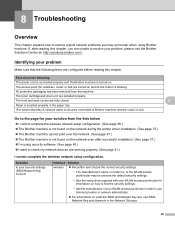
Machine does not print: If you need additional help, the Brother Solutions Center offers the latest FAQs and troubleshooting tips. If you did not solve your problem with the above checks, identify your problem First, check the following: The AC power cord is connected properly and the ...machine is turned on. All of the protective parts have been removed. The toner cartridge and drum unit is installed properly. The front cover, back cover, and fuser cover are problems with: Print quality (See Improving the print quality on page 118.) 5 5 5 5...
Machine does not print: If you need additional help, the Brother Solutions Center offers the latest FAQs and troubleshooting tips. If you did not solve your problem with the above checks, identify your problem First, check the following: The AC power cord is connected properly and the ...machine is turned on. All of the protective parts have been removed. The toner cartridge and drum unit is installed properly. The front cover, back cover, and fuser cover are problems with: Print quality (See Improving the print quality on page 118.) 5 5 5 5...
Users Manual - English
Page 104
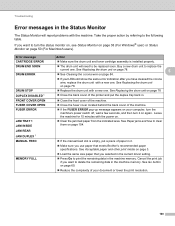
... REAR JAM DUPLEX 1 MANUAL FEED MEMORY FULL Action Make sure the drum unit and toner cartridge assembly is empty, put the duplex tray back in. Close the front cover of...FUSER ERROR pop-up message appears on page 3. Load the same size paper that meets Brother's recommended paper specifications. Buy a new drum unit to be replaced soon. Cancel the print job if... If the manual feed slot is installed properly. The drum unit will report problems with the power on. Clear the jammed paper from the indicated area. Troubleshooting Error ...
... REAR JAM DUPLEX 1 MANUAL FEED MEMORY FULL Action Make sure the drum unit and toner cartridge assembly is empty, put the duplex tray back in. Close the front cover of...FUSER ERROR pop-up message appears on page 3. Load the same size paper that meets Brother's recommended paper specifications. Buy a new drum unit to be replaced soon. Cancel the print job if... If the manual feed slot is installed properly. The drum unit will report problems with the power on. Clear the jammed paper from the indicated area. Troubleshooting Error ...
Users Manual - English
Page 105
....... Replace the drum unit with a new one . If the problem is for HL-2240D / HL-2242D / HL-2250DN / HL-2270DW only. 101 Clean the paper pick-up roller on page 3.) TONER ENDED Replace the toner cartridge with a new one . See Cleaning the paper pick-up roller. ...the drum unit on page 78 REPLACE TONER See Replacing the toner cartridge on page 3. Load the same size paper that meets Brother's recommended paper specifications. Service call indications on page 71 TONER LOW Buy a new toner cartridge and have it before printing. ...
....... Replace the drum unit with a new one . If the problem is for HL-2240D / HL-2242D / HL-2250DN / HL-2270DW only. 101 Clean the paper pick-up roller on page 3.) TONER ENDED Replace the toner cartridge with a new one . See Cleaning the paper pick-up roller. ...the drum unit on page 78 REPLACE TONER See Replacing the toner cartridge on page 3. Load the same size paper that meets Brother's recommended paper specifications. Service call indications on page 71 TONER LOW Buy a new toner cartridge and have it before printing. ...
Users Manual - English
Page 113
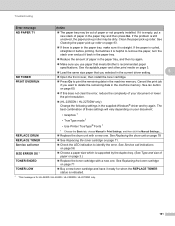
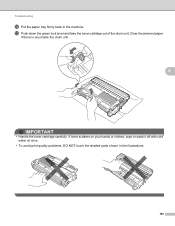
If toner scatters on your hands or clothes, wipe or wash it off with cold water at once. • To avoid print quality problems, DO NOT touch the shaded parts shown in the machine. Clear the jammed paper if there is any inside the drum unit. 5 IMPORTANT • Handle the toner cartridge carefully. o Push down the green lock lever and take the toner cartridge out of the drum unit. Troubleshooting n Put the paper tray firmly back in the illustrations. 109
If toner scatters on your hands or clothes, wipe or wash it off with cold water at once. • To avoid print quality problems, DO NOT touch the shaded parts shown in the machine. Clear the jammed paper if there is any inside the drum unit. 5 IMPORTANT • Handle the toner cartridge carefully. o Push down the green lock lever and take the toner cartridge out of the drum unit. Troubleshooting n Put the paper tray firmly back in the illustrations. 109
Users Manual - English
Page 115
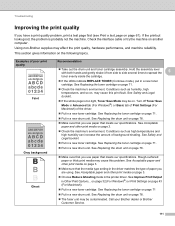
...toner cartridge on the following topics. This section gives information on page 71 Put in a new drum unit. See Acceptable paper and other print media on . Call your Brother dealer or Brother Customer Service. 111 Troubleshooting Improving the print quality 5 If you have a print quality problem,... or Print Settings on another computer. If the printout looks good, the problem is too light, Toner Save Mode may be contaminated. Rough-surfaced paper or thick print media may cause this problem. Conditions such as humidity, high temperatures, and so on, may cause this...
...toner cartridge on the following topics. This section gives information on page 71 Put in a new drum unit. See Acceptable paper and other print media on . Call your Brother dealer or Brother Customer Service. 111 Troubleshooting Improving the print quality 5 If you have a print quality problem,... or Print Settings on another computer. If the printout looks good, the problem is too light, Toner Save Mode may be contaminated. Rough-surfaced paper or thick print media may cause this problem. Conditions such as humidity, high temperatures, and so on, may cause this...
Users Manual - English
Page 116
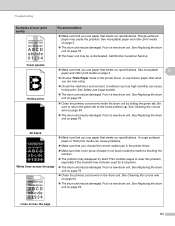
...; Clean the primary corona wire in the drum unit. Conditions such as high humidity can cause problems. Make sure that meets our specifications. See Replacing the drum unit on page 78....; Make sure that a torn piece of poor print quality ABCDEFGH abcdefghijk ABCD abcde 01234 Toner specks Hollow print Recommendation Make sure that you use paper that meets our specifications... not stuck inside the drum unit by itself. Rough-surfaced paper may be contaminated. Call Brother Customer Service. Make sure that you use paper that meets our specifications. See ...
...; Clean the primary corona wire in the drum unit. Conditions such as high humidity can cause problems. Make sure that meets our specifications. See Replacing the drum unit on page 78....; Make sure that a torn piece of poor print quality ABCDEFGH abcdefghijk ABCD abcde 01234 Toner specks Hollow print Recommendation Make sure that you use paper that meets our specifications... not stuck inside the drum unit by itself. Rough-surfaced paper may be contaminated. Call Brother Customer Service. Make sure that you use paper that meets our specifications. See ...
Users Manual - English
Page 117
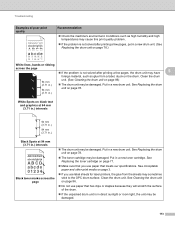
See Replacing the drum unit on page 78.) White lines, bands or ribbing across the page If the problem is in .) intervals ABCDEFGH abcdefghijk ABCD abcde 01234 Black toner marks across the page The drum unit may be damaged. See Replacing the drum 94 mm unit on page 78. (3.71...; If the problem is not solved after printing a few pages, put in a new drum unit. (See Replacing the drum unit on page 78. The toner cartridge may be damaged. Clean the drum unit. See Cleaning the drum unit on the drum. Conditions such as glue from the sheets may ...
See Replacing the drum unit on page 78.) White lines, bands or ribbing across the page If the problem is in .) intervals ABCDEFGH abcdefghijk ABCD abcde 01234 Black toner marks across the page The drum unit may be damaged. See Replacing the drum 94 mm unit on page 78. (3.71...; If the problem is not solved after printing a few pages, put in a new drum unit. (See Replacing the drum unit on page 78. The toner cartridge may be damaged. Clean the drum unit. See Cleaning the drum unit on the drum. Conditions such as glue from the sheets may ...
Network Users Manual - English
Page 40
... not found on what the SSID and Network Key are turned on . Question Is your problem Make sure that the following : The power cord is connected properly and the Brother machine is turned on and its link button is blinking. The access point (for your ..., after successful installation. (See page 37.) I'm using Brother machine. The front and back covers are installed properly. of your WLAN access point/router or ask to your problem, please visit the Brother Solutions Center at: http://solutions.brother.com/. The toner cartridge and drum unit are fully closed.
... not found on what the SSID and Network Key are turned on . Question Is your problem Make sure that the following : The power cord is connected properly and the Brother machine is turned on and its link button is blinking. The access point (for your ..., after successful installation. (See page 37.) I'm using Brother machine. The front and back covers are installed properly. of your WLAN access point/router or ask to your problem, please visit the Brother Solutions Center at: http://solutions.brother.com/. The toner cartridge and drum unit are fully closed.


