Users Manual - English
Page 75
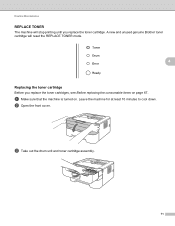
Routine Maintenance REPLACE TONER 4 The machine will reset the REPLACE TONER mode. 4 Replacing the toner cartridge 4 Before you replace the toner cartridge. b Open the front cover. c Take out the drum unit and toner cartridge assembly. 71 A new and unused genuine Brother toner cartridge will stop printing until you replace the toner cartridges, see Before replacing the consumable items on . a Make sure that the machine is turned on page 67. Leave the machine for at least 10 minutes to cool down.
Routine Maintenance REPLACE TONER 4 The machine will reset the REPLACE TONER mode. 4 Replacing the toner cartridge 4 Before you replace the toner cartridge. b Open the front cover. c Take out the drum unit and toner cartridge assembly. 71 A new and unused genuine Brother toner cartridge will stop printing until you replace the toner cartridges, see Before replacing the consumable items on . a Make sure that the machine is turned on page 67. Leave the machine for at least 10 minutes to cool down.

Users Manual - English
Page 82
When you replace the drum unit with a new one, you replace the drum unit, see Before replacing the consumable items on and the Drum LED is flashing. b Open the front cover. 4 c Take out the drum unit and toner cartridge assembly. 78 Leave the machine for at least 10 minutes to reset the drum counter by completing the following steps: a Make sure that the machine is turned on page 67. Routine Maintenance Replacing the drum unit 4 Before you need to cool down.
When you replace the drum unit with a new one, you replace the drum unit, see Before replacing the consumable items on and the Drum LED is flashing. b Open the front cover. 4 c Take out the drum unit and toner cartridge assembly. 78 Leave the machine for at least 10 minutes to reset the drum counter by completing the following steps: a Make sure that the machine is turned on page 67. Routine Maintenance Replacing the drum unit 4 Before you need to cool down.
Users Manual - English
Page 85
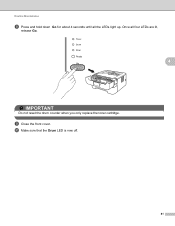
Routine Maintenance h Press and hold down Go for about 4 seconds until all four LEDs are lit, release Go. 4 IMPORTANT Do not reset the drum counter when you only replace the toner cartridge. j Make sure that the Drum LED is now off. 81 Once all the LEDs light up. i Close the front cover.
Routine Maintenance h Press and hold down Go for about 4 seconds until all four LEDs are lit, release Go. 4 IMPORTANT Do not reset the drum counter when you only replace the toner cartridge. j Make sure that the Drum LED is now off. 81 Once all the LEDs light up. i Close the front cover.
Quick Setup Guide - English
Page 1
...Open the front cover. e. Put the drum unit and toner cartridge assembly back in other languages, please visit http://solutions.brother.com/. Pull the paper tray completely out...not a standard accessory. The IP Address of the machine. a. Quick Setup Guide HL-2230, HL-2240, HL-2240D HL-2242D, HL-2250DN Start Here WARNING indicates a potentially hazardous situation which , if not avoided,...and Safari 3.0 (or greater) for 10BASE‑T or 100BASE‑TX Fast Ethernet Network. Reset the network settings to the factory default You can change some regions.) c. a. e. Make ...
...Open the front cover. e. Put the drum unit and toner cartridge assembly back in other languages, please visit http://solutions.brother.com/. Pull the paper tray completely out...not a standard accessory. The IP Address of the machine. a. Quick Setup Guide HL-2230, HL-2240, HL-2240D HL-2242D, HL-2250DN Start Here WARNING indicates a potentially hazardous situation which , if not avoided,...and Safari 3.0 (or greater) for 10BASE‑T or 100BASE‑TX Fast Ethernet Network. Reset the network settings to the factory default You can change some regions.) c. a. e. Make ...


