
Users Manual - English
Page 133
... it may be damaged. ☛ 5. Reset the drum counter (see the instructions supplied with a click. Close the Front Cover. ✒ Note We recommend that you clean the printer when you pick up . ! Caution Wait to Clean the Printer" in the printer. ☛ 7. Caution Make sure you fit... the toner cartridge correctly, or it lock into place with the new drum unit). ✒ Note Do not reset the drum counter if you put in the printer. If an unpacked Drum Unit is will automatically ...
... it may be damaged. ☛ 5. Reset the drum counter (see the instructions supplied with a click. Close the Front Cover. ✒ Note We recommend that you clean the printer when you pick up . ! Caution Wait to Clean the Printer" in the printer. ☛ 7. Caution Make sure you fit... the toner cartridge correctly, or it lock into place with the new drum unit). ✒ Note Do not reset the drum counter if you put in the printer. If an unpacked Drum Unit is will automatically ...

Users Manual - English
Page 202
... character sets A-16 components 1-1 consumables 5-1 control panel 3-1 corona wire 5-17 D data lamp 3-13 Device Options 2-6 drum unit 5-2, 5-11 drum unit assembly 1-1 duplex 2-4 duplex printing 1-30 duplex tray 1-4 E emulation mode 3-30, A-11 envelopes 1-22 environment... 1-6 EPSON FX-850 3-24 EPSON FX-850 mode 3-31, A-12 error messages 6-1 extension flap 1-3 F face up output tray 1-4 face up printing 1-20 face up tray extension 1-4 factory reset...
... character sets A-16 components 1-1 consumables 5-1 control panel 3-1 corona wire 5-17 D data lamp 3-13 Device Options 2-6 drum unit 5-2, 5-11 drum unit assembly 1-1 duplex 2-4 duplex printing 1-30 duplex tray 1-4 E emulation mode 3-30, A-11 envelopes 1-22 environment... 1-6 EPSON FX-850 3-24 EPSON FX-850 mode 3-31, A-12 error messages 6-1 extension flap 1-3 F face up output tray 1-4 face up printing 1-20 face up tray extension 1-4 factory reset...

Service Manual
Page 8
...7-3 3. SOFTWARE SETTING PROBLEMS 6-22 5. IMAGE DEFECTS 6.1 Image Defect Examples 6.2 Troubleshooting Image Defect 6.3 Location of Grounding Contacts 6.3.1 Drum unit 6.3.2 Printer body & Paper cassette 6-31 6-31 6-32 6-50 6-50 6-50 7. OTHER HIDDEN FUNCTION MENUS 7-9 4.1 Hidden Function Menus ...Enabled by Pressing Switch(es) When Turning the Machine on .... 7-9 4.2 Drum Life Reset Function 7-9 4.3 Parts life Reset Function 7-9 vi TABLE OF CONTENTS ...
...7-3 3. SOFTWARE SETTING PROBLEMS 6-22 5. IMAGE DEFECTS 6.1 Image Defect Examples 6.2 Troubleshooting Image Defect 6.3 Location of Grounding Contacts 6.3.1 Drum unit 6.3.2 Printer body & Paper cassette 6-31 6-31 6-32 6-50 6-50 6-50 7. OTHER HIDDEN FUNCTION MENUS 7-9 4.1 Hidden Function Menus ...Enabled by Pressing Switch(es) When Turning the Machine on .... 7-9 4.2 Drum Life Reset Function 7-9 4.3 Parts life Reset Function 7-9 vi TABLE OF CONTENTS ...

Service Manual
Page 163
... genuine Brother toner. When the toner cartridge is installed correctly, the lock lever is lifted automatically. (Fig.5-3) Fig. 5-2 rr Fig. 5-3 (6) Re-install the drum unit assembly in case you accidentally spill or scatter toner. (3) While pressing the lock lever, pull the toner cartridge out of disposable paper or cloth in the printer. (7) Reset the...
... genuine Brother toner. When the toner cartridge is installed correctly, the lock lever is lifted automatically. (Fig.5-3) Fig. 5-2 rr Fig. 5-3 (6) Re-install the drum unit assembly in case you accidentally spill or scatter toner. (3) While pressing the lock lever, pull the toner cartridge out of disposable paper or cloth in the printer. (7) Reset the...

Service Manual
Page 182
HL-1850/1870N SERVICE MANUAL JAM MP TRAY (1) Remove the jammed paper from the multi-purpose tray. (2) Reset all the paper into the printer. JAM INSIDE (1) Press the cover release button, and then open the front cover. (2) Pull the drum unit assembly out of the printer. 6-13 Fig. 6-5 Fig. 6-6 Fig. 6-7 Fig. 6-8 Pull the paper cassette completely out of the printer. (2) Using both hands, pull the jammed paper out of the printer. (3) Install the lower paper cassette into the multipurpose tray correctly.
HL-1850/1870N SERVICE MANUAL JAM MP TRAY (1) Remove the jammed paper from the multi-purpose tray. (2) Reset all the paper into the printer. JAM INSIDE (1) Press the cover release button, and then open the front cover. (2) Pull the drum unit assembly out of the printer. 6-13 Fig. 6-5 Fig. 6-6 Fig. 6-7 Fig. 6-8 Pull the paper cassette completely out of the printer. (2) Using both hands, pull the jammed paper out of the printer. (3) Install the lower paper cassette into the multipurpose tray correctly.
Service Manual
Page 246
... ; 16,000 pages) Modify the drum unit life expectancy reset rate.(Initial rate ; 20,000 pages) Modify the PF kit 1 life period. Modify the laser unit life period. Displays the number of pages when printing DL size paper. Displays the number of pages when printing COM10 size paper. HL-1850/1870N SERVICE MANUAL A5 PAGE...
... ; 16,000 pages) Modify the drum unit life expectancy reset rate.(Initial rate ; 20,000 pages) Modify the PF kit 1 life period. Modify the laser unit life period. Displays the number of pages when printing DL size paper. Displays the number of pages when printing COM10 size paper. HL-1850/1870N SERVICE MANUAL A5 PAGE...

Service Manual
Page 247
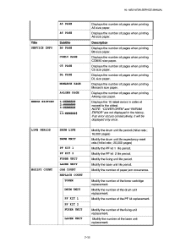
FUSER UNIT Modify the fixing unit remaining life counters. CLEAR COVERAGE Initialize average coverage counter. CLEAR ERROR HIST Clear error histories. ,,, 7-12 CHAPTER 7 HIDDEN FUNCTIONS Title MODIFY COUNT RESET COUNT Subtitle REMAIN LIFE DRUM UNIT PF KIT 1 PF KIT 2 Description Modify the drum unit remaining life counters. Modify the PF kit remaining life counters. LASER UNIT Modify the laser unit remaining life counters.
FUSER UNIT Modify the fixing unit remaining life counters. CLEAR COVERAGE Initialize average coverage counter. CLEAR ERROR HIST Clear error histories. ,,, 7-12 CHAPTER 7 HIDDEN FUNCTIONS Title MODIFY COUNT RESET COUNT Subtitle REMAIN LIFE DRUM UNIT PF KIT 1 PF KIT 2 Description Modify the drum unit remaining life counters. Modify the PF kit remaining life counters. LASER UNIT Modify the laser unit remaining life counters.

Service Manual
Page 248
... user when changing the new drum unit to the printer. For factory use . 4.2 Drum Life Reset Function This function is not normally used by holding down the "Go" switch while the front cover (process unit cover) is ON (default setting), the user can set a printer to clear the life counter. HL-1850/1870N SERVICE MANUAL PR2001022 4. Hex...
... user when changing the new drum unit to the printer. For factory use . 4.2 Drum Life Reset Function This function is not normally used by holding down the "Go" switch while the front cover (process unit cover) is ON (default setting), the user can set a printer to clear the life counter. HL-1850/1870N SERVICE MANUAL PR2001022 4. Hex...

Service Manual
Page 268
... Menu Cr Printer Information : LPT1 Exit Fig. Is connected to a parallelport, you are using and click the OK button. Select the LPT port {1.3) you are usrtp and click OK LPT1: ('[P12: [P13: (3) Click the Exit button. (4) The dialog box will appear and show the frequencies of drum unit change,... error being detected. (Maximum counter: 127) Paper jam When a paper jam occurs. (Maximum counter: 2047) A-22 A-7 Note that each maintenance information is reset. (Maximum counter: 63) Toner cartridge change andpaperjam. APPENDIX If theprinteris connected to a parallel port.
... Menu Cr Printer Information : LPT1 Exit Fig. Is connected to a parallelport, you are using and click the OK button. Select the LPT port {1.3) you are usrtp and click OK LPT1: ('[P12: [P13: (3) Click the Exit button. (4) The dialog box will appear and show the frequencies of drum unit change,... error being detected. (Maximum counter: 127) Paper jam When a paper jam occurs. (Maximum counter: 2047) A-22 A-7 Note that each maintenance information is reset. (Maximum counter: 63) Toner cartridge change andpaperjam. APPENDIX If theprinteris connected to a parallel port.


