
Service Manual
Page 2
..., the Apple Logo, and Macintosh are trademarks, registered in the U.S. Windows is a registered trademark of Microsoft Corporation in the United States and other countries. Trademarks: The brother logo is a registered trademark of Brother Industries, Ltd. IBM, IBM PC and Proprinter are registered trademarks of ... trademark and HP Laser Jet is a registered trademark and FX-80 and FX-850 are subject to change without permission in any form or by any means without notice. and other countries, and True Type is a trademark of International Business Machines Corporation....
..., the Apple Logo, and Macintosh are trademarks, registered in the U.S. Windows is a registered trademark of Microsoft Corporation in the United States and other countries. Trademarks: The brother logo is a registered trademark of Brother Industries, Ltd. IBM, IBM PC and Proprinter are registered trademarks of ... trademark and HP Laser Jet is a registered trademark and FX-80 and FX-850 are subject to change without permission in any form or by any means without notice. and other countries, and True Type is a trademark of International Business Machines Corporation....

Service Manual
Page 4
... Requirements for Brother Printer Solution for HL-1270N only 1-8 3.5 Paper ...1-8 3.5.1 Feedable paper...1-8 3.5.2 Paper cassette capacity...1-10 3.5.3 Print delivery ...1-10 3.6 Printing Area ...1-11 3.6.1 Effective printing area ...1-11 3.6.2 Print guaranteed area ...1-11 CHAPTER 2 INSTALLATION AND BASIC OPERATION 2-1 1. OVERVIEW ...1-4 3. SPECIFICATIONS 1-5 3.1 Printing...1-5 3.2 Functions ...1-6 3.3 Electrical and Mechanical 1-7 3.4 Network (for Windows 2-1 2. INSTALL THE PRINTER 2-3 3.1 For Windows® Users ...2-3 3.2 For Windows® Users with...
... Requirements for Brother Printer Solution for HL-1270N only 1-8 3.5 Paper ...1-8 3.5.1 Feedable paper...1-8 3.5.2 Paper cassette capacity...1-10 3.5.3 Print delivery ...1-10 3.6 Printing Area ...1-11 3.6.1 Effective printing area ...1-11 3.6.2 Print guaranteed area ...1-11 CHAPTER 2 INSTALLATION AND BASIC OPERATION 2-1 1. OVERVIEW ...1-4 3. SPECIFICATIONS 1-5 3.1 Printing...1-5 3.2 Functions ...1-6 3.3 Electrical and Mechanical 1-7 3.4 Network (for Windows 2-1 2. INSTALL THE PRINTER 2-3 3.1 For Windows® Users ...2-3 3.2 For Windows® Users with...
Service Manual
Page 5
...6.1 Preparing the BR-net Board 2-17 6.1.1 Connect the Ethernet cable 2-17 6.1.2 Install the BRAdmin32: configuration utility (for HL-1270 only 3-18 1.6 Power Supply...3-19 1.6.1 Low-voltage Power Supply 3-19 1.6.2 High-voltage Power Supply 3-20 2....serial I/O ...3-15 1.3.7 PCI bus ...3-15 1.3.8 EEPROM...3-16 1.3.9 Reset circuit ...3-16 1.3.10 Engine I/O ...3-17 1.4 Engine PCB ...3-18 1.5 BR-net PCB (for Windows 95/98/NT 4.0 users only) ........ 2-17 6.1.3 Print configuration page ...2-18 6.2 Functions ...2-18 6.2.1 LED functions...2-18 6.2.2 Factory default setting...2-18 CHAPTER 3 THEORY...
...6.1 Preparing the BR-net Board 2-17 6.1.1 Connect the Ethernet cable 2-17 6.1.2 Install the BRAdmin32: configuration utility (for HL-1270 only 3-18 1.6 Power Supply...3-19 1.6.1 Low-voltage Power Supply 3-19 1.6.2 High-voltage Power Supply 3-20 2....serial I/O ...3-15 1.3.7 PCI bus ...3-15 1.3.8 EEPROM...3-16 1.3.9 Reset circuit ...3-16 1.3.10 Engine I/O ...3-17 1.4 Engine PCB ...3-18 1.5 BR-net PCB (for Windows 95/98/NT 4.0 users only) ........ 2-17 6.1.3 Print configuration page ...2-18 6.2 Functions ...2-18 6.2.1 LED functions...2-18 6.2.2 Factory default setting...2-18 CHAPTER 3 THEORY...

Service Manual
Page 7
...Printouts 6-8 4. SOFTWARE SETTING PROBLEMS 6-14 6. PERIODICAL CLEANING 5-5 3.1 Cleaning the Printer Exterior 5-5 3.2 Cleaning the Drum Unit...5-5 3.3 Cleaning the Scanner Window 5-6 3.4 Cleaning the Electrical Terminals 5-6 4. MALFUNCTIONS 6-18 7. IMAGE DEFECTS 6-23... 7.1 Image Defect Examples 6-23 7.2 Troubleshooting Image Defect 6-24 7.3 Location of Grounding Contacts 6-41 7.3.1 Drum unit ...6-41 7.3.2 Printer body & paper cassette 6-41 8. NETWORK PROBLEM (FOR HL...
...Printouts 6-8 4. SOFTWARE SETTING PROBLEMS 6-14 6. PERIODICAL CLEANING 5-5 3.1 Cleaning the Printer Exterior 5-5 3.2 Cleaning the Drum Unit...5-5 3.3 Cleaning the Scanner Window 5-6 3.4 Cleaning the Electrical Terminals 5-6 4. MALFUNCTIONS 6-18 7. IMAGE DEFECTS 6-23... 7.1 Image Defect Examples 6-23 7.2 Troubleshooting Image Defect 6-24 7.3 Location of Grounding Contacts 6-41 7.3.1 Drum unit ...6-41 7.3.2 Printer body & paper cassette 6-41 8. NETWORK PROBLEM (FOR HL...

Service Manual
Page 8
... A-34 INDEX vi SERIAL NO. HOW TO KNOW DRUM UNIT LIFE & PAGE COUNTER A-5 5. CONNECTION DIAGRAM, HL-1030/1240 A-17 9. CONNECTION DIAGRAM, HL-1270N A-19 11. MAIN PCB CIRCUIT DIAGRAM, HL-1030/1240 (2/2 A-21 13. LOW-VOLTAGE POWER SUPPLY PCB CIRCUIT DIAGRAM (110 - 120V) ........ LOW-VOLTAGE POWER... PCB CIRCUIT DIAGRAM, HL-1030/1240 (1/2 A-20 12. NETWORK BOARD CIRCUIT DIAGRAM A-29 20. ENGINE PCB CIRCUIT DIAGRAM (NEW A-28 19. TABLE OF CONTENTS 9.5 Windows NT/LAN Server (TCP/IP) Troubleshooting 6-48 9.6 Windows 95/98 Peer to Peer Print (LPR) Troubleshooting 6-48 9.7 Windows 95/98 (or later...
... A-34 INDEX vi SERIAL NO. HOW TO KNOW DRUM UNIT LIFE & PAGE COUNTER A-5 5. CONNECTION DIAGRAM, HL-1030/1240 A-17 9. CONNECTION DIAGRAM, HL-1270N A-19 11. MAIN PCB CIRCUIT DIAGRAM, HL-1030/1240 (2/2 A-21 13. LOW-VOLTAGE POWER SUPPLY PCB CIRCUIT DIAGRAM (110 - 120V) ........ LOW-VOLTAGE POWER... PCB CIRCUIT DIAGRAM, HL-1030/1240 (1/2 A-20 12. NETWORK BOARD CIRCUIT DIAGRAM A-29 20. ENGINE PCB CIRCUIT DIAGRAM (NEW A-28 19. TABLE OF CONTENTS 9.5 Windows NT/LAN Server (TCP/IP) Troubleshooting 6-48 9.6 Windows 95/98 Peer to Peer Print (LPR) Troubleshooting 6-48 9.7 Windows 95/98 (or later...

Service Manual
Page 11
...) CAUTION: When the machine during servicing is attached on the printer. ACHTUNG: Im Falle von Störungen der Lasereinheit muß diese ersetzt werden. CLASS 3B LASER PRODUCT. VARNING OSYNLIG LASERSTRÅLNING NÄR DENNA DEL ÄR ÖPPNAD OCH SPÄRRAR ÄR ... INFORMATION When servicing the optical system of the printer, be careful not to place a screwdriver or other reflective object in the path of VBG 93 and the performance instructions for VBG 93 are valid. KLASSE 3B LASER. VORSICHT UNSICHTBARE LASERSTRAHLUNG WENN ABDECKUNG GEÖFFENT...
...) CAUTION: When the machine during servicing is attached on the printer. ACHTUNG: Im Falle von Störungen der Lasereinheit muß diese ersetzt werden. CLASS 3B LASER PRODUCT. VARNING OSYNLIG LASERSTRÅLNING NÄR DENNA DEL ÄR ÖPPNAD OCH SPÄRRAR ÄR ... INFORMATION When servicing the optical system of the printer, be careful not to place a screwdriver or other reflective object in the path of VBG 93 and the performance instructions for VBG 93 are valid. KLASSE 3B LASER. VORSICHT UNSICHTBARE LASERSTRAHLUNG WENN ABDECKUNG GEÖFFENT...
Service Manual
Page 13
...minute (ppm) print speed (A4 or Letter paper). You can easily install them into your printer. When printing, the animated dialog box appears on the icon with your Windows system using bi-directional parallel communications. If an error occurs, a dialog box will ...dots per inch (dpi) for Microsoft Windows 95/98, Windows 3.1 and Windows NT 4.0 are available on the actions in Windows applications and allows you know what to open the printer properties selection box every time. The printer status monitor program can hold A4, letter, ...
...minute (ppm) print speed (A4 or Letter paper). You can easily install them into your printer. When printing, the animated dialog box appears on the icon with your Windows system using bi-directional parallel communications. If an error occurs, a dialog box will ...dots per inch (dpi) for Microsoft Windows 95/98, Windows 3.1 and Windows NT 4.0 are available on the actions in Windows applications and allows you know what to open the printer properties selection box every time. The printer status monitor program can hold A4, letter, ...
Service Manual
Page 14
... operate the HL-1250/1270N printers. The printer consumes less than 5W (HL-1030/1240), 6W (HL-1250) or 12W (HL-1270N) when in 256 grayscales, producing nearly photographic quality. Since the toner cartridge is separate from two economy modes, 25% toner saving and 50% toner saving, through the Windows printer driver supplied with the standard printer memory. Drivers...
... operate the HL-1250/1270N printers. The printer consumes less than 5W (HL-1030/1240), 6W (HL-1250) or 12W (HL-1270N) when in 256 grayscales, producing nearly photographic quality. Since the toner cartridge is separate from two economy modes, 25% toner saving and 50% toner saving, through the Windows printer driver supplied with the standard printer memory. Drivers...

Service Manual
Page 15
...-A • UPC-E • EAN-8 • EAN-13 • EAN-128 Network Feature (for HL-1270N only) The Brother printer has built in multi protocol network capability as if the printer was directly connected to share the printer on Windows® 95/98, Windows NT®, UNIX, Novell, Apple Macintosh, LAN server and OS/2 Warp server computer simultaneously...
...-A • UPC-E • EAN-8 • EAN-13 • EAN-128 Network Feature (for HL-1270N only) The Brother printer has built in multi protocol network capability as if the printer was directly connected to share the printer on Windows® 95/98, Windows NT®, UNIX, Novell, Apple Macintosh, LAN server and OS/2 Warp server computer simultaneously...
Service Manual
Page 17
SPECIFICATIONS 3.1 Printing Print method Electrophotography by semiconductor laser beam scanning Laser Wave length: 780 nm Output: 5mW max Resolution HL-1030: HL-1240: HL-1250: HL-1270N: 600 x 600 dots/inch (GDI) 600 x 600 dots/inch (GDI) 300 x 300 dots/inch (under DOS or other operating system) 1200(H) x 600(V) dots/inch (for Windows DIB graphics) 600 x 600 dots...
SPECIFICATIONS 3.1 Printing Print method Electrophotography by semiconductor laser beam scanning Laser Wave length: 780 nm Output: 5mW max Resolution HL-1030: HL-1240: HL-1250: HL-1270N: 600 x 600 dots/inch (GDI) 600 x 600 dots/inch (GDI) 300 x 300 dots/inch (under DOS or other operating system) 1200(H) x 600(V) dots/inch (for Windows DIB graphics) 600 x 600 dots...

Service Manual
Page 18
CHAPTER 1 GENERAL 3.2 Functions CPU Emulation Printer driver Interface Memory Control panel Diagnostics HL-1030/1240: MB86833 66MHz HL-1250/1270N: MB86832 66MHz HL-1030: HL-1240: HL-1250: HL-1270N: Brother Printing Solution for Windows® Brother Printing Solution for Windows® HP LaserJet IIP (PCL level 4) Brother Printing Solution for Windows® Automatic emulation selection among HP LaserJet 6P (PCL level 6), Brother BR-Script Level 2, EPSON...
CHAPTER 1 GENERAL 3.2 Functions CPU Emulation Printer driver Interface Memory Control panel Diagnostics HL-1030/1240: MB86833 66MHz HL-1250/1270N: MB86832 66MHz HL-1030: HL-1240: HL-1250: HL-1270N: Brother Printing Solution for Windows® Brother Printing Solution for Windows® HP LaserJet IIP (PCL level 4) Brother Printing Solution for Windows® Automatic emulation selection among HP LaserJet 6P (PCL level 6), Brother BR-Script Level 2, EPSON...

Service Manual
Page 20
... Transparencies A4, Letter Other sizes 70-216 x 116-356 mm (2.75-8.5 x 4.57-14 inches) Optional lower Normal paper paper cassette Transparencies (HL-1250/1270N only) A4, Letter, B5 (ISO), A5, Executive, Legal* *NOTE: Legal-size paper can be printed with the standard paper ...SMB Print TELNET, SNMP, HTTP, TFTP • Novell IPX.SPX (Bindery/NDS) • AppleTalk Management • Web Based Management • BRAdmin32 Windows based management utility • TELNET and Netware Command Console • SNMP/MIB II • HP JetAdmin / Web JetAdmin compatible Firmware update ...
... Transparencies A4, Letter Other sizes 70-216 x 116-356 mm (2.75-8.5 x 4.57-14 inches) Optional lower Normal paper paper cassette Transparencies (HL-1250/1270N only) A4, Letter, B5 (ISO), A5, Executive, Legal* *NOTE: Legal-size paper can be printed with the standard paper ...SMB Print TELNET, SNMP, HTTP, TFTP • Novell IPX.SPX (Bindery/NDS) • AppleTalk Management • Web Based Management • BRAdmin32 Windows based management utility • TELNET and Netware Command Console • SNMP/MIB II • HP JetAdmin / Web JetAdmin compatible Firmware update ...

Service Manual
Page 25
... rated voltage shown on a flat, horizontal surface. • Keep the printer clean. Do not place the printer in the side cover. 1.3 System Requirements for Brother Printer Solution for Windows Check the following system requirements to setup and operate the printer using Brother Printing Solution for Windows: • IBM PC or compatible with other high-power appliances...
... rated voltage shown on a flat, horizontal surface. • Keep the printer clean. Do not place the printer in the side cover. 1.3 System Requirements for Brother Printer Solution for Windows Check the following system requirements to setup and operate the printer using Brother Printing Solution for Windows: • IBM PC or compatible with other high-power appliances...

Service Manual
Page 27
...HL-1240 model. Then, type D:\START in the command line box and click OK. (If your CD-ROM drive is not D, type the correct drive letter instead of your printer. (5) Select the language you can install the printer driver from the supplied floppy disk. (See Subsection 3.2 'For Windows... AND BASIC OPERATION 3. They vary depending on the model. (4) Select the model of "D".) In Windows 3.1; INSTALL THE PRINTER You need to implement hardware setup and driver installation to use the printer. If you do not have a CD-ROM drive, you want, then follow the instructions on your...
...HL-1240 model. Then, type D:\START in the command line box and click OK. (If your CD-ROM drive is not D, type the correct drive letter instead of your printer. (5) Select the language you can install the printer driver from the supplied floppy disk. (See Subsection 3.2 'For Windows... AND BASIC OPERATION 3. They vary depending on the model. (4) Select the model of "D".) In Windows 3.1; INSTALL THE PRINTER You need to implement hardware setup and driver installation to use the printer. If you do not have a CD-ROM drive, you want, then follow the instructions on your...
Service Manual
Page 28
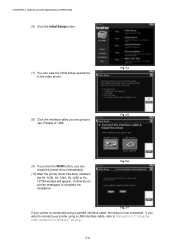
... a parallel interface cable, the setup is connected using a USB interface cable, refer to connect your printer is now completed. If you want to Subsection 3.3 'Using the USB Interface (For Windows 98 only)'. 2-4 Fig. 2-5 (9) If you click the NOW button, you are going .... CHAPTER 2 INSTALLATION AND BASIC OPERATION (6) Click the Initial Setup button. (7) You can install the printer driver immediately. (10) After the printer driver has been installed, the HL-1030, HL-1240, HL-1250 or HL1270N window will appear. Follow the onscreen messages to use, Parallel or USB.
... a parallel interface cable, the setup is connected using a USB interface cable, refer to connect your printer is now completed. If you want to Subsection 3.3 'Using the USB Interface (For Windows 98 only)'. 2-4 Fig. 2-5 (9) If you click the NOW button, you are going .... CHAPTER 2 INSTALLATION AND BASIC OPERATION (6) Click the Initial Setup button. (7) You can install the printer driver immediately. (10) After the printer driver has been installed, the HL-1030, HL-1240, HL-1250 or HL1270N window will appear. Follow the onscreen messages to use, Parallel or USB.
Service Manual
Page 29
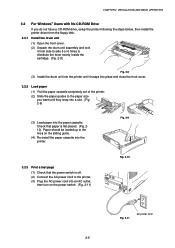
CHAPTER 2 INSTALLATION AND BASIC OPERATION 3.2 For Windows® Users with No CD-ROM Drive If you do not have a CD-ROM drive, setup the printer following the steps below, then install the printer driver from the floppy disk. 3.2.1 Install the drum unit (1) Open the front cover. (2) Unpack the drum ... they snap into a slot. (Fig. 2-9) (3) Load paper into an AC outlet, then turn on the sliding guide. (4) Re-install the paper cassette into the printer. Fig. 2-9 3.2.3 Print a test page (1) Check that paper is off. (2) Connect the AC power cord to the lines on the power switch. (Fig. 2-11...
CHAPTER 2 INSTALLATION AND BASIC OPERATION 3.2 For Windows® Users with No CD-ROM Drive If you do not have a CD-ROM drive, setup the printer following the steps below, then install the printer driver from the floppy disk. 3.2.1 Install the drum unit (1) Open the front cover. (2) Unpack the drum ... they snap into a slot. (Fig. 2-9) (3) Load paper into an AC outlet, then turn on the sliding guide. (4) Re-install the paper cassette into the printer. Fig. 2-9 3.2.3 Print a test page (1) Check that paper is off. (2) Connect the AC power cord to the lines on the power switch. (Fig. 2-11...

Service Manual
Page 30
... instead of 'A'.) iii) Follow the instructions that appear on the computer power. After the printer has warmed up the Ready LED changes from floppy disk (1) Turn on the screen. 2-6 In Windows 95/98 i) Click the Start button and select Run. Parallel interface cable Fig... 2 INSTALLATION AND BASIC OPERATION (4) Extend the tray extension flap. In Windows 3.1 i) Click File menu in the Program Manager screen and select Run. Check the test page printed correctly. 3.2.4 Connect the printer and the computer (1) Turn off the power switch. (2) Connect the parallel...
... instead of 'A'.) iii) Follow the instructions that appear on the computer power. After the printer has warmed up the Ready LED changes from floppy disk (1) Turn on the screen. 2-6 In Windows 95/98 i) Click the Start button and select Run. Parallel interface cable Fig... 2 INSTALLATION AND BASIC OPERATION (4) Extend the tray extension flap. In Windows 3.1 i) Click File menu in the Program Manager screen and select Run. Check the test page printed correctly. 3.2.4 Connect the printer and the computer (1) Turn off the power switch. (2) Connect the parallel...

Service Manual
Page 31
...2-16 2-7 Fig. 2-14 (2) Select "Search for the best driver for Windows 98 only) For the HL-1240/1250/1270N printers, the USB interface cable can be connected between the printer and PC. Prepare the printer to use the USB interface following the steps below; 3.3.1 Connect the USB ...interface cable (1) Check that the printer power switch is on. (2) Connect the USB interface cable to the computer, then connect it to the printer. (Fig. 2-14) USB interface cable 3.3.2 Install the USB driver (1) The "Add New Hardware Wizard" window will appear. CHAPTER 2 INSTALLATION AND ...
...2-16 2-7 Fig. 2-14 (2) Select "Search for the best driver for Windows 98 only) For the HL-1240/1250/1270N printers, the USB interface cable can be connected between the printer and PC. Prepare the printer to use the USB interface following the steps below; 3.3.1 Connect the USB ...interface cable (1) Check that the printer power switch is on. (2) Connect the USB interface cable to the computer, then connect it to the printer. (Fig. 2-14) USB interface cable 3.3.2 Install the USB driver (1) The "Add New Hardware Wizard" window will appear. CHAPTER 2 INSTALLATION AND ...

Service Manual
Page 33
...power, then insert the CD-ROM into the CD-ROM drive. The window shown below will appear automatically. CHAPTER 2 INSTALLATION AND BASIC OPERATION 3.3.3 Set the PC printer port Your PC printer port has to be connected to the printer at the same time. 3.4 For Macintosh (iMac and Power Macintosh)... with USB Users Only When you use the HL-1240/1250/1270N printer with Macintosh using USB, setup the printer following port" box. (Fig. 221) (5) Click the OK button to install the printer driver. 2-9 Fig. 2-21 NOTE: Both the parallel cable and USB interface ...
...power, then insert the CD-ROM into the CD-ROM drive. The window shown below will appear automatically. CHAPTER 2 INSTALLATION AND BASIC OPERATION 3.3.3 Set the PC printer port Your PC printer port has to be connected to the printer at the same time. 3.4 For Macintosh (iMac and Power Macintosh)... with USB Users Only When you use the HL-1240/1250/1270N printer with Macintosh using USB, setup the printer following port" box. (Fig. 221) (5) Click the OK button to install the printer driver. 2-9 Fig. 2-21 NOTE: Both the parallel cable and USB interface ...

Service Manual
Page 41
... 6. Fig. 2-29 6.1.2 Install the BRAdmin32: configuration utility (for Windows 95/98/NT 4.0 users only) NOTE: If you to share the printer on a network. 6.1 Preparing the BR-net Board 6.1.1 Connect the Ethernet cable (1) Turn off the printer power. (2) Connect one end of the Ethernet Hub cable to the...the Network User's Guide on the supplied CDROM. (1) Insert the supplied CD-ROM into your CD-ROM drive. (2) Select the HL-1270N model button and follow the screen instructions. (3) The BRAdmin32 utility will then be installed onto your computer. (4) The Troubleshooting information table...
... 6. Fig. 2-29 6.1.2 Install the BRAdmin32: configuration utility (for Windows 95/98/NT 4.0 users only) NOTE: If you to share the printer on a network. 6.1 Preparing the BR-net Board 6.1.1 Connect the Ethernet cable (1) Turn off the printer power. (2) Connect one end of the Ethernet Hub cable to the...the Network User's Guide on the supplied CDROM. (1) Insert the supplied CD-ROM into your CD-ROM drive. (2) Select the HL-1270N model button and follow the screen instructions. (3) The BRAdmin32 utility will then be installed onto your computer. (4) The Troubleshooting information table...


