
Users Manual - English
Page 10
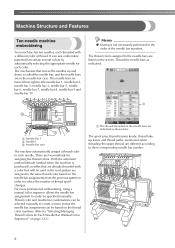
...needle bar case. The needle bars are indicated as indicated. 1 1 Needle bar 1 2 Needle 1 3 Needle bar case The machine automatically assigns a thread color to left: needle bar 1, needle bar 2, needle bar 3, needle bar 4, needle bar 5, needle bar 6, needle bar 7, needle bar 8, needle bar 9 and needle bar 10. Thread the needle bars as shown here. Thread color and needle...color that will be selected manually to create a menu so that the needle bar assignments can sew embroidery patterns that moves the needles up and down is not necessarily performed in order to "Selecting/Managing...
...needle bar case. The needle bars are indicated as indicated. 1 1 Needle bar 1 2 Needle 1 3 Needle bar case The machine automatically assigns a thread color to left: needle bar 1, needle bar 2, needle bar 3, needle bar 4, needle bar 5, needle bar 6, needle bar 7, needle bar 8, needle bar 9 and needle bar 10. Thread the needle bars as shown here. Thread color and needle...color that will be selected manually to create a menu so that the needle bar assignments can sew embroidery patterns that moves the needles up and down is not necessarily performed in order to "Selecting/Managing...
Users Manual - English
Page 11
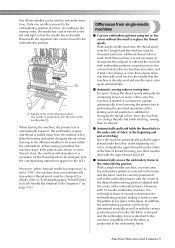
... is centered in the frame and the fabric must be correctly positioned within the embroidery). However, with 10 needle embroidery machine, the embroidery frame is moved to determine the embroidering position, making it easier to replace the thread spools With single-needle machines, the thread spool must be changed . For details, refer to "Selecting/Managing Thread...
... is centered in the frame and the fabric must be correctly positioned within the embroidery). However, with 10 needle embroidery machine, the embroidery frame is moved to determine the embroidering position, making it easier to replace the thread spools With single-needle machines, the thread spool must be changed . For details, refer to "Selecting/Managing Thread...
Users Manual - English
Page 12
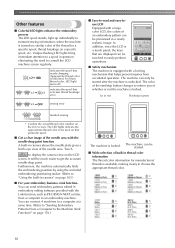
... color of the start/stop button changes to choose the appropriate thread color. 10 The machine can only be started after the machine is locked. Other features ■ Colorful LED lights enhance the embroidery process The LED spool stands, light up individually to consult the LCD machine...LED light turns off.) indicates the spool that particular spool. ■ Get a clear image of the needle area. The LED lights indicate the approximate thread color to be touched to an embroidery machine. In addition, since the LCD is a touch panel, the keys that helps prevent injuries from ...
... color of the start/stop button changes to choose the appropriate thread color. 10 The machine can only be started after the machine is locked. Other features ■ Colorful LED lights enhance the embroidery process The LED spool stands, light up individually to consult the LCD machine...LED light turns off.) indicates the spool that particular spool. ■ Get a clear image of the needle area. The LED lights indicate the approximate thread color to be touched to an embroidery machine. In addition, since the LCD is a touch panel, the keys that helps prevent injuries from ...
Users Manual - English
Page 16
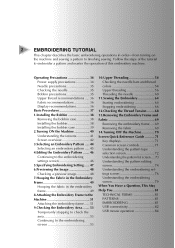
...SAFETY INSTRUCTIONS 1 License Agreement ...6 Warning Labels...7 Machine Structure and Features 8 Ten-needle machine embroidering...8 Differences from single-needle machines ...9 Other features ...10 Available features...12 Manual Structure...13 Read before use ...13 Read when additional information... assembly ...30 Preparing the spool stand ...31 Attaching the embroidery frame holder ...32 EMBROIDERING TUTORIAL 33 Operating Precautions...34 Power supply precautions ...34 Needle precautions ...35 Checking the needle ...35 Bobbin precautions ...35 Upper thread recommendations ...36 Fabric...
...SAFETY INSTRUCTIONS 1 License Agreement ...6 Warning Labels...7 Machine Structure and Features 8 Ten-needle machine embroidering...8 Differences from single-needle machines ...9 Other features ...10 Available features...12 Manual Structure...13 Read before use ...13 Read when additional information... assembly ...30 Preparing the spool stand ...31 Attaching the embroidery frame holder ...32 EMBROIDERING TUTORIAL 33 Operating Precautions...34 Power supply precautions ...34 Needle precautions ...35 Checking the needle ...35 Bobbin precautions ...35 Upper thread recommendations ...36 Fabric...
Users Manual - English
Page 22
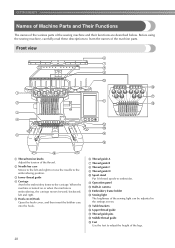
...0 Spool stand Put 10 thread spools to the carriage. When the machine is turned on or when the machine is embroidering, the carriage moves forward, backward, left and right to move the needle to the embroidering position. 3 Lower thread guide 4 Carriage Attach the embroidery frame to embroider. ...Front view 16 17 18 15 19 1 Thread tension knobs Adjust the tension of the machine parts. A Operation panel B Built-in camera C Embroidery frame holder D Sewing...
...0 Spool stand Put 10 thread spools to the carriage. When the machine is turned on or when the machine is embroidering, the carriage moves forward, backward, left and right to move the needle to the embroidering position. 3 Lower thread guide 4 Carriage Attach the embroidery frame to embroider. ...Front view 16 17 18 15 19 1 Thread tension knobs Adjust the tension of the machine parts. A Operation panel B Built-in camera C Embroidery frame holder D Sewing...
Users Manual - English
Page 35
... to embroider a pattern and master the operation of the tutorial to the embroidering screen 53 10.Upper Threading 54 Checking the needle bars and thread colors 54 Upper threading 56 Threading the needle 60 11.Sewing the Embroidery 64 Starting embroidering 64 Stopping embroidering 66 12.Checking the Thread Tension ........68 13.Removing the...
... to embroider a pattern and master the operation of the tutorial to the embroidering screen 53 10.Upper Threading 54 Checking the needle bars and thread colors 54 Upper threading 56 Threading the needle 60 11.Sewing the Embroidery 64 Starting embroidering 64 Stopping embroidering 66 12.Checking the Thread Tension ........68 13.Removing the...
Users Manual - English
Page 56
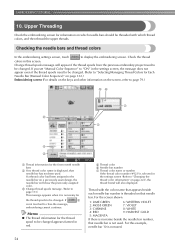
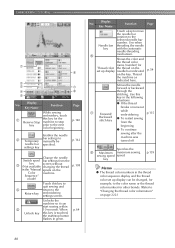
...needle bar number, that needle bar. Memo ● The thread information for Each Needle Bar (Manual Color Sequence)" on page 132.) Embroidering screen (For details on the keys and other information on page 222), the thread brand will appear if the thread spools from the previous embroidery...) is selected in this example, needle bar 10 is not used . 54 For this screen. If 4 is not touched to "Changing the thread color information" on the screen, refer to page 79.) 56 7 2 1 4 3 1 Thread information for information on that needle bar is not used . Upper Threading...
...needle bar number, that needle bar. Memo ● The thread information for Each Needle Bar (Manual Color Sequence)" on page 132.) Embroidering screen (For details on the keys and other information on page 222), the thread brand will appear if the thread spools from the previous embroidery...) is selected in this example, needle bar 10 is not used . 54 For this screen. If 4 is not touched to "Changing the thread color information" on the screen, refer to page 79.) 56 7 2 1 4 3 1 Thread information for information on that needle bar is not used . Upper Threading...
Users Manual - English
Page 66
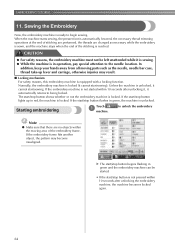
... green, the machine is ready to the needle location. Sewing the Embroidery Now, the embroidery machine is unlocked. Normally, the embroidery machine is equipped with a locking function. In addition, keep your hands away from all moving area of stitching are performed, the threads are no objects within 10 seconds after unlocking it, it cannot start...
... green, the machine is ready to the needle location. Sewing the Embroidery Now, the embroidery machine is unlocked. Normally, the embroidery machine is equipped with a locking function. In addition, keep your hands away from all moving area of stitching are performed, the threads are no objects within 10 seconds after unlocking it, it cannot start...
Users Manual - English
Page 82
...embroidery, touch 1 this key to quit sewing and 4 return to the Return key embroidering settings screen. Shows the color and the thread color name (number) for Thread color the thread on the key. Key Name Function Page Touch a key to move the needle... changing the thread p.108 in the thread color sequence display and the thread color set up display needle bar indicated p.54 on the set up display can start sewing within 5 10 seconds. Moves the needle forward or backward through the stitching. EMBROIDERING TUTORIAL 1 6 2 3 7 4 8 5 Display ...
...embroidery, touch 1 this key to quit sewing and 4 return to the Return key embroidering settings screen. Shows the color and the thread color name (number) for Thread color the thread on the key. Key Name Function Page Touch a key to move the needle... changing the thread p.108 in the thread color sequence display and the thread color set up display needle bar indicated p.54 on the set up display can start sewing within 5 10 seconds. Moves the needle forward or backward through the stitching. EMBROIDERING TUTORIAL 1 6 2 3 7 4 8 5 Display ...
Users Manual - English
Page 135
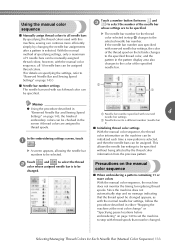
...; Manually assign thread colors to all 10 needle bars can be assigned thread colors. (For details on specifying the settings, refer to "Reserved Needle Bar and Sewing Speed Settings" on page 145, the finished embroidery colors can be checked in "Reserved Needle Bar and Sewing Speed Settings" on ...page 145.) ■ Needle bar number settings The needle bar used with this machine, sewing can ...
...; Manually assign thread colors to all 10 needle bars can be assigned thread colors. (For details on specifying the settings, refer to "Reserved Needle Bar and Sewing Speed Settings" on page 145, the finished embroidery colors can be checked in "Reserved Needle Bar and Sewing Speed Settings" on ...page 145.) ■ Needle bar number settings The needle bar used with this machine, sewing can ...
Users Manual - English
Page 310
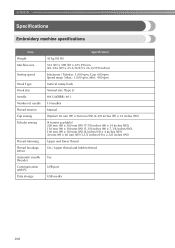
APPENDIX Specifications Embroidery machine specifications Item Weight Machine size Sewing speed Hook Type Hook size Needle Number of needle Thread tension Cap sewing Tubular sewing Thread trimming Thread breakage sensor Automatic needle threader Communication with PC Data storage Specification 42 kg (92 lb) 512 ... Tubular: 1,000 spm, Cap: 600 spm Speed range / Max.: 1,000 spm, Min.: 400 spm Vertical rotary hook Normal size (Type L) HA130EBBR / #11 10 needles Manual (Option) 60 mm (H) × 360 mm (W) (2-3/8 inches (H) × 14 inches (W)) (4 frames available) 200 mm (H) × 360 mm (W)...
APPENDIX Specifications Embroidery machine specifications Item Weight Machine size Sewing speed Hook Type Hook size Needle Number of needle Thread tension Cap sewing Tubular sewing Thread trimming Thread breakage sensor Automatic needle threader Communication with PC Data storage Specification 42 kg (92 lb) 512 ... Tubular: 1,000 spm, Cap: 600 spm Speed range / Max.: 1,000 spm, Min.: 400 spm Vertical rotary hook Normal size (Type L) HA130EBBR / #11 10 needles Manual (Option) 60 mm (H) × 360 mm (W) (2-3/8 inches (H) × 14 inches (W)) (4 frames available) 200 mm (H) × 360 mm (W)...
Users Manual - English
Page 315
...Computer (USB 168 Temporary needle bar setting key 80, 142 from Embroidery cards 166 Ten-needle machine 8 from memory 165...57 S Satin jacket 250 Saving embroidery patterns 211 computer 214 machine's memory 211 ...saver settings 227 Selecting edited pattern 182 embroidery pattern 44, 153 Set key 73 ...123 Thread trimming button 21, 67 Threading needle 60 upper thread 54, 56 Thumbnail size... Troubleshooting 232, 289 T-shirt 250 Sewing the embroidery 64 Sewing time 79 U Short stitch delete ... computer 83 Split (large-size) embroidery patterns 240 media 82 Spool 56 mouse...
...Computer (USB 168 Temporary needle bar setting key 80, 142 from Embroidery cards 166 Ten-needle machine 8 from memory 165...57 S Satin jacket 250 Saving embroidery patterns 211 computer 214 machine's memory 211 ...saver settings 227 Selecting edited pattern 182 embroidery pattern 44, 153 Set key 73 ...123 Thread trimming button 21, 67 Threading needle 60 upper thread 54, 56 Thumbnail size... Troubleshooting 232, 289 T-shirt 250 Sewing the embroidery 64 Sewing time 79 U Short stitch delete ... computer 83 Split (large-size) embroidery patterns 240 media 82 Spool 56 mouse...
Kit 1 Instruction Manual - English
Page 11
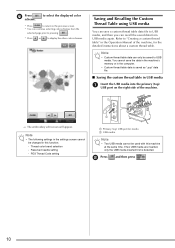
... about a custom thread table. b Press and then press . 10 Saving and Recalling the Custom Thread Table using USB media You can save the data in the machine's memory or in the Operation Manual of the machine. → The embroidery edit screen will appear. Reserved needle setting - Refer to the previous screen. * You can...
... about a custom thread table. b Press and then press . 10 Saving and Recalling the Custom Thread Table using USB media You can save the data in the machine's memory or in the Operation Manual of the machine. → The embroidery edit screen will appear. Reserved needle setting - Refer to the previous screen. * You can...


