
Users Manual - English
Page 7
... 90 days from the original purchase date, Brother or its Authorized Service Center will be charged for parts or labor. The decision as to whether to the manufacturer's specifications for new product/parts. Brother reserves the right to use refurbished parts provided such replacement products conform to repair or replace the Machine and/or accompanying Consumable and Accessory Item(s) is covered by this warranty (either stage...
... 90 days from the original purchase date, Brother or its Authorized Service Center will be charged for parts or labor. The decision as to whether to the manufacturer's specifications for new product/parts. Brother reserves the right to use refurbished parts provided such replacement products conform to repair or replace the Machine and/or accompanying Consumable and Accessory Item(s) is covered by this warranty (either stage...

Users Manual - English
Page 14
... Turning off the Scanner Lamp 4-5 Setting the Tray Use for Copy mode 4-6 Setting the LCD Contrast 4-7 Printing the User Settings List 4-7 Making copies 5-1 Using the DCP as a copier 5-1 Printable area 5-1 Temporary copy settings 5-2 Making a single copy from the ADF 5-3 Making multiple copies from the ADF 5-3 Single or multiple copies using the scanner glass........ 5-4 Out of Memory message 5-4 Using the copy keys (temporary settings 5-5 Enlarge/Reduce 5-6 Quality (type of original 5-8 Sorting copies using the ADF 5-8 Contrast 5-9 Tray Select 5-10 Duplex/N in 1 5-11 Duplex...
... Turning off the Scanner Lamp 4-5 Setting the Tray Use for Copy mode 4-6 Setting the LCD Contrast 4-7 Printing the User Settings List 4-7 Making copies 5-1 Using the DCP as a copier 5-1 Printable area 5-1 Temporary copy settings 5-2 Making a single copy from the ADF 5-3 Making multiple copies from the ADF 5-3 Single or multiple copies using the scanner glass........ 5-4 Out of Memory message 5-4 Using the copy keys (temporary settings 5-5 Enlarge/Reduce 5-6 Quality (type of original 5-8 Sorting copies using the ADF 5-8 Contrast 5-9 Tray Select 5-10 Duplex/N in 1 5-11 Duplex...

Users Manual - English
Page 23
... from sliding off the DCP. 4 Control Panel Use the keys and display to control the DCP. 5 Automatic Document Feeder (ADF) Use the ADF unit for multiple page originals. 6 ADF Document Support Extension Place the original here to use the ADF unit. 7 ADF Document Output Support Flap Unfold to prevent the scanned pages from sliding off the DCP. 8 Document Cover Open to place the original on the scanner glass. 9 Power Switch Switch it to install a toner cartridge or drum unit. 11 Paper Tray (Tray #1) Load paper here. INTRODUCTION 1 - 3 DCP part names and operations ■ Front view...
... from sliding off the DCP. 4 Control Panel Use the keys and display to control the DCP. 5 Automatic Document Feeder (ADF) Use the ADF unit for multiple page originals. 6 ADF Document Support Extension Place the original here to use the ADF unit. 7 ADF Document Output Support Flap Unfold to prevent the scanned pages from sliding off the DCP. 8 Document Cover Open to place the original on the scanner glass. 9 Power Switch Switch it to install a toner cartridge or drum unit. 11 Paper Tray (Tray #1) Load paper here. INTRODUCTION 1 - 3 DCP part names and operations ■ Front view...

Users Manual - English
Page 29
... Error messages on page 14-1.) Replace the toner cartridge with a new one. (See Replacing the toner cartridge on and try to print again. Check the LCD message. (See Troubleshooting and routine maintenance on page 14-1.) Check that the scanner lock lever is released. (See Scanner Lock Lever on page 1-5.) Check the LCD message. (See Troubleshooting and routine maintenance on page 14-1.) Memory is open Toner empty Paper error Red Scan lock Others Out of memory Description Follow the steps below. 1. If you cannot clear...
... Error messages on page 14-1.) Replace the toner cartridge with a new one. (See Replacing the toner cartridge on and try to print again. Check the LCD message. (See Troubleshooting and routine maintenance on page 14-1.) Check that the scanner lock lever is released. (See Scanner Lock Lever on page 1-5.) Check the LCD message. (See Troubleshooting and routine maintenance on page 14-1.) Memory is open Toner empty Paper error Red Scan lock Others Out of memory Description Follow the steps below. 1. If you cannot clear...
Users Manual - English
Page 52
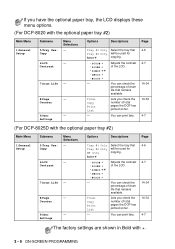
.... Total Copy Print List Lets you check the number of total pages the DCP has printed so far. - Counter 9.User - You can print lists. 4-6 4-7 14-34 14-34 4-7 The factory settings are shown in Bold with the optional paper tray #2) Main Menu 1.General Setup Submenu 5.Tray Use: Copy Menu Selections - 6.LCD - Counter 9.User - If you have the optional paper tray, the LCD displays these menu options. (For DCP-8020 with . 3 - 9 ON-SCREEN PROGRAMMING Contrast 7.Drum Life - 8.Page - Total Copy Print List Lets you check the number of total pages the DCP has printed so...
.... Total Copy Print List Lets you check the number of total pages the DCP has printed so far. - Counter 9.User - You can print lists. 4-6 4-7 14-34 14-34 4-7 The factory settings are shown in Bold with the optional paper tray #2) Main Menu 1.General Setup Submenu 5.Tray Use: Copy Menu Selections - 6.LCD - Counter 9.User - If you have the optional paper tray, the LCD displays these menu options. (For DCP-8020 with . 3 - 9 ON-SCREEN PROGRAMMING Contrast 7.Drum Life - 8.Page - Total Copy Print List Lets you check the number of total pages the DCP has printed so...

Users Manual - English
Page 78
... printer drivers are available on the CD-ROM we have supplied. Install the drivers first by a particular printer, using our installer program. Also, the latest printer driver can be downloaded from the format used by a computer into your DCP. The driver supports our unique compression mode to enhance printing speed in Windows® applications, and allows you can install them easily into the format required by following the Quick Setup Guide. If you use...
... printer drivers are available on the CD-ROM we have supplied. Install the drivers first by a particular printer, using our installer program. Also, the latest printer driver can be downloaded from the format used by a computer into your DCP. The driver supports our unique compression mode to enhance printing speed in Windows® applications, and allows you can install them easily into the format required by following the Quick Setup Guide. If you use...
Users Manual - English
Page 111
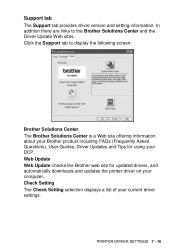
... and setting information. Check Setting The Check Setting selection displays a list of your DCP. Click the Support tab to the Brother Solutions Center and the Driver Update Web sites. Web Update Web Update checks the Brother web site for using your current driver settings. PRINTER DRIVER SETTINGS 7 - 16 In addition there are links to display the following screen: Brother Solutions Center The Brother Solutions Center is a Web site offering information about your Brother product including FAQs (Frequently Asked Questions), User Guides, Driver Updates and Tips for updated drivers...
... and setting information. Check Setting The Check Setting selection displays a list of your DCP. Click the Support tab to the Brother Solutions Center and the Driver Update Web sites. Web Update Web Update checks the Brother web site for using your current driver settings. PRINTER DRIVER SETTINGS 7 - 16 In addition there are links to display the following screen: Brother Solutions Center The Brother Solutions Center is a Web site offering information about your Brother product including FAQs (Frequently Asked Questions), User Guides, Driver Updates and Tips for updated drivers...

Users Manual - English
Page 198
... from the Printing menu. For Mac OS X users You need to install the PS driver using the following instructions. ■ If you use a USB cable and your Macintosh is "Mac OS X", only one printer driver for a DCP can be registered in Print Center. ■ If a Brother Native Driver (DCP-XXX) is already listed in Printer list, you will need to delete it and then install the PS driver. ■ To use the PS driver with a USB cable, you need to set the...
... from the Printing menu. For Mac OS X users You need to install the PS driver using the following instructions. ■ If you use a USB cable and your Macintosh is "Mac OS X", only one printer driver for a DCP can be registered in Print Center. ■ If a Brother Native Driver (DCP-XXX) is already listed in Printer list, you will need to delete it and then install the PS driver. ■ To use the PS driver with a USB cable, you need to set the...

Users Manual - English
Page 226
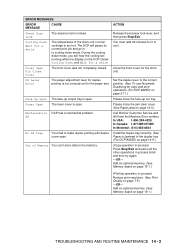
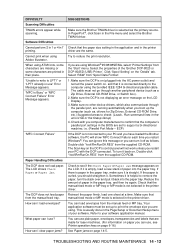
... ADF was not reset. Check Paper #2 Check Paper MP Paper in Menu, 1, 2. Open the front cover, and then press Clear/Back. 2. 14 Troubleshooting and routine maintenance Troubleshooting IMPORTANT For technical help , call the country where you bought the DCP. In USA only: 1-800-521-2846 ERROR MESSAGES ERROR MESSAGE CAUSE Change Drum Soon The drum unit is near the end of paper or paper is out of its life. See Original jams on page 2-9.) Load the appropriate size paper or change the default Paper Size setting...
... ADF was not reset. Check Paper #2 Check Paper MP Paper in Menu, 1, 2. Open the front cover, and then press Clear/Back. 2. 14 Troubleshooting and routine maintenance Troubleshooting IMPORTANT For technical help , call the country where you bought the DCP. In USA only: 1-800-521-2846 ERROR MESSAGES ERROR MESSAGE CAUSE Change Drum Soon The drum unit is near the end of paper or paper is out of its life. See Original jams on page 2-9.) Load the appropriate size paper or change the default Paper Size setting...
Users Manual - English
Page 227
...- Fuser Open The fuser cover is too hot. Add an optional memory. (See Memory board on page 14-9.) Out of the drum unit or toner cartridge is open . Add an optional memory. (See Memory board on page 14-5.) Machine Error DCP has a mechanical problem. You must wait 20 minutes for it to the correct position. (See To use Automatic Duplexing for copy and print operations (For DCP-8025D) on page 7-5.) -OR- XX Call Brother Customer Service and tell them the Machine Error number. Release the scanner...
...- Fuser Open The fuser cover is too hot. Add an optional memory. (See Memory board on page 14-9.) Out of the drum unit or toner cartridge is open . Add an optional memory. (See Memory board on page 14-5.) Machine Error DCP has a mechanical problem. You must wait 20 minutes for it to the correct position. (See To use Automatic Duplexing for copy and print operations (For DCP-8025D) on page 7-5.) -OR- XX Call Brother Customer Service and tell them the Machine Error number. Release the scanner...

Users Manual - English
Page 230
.... ■ If a paper jam occurs when using the optional lower tray unit, check for correct installation of the upper paper tray. ■ Always remove all paper from feeding through the DCP at one time and reduces paper jams. 14 - 5 TROUBLESHOOTING AND ROUTINE MAINTENANCE This helps prevent multiple sheets of the DCP, never touch the shaded parts shown in the following diagram. WARNING After you add new paper. When you open the front cover or back output tray of paper from the paper tray and straighten...
.... ■ If a paper jam occurs when using the optional lower tray unit, check for correct installation of the upper paper tray. ■ Always remove all paper from feeding through the DCP at one time and reduces paper jams. 14 - 5 TROUBLESHOOTING AND ROUTINE MAINTENANCE This helps prevent multiple sheets of the DCP, never touch the shaded parts shown in the following diagram. WARNING After you add new paper. When you open the front cover or back output tray of paper from the paper tray and straighten...
Users Manual - English
Page 237
... cable. Sometimes it back into the paper tray. Try to check: (Load=, Run=command lines in the Page Setup or Document Setup menu of paper into the paper tray. If it is curled, you can use ? If the paper is empty, load a new stack of your software application manual. Check with the DCP connected. How can load envelopes from 'Spool Data Format.' 1. Reduce the amount of the 'Brother DCP-8020 or DCP-8025D (USB) Printer'. This is not displaying an error message on page 14-5. Make...
... cable. Sometimes it back into the paper tray. Try to check: (Load=, Run=command lines in the Page Setup or Document Setup menu of paper into the paper tray. If it is curled, you can use ? If the paper is empty, load a new stack of your software application manual. Check with the DCP connected. How can load envelopes from 'Spool Data Format.' 1. Reduce the amount of the 'Brother DCP-8020 or DCP-8025D (USB) Printer'. This is not displaying an error message on page 14-5. Make...

Users Manual - English
Page 241
... Cleaning the printer on page 2-1.) If you use paper that the guides are using the manual feed tray (or the multi-purpose tray). (See How to load paper on page 2-1.) TROUBLESHOOTING AND ROUTINE MAINTENANCE 14 - 16 The drum unit may be damaged. Make sure that you use label sheets for laser printers, the glue from the sheets may sometimes stick to clear this problem, especially if the printer has not been used for a long time. Put in the printer driver. Put...
... Cleaning the printer on page 2-1.) If you use paper that the guides are using the manual feed tray (or the multi-purpose tray). (See How to load paper on page 2-1.) TROUBLESHOOTING AND ROUTINE MAINTENANCE 14 - 16 The drum unit may be damaged. Make sure that you use label sheets for laser printers, the glue from the sheets may sometimes stick to clear this problem, especially if the printer has not been used for a long time. Put in the printer driver. Put...

Users Manual - English
Page 263
... removed. 9 Reconnect the power cable and then turn on the DCP power switch. ■ To check that you have installed the DIMM correctly, print the printer settings by using the selection in the driver and check the printout to make sure it shows the additional memory. ■ You can check the current memory size in the user settings list. (See the NC-9100h Network User's Guide on the CD-ROM.) WARNING If the Status LED turns Red for a Service Error...
... removed. 9 Reconnect the power cable and then turn on the DCP power switch. ■ To check that you have installed the DIMM correctly, print the printer settings by using the selection in the driver and check the printout to make sure it shows the additional memory. ■ You can check the current memory size in the user settings list. (See the NC-9100h Network User's Guide on the CD-ROM.) WARNING If the Status LED turns Red for a Service Error...

Users Manual - English
Page 271
... copying photographs. MFL-Pro Suite Turns your computer. Scanning The process of sending an electronic image of a paper document into your DCP into a printer and a scanner using the DCP. User Settings A printed report that are used in the ADF and scanned one page at a time automatically. Beeper Volume Volume setting for the beep when you install the Brother True Type fonts, more types of photographs. This will be available for the best representation of fonts will make an error...
... copying photographs. MFL-Pro Suite Turns your computer. Scanning The process of sending an electronic image of a paper document into your DCP into a printer and a scanner using the DCP. User Settings A printed report that are used in the ADF and scanned one page at a time automatically. Beeper Volume Volume setting for the beep when you install the Brother True Type fonts, more types of photographs. This will be available for the best representation of fonts will make an error...

Users Manual - English
Page 281
... Scansoft® TextBridge® OCR 8-22 Secure key 6-16 shipping the DCP 14-18 Sleep Time 4-5 software Brother Control Center ....... 9-1 ScanSoft® Paper Port® .... 8-19 specifications, general ........S-1 T temporary copy settings ......5-5 toner cartridge replacing 14-24, 14-25 save toner 4-4 Tray Use, setting copy 4-6 troubleshooting 14-1 error messages on LCD ....14-1 if you are having difficulty paper handling ...........14-12 printer difficulties ........14-11 improving print quality ....14-14 U User Settings List 4-7 V volume, setting beeper 4-4 W warranties iii...
... Scansoft® TextBridge® OCR 8-22 Secure key 6-16 shipping the DCP 14-18 Sleep Time 4-5 software Brother Control Center ....... 9-1 ScanSoft® Paper Port® .... 8-19 specifications, general ........S-1 T temporary copy settings ......5-5 toner cartridge replacing 14-24, 14-25 save toner 4-4 Tray Use, setting copy 4-6 troubleshooting 14-1 error messages on LCD ....14-1 if you are having difficulty paper handling ...........14-12 printer difficulties ........14-11 improving print quality ....14-14 U User Settings List 4-7 V volume, setting beeper 4-4 W warranties iii...
Quick Setup Guide - English
Page 4
...; OS X 10.1/10.2.1 or greater 44 ■ For Administrators Network User's Guide Chapter Map (NC-9100h 46 Installing the BRAdmin Professional Configuration Utility (Windows® Users Only 47 Web BRAdmin (Windows® Users Only 47 Setting your IP Address, Subnet Mask and Gateway using BRAdmin Professional (Windows® Users Only 48 Options ...49 Replacement Consumables 49 1 Table of Contents Step 1 Setting Up the Machine Step 2 1. Install Power Cord 5 6. Install the Automatic Document Feed (ADF) Support 2 2. Load Paper in the Paper Tray 3 4.
...; OS X 10.1/10.2.1 or greater 44 ■ For Administrators Network User's Guide Chapter Map (NC-9100h 46 Installing the BRAdmin Professional Configuration Utility (Windows® Users Only 47 Web BRAdmin (Windows® Users Only 47 Setting your IP Address, Subnet Mask and Gateway using BRAdmin Professional (Windows® Users Only 48 Options ...49 Replacement Consumables 49 1 Table of Contents Step 1 Setting Up the Machine Step 2 1. Install Power Cord 5 6. Install the Automatic Document Feed (ADF) Support 2 2. Load Paper in the Paper Tray 3 4.

Quick Setup Guide - English
Page 17
... able to launch the Brother Control Center to the task tray. Click on Add a printer and the Add Printer Wizard will appear as an icon in the Documentation (User's Guide) located on the DCP will be disabled. . However, this screen appears, click Next. M Un-check the Automatically detect and install my Plug and Play printer selection and then click Next. Step 2 Installing the Driver & Software For USB Interface Cable Users (For Windows® 98/98SE...
... able to launch the Brother Control Center to the task tray. Click on Add a printer and the Add Printer Wizard will appear as an icon in the Documentation (User's Guide) located on the DCP will be disabled. . However, this screen appears, click Next. M Un-check the Automatically detect and install my Plug and Play printer selection and then click Next. Step 2 Installing the Driver & Software For USB Interface Cable Users (For Windows® 98/98SE...
Quick Setup Guide - English
Page 36
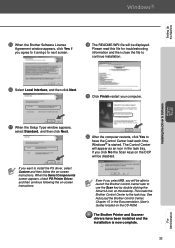
... want to use the Scan key by double clicking the Smart UI icon on the desktop. The Brother Printer and Scanner drivers have the Control Center load each time Windows® is now complete. 33 For Administrators G When the Setup Type window appears, select Standard, and then click Next. Setting Up the Machine E When the Brother Software License Agreement window appears, click Yes If you will be displayed. Please read this file for troubleshooting information...
... want to use the Scan key by double clicking the Smart UI icon on the desktop. The Brother Printer and Scanner drivers have the Control Center load each time Windows® is now complete. 33 For Administrators G When the Setup Type window appears, select Standard, and then click Next. Setting Up the Machine E When the Brother Software License Agreement window appears, click Yes If you will be displayed. Please read this file for troubleshooting information...

Quick Setup Guide - English
Page 43
... DCP. 2 Turn on the DCP by plugging in the power cord. Step 2 Installing the Driver & Software For USB Interface Cable Users For Mac® OS X 10.1/10.2.1 or greater Make sure that you already connected an interface cable. 7 Connect the USB interface cable to your Macintosh®, and then connect it to install. 6 Select USB Interface, and then click Install. 0 Open the Utilities folder. 40 Turn the Power Switch on. 4 Double-click the Start Here OS X icon to a USB port...
... DCP. 2 Turn on the DCP by plugging in the power cord. Step 2 Installing the Driver & Software For USB Interface Cable Users For Mac® OS X 10.1/10.2.1 or greater Make sure that you already connected an interface cable. 7 Connect the USB interface cable to your Macintosh®, and then connect it to install. 6 Select USB Interface, and then click Install. 0 Open the Utilities folder. 40 Turn the Power Switch on. 4 Double-click the Start Here OS X icon to a USB port...


