

User Guide
Page 4
... stitching ...27 Starting to sew ...28 Thread tension ...29 USEFUL SEWING TIPS ...30 Trial sewing ...30 Changing the sewing direction ...30 Sewing curves ...30 Sewing thick fabrics ...30 Sewing thin fabrics ...31 Sewing stretch fabrics ...31 Using a free-arm style ...31 3 NCBC2000.book Page 3 Thursday, October 21, 2004 4:32 PM CONTENTS 1. KNOWING YOUR SEWING MACHINE 5 NAMES OF MACHINE PARTS AND THEIR FUNCTIONS...
... stitching ...27 Starting to sew ...28 Thread tension ...29 USEFUL SEWING TIPS ...30 Trial sewing ...30 Changing the sewing direction ...30 Sewing curves ...30 Sewing thick fabrics ...30 Sewing thin fabrics ...31 Sewing stretch fabrics ...31 Using a free-arm style ...31 3 NCBC2000.book Page 3 Thursday, October 21, 2004 4:32 PM CONTENTS 1. KNOWING YOUR SEWING MACHINE 5 NAMES OF MACHINE PARTS AND THEIR FUNCTIONS...

User Guide
Page 6
...various settings. b Spool pin (pages 11 and 16) This holds the spool of the upper thread. d Upper tension-control dial (page 29) This controls the tension of thread. l Main power and sewing light switch (page 9) You can use as the lower thread. h Flat bed attachment with two needles. p ...16) Used to cut them. j Operation panel (page 7) This is used to start and stop sewing. 5 q Foot controller (page 10) You can turn the main power and sewing light switch on the sewing machine model. e Thread guide (pages 11 and 16) This is used when winding the thread onto the ...
...various settings. b Spool pin (pages 11 and 16) This holds the spool of the upper thread. d Upper tension-control dial (page 29) This controls the tension of thread. l Main power and sewing light switch (page 9) You can use as the lower thread. h Flat bed attachment with two needles. p ...16) Used to cut them. j Operation panel (page 7) This is used to start and stop sewing. 5 q Foot controller (page 10) You can turn the main power and sewing light switch on the sewing machine model. e Thread guide (pages 11 and 16) This is used when winding the thread onto the ...
User Guide
Page 12
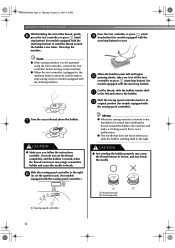
... onto the bobbin. • For details on the fast bobbin winding, see page 13. a Pre-tension disk b Bobbin winder shaft c Bobbin CAUTION ● Only use bobbins (part code: SA156, SFB: XA5539-151) that comes with this machine or bobbins of thread on the spool pin. Only use bobbins from the inside of... the shaft b Groove of the bobbin. Pass the end of the thread through the hole on c the bobbin from other bobbins may tangle on this sewing machine. Turn the bobbin clockwise, by hand, until the spring on the shaft slides into the groove of the bobbin. 1 2 a Spring on the...
... onto the bobbin. • For details on the fast bobbin winding, see page 13. a Pre-tension disk b Bobbin winder shaft c Bobbin CAUTION ● Only use bobbins (part code: SA156, SFB: XA5539-151) that comes with this machine or bobbins of thread on the spool pin. Only use bobbins from the inside of... the shaft b Groove of the bobbin. Pass the end of the thread through the hole on c the bobbin from other bobbins may tangle on this sewing machine. Turn the bobbin clockwise, by hand, until the spring on the shaft slides into the groove of the bobbin. 1 2 a Spring on the...
User Guide
Page 13
.... 1 2 a Wound evenly b Wound poorly a Sewing speed controller 12 CAUTION ● Not winding the bobbin properly may cause the thread tension to loosen, and may tangle around the bobbin and cause the needle to break. Note ● If the sewing machine is to be used to wind the thread around... the bobbin, the machine will make a clicking sound; When the bobbin ...
.... 1 2 a Wound evenly b Wound poorly a Sewing speed controller 12 CAUTION ● Not winding the bobbin properly may cause the thread tension to loosen, and may tangle around the bobbin and cause the needle to break. Note ● If the sewing machine is to be used to wind the thread around... the bobbin, the machine will make a clicking sound; When the bobbin ...
User Guide
Page 14
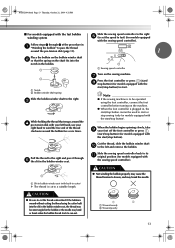
...shaft b so that wraps around the d pre-tension disk with the sewing speed controller). g Press the foot controller or press (start/ h stop button cannot be operated using the cutter built into the notch in the bobbin. Note ● If the sewing machine is cut the thread as described. Pull the thread... to the right and pass it through 2 of the thread clockwise around the bobbin five or six times. CAUTION ● Not winding the bobbin properly may cause the thread tension to loosen, and may bend...
...shaft b so that wraps around the d pre-tension disk with the sewing speed controller). g Press the foot controller or press (start/ h stop button cannot be operated using the cutter built into the notch in the bobbin. Note ● If the sewing machine is cut the thread as described. Pull the thread... to the right and pass it through 2 of the thread clockwise around the bobbin five or six times. CAUTION ● Not winding the bobbin properly may cause the thread tension to loosen, and may bend...

User Guide
Page 15
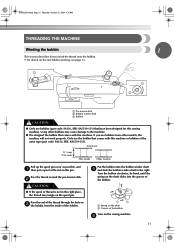
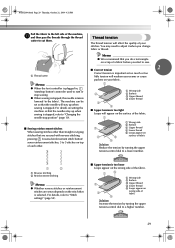
... 14 Thursday, October 21, 2004 4:32 PM KNOWING YOUR SEWING MACHINE Memo ● When the sewing machine is started or the handwheel is not inserted, reinsert the thread. this machine. Lower threading Install the bobbin wound with your finger, and then pass the thread through the tension-adjusting spring of the bobbin case. CAUTION ● Winding...
... 14 Thursday, October 21, 2004 4:32 PM KNOWING YOUR SEWING MACHINE Memo ● When the sewing machine is started or the handwheel is not inserted, reinsert the thread. this machine. Lower threading Install the bobbin wound with your finger, and then pass the thread through the tension-adjusting spring of the bobbin case. CAUTION ● Winding...
User Guide
Page 16
... of the thread comes out from the left tab in the right direction. b 1 2 • Make sure that the thread is not inserted, reinsert the thread. 1 1 a Tension-adjusting spring Memo ● The order that the bobbin thread should be incorrect or break the needle. 1 a Cutter Memo ● You can begin...), and raise the presser foot lever. Slide the button and open the cover. Be sure to thread the machine as shown by marks around the bobbin case. CAUTION ● Make sure you start to sew, follow to the procedure in , feed the end of the bobbin case. a Cover b Slide button Put the...
... of the thread comes out from the left tab in the right direction. b 1 2 • Make sure that the thread is not inserted, reinsert the thread. 1 1 a Tension-adjusting spring Memo ● The order that the bobbin thread should be incorrect or break the needle. 1 a Cutter Memo ● You can begin...), and raise the presser foot lever. Slide the button and open the cover. Be sure to thread the machine as shown by marks around the bobbin case. CAUTION ● Make sure you start to sew, follow to the procedure in , feed the end of the bobbin case. a Cover b Slide button Put the...
User Guide
Page 26
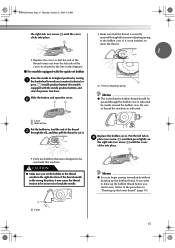
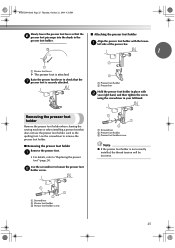
...holder. ■ Removing the presser foot holder Remove the presser foot. Removing the presser foot holder Remove the presser foot holder when cleaning the sewing machine or when installing a presser foot that the g presser foot is securely attached. a left hand. a Presser foot holder b Presser bar ... foot holder in your left side of the presser bar. 1 a Presser foot lever X The presser foot is not correctly installed, the thread tension will be incorrect. a • For details, refer to loosen the presser foot b holder screw. NCBC2000.book Page 25 Thursday, October 21,...
...holder. ■ Removing the presser foot holder Remove the presser foot. Removing the presser foot holder Remove the presser foot holder when cleaning the sewing machine or when installing a presser foot that the g presser foot is securely attached. a left hand. a Presser foot holder b Presser bar ... foot holder in your left side of the presser bar. 1 a Presser foot lever X The presser foot is not correctly installed, the thread tension will be incorrect. a • For details, refer to loosen the presser foot b holder screw. NCBC2000.book Page 25 Thursday, October 21,...
User Guide
Page 30
...; When the foot controller is plugged in, (start or stop sewing. ● When sewing is stopped, refer to sew. ■ Correct tension 2 Correct tension is important as too much or too little tension will stay up when sewing is stopped, the needle remains lowered (in the fabric). The machine can be used to start /stop position" (page 10...
...; When the foot controller is plugged in, (start or stop sewing. ● When sewing is stopped, refer to sew. ■ Correct tension 2 Correct tension is important as too much or too little tension will stay up when sewing is stopped, the needle remains lowered (in the fabric). The machine can be used to start /stop position" (page 10...
User Guide
Page 31
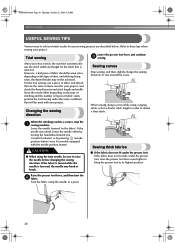
... to its highest position. 30 When the stitching reaches a corner, stop the a sewing machine. If the needle was raised, lower the needle either by turning the handwheel toward you select a stitch, the machine automatically sets the stitch width and length for your project. If the fabric is turned...foot lever even higher to bring the presser foot to these tips when sewing your project, and check the thread tension and stitch length and width. Trial sewing Lower the presser foot lever and continue c sewing. Since the results differ depending on the type of fabric and thread ...
... to its highest position. 30 When the stitching reaches a corner, stop the a sewing machine. If the needle was raised, lower the needle either by turning the handwheel toward you select a stitch, the machine automatically sets the stitch width and length for your project. If the fabric is turned...foot lever even higher to bring the presser foot to these tips when sewing your project, and check the thread tension and stitch length and width. Trial sewing Lower the presser foot lever and continue c sewing. Since the results differ depending on the type of fabric and thread ...

User Guide
Page 51
... 4.0 mm (3/16 inch) and loosen the thread tension. • For details, refer to create gathers. a a 1 cm (3/8 inch) • Do not sew reverse/reinforcement stitches or cut the thread. Pull the bobbin threads to "Selecting stitching" (page 27) and "Thread tension" (page 29). e Stitch between the straight stitches... of the fabric. 1 Select stitch or . b Select stitch , and then increase the thread c tension. • For details, refer to fabric. It is called "shell tucks". Sew while making sure that look like shells are used to decorate trims, the front of blouses or cuffs ...
... 4.0 mm (3/16 inch) and loosen the thread tension. • For details, refer to create gathers. a a 1 cm (3/8 inch) • Do not sew reverse/reinforcement stitches or cut the thread. Pull the bobbin threads to "Selecting stitching" (page 27) and "Thread tension" (page 29). e Stitch between the straight stitches... of the fabric. 1 Select stitch or . b Select stitch , and then increase the thread c tension. • For details, refer to fabric. It is called "shell tucks". Sew while making sure that look like shells are used to decorate trims, the front of blouses or cuffs ...
User Guide
Page 60
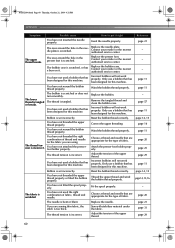
... knots or tangles. page 9 The sewing machine does not work properly. left. page 22 The needle is pushed to Move the bobbin winder shaft to firmly tighten the screw. Choose a thread and needle that has been designed for this machine. appropriate for example, in . Loosen the upper thread tension. The area around the hole...
... knots or tangles. page 9 The sewing machine does not work properly. left. page 22 The needle is pushed to Move the bobbin winder shaft to firmly tighten the screw. Choose a thread and needle that has been designed for this machine. appropriate for example, in . Loosen the upper thread tension. The area around the hole...
User Guide
Page 61
...work properly. Replace the needle. Sew with stabiliser material under the fabric. page 11 page 11 - Only use a bobbin that are using. You have not used a bobbin that has been designed for this machine. Adjust the tension of the upper thread. page ...bobbin thread properly. Choose a thread and needle that has been designed for this machine. The lower thread is wrinkled. Reset the bobbin thread correctly. The thread tension is set incorrectly. Contact your retailer or the nearest authorised service center. Attach the...
...work properly. Replace the needle. Sew with stabiliser material under the fabric. page 11 page 11 - Only use a bobbin that are using. You have not used a bobbin that has been designed for this machine. Adjust the tension of the upper thread. page ...bobbin thread properly. Choose a thread and needle that has been designed for this machine. The lower thread is wrinkled. Reset the bobbin thread correctly. The thread tension is set incorrectly. Contact your retailer or the nearest authorised service center. Attach the...
User Guide
Page 62
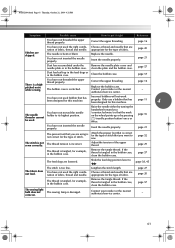
...up or by pressing (needle position button) once or twice. Raise the needle either by turning the handwheel toward you want to sew. Adjust the tension of fabric. Slide the feed dog position lever to . You have not threaded the upper thread properly. Only use a bobbin.... Choose a thread and needle that has been designed for this machine. Insert the needle properly. page 21 The presser foot that has been designed for this machine. page 57 The sewing light bulb does not The sewing lamp is scratched. NCBC2000.book Page 61 Thursday, October 21, ...
...up or by pressing (needle position button) once or twice. Raise the needle either by turning the handwheel toward you want to sew. Adjust the tension of fabric. Slide the feed dog position lever to . You have not threaded the upper thread properly. Only use a bobbin.... Choose a thread and needle that has been designed for this machine. Insert the needle properly. page 21 The presser foot that has been designed for this machine. page 57 The sewing light bulb does not The sewing lamp is scratched. NCBC2000.book Page 61 Thursday, October 21, ...
User Guide
Page 64
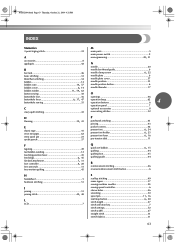
... 33 needle position button 6 needle threader 17 O buttonhole foot 36 openings 46 buttonhole lever 6, 37, 47 buttonhole sewing 35 operation beep 62 operation buttons 6 4 operation panel 7 C crazy quilt stitching 43 optional accessories 8 overcasting stitches...tension disk 11 Q quick-set bobbin 6, 15 quilting 44 quilting foot 45 quilting guide 44 R reinforcement stitching 46 reverse/reinforcement stitch button 6 H handwheel 5 heirloom stitching 51 J joining 51 joining stitch 42, 48 L LCD 7 S scallop stitching 49 seam ripper 37 sewing machine needles 20 sewing...
... 33 needle position button 6 needle threader 17 O buttonhole foot 36 openings 46 buttonhole lever 6, 37, 47 buttonhole sewing 35 operation beep 62 operation buttons 6 4 operation panel 7 C crazy quilt stitching 43 optional accessories 8 overcasting stitches...tension disk 11 Q quick-set bobbin 6, 15 quilting 44 quilting foot 45 quilting guide 44 R reinforcement stitching 46 reverse/reinforcement stitch button 6 H handwheel 5 heirloom stitching 51 J joining 51 joining stitch 42, 48 L LCD 7 S scallop stitching 49 seam ripper 37 sewing machine needles 20 sewing...
User Guide
Page 65
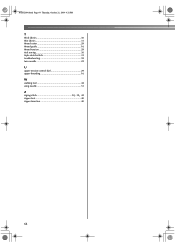
NCBC2000.book Page 64 Thursday, October 21, 2004 4:32 PM T thick fabrics 30 thin fabrics 31 thread cutter 29 thread guide 16 thread tension 29 trial sewing 30 triple stretch stitch 33 troubleshooting 59 twin needle 22 U upper tension-control dial 29 upper threading 16 W walking foot 44 wing needle 51 Z zigzag stitch 30, 32, 42 zipper foot 40 zipper Insertion 40 64
NCBC2000.book Page 64 Thursday, October 21, 2004 4:32 PM T thick fabrics 30 thin fabrics 31 thread cutter 29 thread guide 16 thread tension 29 trial sewing 30 triple stretch stitch 33 troubleshooting 59 twin needle 22 U upper tension-control dial 29 upper threading 16 W walking foot 44 wing needle 51 Z zigzag stitch 30, 32, 42 zipper foot 40 zipper Insertion 40 64


