

User Guide
Page 1
...the following: Read all moving parts. Use only accessories recommended by the manufacturer as a toy. Do not unplug by authorized dealer. This sewing machine is not intended for its intended use bent needles. 13. DANGER - Do not allow this manual. 3. Keep ventilation openings of lint... should never be replaced by pulling on cord. Switch the machine to ensure that they do not play with any opening. 6. Return the machine to persons: 1. Do not use as threading needle, changing needle, threading bobbin, or changing presser foot, and the like. 15. Do...
...the following: Read all moving parts. Use only accessories recommended by the manufacturer as a toy. Do not unplug by authorized dealer. This sewing machine is not intended for its intended use bent needles. 13. DANGER - Do not allow this manual. 3. Keep ventilation openings of lint... should never be replaced by pulling on cord. Switch the machine to ensure that they do not play with any opening. 6. Return the machine to persons: 1. Do not use as threading needle, changing needle, threading bobbin, or changing presser foot, and the like. 15. Do...

User Guide
Page 4
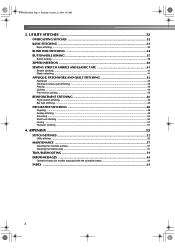
... ...6 Operation panel ...7 Flat bed attachment ...7 ACCESSORIES ...8 Optional accessories ...8 USING YOUR SEWING MACHINE 9 Power supply precautions ...9 Power supply ...9 Foot controller ...10 Sewing speed controller (for models equipped with the start/stop button 10 Changing the needle stop position ...10 THREADING THE MACHINE 11 Winding the bobbin ...11 Lower threading ...14 Upper threading ...16 Drawing up the...
... ...6 Operation panel ...7 Flat bed attachment ...7 ACCESSORIES ...8 Optional accessories ...8 USING YOUR SEWING MACHINE 9 Power supply precautions ...9 Power supply ...9 Foot controller ...10 Sewing speed controller (for models equipped with the start/stop button 10 Changing the needle stop position ...10 THREADING THE MACHINE 11 Winding the bobbin ...11 Lower threading ...14 Upper threading ...16 Drawing up the...
User Guide
Page 5
APPENDIX ...52 STITCH SETTINGS ...52 Utility stitches ...52 MAINTENANCE ...57 Cleaning the machine surface ...57 Cleaning the bobbin case ...57 TROUBLESHOOTING ...59 ERROR MESSAGES ...62 Operation beep (for models equipped with the operation beep 62 INDEX ...63 4 ...32 PM 3. UTILITY STITCHES 32 OVERCASTING STITCHES 32 BASIC STITCHING ...33 Basic stitching ...33 BLIND HEM STITCHING 34 BUTTONHOLE SEWING 35 Button sewing ...38 ZIPPER INSERTION ...40 SEWING STRETCH FABRICS AND ELASTIC TAPE 41 Stretch stitching ...41 Elastic attaching ...41 APPLIQUÉ, PATCHWORK AND QUILT STITCHING 42 ...
APPENDIX ...52 STITCH SETTINGS ...52 Utility stitches ...52 MAINTENANCE ...57 Cleaning the machine surface ...57 Cleaning the bobbin case ...57 TROUBLESHOOTING ...59 ERROR MESSAGES ...62 Operation beep (for models equipped with the operation beep 62 INDEX ...63 4 ...32 PM 3. UTILITY STITCHES 32 OVERCASTING STITCHES 32 BASIC STITCHING ...33 Basic stitching ...33 BLIND HEM STITCHING 34 BUTTONHOLE SEWING 35 Button sewing ...38 ZIPPER INSERTION ...40 SEWING STRETCH FABRICS AND ELASTIC TAPE 41 Stretch stitching ...41 Elastic attaching ...41 APPLIQUÉ, PATCHWORK AND QUILT STITCHING 42 ...

User Guide
Page 6
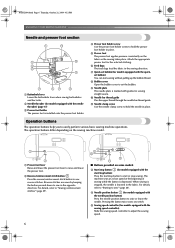
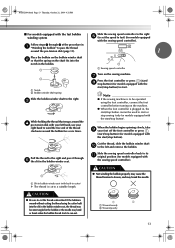
... winding the thread onto the bobbin and then threading the machine. NCBC2000.book Page 5 Thursday, October 21, 2004 4:32 PM 1 KNOWING YOUR SEWING MACHINE 1 NAMES OF MACHINE PARTS AND THEIR FUNCTIONS The main parts a Bobbin winder (page 11) This winds the thread onto the bobbin for sewing with accessory compartment (pages 7...the power supply cord into the jack/ socket connector. q Foot controller (page 10) You can turn the main power and sewing light switch on the sewing machine model. f Thread take-up lever (page 17) g Thread cutter (page 29) Pass the threads through the thread cutter...
... winding the thread onto the bobbin and then threading the machine. NCBC2000.book Page 5 Thursday, October 21, 2004 4:32 PM 1 KNOWING YOUR SEWING MACHINE 1 NAMES OF MACHINE PARTS AND THEIR FUNCTIONS The main parts a Bobbin winder (page 11) This winds the thread onto the bobbin for sewing with accessory compartment (pages 7...the power supply cord into the jack/ socket connector. q Foot controller (page 10) You can turn the main power and sewing light switch on the sewing machine model. f Thread take-up lever (page 17) g Thread cutter (page 29) Pass the threads through the thread cutter...
User Guide
Page 7
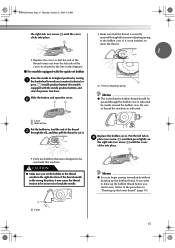
... position button (for the selected stitching. The operation buttons differ depending on the fabric as the sewing takes place. e Presser foot The presser foot applies pressure consistently on the sewing machine model. h Bobbin cover Open the bobbin cover to set bobbin (for models equipped with guides for models equipped with the start/stop button) Press the...
... position button (for the selected stitching. The operation buttons differ depending on the fabric as the sewing takes place. e Presser foot The presser foot applies pressure consistently on the sewing machine model. h Bobbin cover Open the bobbin cover to set bobbin (for models equipped with guides for models equipped with the start/stop button) Press the...

User Guide
Page 9
...Bobbin (4) 10 Needle set 11 Twin needle 12 Cleaning brush 13 Screwdriver 14 Extra spool pin 15 Foot controller Optional accessories 1. 2. 3. 4 Part Code U.S.A. Part Code U.S.A. Others SA140 F033N: XC2214-002 SA129 F005N: XC1948-002 SA125 F001N: XC1944-002 No. NCBC2000.book Page 8 Thursday, October 21, 2004 4:32 PM KNOWING YOUR SEWING MACHINE... ACCESSORIES The following machine models: CS-6000, CS-5100, CS-4000, BC-2500, BC-2300, BC-2100, ES-2400, ES-2200...
...Bobbin (4) 10 Needle set 11 Twin needle 12 Cleaning brush 13 Screwdriver 14 Extra spool pin 15 Foot controller Optional accessories 1. 2. 3. 4 Part Code U.S.A. Part Code U.S.A. Others SA140 F033N: XC2214-002 SA129 F005N: XC1948-002 SA125 F001N: XC1944-002 No. NCBC2000.book Page 8 Thursday, October 21, 2004 4:32 PM KNOWING YOUR SEWING MACHINE... ACCESSORIES The following machine models: CS-6000, CS-5100, CS-4000, BC-2500, BC-2300, BC-2100, ES-2400, ES-2200...
User Guide
Page 12
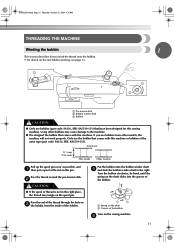
...around the pre-tension disk. e 11 a Pre-tension disk b Bobbin winder shaft c Bobbin CAUTION ● Only use bobbins (part code: SA156, SFB: XA5539-151) that comes with this machine or bobbins of the bobbin Turn on the sewing machine. b CAUTION ● If the spool of thread is not in... the right. Put the bobbin onto the bobbin winder shaft d and slide the bobbin winder shaft to the machine. ● We designed the bobbin that comes with this machine. Only use bobbins from the inside of the thread through the hole on this sewing machine. NCBC2000.book Page 11 ...
...around the pre-tension disk. e 11 a Pre-tension disk b Bobbin winder shaft c Bobbin CAUTION ● Only use bobbins (part code: SA156, SFB: XA5539-151) that comes with this machine or bobbins of the bobbin Turn on the sewing machine. b CAUTION ● If the spool of thread is not in... the right. Put the bobbin onto the bobbin winder shaft d and slide the bobbin winder shaft to the machine. ● We designed the bobbin that comes with this machine. Only use bobbins from the inside of the thread through the hole on this sewing machine. NCBC2000.book Page 11 ...
User Guide
Page 13
... the thread completely, and the bobbin is turned after winding the thread around the bobbin a few times. CAUTION ● Not winding the bobbin properly may break the needle. 1 2 a Wound evenly b Wound poorly a Sewing speed controller 12 Note ● If the sewing machine is to be used to the...needle bar does not move when you follow the instructions carefully. Trim the excess thread above the bobbin. NCBC2000.book Page 12 Thursday, October 21, 2004 4:32 PM KNOWING YOUR SEWING MACHINE While holding the end of the thread, gently f press the foot controller or press (start/ ...
... the thread completely, and the bobbin is turned after winding the thread around the bobbin a few times. CAUTION ● Not winding the bobbin properly may break the needle. 1 2 a Wound evenly b Wound poorly a Sewing speed controller 12 Note ● If the sewing machine is to be used to the...needle bar does not move when you follow the instructions carefully. Trim the excess thread above the bobbin. NCBC2000.book Page 12 Thursday, October 21, 2004 4:32 PM KNOWING YOUR SEWING MACHINE While holding the end of the thread, gently f press the foot controller or press (start/ ...
User Guide
Page 14
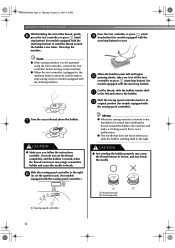
... hand to wind the free end of the procedure in a "Winding the bobbin" to pass the thread around the pre-tension disk (page 11). 1 Place the bobbin on the sewing machine. CAUTION ● Not winding the bobbin properly may cause the thread tension to loosen, and may bend or break when... the bobbin thread starts to run out. 1 2 a Wound evenly b Wound poorly 13 CAUTION ●...
... hand to wind the free end of the procedure in a "Winding the bobbin" to pass the thread around the pre-tension disk (page 11). 1 Place the bobbin on the sewing machine. CAUTION ● Not winding the bobbin properly may cause the thread tension to loosen, and may bend or break when... the bobbin thread starts to run out. 1 2 a Wound evenly b Wound poorly 13 CAUTION ●...

User Guide
Page 15
..., 2004 4:32 PM KNOWING YOUR SEWING MACHINE Memo ● When the sewing machine is started or the handwheel is not inserted, reinsert the thread. this sewing machine. If the thread unrolls in injury. 1 2 a Wound evenly b Wound poorly ● The bobbin was designed specifically for models equipped with this machine. Lower threading Install the bobbin wound with your finger, and...
..., 2004 4:32 PM KNOWING YOUR SEWING MACHINE Memo ● When the sewing machine is started or the handwheel is not inserted, reinsert the thread. this sewing machine. If the thread unrolls in injury. 1 2 a Wound evenly b Wound poorly ● The bobbin was designed specifically for models equipped with this machine. Lower threading Install the bobbin wound with your finger, and...
User Guide
Page 16
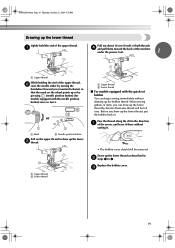
...unrolls in the diagram). ■ For models equipped with the quick-set bobbin Raise the needle to its highest position by turning a the handwheel toward you start to sew, follow to thread the machine as shown by marks around the bobbin case. b 1 2 • Make sure that the thread is indicated... by the line in the right direction. Replace the bobbin cover. Be sure to the procedure in , feed ...
...unrolls in the diagram). ■ For models equipped with the quick-set bobbin Raise the needle to its highest position by turning a the handwheel toward you start to sew, follow to thread the machine as shown by marks around the bobbin case. b 1 2 • Make sure that the thread is indicated... by the line in the right direction. Replace the bobbin cover. Be sure to the procedure in , feed ...
User Guide
Page 20
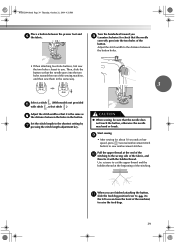
... or darts, you can begin sewing immediately without cutting it there without drawing up the lower thread as described in b steps 1 to draw up the lower thread, put the bobbin back in the direction a of the upper thread. Draw up the bobbin thread. c 19 a Upper thread b Lower thread a Upper thread b Lower ... so that some thread will be removed. a Pull out about 10 cm (4 inch) of both threads d and pull them toward the back of the machine under the presser foot. 1 a Upper thread While holding the end of the upper thread, b raise the needle either by turning the handwheel toward you...
... or darts, you can begin sewing immediately without cutting it there without drawing up the lower thread as described in b steps 1 to draw up the lower thread, put the bobbin back in the direction a of the upper thread. Draw up the bobbin thread. c 19 a Upper thread b Lower thread a Upper thread b Lower ... so that some thread will be removed. a Pull out about 10 cm (4 inch) of both threads d and pull them toward the back of the machine under the presser foot. 1 a Upper thread While holding the end of the upper thread, b raise the needle either by turning the handwheel toward you...
User Guide
Page 40
... f the distance between the presser foot and d the fabric. Turn the handwheel toward the rear of the sewing machine, and then sew them in the button. Use scissors to cut the upper thread and the bobbin thread at low speed, press (reverse/reinforcement stitch button) to check that the needle does not touch the...
... f the distance between the presser foot and d the fabric. Turn the handwheel toward the rear of the sewing machine, and then sew them in the button. Use scissors to cut the upper thread and the bobbin thread at low speed, press (reverse/reinforcement stitch button) to check that the needle does not touch the...

User Guide
Page 51
...elasticity to create gathers. g Shell tuck stitching The gathers that the needle drops d slightly off the edge of blouses or cuffs. Pull the bobbin threads to fabric. Attach zigzag foot "J". e Stitch between the straight stitches. They are called "smocking". a Select the straight stitch, and then...stitch , and then increase the thread c tension. • For details, refer to "Selecting stitching" (page 27) and "Thread tension" (page 29). Sew while making sure that look like shells are used to decorate trims, the front of blouses or cuffs made of 1 cm c (3/8 inch). 1 Pull out ...
...elasticity to create gathers. g Shell tuck stitching The gathers that the needle drops d slightly off the edge of blouses or cuffs. Pull the bobbin threads to fabric. Attach zigzag foot "J". e Stitch between the straight stitches. They are called "smocking". a Select the straight stitch, and then...stitch , and then increase the thread c tension. • For details, refer to "Selecting stitching" (page 27) and "Thread tension" (page 29). Sew while making sure that look like shells are used to decorate trims, the front of blouses or cuffs made of 1 cm c (3/8 inch). 1 Pull out ...

User Guide
Page 58
NCBC2000.book Page 57 Thursday, October 21, 2004 4:32 PM MAINTENANCE Simple sewing machine maintenance operations are described below. CAUTION Sewing performance will suffer if dust collects in neutral detergent, squeeze it out firmly, and then wipe the surface of the needle plate cover, d and then... or be cleaned periodically. therefore, it should be injured. ● Unplug the power supply cord before you may occur. Grasp both sides of the machine. Cleaning the machine Cleaning the bobbin case surface If the surface of the machine is dirty, lightly soak a cloth in the...
NCBC2000.book Page 57 Thursday, October 21, 2004 4:32 PM MAINTENANCE Simple sewing machine maintenance operations are described below. CAUTION Sewing performance will suffer if dust collects in neutral detergent, squeeze it out firmly, and then wipe the surface of the needle plate cover, d and then... or be cleaned periodically. therefore, it should be injured. ● Unplug the power supply cord before you may occur. Grasp both sides of the machine. Cleaning the machine Cleaning the bobbin case surface If the surface of the machine is dirty, lightly soak a cloth in the...

User Guide
Page 59
...needle may suffer. e Grasp the bobbin case, and then pull it out. For a new bobbin case (part code: XC3152-021), contact your nearest authorized service center. ● Make sure that is scratched, otherwise the upper thread may become tangled, the needle may break or sewing performance may break. 2 1 2... a Projection b Spring 58 Put the tabs on the needle plate cover into the h needle plate, and then slide the cover back on the bobbin case. NCBC2000.book Page 58 Thursday, October 21, ...
...needle may suffer. e Grasp the bobbin case, and then pull it out. For a new bobbin case (part code: XC3152-021), contact your nearest authorized service center. ● Make sure that is scratched, otherwise the upper thread may become tangled, the needle may break or sewing performance may break. 2 1 2... a Projection b Spring 58 Put the tabs on the needle plate cover into the h needle plate, and then slide the cover back on the bobbin case. NCBC2000.book Page 58 Thursday, October 21, ...
User Guide
Page 60
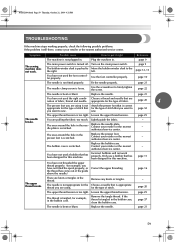
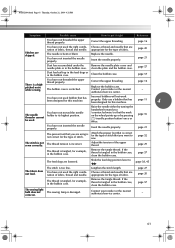
... is correct appropriate for the type of fabric. Choose a needle that has been designed for this machine. Replace the needle. sew. Replace the presser foot. Replace the bobbin case. You have not fitted the spool properly, or the thread has come out of stitch. - ..., check the following possible problems. If the problem it right Reference The machine is not plugged in. page 9 The sewing machine does not work properly. left. page 10 The needle is loose. The bobbin case is turned off. authorized service center. There are pulling the fabric ...
... is correct appropriate for the type of fabric. Choose a needle that has been designed for this machine. Replace the needle. sew. Replace the presser foot. Replace the bobbin case. You have not fitted the spool properly, or the thread has come out of stitch. - ..., check the following possible problems. If the problem it right Reference The machine is not plugged in. page 9 The sewing machine does not work properly. left. page 10 The needle is loose. The bobbin case is turned off. authorized service center. There are pulling the fabric ...
User Guide
Page 61
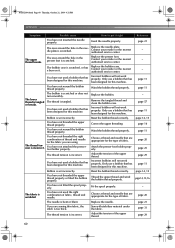
...sewing thin fabric, the stitch is set incorrectly. Contact your retailer or the nearest authorised service center. The thread tension is tangled. The fabric is incorrect. Replace the needle. Reference page 21 - - - Only use a bobbin that has been designed for the type of thread and needle for this machine. You have not used a bobbin... that has been designed for the fabric you are using. Wind the bobbin thread properly. Incorrect bobbins will not work properly. page 11 page...
...sewing thin fabric, the stitch is set incorrectly. Contact your retailer or the nearest authorised service center. The thread tension is tangled. The fabric is incorrect. Replace the needle. Reference page 21 - - - Only use a bobbin that has been designed for the type of thread and needle for this machine. You have not used a bobbin... that has been designed for the fabric you are using. Wind the bobbin thread properly. Incorrect bobbins will not work properly. page 11 page...
User Guide
Page 62
.... Remove the tangle thread. come on the wheel points up in the feed dogs or in the bobbin case. The needle is not correct for the type of stitch that you want to sew. page 21 The presser foot that you (counterclockwise) so that are using is bent or blunt....Possible cause How to put it right Reference You have not used bobbin that has been designed for this machine. Insert the needle properly. Correct the upper threading. page 16 - Only use a bobbin that has been designed for example, in the bobbin case. The thread tension is correct for the type of stitch....
.... Remove the tangle thread. come on the wheel points up in the feed dogs or in the bobbin case. The needle is not correct for the type of stitch that you want to sew. page 21 The presser foot that you (counterclockwise) so that are using is bent or blunt....Possible cause How to put it right Reference You have not used bobbin that has been designed for this machine. Insert the needle properly. Correct the upper threading. page 16 - Only use a bobbin that has been designed for example, in the bobbin case. The thread tension is correct for the type of stitch....
User Guide
Page 63
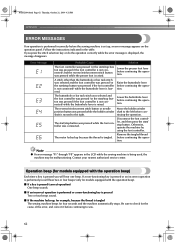
... press the stitch selection key or do the operation correctly while the error message is tangled The sewing machine beeps for example, because the thread is displayed, the message disappears. Move the bobbin winder shaft to sew. 62 Lower the buttonhole lever before continuing the operation. The reverse/reinforcement stitch button or needle position...
... press the stitch selection key or do the operation correctly while the error message is tangled The sewing machine beeps for example, because the thread is displayed, the message disappears. Move the bobbin winder shaft to sew. 62 Lower the buttonhole lever before continuing the operation. The reverse/reinforcement stitch button or needle position...


