

Users Manual - English
Page 19
... winder shaft to 3-15/16 inches) of the thread, gently j press the foot controller or press (start/ stop button) (for models equipped with the start /stop the machine. Turn on the shaft b Notch c 7-10 cm (2-3/4 ... disk d Pull it in as far as possible. i While holding the end of thread from the hole on the bobbin. Pull the thread to the right, pass it under the pretension disk. Note ●...notch in as far as possible. ● Pull the thread taut and hold the end of thread from the hole on the bobbin. 1 a 1 cm (3/8 inch) CAUTION ● Make sure you do not cut the...
... winder shaft to 3-15/16 inches) of the thread, gently j press the foot controller or press (start/ stop button) (for models equipped with the start /stop the machine. Turn on the shaft b Notch c 7-10 cm (2-3/4 ... disk d Pull it in as far as possible. i While holding the end of thread from the hole on the bobbin. Pull the thread to the right, pass it under the pretension disk. Note ●...notch in as far as possible. ● Pull the thread taut and hold the end of thread from the hole on the bobbin. 1 a 1 cm (3/8 inch) CAUTION ● Make sure you do not cut the...
Users Manual - English
Page 54
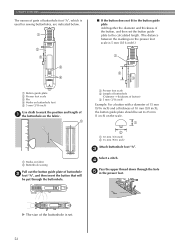
...upper thread down through the hole e in the button guide plate Add together the diameter and thickness of the button, and then set the button guide plate to the calculated length. (The distance between the markings on the presser foot scale is 5 mm (3/16 inch).) 1 3 4 A a Button guide plate b Presser foot ...buttonhole. 2 3 a Presser foot scale b Length of buttonhole (Diameter + thickness of button) c 5 mm (3/16 inch) Example: For a button with a diameter of 15 mm (9/16 inch) and a thickness of 10 mm (3/8 inch), the button guide plate should be set . 52 A X The size of the buttonhole is set...
...upper thread down through the hole e in the button guide plate Add together the diameter and thickness of the button, and then set the button guide plate to the calculated length. (The distance between the markings on the presser foot scale is 5 mm (3/16 inch).) 1 3 4 A a Button guide plate b Presser foot ...buttonhole. 2 3 a Presser foot scale b Length of buttonhole (Diameter + thickness of button) c 5 mm (3/16 inch) Example: For a button with a diameter of 15 mm (9/16 inch) and a thickness of 10 mm (3/8 inch), the button guide plate should be set . 52 A X The size of the buttonhole is set...
Users Manual - English
Page 57
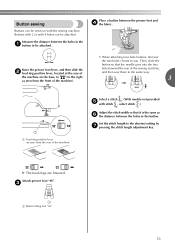
... on the base, to (to the right as f the distance between the holes in the button. X The feed dogs are lowered. Set the stitch length to be attached. c 1 a Button fitting foot "M" 55 Attach presser foot "M". Place a button between the holes in the same way. 3 a Feed dog position lever (as seen from... the needle goes into the two holes toward the rear of the sewing machine, and then sew them in the a button to the shortest setting by g pressing the stitch length adjustment key. Buttons with 2 or with the sewing machine. Then, slide the button so that it is the same ...
... on the base, to (to the right as f the distance between the holes in the button. X The feed dogs are lowered. Set the stitch length to be attached. c 1 a Button fitting foot "M" 55 Attach presser foot "M". Place a button between the holes in the same way. 3 a Feed dog position lever (as seen from... the needle goes into the two holes toward the rear of the sewing machine, and then sew them in the a button to the shortest setting by g pressing the stitch length adjustment key. Buttons with 2 or with the sewing machine. Then, slide the button so that it is the same ...

Users Manual - English
Page 58
...sure that the needle correctly goes into the two holes of the button. When you h (counterclockwise) to check that the needle does not touch the button, otherwise the needle may bend or break. Adjust the stitch width to the distance between the button holes. Use scissors to cut the upper thread and the... thread. Start sewing. Pull the upper thread at the beginning of the stitching. UTILITY STITCHES Turn the handwheel toward you are finished attaching the button, k slide the feed dog position lever to (to the left as seen from the front of the machine) and turn the handwheel to...
...sure that the needle correctly goes into the two holes of the button. When you h (counterclockwise) to check that the needle does not touch the button, otherwise the needle may bend or break. Adjust the stitch width to the distance between the button holes. Use scissors to cut the upper thread and the... thread. Start sewing. Pull the upper thread at the beginning of the stitching. UTILITY STITCHES Turn the handwheel toward you are finished attaching the button, k slide the feed dog position lever to (to the left as seen from the front of the machine) and turn the handwheel to...

Users Manual - English
Page 68
...triple stretch stitching to strain, such as pocket corners and openings. c • For details, refer to "Starting to strain, such as sleeve holes, inseams and pocket corners. b Select stitch . Application Stitch Width Stitch Length [mm (inch.)] [mm (inch.)] Auto Manual Auto Manual Triple ...model Twin Needle Walking Foot Reverse (Rev.)/ Reinforcement (Rfc.) Stitching Stitch Name Pattern No. Otherwise, injuries may occur if the foot controller or (start/stop button) is described below. 2 3 a Presser foot scale b Length of bar tack c 5 mm (3/16 inch) • A bar tack with a maximum...
...triple stretch stitching to strain, such as pocket corners and openings. c • For details, refer to "Starting to strain, such as sleeve holes, inseams and pocket corners. b Select stitch . Application Stitch Width Stitch Length [mm (inch.)] [mm (inch.)] Auto Manual Auto Manual Triple ...model Twin Needle Walking Foot Reverse (Rev.)/ Reinforcement (Rfc.) Stitching Stitch Name Pattern No. Otherwise, injuries may occur if the foot controller or (start/stop button) is described below. 2 3 a Presser foot scale b Length of bar tack c 5 mm (3/16 inch) • A bar tack with a maximum...
Users Manual - English
Page 95
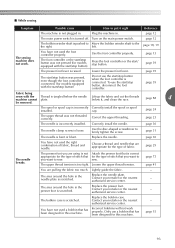
...is tangled below it right Reference The machine is scratched. The area around the hole in the presser foot is not plugged in . Incorrect bobbins will not work . Only use the start / stop button was not pressed (for the type of fabric, thread and needle. You ... upper thread tension. Contact your retailer or the nearest authorized service center. - Use the foot controller properly. page 39 The start/stop button. below the needle Lift up the fabric and cut the threads machine cannot plate. Contact your retailer or the nearest authorized service center. ...
...is tangled below it right Reference The machine is scratched. The area around the hole in the presser foot is not plugged in . Incorrect bobbins will not work . Only use the start / stop button was not pressed (for the type of fabric, thread and needle. You ... upper thread tension. Contact your retailer or the nearest authorized service center. - Use the foot controller properly. page 39 The start/stop button. below the needle Lift up the fabric and cut the threads machine cannot plate. Contact your retailer or the nearest authorized service center. ...
Users Manual - English
Page 100
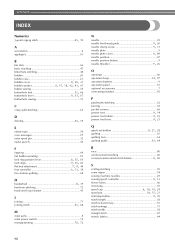
...63 quilting foot 64 , quilting guide 63 64 R race 80 reinforcement stitching 40 , reverse/reinforcement stitch button 9 40 S scallop stitching 70 seam ripper 54 sewing machine needles 29 , sewing speed controller 9 13 sleeve holes 66 smocking 70 spool cap 6 10, 15, 24 spool , pin 10 15, 23 , start.../stop button 9 39 stitch length 38 stitch selection key 10 stitch settings 73 stitch width 38 straight ...
...63 quilting foot 64 , quilting guide 63 64 R race 80 reinforcement stitching 40 , reverse/reinforcement stitch button 9 40 S scallop stitching 70 seam ripper 54 sewing machine needles 29 , sewing speed controller 9 13 sleeve holes 66 smocking 70 spool cap 6 10, 15, 24 spool , pin 10 15, 23 , start.../stop button 9 39 stitch length 38 stitch selection key 10 stitch settings 73 stitch width 38 straight ...


