
Accessories catalog
Page 36
... - - - - - - - - - 12 Dual Feed Quilting Guide SA206 SA206 SA206 SA206 - - - - - - - - - 13 Edge sewing sheet (5 sheets) - SAWT6 - 5234PRW - Partcode list / Liste des codes de pièces / Listado de codigo de piezas General sewing accessories A B C D E F G H I 17 Software Upgrade Premium Pack II 18 Embroidery positioning sticker (504 stickers) 19 Embroidery card reader 20 Embroidery foot with LED pointer 21 Embroidery Frames 22 Border frame 23 Square embroidery frame 24 Ten spool thread stand SA740...
... - - - - - - - - - 12 Dual Feed Quilting Guide SA206 SA206 SA206 SA206 - - - - - - - - - 13 Edge sewing sheet (5 sheets) - SAWT6 - 5234PRW - Partcode list / Liste des codes de pièces / Listado de codigo de piezas General sewing accessories A B C D E F G H I 17 Software Upgrade Premium Pack II 18 Embroidery positioning sticker (504 stickers) 19 Embroidery card reader 20 Embroidery foot with LED pointer 21 Embroidery Frames 22 Border frame 23 Square embroidery frame 24 Ten spool thread stand SA740...

Accessories catalog
Page 38
... list / Liste des codes de pièces / Artikelnummern-Liste / Artikelnummer lijst / Listado de codigo de piezas / Lista dei codici delle parti / Lista de códigos de peça General sewing accessories A B C D E F G H I 17 Software Upgrade Premium Pack II 18 Embroidery positioning sticker (504 stickers) 19 Embroidery card reader 20 Embroidery foot with LED pointer 21 Embroidery Frames 22 Border frame 23 Square embroidery frame 24 Ten spool thread...
... list / Liste des codes de pièces / Artikelnummern-Liste / Artikelnummer lijst / Listado de codigo de piezas / Lista dei codici delle parti / Lista de códigos de peça General sewing accessories A B C D E F G H I 17 Software Upgrade Premium Pack II 18 Embroidery positioning sticker (504 stickers) 19 Embroidery card reader 20 Embroidery foot with LED pointer 21 Embroidery Frames 22 Border frame 23 Square embroidery frame 24 Ten spool thread...
Operation Manual
Page 6
...Power supply ...12 Foot controller ...13 Sewing speed controller (for models equipped with the start/stop button 13 Changing the needle stop position ...13 Changing the initial needle position ...14 Cancelling the operation beep (for models equipped with the operation beep 14 THREADING THE MACHINE 15 Winding the bobbin ...15 Lower threading ...20 Upper threading ...23 Drawing up the lower thread ...28 REPLACING THE NEEDLE 29 Needle precautions ...29 Needle types and their uses ...29 Checking the needle ...30 Replacing the needle ...30 Sewing with the twin needle ...32 REPLACING THE PRESSER...
...Power supply ...12 Foot controller ...13 Sewing speed controller (for models equipped with the start/stop button 13 Changing the needle stop position ...13 Changing the initial needle position ...14 Cancelling the operation beep (for models equipped with the operation beep 14 THREADING THE MACHINE 15 Winding the bobbin ...15 Lower threading ...20 Upper threading ...23 Drawing up the lower thread ...28 REPLACING THE NEEDLE 29 Needle precautions ...29 Needle types and their uses ...29 Checking the needle ...30 Replacing the needle ...30 Sewing with the twin needle ...32 REPLACING THE PRESSER...
Operation Manual
Page 8
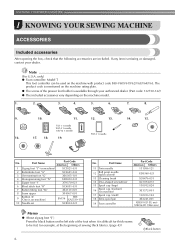
... machine) XC3021-031 2 Buttonhole foot "A" XC2691-033 3 Overcasting foot "G" XE6305-101 4 Monogramming foot "N" XD0810-031 5 Zipper foot "I" X59370-021 6 Blind stitch foot "R" XC4051-031 7 Button fitting foot "M" XE2137-001 8 Seam ripper XF4967-001 9 Bobbin (4) (One is available through your dealer. Part Name 11 Twin needle 12 Ball point needle (gold colored) 13 Cleaning brush 14 Disc-shaped screwdriver 15 Spool cap (large) 16 Spool cap (medium) (on machine.) SA156 SFB: XA5539-151 10 Needle set...
... machine) XC3021-031 2 Buttonhole foot "A" XC2691-033 3 Overcasting foot "G" XE6305-101 4 Monogramming foot "N" XD0810-031 5 Zipper foot "I" X59370-021 6 Blind stitch foot "R" XC4051-031 7 Button fitting foot "M" XE2137-001 8 Seam ripper XF4967-001 9 Bobbin (4) (One is available through your dealer. Part Name 11 Twin needle 12 Ball point needle (gold colored) 13 Cleaning brush 14 Disc-shaped screwdriver 15 Spool cap (large) 16 Spool cap (medium) (on machine.) SA156 SFB: XA5539-151 10 Needle set...
Operation Manual
Page 10
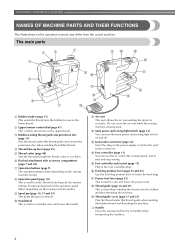
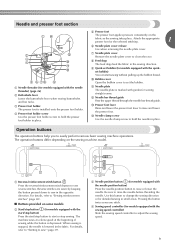
...bobbin thread and threading the machine. l Main power and sewing light switch (page 12) You can use as the lower thread. p Feed dog position lever (page 55 and 65) Use the feed dog position lever to start and stop sewing. f Flat bed attachment with accessory compartment (page 7 and 44) g Operation buttons (page 9) The operation buttons differ depending on the sewing machine model. i Spool pin (page 10, 15 and 23) This holds the spool of the upper thread. Design and position of the operation panel differs depending on the sewing machine model. b Upper tension-control dial...
...bobbin thread and threading the machine. l Main power and sewing light switch (page 12) You can use as the lower thread. p Feed dog position lever (page 55 and 65) Use the feed dog position lever to start and stop sewing. f Flat bed attachment with accessory compartment (page 7 and 44) g Operation buttons (page 9) The operation buttons differ depending on the sewing machine model. i Spool pin (page 10, 15 and 23) This holds the spool of the upper thread. Design and position of the operation panel differs depending on the sewing machine model. b Upper tension-control dial...
Operation Manual
Page 11
... threader) (page 26) b Buttonhole lever Lower the buttonhole lever when sewing buttonholes and bar tacks. Use this button to sew reverse stitches. i Quick-set the bobbin. k Needle plate The needle plate is lowered in the sewing direction. a Reverse/reinforcement stitch button Press the reverse/reinforcement stitch button to change the sewing direction or for sewing straight seams. l Needle bar thread guide Pass the upper thread through the needle bar thread guide. d Presser foot holder screw Use the presser foot holder screw to raise and lower the presser foot. m Presser foot...
... threader) (page 26) b Buttonhole lever Lower the buttonhole lever when sewing buttonholes and bar tacks. Use this button to sew reverse stitches. i Quick-set the bobbin. k Needle plate The needle plate is lowered in the sewing direction. a Reverse/reinforcement stitch button Press the reverse/reinforcement stitch button to change the sewing direction or for sewing straight seams. l Needle bar thread guide Pass the upper thread through the needle bar thread guide. d Presser foot holder screw Use the presser foot holder screw to raise and lower the presser foot. m Presser foot...

Operation Manual
Page 20
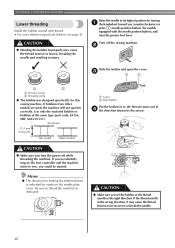
KNOWING YOUR SEWING MACHINE Slide the sewing speed controller to the right l (to set the speed to fast). (For models equipped with the sewing speed controller.) CAUTION ● Not winding the bobbin properly may break the needle. Slide the sewing speed controller back to loosen, and may cause the thread tension to its p original position (for models equipped with the start /stop button). While holding the thread that the spring on the bobbin winder shaft a so that wraps around...
KNOWING YOUR SEWING MACHINE Slide the sewing speed controller to the right l (to set the speed to fast). (For models equipped with the sewing speed controller.) CAUTION ● Not winding the bobbin properly may break the needle. Slide the sewing speed controller back to loosen, and may cause the thread tension to its p original position (for models equipped with the start /stop button). While holding the thread that the spring on the bobbin winder shaft a so that wraps around...
Operation Manual
Page 22
... thread unrolls in d the direction shown by marks on the needle plate cover. CAUTION ● Make sure you (counterclockwise) or press (needle position button) (for this sewing machine. c 1 2 1 2 a Wound evenly b Wound poorly ● The bobbin was designed specifically for models equipped with thread. • For more details on the foot controller and the machine starts to thread the machine as indicated. KNOWING YOUR SEWING MACHINE Lower threading Install the bobbin wound with the needle position button), and raise the presser foot lever. Raise the needle...
... thread unrolls in d the direction shown by marks on the needle plate cover. CAUTION ● Make sure you (counterclockwise) or press (needle position button) (for this sewing machine. c 1 2 1 2 a Wound evenly b Wound poorly ● The bobbin was designed specifically for models equipped with thread. • For more details on the foot controller and the machine starts to thread the machine as indicated. KNOWING YOUR SEWING MACHINE Lower threading Install the bobbin wound with the needle position button), and raise the presser foot lever. Raise the needle...

Operation Manual
Page 23
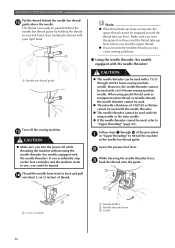
... the needle plate cover. b Slide the button and open the cover. c 1 2 1 a Tension-adjusting spring Replace the bobbin cover. case, it may cause the thread tension to its highest position by the line in the diagram). ■ For models equipped with the quick-set the bobbin so the thread unrolls in the wrong direction, it may cause incorrect thread tension 1 (page 41). press (needle position button) (for feeding the bobbin thread is not correctly inserted through the slit, as indicated. Turn off the sewing machine...
... the needle plate cover. b Slide the button and open the cover. c 1 2 1 a Tension-adjusting spring Replace the bobbin cover. case, it may cause the thread tension to its highest position by the line in the diagram). ■ For models equipped with the quick-set the bobbin so the thread unrolls in the wrong direction, it may cause incorrect thread tension 1 (page 41). press (needle position button) (for feeding the bobbin thread is not correctly inserted through the slit, as indicated. Turn off the sewing machine...
Operation Manual
Page 28
... "Upper threading" (page 23). Lower the presser foot lever. Thread the needle from front to back and pull n out about 5 cm (2 inches) of the procedure a in your right hand. 1 Note ● If the thread take-up lever. If you accidentally step on the foot controller and the machine starts to sew, you may cause sewing problems. ■ Using the needle threader (for models equipped with the needle threader). Make sure you turn the power off...
... "Upper threading" (page 23). Lower the presser foot lever. Thread the needle from front to back and pull n out about 5 cm (2 inches) of the procedure a in your right hand. 1 Note ● If the thread take-up lever. If you accidentally step on the foot controller and the machine starts to sew, you may cause sewing problems. ■ Using the needle threader (for models equipped with the needle threader). Make sure you turn the power off...

Operation Manual
Page 45
Sewing hook-and-loop fastener 2 a Sewing direction Raise the presser foot lever. CAUTION ● Use only the ungummed hook-and-loop fastener which is sewn with the thin needle (65/9-75/11), the needle may not feed when thick seams are being sewn and the presser foot is pushed with the needle for sewing. Note ● Before start sewing, baste together the fabric and the hook-and-loop fastener. ■ If thick seams are...
Sewing hook-and-loop fastener 2 a Sewing direction Raise the presser foot lever. CAUTION ● Use only the ungummed hook-and-loop fastener which is sewn with the thin needle (65/9-75/11), the needle may not feed when thick seams are being sewn and the presser foot is pushed with the needle for sewing. Note ● Before start sewing, baste together the fabric and the hook-and-loop fastener. ■ If thick seams are...

Operation Manual
Page 54
... of 10 mm (3/8 inch), the button guide plate should be set . 52 A X The size of the buttonhole is set to mark the position and length of a the buttonhole on the fabric. 2 1 a Marks on the scale. 1 2 a 10 mm (3/8 inch) b 15 mm (9/16 inch) Attach buttonhole foot "A". UTILITY STITCHES The names of parts of buttonhole foot "A", which is used for sewing buttonholes, are indicated below. 1 2 5 ■ If the button does not fit in the presser foot.
... of 10 mm (3/8 inch), the button guide plate should be set . 52 A X The size of the buttonhole is set to mark the position and length of a the buttonhole on the fabric. 2 1 a Marks on the scale. 1 2 a 10 mm (3/8 inch) b 15 mm (9/16 inch) Attach buttonhole foot "A". UTILITY STITCHES The names of parts of buttonhole foot "A", which is used for sewing buttonholes, are indicated below. 1 2 5 ■ If the button does not fit in the presser foot.

Operation Manual
Page 57
... the front of the machine on with 4 holes can be sewn on the base, to (to the right as f the distance between the holes in the a button to the shortest setting by g pressing the stitch length adjustment key. Measure the distance between the presser foot and d the fabric. Attach presser foot "M". Buttons with 2 or with the sewing machine. Button sewing Buttons can be attached. Set the stitch length to be attached. X The feed dogs are lowered. c 1 a Button fitting foot "M" 55
... the front of the machine on with 4 holes can be sewn on the base, to (to the right as f the distance between the holes in the a button to the shortest setting by g pressing the stitch length adjustment key. Measure the distance between the presser foot and d the fabric. Attach presser foot "M". Buttons with 2 or with the sewing machine. Button sewing Buttons can be attached. Set the stitch length to be attached. X The feed dogs are lowered. c 1 a Button fitting foot "M" 55

Operation Manual
Page 65
... "Removing the presser foot holder" (page 35). Quilts can easily be sewn using the optional walking foot and the optional quilting guide. ● Use the disc-shaped screwdriver to "Changing the needle position" (page 47). Hook the connecting fork of the walking foot c onto the needle clamp screw, lower the presser foot lever, and then use the presser foot holder screw to attach the walking foot to be sewn with the walking foot. Baste the fabric to the presser bar. If the screw is called "quilting". a 6.5 mm (1/4 inch) ■ For a seam...
... "Removing the presser foot holder" (page 35). Quilts can easily be sewn using the optional walking foot and the optional quilting guide. ● Use the disc-shaped screwdriver to "Changing the needle position" (page 47). Hook the connecting fork of the walking foot c onto the needle clamp screw, lower the presser foot lever, and then use the presser foot holder screw to attach the walking foot to be sewn with the walking foot. Baste the fabric to the presser bar. If the screw is called "quilting". a 6.5 mm (1/4 inch) ■ For a seam...

Operation Manual
Page 95
... power switch. Move the bobbin winder shaft to firmly tighten the screw. Press the foot controller or the start /stop button was not threaded correctly. page 13 page 39 The presser foot lever is not plugged in . To use a bobbin that has been designed for the type of stitch that you want to sew. below the needle Lift up the fabric and cut the threads machine cannot plate. The spool or spool cap is loose. Correctly install...
... power switch. Move the bobbin winder shaft to firmly tighten the screw. Press the foot controller or the start /stop button was not threaded correctly. page 13 page 39 The presser foot lever is not plugged in . To use a bobbin that has been designed for the type of stitch that you want to sew. below the needle Lift up the fabric and cut the threads machine cannot plate. The spool or spool cap is loose. Correctly install...

Operation Manual
Page 96
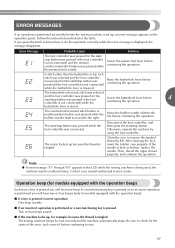
... - - - APPENDIX Symptom The upper thread breaks. Replace the bobbin case. The thread is tangled, for the Choose a needle that has been designed for the type of fabric. The bobbin is incorrectly Correctly install the spool or spool installed. Sew with stabilizer material under the fabric. Reset the bobbin thread correctly. You have not used a bobbin that is too big for the type of stitch. The lower thread is too coarse. Remove the tangle thread. If thin fabrics are knots or...
... - - - APPENDIX Symptom The upper thread breaks. Replace the bobbin case. The thread is tangled, for the Choose a needle that has been designed for the type of fabric. The bobbin is incorrectly Correctly install the spool or spool installed. Sew with stabilizer material under the fabric. Reset the bobbin thread correctly. You have not used a bobbin that is too big for the type of stitch. The lower thread is too coarse. Remove the tangle thread. If thin fabrics are knots or...

Operation Manual
Page 97
... feed dogs or Remove the needle plate cover and in the race. page 80 You have not threaded the upper thread properly. Use the presser foot locking pin (black button on the left side) on a thick seam at the beginning of fabric. Remove the needle plate cover and clean the plate and the race. Lengthen the stitch length. Remove the tangle thread. Incorrect bobbins will not work properly. Only use a bobbin that are using is wrinkled. Replace the bobbin case. Slide the feed dog position lever to keep the presser foot...
... feed dogs or Remove the needle plate cover and in the race. page 80 You have not threaded the upper thread properly. Use the presser foot locking pin (black button on the left side) on a thick seam at the beginning of fabric. Remove the needle plate cover and clean the plate and the race. Lengthen the stitch length. Remove the tangle thread. Incorrect bobbins will not work properly. Only use a bobbin that are using is wrinkled. Replace the bobbin case. Slide the feed dog position lever to keep the presser foot...

Operation Manual
Page 98
... upper threading. Adjust the tension of thread and needle for the fabric you are using is correct for this machine. Correct the upper threading. Bobbin is incorrectly installed. Wind the bobbin thread properly. Attach the presser-foot holder properly. Attach the presser foot that is not appropriate for this machine. You have not threaded the upper thread properly. The bobbin thread is set incorrectly. The thread tension is not sewn correctly. You have not threaded the upper thread properly. Only use a bobbin that has been designed for the type...
... upper threading. Adjust the tension of thread and needle for the fabric you are using is correct for this machine. Correct the upper threading. Bobbin is incorrectly installed. Wind the bobbin thread properly. Attach the presser-foot holder properly. Attach the presser foot that is not appropriate for this machine. You have not threaded the upper thread properly. The bobbin thread is set incorrectly. The thread tension is not sewn correctly. You have not threaded the upper thread properly. Only use a bobbin that has been designed for the type...
Operation Manual
Page 99
... the reverse/ reinforcement stitch button was pressed if the foot controller is not connected) while the buttonhole lever is lowered. A stitch other than the buttonhole or bar tack stitch was selected and the foot controller was pressed (or the start /stop button was pressed while the presser foot is raised. Move the bobbin winder shaft to sew. 97 Otherwise, operate the machine by using the foot controller. The motor locked up because the thread is bent or broken, replace the needle...
... the reverse/ reinforcement stitch button was pressed if the foot controller is not connected) while the buttonhole lever is lowered. A stitch other than the buttonhole or bar tack stitch was selected and the foot controller was pressed (or the start /stop button was pressed while the presser foot is raised. Move the bobbin winder shaft to sew. 97 Otherwise, operate the machine by using the foot controller. The motor locked up because the thread is bent or broken, replace the needle...
Operation Manual
Page 100
... buttonhole sewing 51 C crazy quilt stitching 62 D , darning 45 59 E elastic tape 59 error messages 97 extra spool pin 32 eyelet punch 54 F fagoting 69 fast bobbin winding 18 feed dog position lever 8, 55, 65 feed , dogs 9 55, 64 flat bed , attachment 7 8, 44 foot controller 6 13, 39 free-motion quilting 64 H , handwheel 8 39 heirloom stitching 72 hook-and-loop fastener 43 J joining 71 , joining stitch 61 68 M main parts 8 main power switch 12 , monogramming 70 72 N needle 29 , needle bar thread guide 9 26 , needle clamp screw 9 31 needle plate 9 , needle plate cover...
... buttonhole sewing 51 C crazy quilt stitching 62 D , darning 45 59 E elastic tape 59 error messages 97 extra spool pin 32 eyelet punch 54 F fagoting 69 fast bobbin winding 18 feed dog position lever 8, 55, 65 feed , dogs 9 55, 64 flat bed , attachment 7 8, 44 foot controller 6 13, 39 free-motion quilting 64 H , handwheel 8 39 heirloom stitching 72 hook-and-loop fastener 43 J joining 71 , joining stitch 61 68 M main parts 8 main power switch 12 , monogramming 70 72 N needle 29 , needle bar thread guide 9 26 , needle clamp screw 9 31 needle plate 9 , needle plate cover...


