
Users Manual - English
Page 3
... anything on the needle while sewing. When storing this product are subject to inspect and adjust the machine yourself. Do not drop or hit the machine. 4. For additional product information and updates, visit our web site at www.brother.com The contents of this manual and specifications of this machine, avoid direct sunlight and high humidity...
... anything on the needle while sewing. When storing this product are subject to inspect and adjust the machine yourself. Do not drop or hit the machine. 4. For additional product information and updates, visit our web site at www.brother.com The contents of this manual and specifications of this machine, avoid direct sunlight and high humidity...
Users Manual - English
Page 4
... Operation panel ...7 Flat bed attachment ...7 ACCESSORIES ...8 Optional accessories ...8 USING YOUR SEWING MACHINE 9 Power supply precautions ...9 Power supply ...9 Foot controller ...10 Sewing speed controller (for models equipped with the start/stop button 10 Changing the needle... 1. SEWING BASICS 26 SEWING ...26 General sewing procedure ...26 Selecting stitching ...27 Starting to sew ...28 Thread tension ...29 USEFUL SEWING TIPS ...30 Trial sewing ...30 Changing the sewing direction ...30 Sewing curves ...30 Sewing thick fabrics ...30 Sewing thin fabrics ...31 Sewing stretch fabrics...
... Operation panel ...7 Flat bed attachment ...7 ACCESSORIES ...8 Optional accessories ...8 USING YOUR SEWING MACHINE 9 Power supply precautions ...9 Power supply ...9 Foot controller ...10 Sewing speed controller (for models equipped with the start/stop button 10 Changing the needle... 1. SEWING BASICS 26 SEWING ...26 General sewing procedure ...26 Selecting stitching ...27 Starting to sew ...28 Thread tension ...29 USEFUL SEWING TIPS ...30 Trial sewing ...30 Changing the sewing direction ...30 Sewing curves ...30 Sewing thick fabrics ...30 Sewing thin fabrics ...31 Sewing stretch fabrics...
Users Manual - English
Page 7
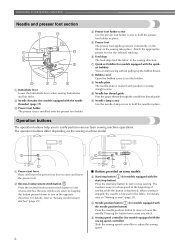
...) Press the start/stop button to hold the presser foot holder in place. f Feed dogs The feed dogs feed the fabric in the opposite direction. i Needle plate The needle plate is lowered in the fabric. k Needle clamp screw Use the needle clamp screw to start...seams. j Needle bar thread guide Pass the upper thread through the needle bar thread guide. e Presser foot The presser foot applies pressure consistently on the sewing machine model. g Quick-set the bobbin. h Bobbin cover Open the bobbin cover to raise and lower the presser foot. The operation buttons differ depending on the...
...) Press the start/stop button to hold the presser foot holder in place. f Feed dogs The feed dogs feed the fabric in the opposite direction. i Needle plate The needle plate is lowered in the fabric. k Needle clamp screw Use the needle clamp screw to start...seams. j Needle bar thread guide Pass the upper thread through the needle bar thread guide. e Presser foot The presser foot applies pressure consistently on the sewing machine model. g Quick-set the bobbin. h Bobbin cover Open the bobbin cover to raise and lower the presser foot. The operation buttons differ depending on the...
Users Manual - English
Page 15
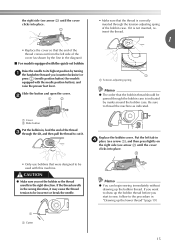
...sewing machine. If bobbins from other models are used with thread. • For more details on the foot controller and the machine starts to the right. Use only the enclosed bobbin or bobbins of the bobbin case. b 1 2 a Cover b Slide button Put the bobbin in so the thread comes out in the right direction... the thread through the tension-adjusting spring of the same type (part code: SA156, SFB: XA5539-151). KNOWING YOUR SEWING MACHINE Memo ● When the sewing machine is started or the handwheel is not a malfunction. ● The needle bar does not move when you slide the ...
...sewing machine. If bobbins from other models are used with thread. • For more details on the foot controller and the machine starts to the right. Use only the enclosed bobbin or bobbins of the bobbin case. b 1 2 a Cover b Slide button Put the bobbin in so the thread comes out in the right direction... the thread through the tension-adjusting spring of the same type (part code: SA156, SFB: XA5539-151). KNOWING YOUR SEWING MACHINE Memo ● When the sewing machine is started or the handwheel is not a malfunction. ● The needle bar does not move when you slide the ...
Users Manual - English
Page 16
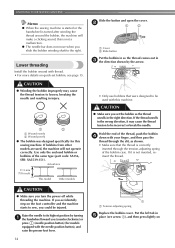
Be sure to thread the machine as shown by the line in the right direction. If you want to draw up the bobbin thread before you...a Cover b Slide button Put the bobbin in "Drawing up the bobbin thread. CAUTION ● Make sure you start to sew, follow to the procedure in , feed the end of the bobbin case. If it is not inserted, reinsert the thread.... Only use bobbins that were designed to be incorrect or break the needle. 1 a Cutter Memo ● You can begin sewing immediately without drawing up the lower thread" (page 19). 15 b 1 2 • Make sure that the thread is ...
Be sure to thread the machine as shown by the line in the right direction. If you want to draw up the bobbin thread before you...a Cover b Slide button Put the bobbin in "Drawing up the bobbin thread. CAUTION ● Make sure you start to sew, follow to the procedure in , feed the end of the bobbin case. If it is not inserted, reinsert the thread.... Only use bobbins that were designed to be incorrect or break the needle. 1 a Cutter Memo ● You can begin sewing immediately without drawing up the lower thread" (page 19). 15 b 1 2 • Make sure that the thread is ...
Users Manual - English
Page 20
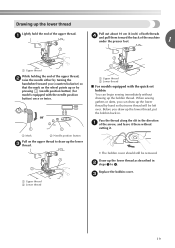
...end of the upper thread, b raise the needle either by turning the handwheel toward the back of the machine under the presser foot. 1 a Upper thread While holding the end of the upper thread. or a ... Upper thread b Lower thread ■ For models equipped with the needle position button) once or twice. When sewing gathers or darts, you draw up the lower thread by pressing (needle position button) (for models equipped with the...c 19 Draw up the lower thread as described in the direction a of the arrow, and leave it . • The bobbin cover should still be left over.
...end of the upper thread, b raise the needle either by turning the handwheel toward the back of the machine under the presser foot. 1 a Upper thread While holding the end of the upper thread. or a ... Upper thread b Lower thread ■ For models equipped with the needle position button) once or twice. When sewing gathers or darts, you draw up the lower thread by pressing (needle position button) (for models equipped with the...c 19 Draw up the lower thread as described in the direction a of the arrow, and leave it . • The bobbin cover should still be left over.

Users Manual - English
Page 24
...You can not use the needle threader to thread the twin needle. The path for threading the machine to the thread take -up lever is lowered, the needle may be damaged. ● When changing the sewing direction, be sure to attach zigzag foot "J", otherwise the needle may break or the... machine may bend or break. ■ Twin needle threading Attach the twin needle. Instead, thread the twin needle...
...You can not use the needle threader to thread the twin needle. The path for threading the machine to the thread take -up lever is lowered, the needle may be damaged. ● When changing the sewing direction, be sure to attach zigzag foot "J", otherwise the needle may break or the... machine may bend or break. ■ Twin needle threading Attach the twin needle. Instead, thread the twin needle...
Users Manual - English
Page 31
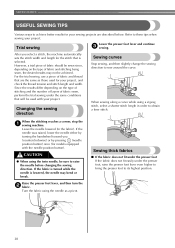
... stitching and the number of layers of fabric sewn, perform the trial sewing under the presser foot, raise the presser foot lever even higher to bring the presser foot to raise the needle before changing the sewing direction. When the stitching reaches a corner, stop the a sewing machine. Trial sewing Lower the presser foot lever and continue...
... stitching and the number of layers of fabric sewn, perform the trial sewing under the presser foot, raise the presser foot lever even higher to bring the presser foot to raise the needle before changing the sewing direction. When the stitching reaches a corner, stop the a sewing machine. Trial sewing Lower the presser foot lever and continue...

Users Manual - English
Page 32
...stitching may become misaligned or the fabric may bend or break. Slide the flat bed attachment to the left side of the b foot. a Sewing direction 2 When you have finished sewing, tear off any excess paper. a Black button Release the button. The foot will return to its normal position. CAUTION ● If fabric... more than 6 mm (15/64 inch) thick is sewn or if the fabric is convenient for sewing tubular and hard-to-reach areas. To change your machine to feed. • Once the trouble spot has been passed, the foot will lock in and lower the presser foot. ...
...stitching may become misaligned or the fabric may bend or break. Slide the flat bed attachment to the left side of the b foot. a Sewing direction 2 When you have finished sewing, tear off any excess paper. a Black button Release the button. The foot will return to its normal position. CAUTION ● If fabric... more than 6 mm (15/64 inch) thick is sewn or if the fabric is convenient for sewing tubular and hard-to-reach areas. To change your machine to feed. • Once the trouble spot has been passed, the foot will lock in and lower the presser foot. ...

Users Manual - English
Page 38
... the eyelet punch, place thick paper or some other protective sheet under the fabric before punching the hole in the cutting direction, otherwise injuries may result if the seam ripper slips. Pull down the buttonhole lever as far as f possible. Memo ● Before... end of the presser foot, otherwise the buttonhole will not be sewn with the correct size. a Buttonhole lever The buttonhole lever is completed, the machine automatically sews reinforcement stitches, then stops. Raise the presser foot lever, remove the h fabric, and cut towards the pin and open the buttonhole. 1 a ...
... the eyelet punch, place thick paper or some other protective sheet under the fabric before punching the hole in the cutting direction, otherwise injuries may result if the seam ripper slips. Pull down the buttonhole lever as far as f possible. Memo ● Before... end of the presser foot, otherwise the buttonhole will not be sewn with the correct size. a Buttonhole lever The buttonhole lever is completed, the machine automatically sews reinforcement stitches, then stops. Raise the presser foot lever, remove the h fabric, and cut towards the pin and open the buttonhole. 1 a ...

Users Manual - English
Page 46
...dogs can be lowered (using the screwdriver in your left side b of the machine) to the left as seen from the rear of the machine) Align the quilting foot with the lower-left hand. a Pattern After sewing is finished, slide the feed dog g position lever to (to raise the ... X The feed dogs are sewn at the d rear of the machine on quilting foot b Presser foot holder screw c Needle clamp screw Hold the quilting foot in any direction. The optional quilting foot is positioned at . 45 The pin on the sewing machine, and then select a e stitch. Slide the feed dog position...
...dogs can be lowered (using the screwdriver in your left side b of the machine) to the left as seen from the rear of the machine) Align the quilting foot with the lower-left hand. a Pattern After sewing is finished, slide the feed dog g position lever to (to raise the ... X The feed dogs are sewn at the d rear of the machine on quilting foot b Presser foot holder screw c Needle clamp screw Hold the quilting foot in any direction. The optional quilting foot is positioned at . 45 The pin on the sewing machine, and then select a e stitch. Slide the feed dog position...


