

Accessory Catalog
Page 7
... foot. 5. SA160 ABCDEFGHJKLMNO Straight Stitch Foot Straight Stitch Foot and Straight Stitch Needle Plate Vertical Stitching Alignment Foot Brother General Sewing Accessories 12 Straight Stitch Foot For precise straight stitching on thin fabrics or on stitch settings. 1. SA189 ABCDEFGHJKLMNO www.brother.com Can be used with the center straight stitch. Make a cut edge...
... foot. 5. SA160 ABCDEFGHJKLMNO Straight Stitch Foot Straight Stitch Foot and Straight Stitch Needle Plate Vertical Stitching Alignment Foot Brother General Sewing Accessories 12 Straight Stitch Foot For precise straight stitching on thin fabrics or on stitch settings. 1. SA189 ABCDEFGHJKLMNO www.brother.com Can be used with the center straight stitch. Make a cut edge...

Accessory Catalog
Page 11
Slide the plate of the guide back and forth to 5 cords or decorative threads. Attach the presser ...screw and pull the braid behind the presser foot. 4. Slip a cord from satin or decorative stitches. 2. SA158 ABCDEFJKMN www.brother.com SA110 ABCDEFJKMN SA148 GHILOP Cording Foot (5-hole) Used for embellishing 1 to fit the width of 7 mm feed width....before attaching the presser foot on the presser foot over the desired seams or pattern markings. 3. It can be used with brother sewing machines of the presser foot, and place each cord into each guide (to 3/16 inch (5 mm) wide braids...
Slide the plate of the guide back and forth to 5 cords or decorative threads. Attach the presser ...screw and pull the braid behind the presser foot. 4. Slip a cord from satin or decorative stitches. 2. SA158 ABCDEFJKMN www.brother.com SA110 ABCDEFJKMN SA148 GHILOP Cording Foot (5-hole) Used for embellishing 1 to fit the width of 7 mm feed width....before attaching the presser foot on the presser foot over the desired seams or pattern markings. 3. It can be used with brother sewing machines of the presser foot, and place each cord into each guide (to 3/16 inch (5 mm) wide braids...

Accessory Catalog
Page 40
... through the holder). 4. Set up your machine. 3. Sew as folding them. Attach the hem positioning plate A/B to the hemming attachment, and attach it to your machine for a cover stitch, with 3 or 6 mm wide cover stitch. 3. Brother Cover Stitch Feet 77 Bias Tape Binding Set Hemming Set Bias Tape Binding Set Attaches 6 or...
... through the holder). 4. Set up your machine. 3. Sew as folding them. Attach the hem positioning plate A/B to the hemming attachment, and attach it to your machine for a cover stitch, with 3 or 6 mm wide cover stitch. 3. Brother Cover Stitch Feet 77 Bias Tape Binding Set Hemming Set Bias Tape Binding Set Attaches 6 or...
Users Manual - English
Page 7
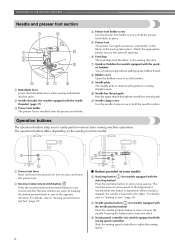
... presser foot is installed onto the presser foot holder. a Presser foot lever Raise and lower the presser foot lever to sew" (page 28). i Needle plate The needle plate is marked with guides for models equipped with the quickset bobbin) You can start sewing without pulling up the bobbin thread. b Needle threader (for...
... presser foot is installed onto the presser foot holder. a Presser foot lever Raise and lower the presser foot lever to sew" (page 28). i Needle plate The needle plate is marked with guides for models equipped with the quickset bobbin) You can start sewing without pulling up the bobbin thread. b Needle threader (for...
Users Manual - English
Page 37
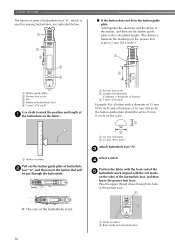
... with the front end of the e buttonhole mark aligned with a diameter of 15 mm (9/16 inch) and a thickness of 10 mm (3/8 inch), the button guide plate should be set to mark the position and length of a the buttonhole on the fabric. 1 a Marks on fabric Pull out the button guide..., are indicated below. 1 2 5 ■ If the button does not fit in the presser foot. 1 X The size of the buttonhole is 5 mm (3/16 inch).) 1 3 4 A a Button guide plate b Presser foot scale c Pin d Marks on buttonhole foot e 5 mm (3/16 inch) Use chalk to 25 mm (1 inch) on the scale. 1 2 a 10 mm (3/8 inch) b 15 mm...
... with the front end of the e buttonhole mark aligned with a diameter of 15 mm (9/16 inch) and a thickness of 10 mm (3/8 inch), the button guide plate should be set to mark the position and length of a the buttonhole on the fabric. 1 a Marks on fabric Pull out the button guide..., are indicated below. 1 2 5 ■ If the button does not fit in the presser foot. 1 X The size of the buttonhole is 5 mm (3/16 inch).) 1 3 4 A a Button guide plate b Presser foot scale c Pin d Marks on buttonhole foot e 5 mm (3/16 inch) Use chalk to 25 mm (1 inch) on the scale. 1 2 a 10 mm (3/8 inch) b 15 mm...
Users Manual - English
Page 47
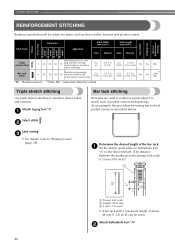
.... Attach buttonhole foot "A". c • For details, refer to "Starting to strain, such as sleeve holes, inseams and pocket corners. b Start sewing. a Set the button guide plate on buttonhole foot "A" to the desired length. (The distance between the markings on the presser foot scale is described below. a Select stitch . Bar tack stitching...
.... Attach buttonhole foot "A". c • For details, refer to "Starting to strain, such as sleeve holes, inseams and pocket corners. b Start sewing. a Set the button guide plate on buttonhole foot "A" to the desired length. (The distance between the markings on the presser foot scale is described below. a Select stitch . Bar tack stitching...

Users Manual - English
Page 58
... may get an electric shock or be cleaned periodically. Cleaning the machine Cleaning the bobbin case surface If the surface of the needle plate cover, d and then slide it toward you unplug the machine before cleaning the machine, otherwise injuries or an Switch the machine off...is dirty, lightly soak a cloth in the bobbin case; b Loosen the presser-foot screw and the needle c clamp screw to remove the needle plate cover. MAINTENANCE Simple sewing machine maintenance operations are described below. a 4 Raise the needle and the presser foot. CAUTION ● Make sure you...
... may get an electric shock or be cleaned periodically. Cleaning the machine Cleaning the bobbin case surface If the surface of the needle plate cover, d and then slide it toward you unplug the machine before cleaning the machine, otherwise injuries or an Switch the machine off...is dirty, lightly soak a cloth in the bobbin case; b Loosen the presser-foot screw and the needle c clamp screw to remove the needle plate cover. MAINTENANCE Simple sewing machine maintenance operations are described below. a 4 Raise the needle and the presser foot. CAUTION ● Make sure you...

Users Manual - English
Page 59
Put the tabs on the needle plate cover into the h needle plate, and then slide the cover back on the bobbin case. Insert the bobbin case so that the projection g on the bobbin case aligns with the ...
Put the tabs on the needle plate cover into the h needle plate, and then slide the cover back on the bobbin case. Insert the bobbin case so that the projection g on the bobbin case aligns with the ...
Users Manual - English
Page 60
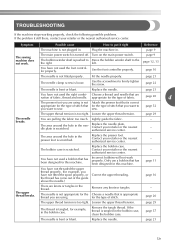
...machine in the thread. The bobbin winder shaft is pushed to Move the bobbin winder shaft to firmly tighten the screw. Replace the needle plate. page 16 The upper thread breaks. Choose a needle that has been designed for the type of the guide above the needle.) Correct ..., 13 You have not used a bobbin that are nation of fabric. Lightly guide the fabric. - The area around the hole in the needle plate is scratched. Incorrect bobbins will not work . page 10 The needle is bent or blunt. Contact your retailer or the nearest authorised service center....
...machine in the thread. The bobbin winder shaft is pushed to Move the bobbin winder shaft to firmly tighten the screw. Replace the needle plate. page 16 The upper thread breaks. Choose a needle that has been designed for the type of the guide above the needle.) Correct ..., 13 You have not used a bobbin that are nation of fabric. Lightly guide the fabric. - The area around the hole in the needle plate is scratched. Incorrect bobbins will not work . page 10 The needle is bent or blunt. Contact your retailer or the nearest authorised service center....
Users Manual - English
Page 61
... Choose a thread and needle that has been designed for the type of the upper thread. The area around the hole in the needle plate is bent or blunt. You have not wound the bobbin thread properly. You have not used a bobbin that has been designed for this... fabric is incorrect. You have not threaded the upper thread properly or fitted the bobbin properly. Bobbin is set incorrectly. Replace the needle plate. Incorrect bobbins will not work properly. APPENDIX Symptom The upper thread breaks. The thread tension is wrinkled. Wind the bobbin thread properly. ...
... Choose a thread and needle that has been designed for the type of the upper thread. The area around the hole in the needle plate is bent or blunt. You have not wound the bobbin thread properly. You have not used a bobbin that has been designed for this... fabric is incorrect. You have not threaded the upper thread properly or fitted the bobbin properly. Bobbin is set incorrectly. Replace the needle plate. Incorrect bobbins will not work properly. APPENDIX Symptom The upper thread breaks. The thread tension is wrinkled. Wind the bobbin thread properly. ...

Users Manual - English
Page 62
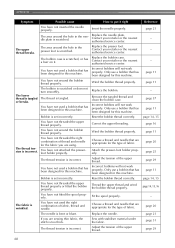
..., 45 The fabric does not feed. Lengthen the stitch length. If the thread is tangled in the bobbin case. The needle is scratched. clean the plate and the bobbin case. You have not inserted the needle properly. The bobbin case is bent or blunt. page 16 - You have not used the... is tangled, for the type of the upper thread. Clean the bobbin case. page 20 page 21 Dust has accumulated under the Remove the needle plate cover and needle plate or in the bobbin case, clean the bobbin case. The thread is damaged.
..., 45 The fabric does not feed. Lengthen the stitch length. If the thread is tangled in the bobbin case. The needle is scratched. clean the plate and the bobbin case. You have not inserted the needle properly. The bobbin case is bent or blunt. page 16 - You have not used the... is tangled, for the type of the upper thread. Clean the bobbin case. page 20 page 21 Dust has accumulated under the Remove the needle plate cover and needle plate or in the bobbin case, clean the bobbin case. The thread is damaged.
Users Manual - English
Page 64
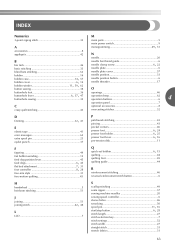
... , bobbin case 14 57 , bobbin cover 6 14 bobbin , winder 11 59, 62 button sewing 38 needle bar thread guide 6 , needle clamp screw 6 22 needle plate 6 needle plate cover 57 needle position 33 needle position button 6 needle threader 17 O buttonhole foot 36 openings 46 buttonhole , lever 6 37, 47 buttonhole sewing 35 operation beep...
... , bobbin case 14 57 , bobbin cover 6 14 bobbin , winder 11 59, 62 button sewing 38 needle bar thread guide 6 , needle clamp screw 6 22 needle plate 6 needle plate cover 57 needle position 33 needle position button 6 needle threader 17 O buttonhole foot 36 openings 46 buttonhole , lever 6 37, 47 buttonhole sewing 35 operation beep...


