

Thread Tensions - English
Page 1
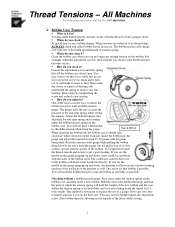
... the Brother bobbin case assembly p/n#S35584001. !" Thread Tensions - Install a brand new bobbin, (for the correct weight), in these types of the cardboard. They are items related to keep the bobbin from spinning after the takeup lever has pulled the stitch tight. Following this procedure a few times until it is it ? It is used to thread tensions and tension problems as found on the flat surface of machines with a Brother Anti-Spin Spring...
... the Brother bobbin case assembly p/n#S35584001. !" Thread Tensions - Install a brand new bobbin, (for the correct weight), in these types of the cardboard. They are items related to keep the bobbin from spinning after the takeup lever has pulled the stitch tight. Following this procedure a few times until it is it ? It is used to thread tensions and tension problems as found on the flat surface of machines with a Brother Anti-Spin Spring...
Thread Tensions - English
Page 2
... the spring to slow as well. Insert the bobbin into the bobbin case it falls out. Read the tension of the fabric while sewing. 2 You may want the bobbin thread to replace the use of the garment as these are believed to get enough tension on the bobbin case. To keep under thread tension constant, works with the sides of the bobbin. You may need a full bobbin to check the tension when using...
... the spring to slow as well. Insert the bobbin into the bobbin case it falls out. Read the tension of the fabric while sewing. 2 You may want the bobbin thread to replace the use of the garment as these are believed to get enough tension on the bobbin case. To keep under thread tension constant, works with the sides of the bobbin. You may need a full bobbin to check the tension when using...

Thread Tensions - English
Page 3
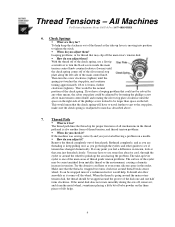
... individual needle tail lengths during trims. !" Main upper thread tension control of the silver screw inside the knob where the screw threads start . For looping problems, turn knob clockwise (tighten) no more than one half turn at a time. Pre-tensioners !" o Metal Knob Type Screw the knob down until the top of machine. !" To take the looseness out of the knob is even with Thread Tree Tensioners for individual needle tail lengths. !" Thread Tensions - Adjust...
... individual needle tail lengths during trims. !" Main upper thread tension control of the silver screw inside the knob where the screw threads start . For looping problems, turn knob clockwise (tighten) no more than one half turn at a time. Pre-tensioners !" o Metal Knob Type Screw the knob down until the top of machine. !" To take the looseness out of the knob is even with Thread Tree Tensioners for individual needle tail lengths. !" Thread Tensions - Adjust...
Thread Tensions - English
Page 4
... spring, use some silicone spray in the thread path and is moving into position to be wrapped around thread break sensor wheel. It should be larger than space on the three pieces of thread tension, and thread tension problems. !" Thread Tensions - To help . The thread path lines the thread up lever is also another form of felt helps. 4 When do you feel a difference in tension. Thread Path !" If the machine was sewing...
... spring, use some silicone spray in the thread path and is moving into position to be wrapped around thread break sensor wheel. It should be larger than space on the three pieces of thread tension, and thread tension problems. !" Thread Tensions - To help . The thread path lines the thread up lever is also another form of felt helps. 4 When do you feel a difference in tension. Thread Path !" If the machine was sewing...

Thread Tensions - English
Page 5
... the bottom of you should have changed your bobbin tension when replacing the bobbin. If all the needles are not wound exactly the same. You could be wide. Step 1. Sometimes these disks look for the obvious Step 2. Clean the bobbin tension spring, set bobbin tension. Adjust the main tension 5 For example, if you will become wider on the next sew off . Usually you are all the...
... the bottom of you should have changed your bobbin tension when replacing the bobbin. If all the needles are not wound exactly the same. You could be wide. Step 1. Sometimes these disks look for the obvious Step 2. Clean the bobbin tension spring, set bobbin tension. Adjust the main tension 5 For example, if you will become wider on the next sew off . Usually you are all the...
Knife Adjustments - English
Page 1
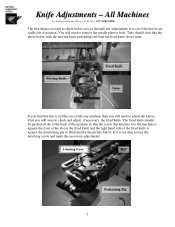
... need to remove the needle plate to the back of the machine so that the screw that this is against the front of the slot in the fixed knife and the right hand side of position. The fixed knife should look . Knife Adjustments - Moving Knife Fixed Knife 1mm If you go through any adjustments is not then loosen the attaching screw and make the necessary adjustments...
... need to remove the needle plate to the back of the machine so that the screw that this is against the front of the slot in the fixed knife and the right hand side of position. The fixed knife should look . Knife Adjustments - Moving Knife Fixed Knife 1mm If you go through any adjustments is not then loosen the attaching screw and make the necessary adjustments...
Motor Locks - English
Page 1
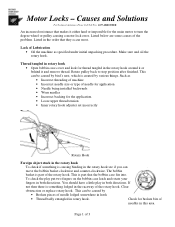
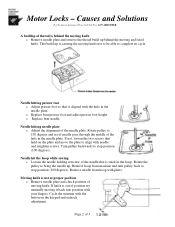
... counter-clockwise. Thread tangled in rotary hook • Open bobbin case cover and look for thread tangled in both directions. Such as specified under initial unpacking procedure. If not then there is part that the bobbin case fits into. Listed below are some causes of Lubrication • Oil the machine as • Incorrect threading of machine • Incorrect needle size or type of needle for application • Needle being installed backwards •...
... counter-clockwise. Thread tangled in rotary hook • Open bobbin case cover and look for thread tangled in both directions. Such as specified under initial unpacking procedure. If not then there is part that the bobbin case fits into. Listed below are some causes of Lubrication • Oil the machine as • Incorrect threading of machine • Incorrect needle size or type of needle for application • Needle being installed backwards •...
Motor Locks - English
Page 2
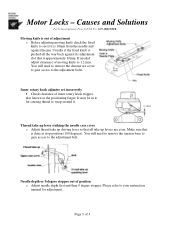
... Toll Free 1-877-4BROTHER A buildup of moving and fixed knife. Needle hitting needle plate o Adjust the alignment of 3 Turn pulley backwards to complete its cycle Needle hitting presser foot o Adjust presser foot so that is behind the moving knife. Page 2 of the needle plate. Moving knife is stuck in the needle plate. Motor Locks - o Replace bent needle. If not, loosen the two screws that is not at proper position o Remove needle plate and check position of thread...
... Toll Free 1-877-4BROTHER A buildup of moving and fixed knife. Needle hitting needle plate o Adjust the alignment of 3 Turn pulley backwards to complete its cycle Needle hitting presser foot o Adjust presser foot so that is behind the moving knife. Page 2 of the needle plate. Moving knife is stuck in the needle plate. Motor Locks - o Replace bent needle. If not, loosen the two screws that is not at proper position o Remove needle plate and check position of thread...
Motor Locks - English
Page 3
... the pin. Thread take up lever striking the needle case cover o Adjust thread take up driving lever so that is approximately 10mm. Make sure this is pushed all take up levers are cover to gain access to 1.2 mm. You will need to remove the tension base to gain access to see if it . If needed adjust clearance of inner rotary hook stopper, also known as the positioning finger. Needle depth...
... the pin. Thread take up lever striking the needle case cover o Adjust thread take up driving lever so that is approximately 10mm. Make sure this is pushed all take up levers are cover to gain access to 1.2 mm. You will need to remove the tension base to gain access to see if it . If needed adjust clearance of inner rotary hook stopper, also known as the positioning finger. Needle depth...

Upper Thread Breaks - English
Page 1
... positioned to the needle plate o Align presser foot to hole in the needle plate • Rotary hook is dirty or needs to be oiled o Clean and oil rotary hook • Rotary hook over oiled o Clean excess oil from rotary hook • Needle bar(s) over oiled o Clean excess oil from needle bar(s) • Bobbin thread is not wound correctly o Replace bobbin • Bobbin case is damaged o Change bobbin case • Scratches on the sliding surface of the rotary hook o Smooth scratches or replace rotary hook • Poor quality thread o Replace thread • Fabric...
... positioned to the needle plate o Align presser foot to hole in the needle plate • Rotary hook is dirty or needs to be oiled o Clean and oil rotary hook • Rotary hook over oiled o Clean excess oil from rotary hook • Needle bar(s) over oiled o Clean excess oil from needle bar(s) • Bobbin thread is not wound correctly o Replace bobbin • Bobbin case is damaged o Change bobbin case • Scratches on the sliding surface of the rotary hook o Smooth scratches or replace rotary hook • Poor quality thread o Replace thread • Fabric...
Rotary Hook Scratches - English
Page 1
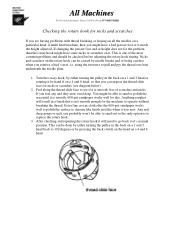
... replace the rotary hook. 3. Feel along the thread slide face to 100 degrees or by hand if on a 4 and 6 head. Anything rougher will need to go back to pull and pry the thread out from underneath the needle plate. 1. This can be able to operate without breaking the thread. If changing the presser foot and or height does not fix the problem than the rotary hook...
... replace the rotary hook. 3. Feel along the thread slide face to 100 degrees or by hand if on a 4 and 6 head. Anything rougher will need to go back to pull and pry the thread out from underneath the needle plate. 1. This can be able to operate without breaking the thread. If changing the presser foot and or height does not fix the problem than the rotary hook...
Changing Needle Bar Cushions - English
Page 1
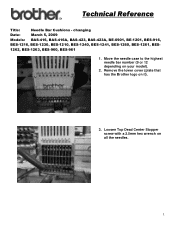
Remove the lower cover (plate that has the Brother logo on your model). 2. Move the needle case to the highest needle bar number (9 or 12 depending on it). 3. Loosen Top Dead Center Stopper screw with a 2.5mm hex wrench on all the needles. 1 Technical Reference Title: Needle Bar Cushions - changing Date: March 5, 2009 Models: BAS-416, BAS-416A, BAS-423, BAS-423A, BE-0901, BE-1201, BES-916, BES-1216, BES-1230, BES-1210, BES-1240, BES-1241, BES-1260, BES-1261, BES- 1262, BES-1263, BES-960, BES-961 1.
Remove the lower cover (plate that has the Brother logo on your model). 2. Move the needle case to the highest needle bar number (9 or 12 depending on it). 3. Loosen Top Dead Center Stopper screw with a 2.5mm hex wrench on all the needles. 1 Technical Reference Title: Needle Bar Cushions - changing Date: March 5, 2009 Models: BAS-416, BAS-416A, BAS-423, BAS-423A, BE-0901, BE-1201, BES-916, BES-1216, BES-1230, BES-1210, BES-1240, BES-1241, BES-1260, BES-1261, BES- 1262, BES-1263, BES-960, BES-961 1.

Quick Reference Guide - English
Page 2
... Turn the power OFF on the machine. BACK FORWARD To move BACK only to the first stitch of the option you wish to change the position Use the ARROW keys to move the frame to a new position ENTER HOOP FEED Press ENTER to store the new HOOP FEED position Press HOOP FEED to toggle between sewing position and hoop feed position MOVING THE NEEDLE CASE NEEDLE SELECT To enter the NEEDLE SELECT mode 1 9 Use numeric keypad...
... Turn the power OFF on the machine. BACK FORWARD To move BACK only to the first stitch of the option you wish to change the position Use the ARROW keys to move the frame to a new position ENTER HOOP FEED Press ENTER to store the new HOOP FEED position Press HOOP FEED to toggle between sewing position and hoop feed position MOVING THE NEEDLE CASE NEEDLE SELECT To enter the NEEDLE SELECT mode 1 9 Use numeric keypad...
Tubular to Cap - English
Page 1
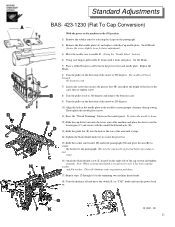
... the machine off and move the switch (L) to ensure proper clearance during sewing. Then tighten the needle plate screws. 11) Press the "Thread Trimming" button on . This will lower through 16 for later adjustment). 3) Move the needle case to needle #1. (Using the "Needle Select" button). 4) Using your fingers pull needle #1 down until it has both a spring washer and flat washer. Standard Adjustments BAS- 423-1230 (Flat To Cap Conversion) With the power...
... the machine off and move the switch (L) to ensure proper clearance during sewing. Then tighten the needle plate screws. 11) Press the "Thread Trimming" button on . This will lower through 16 for later adjustment). 3) Move the needle case to needle #1. (Using the "Needle Select" button). 4) Using your fingers pull needle #1 down until it has both a spring washer and flat washer. Standard Adjustments BAS- 423-1230 (Flat To Cap Conversion) With the power...
Cap to Tubular - English
Page 1
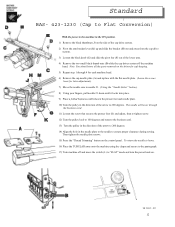
... presser foot (B) and adjust, then re-tighten screw. 12) Turn the pulley back to 100 degrees and remove the business card. 13) Turn the pulley in the direction of the arrow to 200 degrees. 14) Align the hole in the needle plate to the needle to ensure proper clearance during sewing. Then tighten the needle plate screws. 15) Press the "Thread Trimming" button on the control panel. Standard BAS- 423...
... presser foot (B) and adjust, then re-tighten screw. 12) Turn the pulley back to 100 degrees and remove the business card. 13) Turn the pulley in the direction of the arrow to 200 degrees. 14) Align the hole in the needle plate to the needle to ensure proper clearance during sewing. Then tighten the needle plate screws. 15) Press the "Thread Trimming" button on the control panel. Standard BAS- 423...
Maintenance Schedule - English
Page 1
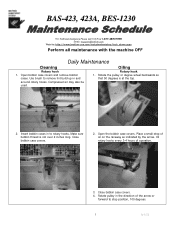
.... Make sure bobbin thread is at the top. 2. Close bobbin case covers. 4. BAS-423, 423A, BES-1230 For Technical Assistance Please Call Toll Free 1-877-4BROTHER Email: tsupport@brother.com Website: http://www.brother-usa.com/industembroidery/tech_down.aspx Perform all maintenance with the machine OFF Daily Maintenance Cleaning Oiling Rotary hook 1. Open bobbin case covers and remove bobbin cases. Rotary hook 1. Place a small drop of the arrow or forward to stop position, 100 degrees. 1 9/1/05 Oil rotary hooks...
.... Make sure bobbin thread is at the top. 2. Close bobbin case covers. 4. BAS-423, 423A, BES-1230 For Technical Assistance Please Call Toll Free 1-877-4BROTHER Email: tsupport@brother.com Website: http://www.brother-usa.com/industembroidery/tech_down.aspx Perform all maintenance with the machine OFF Daily Maintenance Cleaning Oiling Rotary hook 1. Open bobbin case covers and remove bobbin cases. Rotary hook 1. Place a small drop of the arrow or forward to stop position, 100 degrees. 1 9/1/05 Oil rotary hooks...
Maintenance Schedule - English
Page 2
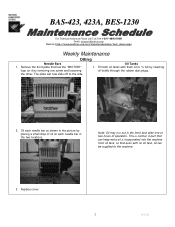
... plate will now slide off to the machine. 3. Replace cover. 2 9/1/05 This is incorporated into the machine front oil tank, so that has the "BROTHER" logo on each needle bar as shown in the picture by placing a small drop of oil on it by inserting oil bottle through the rubber dust plugs. 2. Oil each needle bar in the front tank after one screw and loosening the other. BAS-423...
... plate will now slide off to the machine. 3. Replace cover. 2 9/1/05 This is incorporated into the machine front oil tank, so that has the "BROTHER" logo on each needle bar as shown in the picture by placing a small drop of oil on it by inserting oil bottle through the rubber dust plugs. 2. Oil each needle bar in the front tank after one screw and loosening the other. BAS-423...
Parts Manual - English
Page 4
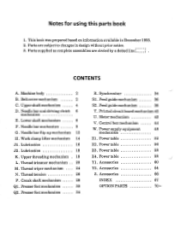
Lower shaft mechanism 6 F. Printed circuit board mechanism 42 U. Motor mechanism 42 V. Control box mechanism 44 W. Machine body 2 B. Needle bar mechanism 8 G. Lubrication 16 J2. Upper threading mechanism . 18 L. Thread trimmer mechanism .. 20 M. Presser foot mechanism 30 Q2. Presser foot mechanism 34 R. Feed guide mechanism 36 S2. Accessories 66 INDEX 67 OPTION PARTS 70- Parts supplied as complete assemblies are subject to changes in December 1993. 2. Upper shaft mechanism 4 D. Power supply equipment 48 mechanism X1...
Lower shaft mechanism 6 F. Printed circuit board mechanism 42 U. Motor mechanism 42 V. Control box mechanism 44 W. Machine body 2 B. Needle bar mechanism 8 G. Lubrication 16 J2. Upper threading mechanism . 18 L. Thread trimmer mechanism .. 20 M. Presser foot mechanism 30 Q2. Presser foot mechanism 34 R. Feed guide mechanism 36 S2. Accessories 66 INDEX 67 OPTION PARTS 70- Parts supplied as complete assemblies are subject to changes in December 1993. 2. Upper shaft mechanism 4 D. Power supply equipment 48 mechanism X1...
Parts Manual - English
Page 15
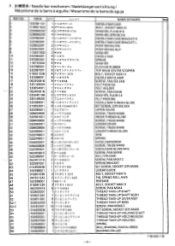
..., SPRING 2-6 NEEDLE BAR CASE BRACKET R NEEDLE BAR CASE BRACKET L POSITIONING PIN POSITIONING NUT WASHER NEEDLE BAR SPRING WASHER CUSHION RUBBER TOP DEAD CENTRE STOPPER BOLT, SOCKET M3X10 NEEDLE BAR CLAMP SCREW, PAN M3.5X8 FELT PACKING FELT HOLDER SCREW, PAN M4X8 WASHER, PLAIN 54 FELT PACKING NEEDLE BAR THREAD GUIDE SET SCREW, (CP) M3.5X4 UPPER COVER SCREW, TRUSS'1V14X8 INNER THREAD GUIDE SCREW, TRUSS M4X8 LOWER COVER SCREW, TRUSS M4X8 LOWER THREAD GUIDE DISK SPRING SHOULDER SCREW SCREW, TRUSS M4X8 NEEDLE BAR GUIDE RAIL SCREW, PAN M4X8 RAIL FOR CASE SCREW, PAN M4X12 SPRING BRACKET SET SCREW...
..., SPRING 2-6 NEEDLE BAR CASE BRACKET R NEEDLE BAR CASE BRACKET L POSITIONING PIN POSITIONING NUT WASHER NEEDLE BAR SPRING WASHER CUSHION RUBBER TOP DEAD CENTRE STOPPER BOLT, SOCKET M3X10 NEEDLE BAR CLAMP SCREW, PAN M3.5X8 FELT PACKING FELT HOLDER SCREW, PAN M4X8 WASHER, PLAIN 54 FELT PACKING NEEDLE BAR THREAD GUIDE SET SCREW, (CP) M3.5X4 UPPER COVER SCREW, TRUSS'1V14X8 INNER THREAD GUIDE SCREW, TRUSS M4X8 LOWER COVER SCREW, TRUSS M4X8 LOWER THREAD GUIDE DISK SPRING SHOULDER SCREW SCREW, TRUSS M4X8 NEEDLE BAR GUIDE RAIL SCREW, PAN M4X8 RAIL FOR CASE SCREW, PAN M4X12 SPRING BRACKET SET SCREW...
Parts Manual - English
Page 55
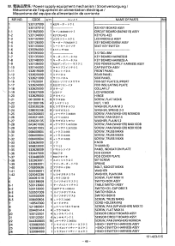
..., SPRING 2-3 SCREW, PAN (WASHER) M3X6DB SCREW, PAN M2X14 WASHER, PLAIN S 2 SCREW, PAN (WASHER) M4X10DB SCREW, PAN (WASHER) M3X10DB SCREW, TRUSS M4X6 SCREW, TRUSS M4X6 SCREW, TRUSS M4X6 KNOB THUMB (5) PANEL INDICATION PLATE FDD COVER FDD COVER PLATE SET SCREW SPRING BOLT, SOCKET M3X6 WASHER WASHER, PLAIN M4 SCREW, FLAT M6X10 SWITCH BOX ASSY TABLE SWITCH ASSY SWITCH OIL CAP OBS13 SWITCH BOX A SWITCH BOX B SCREW, TRUSS M4X6 CORD HOLDER (4N) SCREW, PAN...
..., SPRING 2-3 SCREW, PAN (WASHER) M3X6DB SCREW, PAN M2X14 WASHER, PLAIN S 2 SCREW, PAN (WASHER) M4X10DB SCREW, PAN (WASHER) M3X10DB SCREW, TRUSS M4X6 SCREW, TRUSS M4X6 SCREW, TRUSS M4X6 KNOB THUMB (5) PANEL INDICATION PLATE FDD COVER FDD COVER PLATE SET SCREW SPRING BOLT, SOCKET M3X6 WASHER WASHER, PLAIN M4 SCREW, FLAT M6X10 SWITCH BOX ASSY TABLE SWITCH ASSY SWITCH OIL CAP OBS13 SWITCH BOX A SWITCH BOX B SCREW, TRUSS M4X6 CORD HOLDER (4N) SCREW, PAN...


