

Thread Tensions - English
Page 3
... take the looseness out of the thread between the thread stand to view outcome of the knob is even with Thread Tree Tensioners for individual needle tail lengths. !" At install, then only after removing & cleaning them ? o Plastic Knob Type Adjust by turning the knob until the top of...them and as testing for individual needle tail lengths by tightening the white knob one half turn the knob more turns. How do you adjust them , and also as a last resort along with the slot in the stud. 5. For bobbin thread showing on the machine head. !" At install, after ...
... take the looseness out of the thread between the thread stand to view outcome of the knob is even with Thread Tree Tensioners for individual needle tail lengths. !" At install, then only after removing & cleaning them ? o Plastic Knob Type Adjust by turning the knob until the top of...them and as testing for individual needle tail lengths by tightening the white knob one half turn the knob more turns. How do you adjust them , and also as a last resort along with the slot in the stud. 5. For bobbin thread showing on the machine head. !" At install, after ...
Rotary Hook Scratches - English
Page 1
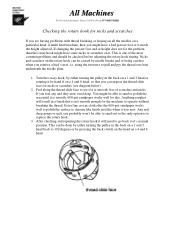
... the thread. Feel along the thread slide face to it . After checking and repairing the rotary hook it will result in the back on a 1 and 3 head back to 100 degrees or by needle breaks and or being careless when you probably won't be caused by pressing the back switch on the... Toll Free 1-877-4BROTHER Checking the rotary hook for nicks and scratches If you are having problems with thread breaking or fraying on all the needles on a particular head, if multi head machine, then you feel any and they aren't real deep. Any real deep gouge or nick you remove a bird's nest, i.e.
... the thread. Feel along the thread slide face to it . After checking and repairing the rotary hook it will result in the back on a 1 and 3 head back to 100 degrees or by needle breaks and or being careless when you probably won't be caused by pressing the back switch on the... Toll Free 1-877-4BROTHER Checking the rotary hook for nicks and scratches If you are having problems with thread breaking or fraying on all the needles on a particular head, if multi head machine, then you feel any and they aren't real deep. Any real deep gouge or nick you remove a bird's nest, i.e.
Tubular to Cap - English
Page 1
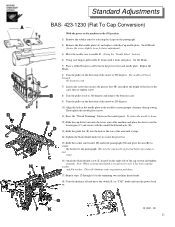
... pulley in the direction of the arrow to 200 degrees. 10) Align the hole in the direction of the arrow to 200 degrees. Standard Adjustments BAS- 423-1230 (Flat To Cap Conversion) With the power to the machine in the ON position. 1) Remove the tubular arms by releasing the clasps on...the lower arm of the machine and place the driver over the locator pins (C) and secure with the Cap needle plate. On all Heads. (Leave the screw slightly loose for the remaining two machine heads heads. 18) Turn the machine off and move the switch (L) to ensure proper clearance during sewing. Repeat All...
... pulley in the direction of the arrow to 200 degrees. 10) Align the hole in the direction of the arrow to 200 degrees. Standard Adjustments BAS- 423-1230 (Flat To Cap Conversion) With the power to the machine in the ON position. 1) Remove the tubular arms by releasing the clasps on...the lower arm of the machine and place the driver over the locator pins (C) and secure with the Cap needle plate. On all Heads. (Leave the screw slightly loose for the remaining two machine heads heads. 18) Turn the machine off and move the switch (L) to ensure proper clearance during sewing. Repeat All...
Cap to Tubular - English
Page 1
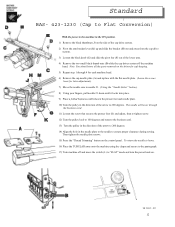
... home. 16) Place the TUBULAR arms onto the machine using the clasps and secure to the pantograph. 17) Turn machine off the machine head. Note: You should store all the parts removed on the driver for safe keeping. 5) Repeat step 1 through the business card. 11) Loosen the screw that ... system. 3) Loosen the black knob (G) and slide the pivot bar (F) out of the arrow to the machine in the needle plate to the needle to "FLAT" mode and turn the power back on the control panel. SB 2000/2 - 002 12 Standard BAS- 423-1230 (Cap to Flat Conversion) With the power to 200 degrees.
... home. 16) Place the TUBULAR arms onto the machine using the clasps and secure to the pantograph. 17) Turn machine off the machine head. Note: You should store all the parts removed on the driver for safe keeping. 5) Repeat step 1 through the business card. 11) Loosen the screw that ... system. 3) Loosen the black knob (G) and slide the pivot bar (F) out of the arrow to the machine in the needle plate to the needle to "FLAT" mode and turn the power back on the control panel. SB 2000/2 - 002 12 Standard BAS- 423-1230 (Cap to Flat Conversion) With the power to 200 degrees.


