
Instruction Manual - English
Page 5
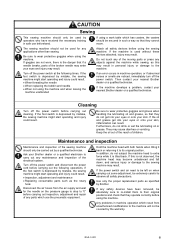
..., adjustment and repair of the electrical system. If an error occurs in machine operation which result from the air supply and wait for any objects against the machine while sewing, as specified by mistake, the sewing machine might start operating and injury could result. • When threading the needle • When replacing the bobbin and needle • When not using the machine and when leaving the machine unattended If using...
..., adjustment and repair of the electrical system. If an error occurs in machine operation which result from the air supply and wait for any objects against the machine while sewing, as specified by mistake, the sewing machine might start operating and injury could result. • When threading the needle • When replacing the bobbin and needle • When not using the machine and when leaving the machine unattended If using...
Instruction Manual - English
Page 8
.... Thread tension 24 5-6-1. Setting 2-step operation for the work clamp..... 26 6. USING CF CARDS 47 8-1. Adjusting the speed controller [7 11 4-13. Connecting the cords [8 12 4-14. Installing the cotton stand [12 16 4-18. Direct selection (combination table 44 7-10. Installing the machine head 6 4-5. Loading sewing data 29 6-3. Setting the program number 29 6-4. Clearing memory data (reinitialization 46 8. Tilting back and returning the machine head ... 7 4-6. Checking the sewing pattern 31 6-7. Installing the solenoid valve assembly 10 4-9. List...
.... Thread tension 24 5-6-1. Setting 2-step operation for the work clamp..... 26 6. USING CF CARDS 47 8-1. Adjusting the speed controller [7 11 4-13. Connecting the cords [8 12 4-14. Installing the cotton stand [12 16 4-18. Direct selection (combination table 44 7-10. Installing the machine head 6 4-5. Loading sewing data 29 6-3. Setting the program number 29 6-4. Clearing memory data (reinitialization 46 8. Tilting back and returning the machine head ... 7 4-6. Checking the sewing pattern 31 6-7. Installing the solenoid valve assembly 10 4-9. List...
Instruction Manual - English
Page 9
...-8. TROUBLESHOOTING 70 14. 7-SEGMENT DISPLAY 73 BAS-342G Cleaning the rotary hook 53 10-2. Checking the regulator 54 10-4. Adjusting the needle bar lift amount 56 11-5. Adjusting the needle clearance 57 11-7. Installing the feed plate 62 11-11. Using the STOP switch 52 9-3. Adjusting the rotary hook lubrication amount... 58 11-9. SEWING 51 9-1. Lubrication 54 11. Replacing the movable and fixed knives...... 61 11-10-1. Sewing 51 9-2. Presser foot installation position 63...
...-8. TROUBLESHOOTING 70 14. 7-SEGMENT DISPLAY 73 BAS-342G Cleaning the rotary hook 53 10-2. Checking the regulator 54 10-4. Adjusting the needle bar lift amount 56 11-5. Adjusting the needle clearance 57 11-7. Installing the feed plate 62 11-11. Using the STOP switch 52 9-3. Adjusting the rotary hook lubrication amount... 58 11-9. SEWING 51 9-1. Lubrication 54 11. Replacing the movable and fixed knives...... 61 11-10-1. Sewing 51 9-2. Presser foot installation position 63...
Instruction Manual - English
Page 31
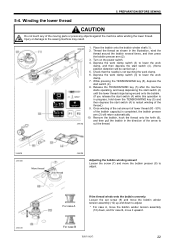
.... Once winding of the set screw (9) and move the bobbin winder tension assembly (10) up and down to adjust. * For case A, move the bobbin winder tension assembly (10) down the TENSION/WIND key (5) and then depress the start switch (4) to restart winding of the moving parts or press any objects against the machine while winding the lower thread. Check that the needle is completed, the bobbin presser arm (2) will be carried out.) 5. Remove the bobbin, hook the thread onto the...
.... Once winding of the set screw (9) and move the bobbin winder tension assembly (10) up and down to adjust. * For case A, move the bobbin winder tension assembly (10) down the TENSION/WIND key (5) and then depress the start switch (4) to restart winding of the moving parts or press any objects against the machine while winding the lower thread. Check that the needle is completed, the bobbin presser arm (2) will be carried out.) 5. Remove the bobbin, hook the thread onto the...

Instruction Manual - English
Page 36
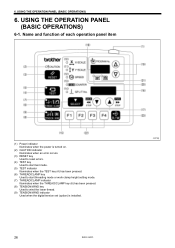
... power is turned on. (2) CAUTION indicator Illuminates when an error occurs. (3) RESET key Used to reset errors. (4) TEST key Used to start test mode. (5) TEST indicator Illuminates when the TEST key (4) has been pressed. (6) THREAD/CLAMP key Used to start threading mode or work clamp height setting mode. (7) THREAD/CLAMP indicator Illuminates when the THREAD/CLAMP key (6) has been pressed. (8) TENSION/WIND key Used to wind the lower thread. (9) TENSION/WIND indicator Used when the digital tension set (option) is installed. 27 BAS-342G...
... power is turned on. (2) CAUTION indicator Illuminates when an error occurs. (3) RESET key Used to reset errors. (4) TEST key Used to start test mode. (5) TEST indicator Illuminates when the TEST key (4) has been pressed. (6) THREAD/CLAMP key Used to start threading mode or work clamp height setting mode. (7) THREAD/CLAMP indicator Illuminates when the THREAD/CLAMP key (6) has been pressed. (8) TENSION/WIND key Used to wind the lower thread. (9) TENSION/WIND indicator Used when the digital tension set (option) is installed. 27 BAS-342G...

Instruction Manual - English
Page 41
... of the new value that it from coming into contact with the needle plate. (Refer to page 63.) 3 Intermittent stroke Refer to change the setting value for the intermittent presser foot height. 1 All indicators switch off 4445Q 4015M 2 Press the key. THREAD/CLAMP indicator switches off Intermittent presser foot operation During standby When lowered While sewing 1 Intermittent presser foot lift amount 2 Intermittent presser foot height The settings can use the operation panel...
... of the new value that it from coming into contact with the needle plate. (Refer to page 63.) 3 Intermittent stroke Refer to change the setting value for the intermittent presser foot height. 1 All indicators switch off 4445Q 4015M 2 Press the key. THREAD/CLAMP indicator switches off Intermittent presser foot operation During standby When lowered While sewing 1 Intermittent presser foot lift amount 2 Intermittent presser foot height The settings can use the operation panel...
Instruction Manual - English
Page 44
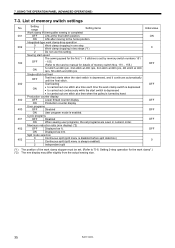
... 001 OFF Lifts at a time each time the work clamp drop operation 002 0 Work clamp dropping in one stitch at the final stitch position. ON ON Lifts after sewing is always enabled) 0 2 Independent split (*1) The position of the work clamp".) (*2) The mm display may differ slightly from the actual sewing size. 35 BAS-342G Sewing start switch is set programs are sewn in two steps (*1) 0 2 Do not use this setting. List of memory switch Nos. 151...
... 001 OFF Lifts at a time each time the work clamp drop operation 002 0 Work clamp dropping in one stitch at the final stitch position. ON ON Lifts after sewing is always enabled) 0 2 Independent split (*1) The position of the work clamp".) (*2) The mm display may differ slightly from the actual sewing size. 35 BAS-342G Sewing start switch is set programs are sewn in two steps (*1) 0 2 Do not use this setting. List of memory switch Nos. 151...
Instruction Manual - English
Page 56
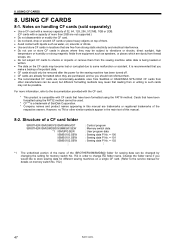
... of this manual are trademarks or registered trademarks of SanDisk Corporation. * Company names and product names appearing in locations that have been formatted using the FAT32 method cannot be removed after the power for sewing data can be used . * CFTM is being loaded or written. • The data on memory switch No. 752.) 47 BAS-342G Change the folder...
... of this manual are trademarks or registered trademarks of SanDisk Corporation. * Company names and product names appearing in locations that have been formatted using the FAT32 method cannot be removed after the power for sewing data can be used . * CFTM is being loaded or written. • The data on memory switch No. 752.) 47 BAS-342G Change the folder...
Instruction Manual - English
Page 64
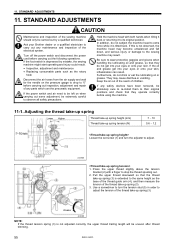
... rotary hook Disconnect the air hoses from the air supply and wait for the needle on when carrying out some adjustment, be carried out by mistake, the sewing machine might start operating and injury could result. • Inspection, adjustment and maintenance • Replacing consumable parts such as the base of the thread guide arm (4), and then measure the tension of the thread take -up spring (3). 3. Pull the upper thread...
... rotary hook Disconnect the air hoses from the air supply and wait for the needle on when carrying out some adjustment, be carried out by mistake, the sewing machine might start operating and injury could result. • Inspection, adjustment and maintenance • Replacing consumable parts such as the base of the thread guide arm (4), and then measure the tension of the thread take -up spring (3). 3. Pull the upper thread...

Instruction Manual - English
Page 70
Replacing the movable and fixed knives 4044M 1. Open the shuttle race cover, remove the two screws (3) and the two flat screws (4), and then remove the needle plate (5). 3. STANDARD ADJUSTMENTS 11-10. Apply grease to the outside of the needle hole. 9. Check that the needle is too strong and the movable knife (1) turns stiffly, use a thicker movable knife spacer. 7. Install the feed plate (2). (Refer to the shoulder screw (9), and then install the new movable...
Replacing the movable and fixed knives 4044M 1. Open the shuttle race cover, remove the two screws (3) and the two flat screws (4), and then remove the needle plate (5). 3. STANDARD ADJUSTMENTS 11-10. Apply grease to the outside of the needle hole. 9. Check that the needle is too strong and the movable knife (1) turns stiffly, use a thicker movable knife spacer. 7. Install the feed plate (2). (Refer to the shoulder screw (9), and then install the new movable...
Instruction Manual - English
Page 75
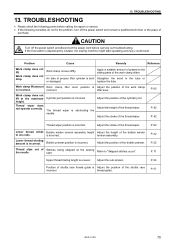
... Problem with the sewing machine, a buzzer will sound and an error code will appear in severe injury. Turn off the power, and then check that you can result in the display window. If the start switch was depressed without lowering the work clamp, depress the work clamp switch is properly connected. Machine head tilting was turned on next page) BAS-342G 66 Turn off the power...
... Problem with the sewing machine, a buzzer will sound and an error code will appear in severe injury. Turn off the power, and then check that you can result in the display window. If the start switch was depressed without lowering the work clamp, depress the work clamp switch is properly connected. Machine head tilting was turned on next page) BAS-342G 66 Turn off the power...
Instruction Manual - English
Page 78
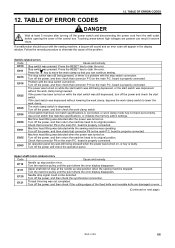
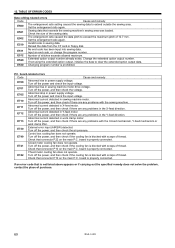
... pitch of thread. E530 Changing program number is properly connected. P.C. E710 Abnormal current detected in sewing machine motor drive voltage. board is prohibited. E741 Turn off the power, and then check if there are any problems with scraps of the sewing data. Y-feed motor cooling fan does not operate. If an error code that exceeds the sewing machine's sewing area was loaded. TABLE OF ERROR CODES Data editing-related errors Code Cause...
... pitch of thread. E530 Changing program number is properly connected. P.C. E710 Abnormal current detected in sewing machine motor drive voltage. board is prohibited. E741 Turn off the power, and then check if there are any problems with scraps of the sewing data. Y-feed motor cooling fan does not operate. If an error code that exceeds the sewing machine's sewing area was loaded. TABLE OF ERROR CODES Data editing-related errors Code Cause...
Instruction Manual - English
Page 79
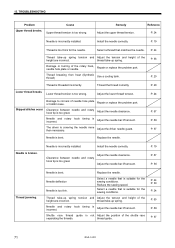
... do not fix the problem, turn off the power switch and disconnect the power cord before carrying out troubleshooting. lifter lever. Adjust the stroke of the bobbin presser. Lower thread winds Bobbin winder tension assembly height Adjust the height of the work clamp slider. P. 62 P. 22 P. 22 P. 71 P. 24 P. 57 BAS-342G 70 Problem Cause Remedy Reference Work clamp does not lift. Work clamp moves stiffly. Work clamp lift amount Work clamp lifter lever position is Adjust the position of the bobbin winder to "Skipped stitches occur". incorrect...
... do not fix the problem, turn off the power switch and disconnect the power cord before carrying out troubleshooting. lifter lever. Adjust the stroke of the bobbin presser. Lower thread winds Bobbin winder tension assembly height Adjust the height of the work clamp slider. P. 62 P. 22 P. 22 P. 71 P. 24 P. 57 BAS-342G 70 Problem Cause Remedy Reference Work clamp does not lift. Work clamp moves stiffly. Work clamp lift amount Work clamp lifter lever position is Adjust the position of the bobbin winder to "Skipped stitches occur". incorrect...
Instruction Manual - English
Page 80
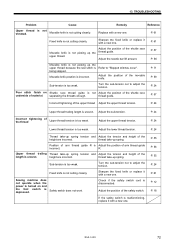
.... Repair or replace the problem part. Thread the thread correctly. Clearance between needle and rotary hook tip is incorrectly installed. Needle is too strong. Lower thread breaks. Lower thread tension is bent. Replace the needle. Install the needle correctly. Shuttle race thread guide is bent. 13. Needle and incorrect. Thread take -up spring. Skipped stitches occur. TROUBLESHOOTING Problem Cause Upper thread breaks. Needle is not Adjust the position of the height are incorrect. P. 19 P. 57 P. 56 Thread jamming. Upper thread tension is...
.... Repair or replace the problem part. Thread the thread correctly. Clearance between needle and rotary hook tip is incorrectly installed. Needle is too strong. Lower thread breaks. Lower thread tension is bent. Replace the needle. Install the needle correctly. Shuttle race thread guide is bent. 13. Needle and incorrect. Thread take -up spring. Skipped stitches occur. TROUBLESHOOTING Problem Cause Upper thread breaks. Needle is not Adjust the position of the height are incorrect. P. 19 P. 57 P. 56 Thread jamming. Upper thread tension is...
Instruction Manual - English
Page 81
... cord is too weak. being skipped. Incorrect tightening of the height are incorrect. Safety switch does not work. Sub-tension is disconnected. P. 24 P. 55 P. 56 P. 55 P. 24 P. 61 P. 12 P. 18 BAS-342G 72 TROUBLESHOOTING Problem Cause Remedy Reference Upper thread is too weak. Sharpen the fixed knife or replace it with a new one . P. 71 P. 59 Sub-tension is not trimmed. thread guide. Adjust the sub-tension. Adjust the lower thread tension...
... cord is too weak. being skipped. Incorrect tightening of the height are incorrect. Safety switch does not work. Sub-tension is disconnected. P. 24 P. 55 P. 56 P. 55 P. 24 P. 61 P. 12 P. 18 BAS-342G 72 TROUBLESHOOTING Problem Cause Remedy Reference Upper thread is too weak. Sharpen the fixed knife or replace it with a new one . P. 71 P. 59 Sub-tension is not trimmed. thread guide. Adjust the sub-tension. Adjust the lower thread tension...

Basic Instruction Manual - English
Page 5
... power switch at the following operations. Use only the proper replacement parts as the rotary hook Disconnect the air hoses from unauthorized modifications to the machine will not be covered by mistake, the sewing machine might start operating and injury could result. • When threading the needle • When replacing the bobbin and needle • When not using the machine and when leaving the machine unattended If an error occurs in machine operation...
... power switch at the following operations. Use only the proper replacement parts as the rotary hook Disconnect the air hoses from unauthorized modifications to the machine will not be covered by mistake, the sewing machine might start operating and injury could result. • When threading the needle • When replacing the bobbin and needle • When not using the machine and when leaving the machine unattended If an error occurs in machine operation...
Basic Instruction Manual - English
Page 10
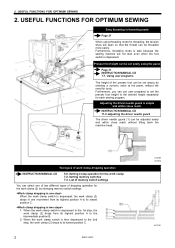
... its lowest position C. 2 BAS-342G 4056M 2555Q 4057M List of the presser foot can be set simply by changing memory switch settings. USEFUL FUNCTIONS FOR OPTIMUM SEWING Easy threading in one of two different types of work clamp 7-2. INSTRUCTION MANUAL CD 11-5. Furthermore, you can be threaded more easily. When the work clamp switch is then depressed to set easily using threading mode for the work clamp dropping operation INSTRUCTION MANUAL CD 5-8. 2. Adjusting the driver needle guard The driver needle guard (1) can use user programs to...
... its lowest position C. 2 BAS-342G 4056M 2555Q 4057M List of the presser foot can be set simply by changing memory switch settings. USEFUL FUNCTIONS FOR OPTIMUM SEWING Easy threading in one of two different types of work clamp 7-2. INSTRUCTION MANUAL CD 11-5. Furthermore, you can be threaded more easily. When the work clamp switch is then depressed to set easily using threading mode for the work clamp dropping operation INSTRUCTION MANUAL CD 5-8. 2. Adjusting the driver needle guard The driver needle guard (1) can use user programs to...
Basic Instruction Manual - English
Page 34
... power is turned on. (2) CAUTION indicator Illuminates when an error occurs. (3) RESET key Used to reset errors. (4) TEST key Used to start test mode. (5) TEST indicator Illuminates when the TEST key (4) has been pressed. (6) THREAD/CLAMP key Used to start threading mode or work clamp height setting mode. (7) THREAD/CLAMP indicator Illuminates when the THREAD/CLAMP key (6) has been pressed. (8) TENSION/WIND key Used to wind the lower thread. (9) TENSION/WIND indicator Used when the digital tension set (option) is installed. 26 BAS-342G...
... power is turned on. (2) CAUTION indicator Illuminates when an error occurs. (3) RESET key Used to reset errors. (4) TEST key Used to start test mode. (5) TEST indicator Illuminates when the TEST key (4) has been pressed. (6) THREAD/CLAMP key Used to start threading mode or work clamp height setting mode. (7) THREAD/CLAMP indicator Illuminates when the THREAD/CLAMP key (6) has been pressed. (8) TENSION/WIND key Used to wind the lower thread. (9) TENSION/WIND indicator Used when the digital tension set (option) is installed. 26 BAS-342G...

Basic Instruction Manual - English
Page 39
... the needle bar. 5225Q " 1" Threading mode ↑ ↓ " 4" Intermittent presser foot height setting mode 4016M 3 Ending setting mode Press the THREAD/CLAMP key. • The setting values will be memorized. • The intermittent presser foot (1) will return to setting mode. USING THE OPERATION PANEL (BASIC OPERATIONS) 6-7. The sewing machine will switch to "11-13. NOTE: After making the adjustment, refer to intermittent presser foot height setting mode. • " 4" will drop. display and the intermittent presser foot...
... the needle bar. 5225Q " 1" Threading mode ↑ ↓ " 4" Intermittent presser foot height setting mode 4016M 3 Ending setting mode Press the THREAD/CLAMP key. • The setting values will be memorized. • The intermittent presser foot (1) will return to setting mode. USING THE OPERATION PANEL (BASIC OPERATIONS) 6-7. The sewing machine will switch to "11-13. NOTE: After making the adjustment, refer to intermittent presser foot height setting mode. • " 4" will drop. display and the intermittent presser foot...
Brochure - English
Page 6
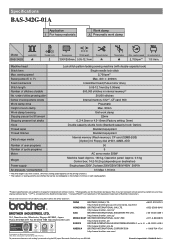
....com.sg/ MIDDLE EAST BROTHER INTERNATIONAL (GULF) FZE +971-4-8835878 http://www.brother.ae/ EUROPE BROTHER INTERNATIONALE INDUSTRIEMASCHINEN G. sewing speed 2,700rpm*1 Air consumption 1.8 l/min. number of stitches per sewing pattern 20,000 stitches Number of sewing patterns storable Internal memory: 512*2, CF card: 900 Work clamp drive Pneumatic Height of work clamp Max. 30mm Work clamp lowering Unit work clamp Model BAS-342G Lock stitch ˒ Double hook 2 Sewing area Stitch length 300ʷ200mm 0.05-12.7mm Thread trimmer ˒ Thread wiper ˒ Max. w Product...
....com.sg/ MIDDLE EAST BROTHER INTERNATIONAL (GULF) FZE +971-4-8835878 http://www.brother.ae/ EUROPE BROTHER INTERNATIONALE INDUSTRIEMASCHINEN G. sewing speed 2,700rpm*1 Air consumption 1.8 l/min. number of stitches per sewing pattern 20,000 stitches Number of sewing patterns storable Internal memory: 512*2, CF card: 900 Work clamp drive Pneumatic Height of work clamp Max. 30mm Work clamp lowering Unit work clamp Model BAS-342G Lock stitch ˒ Double hook 2 Sewing area Stitch length 300ʷ200mm 0.05-12.7mm Thread trimmer ˒ Thread wiper ˒ Max. w Product...


